当点击事件传到View时,系统会记下触摸点的坐标,手指移动时系统记下移动后触摸的坐标并计算出偏移量,通过偏移量来修改View的坐标。实现View滑动有很多中方法,主要有:layout()、offsetLeftAndRight()与offsetTopAndBottom()、LayoutParams、动画、scrollTo和scrollBy,以及Scroller。
1 layout()方法
View进行绘制的时候会调用onLayout()方法来设置显示的位置,因此可以通过修改View的left、top、right、bottom这4种属性来控制View的坐标。
首先自定义一个View,在onTouchEvent()方法中获取触摸点的坐标,代码如下所示:
public class CustomView extends View {

  private int lastX;
  private int lastY;

  public CustomView(@NonNull @NotNull Context context) {
    super(context);
  }

  public CustomView(@NonNull @NotNull Context context, @Nullable @org.jetbrains.annotations.Nullable AttributeSet attrs) {
    super(context, attrs);
  }

  public CustomView(@NonNull @NotNull Context context, @Nullable @org.jetbrains.annotations.Nullable AttributeSet attrs, int defStyleAttr) {
    super(context, attrs, defStyleAttr);
  }

  // 1. 在onTouchEvent()方法中获取触摸点的坐标
  @Override
  public boolean onTouchEvent(MotionEvent event) {
    // 2. 获取触摸点的横、纵坐标
    int x = (int) event.getX();
    int y = (int) event.getY();
    switch (event.getAction()) {
      case MotionEvent.ACTION_DOWN:
        lastX = x;
        lastY = y;
        break;
      case MotionEvent.ACTION_MOVE:
        // 3. 计算偏移量
        int offsetX = x - lastX;
        int offsetY = y - lastY;
        // 4. layout()方法重新放置这个自定义View的位置
        // 5. 每次移动时都会调用layout()方法来对屏幕重新布局,从而达到移动View的效果
        layout(getLeft() + offsetX, getTop() + offsetY, getRight() + offsetX, getBottom() + offsetY);
        break;
    }
    return true;
  }
}
在布局中引用自定义View:
<RelativeLayout xmlns:android="http://schemas.android.com/apk/res/android"
    xmlns:app="http://schemas.android.com/apk/res-auto"
    xmlns:tools="http://schemas.android.com/tools"
    android:layout_width="match_parent"
    android:layout_height="match_parent"
    tools:context=".MainActivity">

    <com.example.myapplication.CustomView
        android:id="@+id/custom_view"
        android:layout_width="100dp"
        android:layout_height="100dp"
        android:layout_margin="50dp"
        android:background="@android:color/holo_red_dark" />

</RelativeLayout>
2 offsetLeftAndRight()和offsetTopAndBottom()
这两种方法和layout()方法的效果差不多,其使用方式也差不多,将ACTION_MOVE中的代码替代如下:
case MotionEvent.ACTION_MOVE:
		// 1. 计算移动的距离
    int offsetX = x - lastX;
    int offsetY = y - lastY;
		// 2. 对left和right进行偏移
    offsetLeftAndRight(offsetX);
		// 3. 对top和bottom进行偏移
    offsetTopAndBottom(offsetY);
    break;
3 LauyoutParams(改变布局参数)
LayoutParams主要保存了一个View的布局参数,因此可以通过LayoutParams来改变View的布局参数,从而达到改变View位置的效果, 在ACTION_MOVE中:
case MotionEvent.ACTION_MOVE:
    int offsetX = x - lastX;
    int offsetY = y - lastY;
		// 1. 取决于父控件,如果是RelativeLayout,那就是RelativeLayout.LayoutParams
    LinearLayout.LayoutParams layoutParams = (LinearLayout.LayoutParams) getLayoutParams();
    layoutParams.leftMargin = getLeft() + offsetX;
    layoutParams.topMargin = getTop() + offsetY;
    setLayoutParams(layoutParams);
    break;
4 动画
可以采用View动画来移动,在res目录新建anim文件夹并创建translate.xml:
<set xmlns:android="http://schemas.android.com/apk/res/android"
    android:duration="1000">
    <translate
        android:fromXDelta="0"
        android:toXDelta="300" />
</set>
在Java代码中调用:
findViewById(R.id.button).setAnimation(AnimationUtils.loadAnimation(this, R.anim.translate));
运行程序,设置的按钮会向右移动300像素,然后又回到原来的位置。如果想要停留在当前位置,需要加上android:fillAfter="true":
<set xmlns:android="http://schemas.android.com/apk/res/android"
    android:duration="1000"
    android:fillAfter="true">
    <translate
        android:fromXDelta="0"
        android:toXDelta="300" />
</set>
View动画是对View的影像做操作,并不能真正改变View的位置参数,包括宽高。如果对一个Button进行上述的平移动画操作,当Button平移300像素停留在当前位置时,点击这个Button并不会触发点击事件,但是点击原来的位置就会触发点击事件。Android 3.0的属性动画解决了上述问题,因为它不仅仅可以执行动画,还能够改变View的位置参数:
ObjectAnimator.ofFloat(button, "translationX", 0, 300).setDuration(1000).start();
在Android 3.0以下的手机可以使用开源动画库nineolddandroids来实现属性动画,其本质上仍然是View动画。
5 scrollTo/scrollBy
为了实现View的内容滑动,View提供了专门的方法来实现这个功能,就是scrollTo和scrollBy:
public class View implements Drawable.Callback, KeyEvent.Callback, AccessibilityEventSource {
  public void scrollBy(int x, int y) {
    scrollTo(mScrollX + x, mScrollY + y);
  }

  public void scrollTo(int x, int y) {
    if (mScrollX != x || mScrollY != y) {
      int oldX = mScrollX;
      int oldY = mScrollY;
      mScrollX = x;
      mScrollY = y;
      invalidateParentCaches();
      onScrollChanged(mScrollX, mScrollY, oldX, oldY);
      if (!awakenScrollBars()) {
        postInvalidateOnAnimation();
      }
    }
  }
}
scrollBy最终也是要调用scrollTo的。scrollTo(x, y)表示移动到一个具体的坐标点,而scrollBy(dx, dy)则表示移动的增量dx、dy。ScrollBy实现了基于当前位置的相对滑动,而scrollTo则实现了基于所传递参数的绝对滑动。
scrollTo、scrollBy移动的是View的内容而不是View本身,如果是在ViewGroup中使用,则是移动其所有的子View。scrollTo和scrollBy并且不影响内部元素的单击事件。
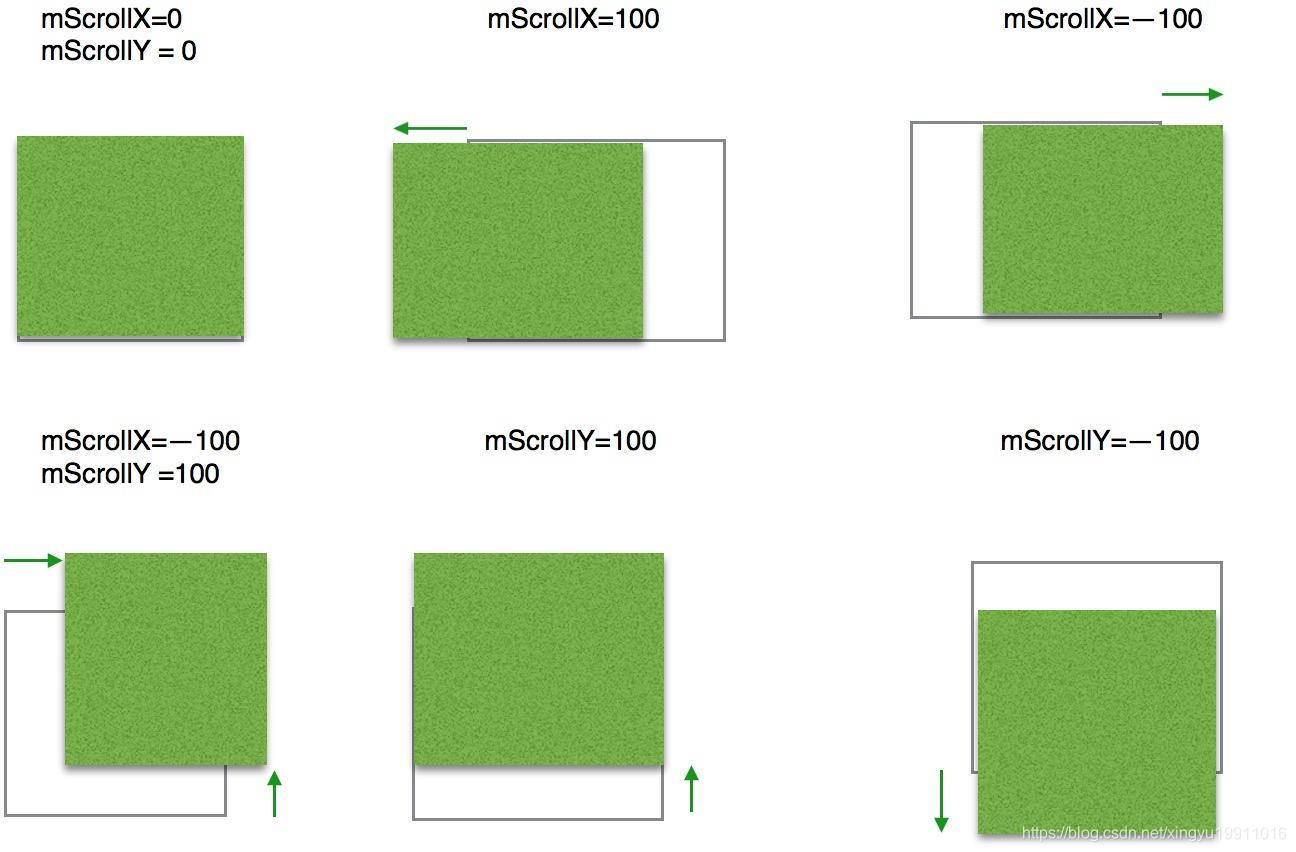
在滑动过程中View内部有两个属性mScrollX和mScrollY,它们可以通过getScrollX()和getScrollY()方法分别得到。在滑动过程中,mScrollX的值总是等于View左边缘和View内容左边缘在水平方向上的距离,而mScrollY的值总是等于View上边缘和View内容上边缘在竖直方向上的距离。scrollTo()和scrollBy()只能改变View内容的位置而不能改变View在布局中的位置。mScrollX和mScrollY的单位是像素,从左向右滑时,mScrollX为负值,反之为正值,从上向下滑时,mScrollY为负值,反之为正值:

使用scrollTo和scrollBy来实现View的滑动,只能将View的内容进行移动,并不能将View本身进行移动,也就是说,不管怎么移动,也不可能将当前的View滑动到附近View所在的区域。
6 Scroller弹性滑动
用于实现View的弹性滑动。 当使用View的scrollTo/scrollBy方法来进行滑动时,其过程是瞬间完成的,没有过渡效果的滑动用户体验不好。 使用Scroller来实现有过渡效果的滑动,在一定的时间间隔内完成。Scroller本身无法让View弹性滑动,需要和View的computeScroll方法配合才可以完成这个功能:
public class CustomView extends View {

  Scroller mScroller;

  public CustomView(@NonNull @NotNull Context context) {
    this(context, null);
  }

  public CustomView(@NonNull @NotNull Context context, @Nullable @org.jetbrains.annotations.Nullable AttributeSet attrs) {
    this(context, attrs, 0);
  }

  public CustomView(@NonNull @NotNull Context context, @Nullable @org.jetbrains.annotations.Nullable AttributeSet attrs, int defStyleAttr) {
    super(context, attrs, defStyleAttr);
    // 1. 初始化Scroller
    mScroller = new Scroller(context);
  }

  // 2. 重写computeScroll(),在draw()方法中调用该方法
  @Override
  public void computeScroll() {
    super.computeScroll();
    if (mScroller.computeScrollOffset()) {
      // 3. 调用父类的scrollTo方法并通过Scroller来不断获取当前的滚动值
      ((View) getParent()).scrollTo(mScroller.getCurrX(), mScroller.getCurrY());
      // 4. 不断重绘,重绘就会调用computeScroll方法,这样就不断的移动一个小距离并连贯起来实现平滑移动的效果
      invalidate();
    }
  }

  public void smoothScrollTo(int destX, int destY) {
    int scrollX = getScrollX();
    int delta = destX - scrollX;
    // 5. 调用startScroll方法,在2000ms内沿X轴平移delta像素
    mScroller.startScroll(scrollX, 0, delta, 0, 2000);
    invalidate();
  }

}

// 使用
CustomView mCustomView = findViewById(R.id.custom_view);
mCustomView.smoothScrollTo(-400, 0);
以下分析Scroller的源码。
要想使用Scroller,必须先调用new Scroller()。以下是Scroller的构造方法:
public class Scroller {
  public Scroller(Context context) {
    this(context, null);
  }

  public Scroller(Context context, Interpolator interpolator) {
    this(context, interpolator,
         context.getApplicationInfo().targetSdkVersion >= Build.VERSION_CODES.HONEYCOMB);
  }

  public Scroller(Context context, Interpolator interpolator, boolean flywheel) {
    mFinished = true;
    // 1. 如果不传插值器,则采用默认的ViscousFluidInterpolator
    if (interpolator == null) {
      mInterpolator = new ViscousFluidInterpolator();
    } else {
      mInterpolator = interpolator;
    }
    mPpi = context.getResources().getDisplayMetrics().density * 160.0f;
    mDeceleration = computeDeceleration(ViewConfiguration.getScrollFriction());
    mFlywheel = flywheel;

    mPhysicalCoeff = computeDeceleration(0.84f);
  }
}
Scroller有三个构造方法,通常情况下都是使用第一个;第二个需要传入一个插值器Interpolator,如果不传则采用默认的插值器ViscousFluidInterpolator。
interpolator [in't?:p?uleit?] 插入器;内插程序 viscous [?v?sk?s] 粘性的;黏的
fluid [?flu??d] 液体的,流体的;易变的,不稳定的
接下来看Scroller.startScroll()方法:
public class Scroller {
  // 1. startX和startY表示滑动开始的起点
  // 2. dx和dy表示滑动的距离
  // 3. duration表示滑动持续的时间
  public void startScroll(int startX, int startY, int dx, int dy, int duration) {
        mMode = SCROLL_MODE;
        mFinished = false;
        mDuration = duration;
        mStartTime = AnimationUtils.currentAnimationTimeMillis();
        mStartX = startX;
        mStartY = startY;
        mFinalX = startX + dx;
        mFinalY = startY + dy;
        mDeltaX = dx;
        mDeltaY = dy;
        mDurationReciprocal = 1.0f / (float) mDuration;
    }
}
在startScroll()方法中并没有调用类似开启滑动的方法,而是保存了传进来的各种参数。 所以,startScroll()方法只是用来做前期准备的,并不能使用View进行滑动。关键的是在startScroll()方法后调用了invalidate()方法,这个方法会导致View重绘,而View重绘会调用View的draw()方法,draw()方法又会调用View.computeScroll()方法。
在自定义View中重写computeScroll()方法:
public class CustomView extends View {
  @Override
  public void computeScroll() {
    super.computeScroll();
    if (mScroller.computeScrollOffset()) {
      ((View) getParent()).scrollTo(mScroller.getCurrX(), mScroller.getCurrY());
      invalidate();
    }
  }
}
在computeScroll()方法中通过Scroller来获取当前的ScrollX和ScrollY,然后调用scrollTo()方法进行View的滑动,接着调用invalidate方法来让View进行重绘,重绘就会调用computeScroll()方法来实现View的滑动,这样通过不断的移动一个小的距离并连贯起来实现平滑移动的效果。
但是在Scroller中如何获取当前位置的scrollX和scrollY呢?那就是在调用scrollTo()方法前会调用Scroller的computeScrollOffset()方法:
public class Scroller  {
  public boolean computeScrollOffset() {
    if (mFinished) {
      return false; // 表示滑动结束
    }

    // 1. 计算动画持续的时间
    int timePassed = (int)(AnimationUtils.currentAnimationTimeMillis() - mStartTime);

    if (timePassed < mDuration) { // 动画持续的时间小于我们设置滑动的持续时间mDuration
      switch (mMode) {
        // 2. 在startScroll方法中的 mMode = SCROLL_MODE
        case SCROLL_MODE:
          // 3. 根据插值器Interpolator来计算在该时间段内移动的距离,赋值给mCurrX和mCurrY,这样就可以通过Scroller获取当前的ScrollX和ScrollY
          final float x = mInterpolator.getInterpolation(timePassed * mDurationReciprocal);
          mCurrX = mStartX + Math.round(x * mDeltaX);
          mCurrY = mStartY + Math.round(x * mDeltaY);
          break;
        case FLING_MODE:
          final float t = (float) timePassed / mDuration;
          final int index = (int) (NB_SAMPLES * t);
          float distanceCoef = 1.f;
          float velocityCoef = 0.f;
          if (index < NB_SAMPLES) {
            final float t_inf = (float) index / NB_SAMPLES;
            final float t_sup = (float) (index + 1) / NB_SAMPLES;
            final float d_inf = SPLINE_POSITION[index];
            final float d_sup = SPLINE_POSITION[index + 1];
            velocityCoef = (d_sup - d_inf) / (t_sup - t_inf);
            distanceCoef = d_inf + (t - t_inf) * velocityCoef;
          }

          mCurrVelocity = velocityCoef * mDistance / mDuration * 1000.0f;

          mCurrX = mStartX + Math.round(distanceCoef * (mFinalX - mStartX));
          // Pin to mMinX <= mCurrX <= mMaxX
          mCurrX = Math.min(mCurrX, mMaxX);
          mCurrX = Math.max(mCurrX, mMinX);

          mCurrY = mStartY + Math.round(distanceCoef * (mFinalY - mStartY));
          // Pin to mMinY <= mCurrY <= mMaxY
          mCurrY = Math.min(mCurrY, mMaxY);
          mCurrY = Math.max(mCurrY, mMinY);

          if (mCurrX == mFinalX && mCurrY == mFinalY) {
            mFinished = true;
          }

          break;
      }
    }
    else {
      mCurrX = mFinalX;
      mCurrY = mFinalY;
      mFinished = true;
    }
    return true; // 滑动未结束,如果滑动未结束,就得持续调用scrollTo()方法和invalidate()方法来进行View滑动
  }
}
Scroller的原理:Scroller并不能直接实现View的滑动,它需要配合View的computeScroll()方法。在computeScroll()中不断让View进行重绘,每次重绘都会计算滑动持续的时间,根据这个持续时间就能算出这次View滑动的位置,根据每次滑动的位置调用scrollTo()方法进行滑动,这样不断地重复上述过程就形成了弹性滑动。