导入PicoVRSDK
1.新创一个Unity工程(Unity版本最好选择2019.4以上版本,以及需配置好安卓环境),然后导入官方picoVRSDK;
2.渲染设置
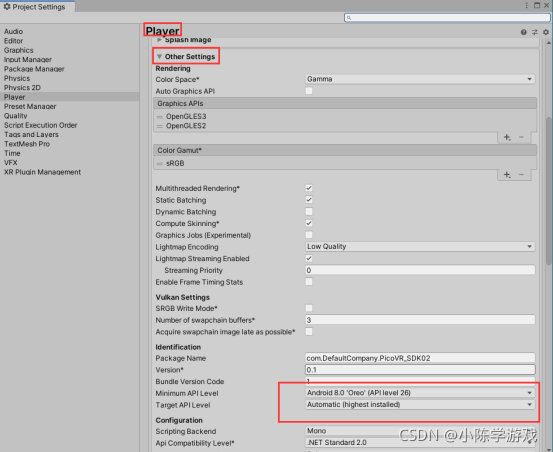
Graphics APIs暂不支持Vulkan,对于OpenGLES2,OpenGLES3,开发者需要按照需求选择。

三:对于API Level的设置要求
Pico开发之无线打包与调试
1.虽然说是无线,但是我们第一次还是需要进行usb连接,打开Pico的开发者模式,与电脑进行连接,连接好了之后,按下Win+R输入Cmd打开命令窗口,输出adb tcpip 5555,进行tcp模式的连接,连接之后会输出重新连接到这个端口,需要保证设备和电脑是同一网络下哦!也就是局域网
|
2.输出成功连接之后我们需要找到Pico连接的WIFI的IP地址,点击Pico的WIFI或者点击设置进入WIFI找到连接的WIFI,点击左下角的更多,进入WIFI点击网络信息,可以找到我们目前连接WIFI的IP地址
3.记录下这个IP地址,然后输入adb connect 192.168.131.163,这个是我的IP地址可以换成自己设备上的,输入成功之后会输出已经成功连接到这个IP地址
4.这个时候我们的Pico设备就已经和电脑进行无线连接了,可以将usb线拔掉了,这个时候我们返回Unity,点击File找到Build Setting页面,点击Refresh,就可以到当前设备名字+ip地址,证明连接成功了,这个时候我们打包的时候就可以进行无线传输了
5.接下来我们进行的是调试方面的设置,由于Unity中的Debug打包到Pico上是无法进行输出的,这对我们的调试造成了极大的不便,这个我们只需要勾选几个选项,就可以在Pico运行的时候我们在Unity的输出窗口也能够看到调试信息,我们需要将Development Bulid勾选上,这个是开发者模式构建,第二个就是Script Debugging这个是可以让你的Debug信息进行输出
6.然后我们进行打包测试,我们进行输出的就是Pico头盔的状态,通过UPvr_GetPsensorState()得到,为0的则是戴上的状态,为1则为表示远离,当我们打包在头盔上运行后,打开Unity的Console面板,点击Editor,展开后会发现AndroidPlayer +一串IP地址,点击这个就看到输出结果.大功告成!
试玩接口验证错误(61001)
61001的错误的出现是因为你的应用程序没有上传到Pico Developer Platform上。
因为受限于Pico neo3,它会把这个apk文件当作在Pico Store上发布的应用程序,所以需要进行“用户权限检查”。
然而,没有在Pico Store上发布的作品,“用户权限检查”也没法通过。
因此有两种办法:
1.第一种方法
直接把“用户权限检查”给关闭掉,这个方式直接、简单。【推荐】
具体操作:Pvr_UnitySDK -> Platform settings ->User Entitlement Check 把这个叉掉就行了
2.第二种方法
可以使用设备的SN来模拟“用户权限检查”。
至于设备的SN可以在Pico neo3上获得:设置 -> 通用 -> 设备序列号
当然,为了方便复制,可以直接在有线串流模式下,打开cmd,运行代码adb devices就可以得到SN号。
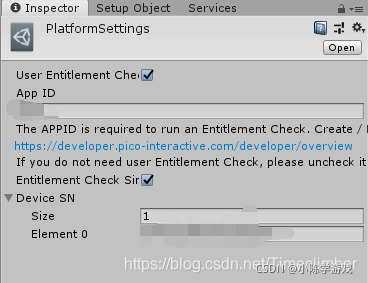
接着在Platform Settings中输入App ID(也就是登录这个网址后https://developer.pico-interactive.com/账号的Publisher ID)和设备的SN号。
PicoNeo3手柄发射射线交互UI
1:先将场景中的MainCamera删除,然后根据下面所示路径找到Assets>PicoMobileSDK>Pvr_UnitySDk>Prefabs>Pvr_UnitySDK预置体,将其拖放到场景中。
此时运行就可以在PicoNeo3眼镜中看到此场景了。
2:这时我们会发现,我们现在还控制不了场景(缺少控制器,手柄),所以我们要添加一个手柄。
将Asset>PicoMobileSDK>Pvr_Controller>Prefabs>ControllerManager预置体添加到场景中,放到Pvr_UnitySDK下,和Head同级,如下
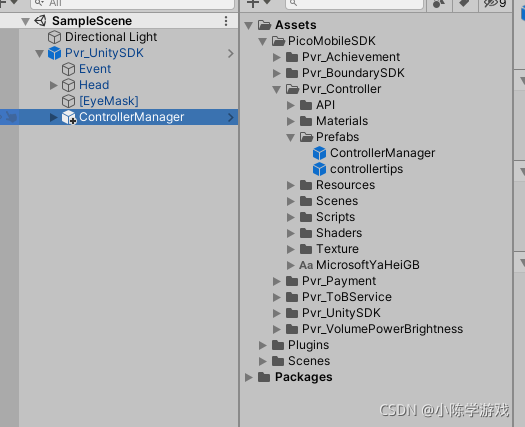
在ControllerManager下有PvrController0和PvrController1两个物体,分别对应两个手柄
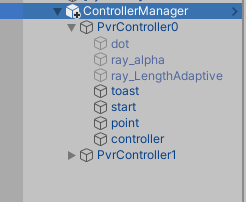
dot:手柄发射的线段的顶端,一个小圆点
ray_alpha:手柄发射的可视化线段
controller:其上挂载着Pvr_ControllerInit脚本,负责控制手柄的初始化,上面有三种手柄的模型可供选择。
此时,再运行,就可以再场景中看到我们的手柄了。
3:在Pvr_UnitySDK上新建一个空物体为子物体,与Head同级,命名为HeadController,再新建一个空物体作为HeadController的子物体,并为这个子物体挂载Pvr_UIPointer这个脚本。
4:Event上挂载Pvr_InputModule脚本。
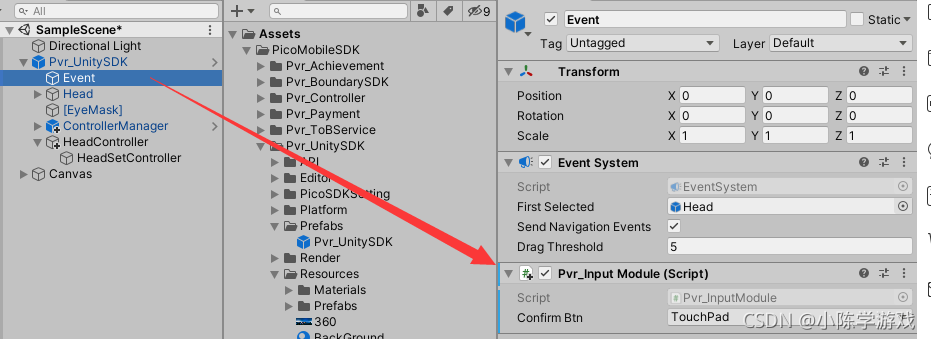
默认是按下摇杆键与UI进行交互,Pvr_InputModule中ConfirmBtn参数可修改与控制UI交互的手柄按键
5:创建一个Canvas(Scale建议设为(0.005,0.005,0.001)),RenderMode设为WorldSpace,将EventSystem删除,再将这两个脚本Pvr_UICanvas、Pvr_ControllerDemo挂载到Canvas上,并且指定部分值,如下图所示:

6:此时,UI已经可以和手柄完成正常交互检测了,InputField中键盘异常的问题有待进一步解决。
2D物体的射线拖拽
1:需要被射线拖拽的2d物体上挂载Pvr_UIDraggableItem脚本以及CanvasGroup组件,即可实现在Canvas内随意拖动,切记一定要添加CanvasGroup组件,否则只能实现一次拖拽,第二次拖拽将不起作用。
2:特定范围内拖拽的实现:
需拖拽的物体挂载脚本和组件与第一步相同,不同的是特定范围的拖拽需要将Pvr_UIDraggableItem脚本上的两个复选框√上。然后在可拖动的范围物体上挂载Pvr_UIDropZone脚本,最后将被拖拽的物体作为其中一个挂载了Pvr_UIDropZone脚本的范围物体上的子物体。如下图所示:

瞬移功能的实现
1:创建一个可供移动的Plane,给其指定层级,如下图所示:

2:创建一个空物体,命名为Point,新建一个名为Teleport脚本,并挂载在Point上,脚本如下:
using Pvr_UnitySDKAPI;
using System.Collections;
using UnityEngine;

public class Teleport : MonoBehaviour
{
    public static Pvr_KeyCode TOUCHPAD = Pvr_KeyCode.TOUCHPAD;
    public static Pvr_KeyCode TRIGGER = Pvr_KeyCode.TRIGGER;
    public float fadeTime = 0.2f;
    public bool IsBezierCurve = false;
    public bool IsScreenFade = false;
    public Material LineMat;
    public GameObject PointGo;
    public Material PointGoMat;
    private GameObject cube;
    private GameObject currentController = null;
    private Vector3 currentHitPoint = Vector3.zero;
    private Color fadeColor = new Color(0.9f, 0.9f, 0.9f, 0f);
    private Material fademat;

    private LineRenderer line;
    private Ray ray;
    private GameObject sdkManagerGo;


    public GameObject CurrentController
    {
        get
        {
            if (currentController == null)
                currentController = FindObjectOfType<Pvr_ControllerDemo>().currentController;
            return currentController;
        }
    }

    public static Vector3[] GetBeizerPathPointList(Vector3 startPoint, Vector3 controlPoint, Vector3 endPoint, int pointNum)
    {
        Vector3[] BeizerPathPointList = new Vector3[pointNum];
        for (int i = 1; i <= pointNum; i++)
        {
            float t = i / (float)pointNum;
            Vector3 point = GetBeizerPathPoint(t, startPoint,
                controlPoint, endPoint);
            BeizerPathPointList[i - 1] = point;
        }
        return BeizerPathPointList;
    }

    private static Vector3 GetBeizerPathPoint(float t, Vector3 p0, Vector3 p1, Vector3 p2)
    {
        return (1 - t) * (1 - t) * p0 + 2 * t * (1 - t) * p1 + t * t * p2;
    }
    /// <summary>
    /// 瞬移功能按键控制功能  如需改变控制瞬移功能的按键  在此处修改即可
    /// </summary>
    /// <returns></returns>
    private static bool GetTeleportKey()
    {
        return //Controller.UPvr_GetKey(0, TOUCHPAD) ||
            Controller.UPvr_GetKey(1, TOUCHPAD) ||
            //Controller.UPvr_GetKey(0, TRIGGER) ||
            //Controller.UPvr_GetKey(1, TRIGGER) ||
            Input.GetMouseButton(0);
    }

    private static bool GetTeleportKeyUp()
    {
        return //Controller.UPvr_GetKeyUp(0, TOUCHPAD) ||
            Controller.UPvr_GetKeyUp(1, TOUCHPAD) ||
            //Controller.UPvr_GetKeyUp(0, TRIGGER) ||
            //Controller.UPvr_GetKeyUp(1, TRIGGER) ||
            Input.GetMouseButtonUp(0);
    }

    private void DrawLine()
    {
        Vector3 startPoint = CurrentController.transform.Find("start").position;
        Vector3 endPoint = CurrentController.transform.Find("dot").position;
        Vector3 controllerPoint = CurrentController.transform.Find("controller").position;
        if (!IsBezierCurve)
        {
            line.positionCount = 2;
            line.SetPosition(0, startPoint);
            line.SetPosition(1, endPoint);
        }
        else
        {
            float distance = Vector3.Distance(startPoint, endPoint);
            Vector3 controlPoint = startPoint + (startPoint - controllerPoint).normalized * distance / 1.6f;

            Vector3[] bcList = GetBeizerPathPointList(startPoint, controlPoint, endPoint, 30);
            line.positionCount = bcList.Length + 1;
            line.SetPosition(0, startPoint);
            for (int i = 0; i < bcList.Length; i++)
            {
                Vector3 v = bcList[i];
                line.SetPosition(i + 1, v);
            }
        }
    }

    private bool HitFloor(ref RaycastHit hit)
    {
        return 1 << hit.transform.gameObject.layer == LayerMask.GetMask("TransparentFX");
    }

    private void LineInit()
    {
        if (GetComponent<LineRenderer>())
            line = GetComponent<LineRenderer>();
        else
            line = gameObject.AddComponent<LineRenderer>();
        line.material = LineMat;
        line.startWidth = 0.02f;
        line.numCapVertices = 5;
    }

    private void MoveCameraPrefab(Vector3 target)
    {
        if (GetTeleportKeyUp())
        {
            if (IsScreenFade)
                StartCoroutine(ScreenFade(target));
            else
                sdkManagerGo.transform.position = new Vector3(target.x, target.y + 1.67f, target.z);
        }
    }

    private IEnumerator ScreenFade(Vector3 target)
    {
        float ShowTimer = 0.0f;
        float HideTimer = 0.0f;
        fademat.color = fadeColor;
        cube.SetActive(true);
        Color color = fadeColor;
        while (ShowTimer < fadeTime)
        {
            yield return new WaitForEndOfFrame();
            ShowTimer += Time.deltaTime;
            color.a = Mathf.Clamp01(ShowTimer / fadeTime);
            if (color.a > 0.8f)
                break;
            fademat.color = color;
        }
        sdkManagerGo.transform.position = new Vector3(target.x, target.y + 1.67f, target.z);
        while (HideTimer < fadeTime)
        {
            yield return new WaitForEndOfFrame();
            HideTimer += Time.deltaTime;
            color.a = 0.8f - Mathf.Clamp01(HideTimer / fadeTime);
            if (color.a < 0.01f)
                break;
            fademat.color = color;
        }
        cube.SetActive(false);
    }

    private void Start()
    {
        LineInit();
        sdkManagerGo = FindObjectOfType<Pvr_UnitySDKManager>().gameObject;

        fademat = new Material(Shader.Find("Sprites/Default"));
        cube = GameObject.CreatePrimitive(PrimitiveType.Cube);
        cube.GetComponent<MeshRenderer>().material = fademat;
        cube.transform.position = sdkManagerGo.transform.position;
        cube.transform.parent = sdkManagerGo.transform;
        cube.SetActive(false);

        if (PointGoMat != null)
            PointGo.GetComponent<MeshRenderer>().material = PointGoMat;
        PointGo.SetActive(false);

        ray = new Ray();
    }

    // Update is called once per frame

    private void Update()
    {
        if (CurrentController != null && GetTeleportKey())
        {
            line.enabled = true;
            //sdkManagerGo = currentController.transform.parent.gameObject;
            ray.direction = CurrentController.transform.Find("dot").position - CurrentController.transform.Find("start").position;
            ray.origin = CurrentController.transform.Find("start").position;

            RaycastHit hit;
            if (Physics.Raycast(ray, out hit))
            {
                currentHitPoint = hit.point;
                if (HitFloor(ref hit) && hit.point != null)
                {
                    PointGo.transform.position = hit.point;

                    PointGo.SetActive(true);
                    //CurrentController.transform.Find("dot").position = hit.point;
                }
            }
            else { PointGo.SetActive(false); }

            DrawLine();
        }
        else
        {
            if (currentHitPoint != Vector3.zero)
            {
                if (PointGo.activeInHierarchy)
                {
                    MoveCameraPrefab(currentHitPoint);

                    currentHitPoint = Vector3.zero;
                    PointGo.SetActive(false);
                }
            }

            if (line.enabled == false)
                return;
            line.enabled = false;
        }


    }
}
脚本会有一个报错,只需将Pvr_ControllerDemo脚本中的currentController变量设为public类型的即可。
然后,再创建一个Capsule作为Point的子物体,建议将其Scale设为(0.1,0.01,0.1),并且将其隐藏,切记不能移除其碰撞体。
PS:如在瞬移前没有实现UI交互功能,需要找个物体挂载Pvr_ControllerDemo脚本,并进行相应赋值,详细请看上文添加UI交互部分

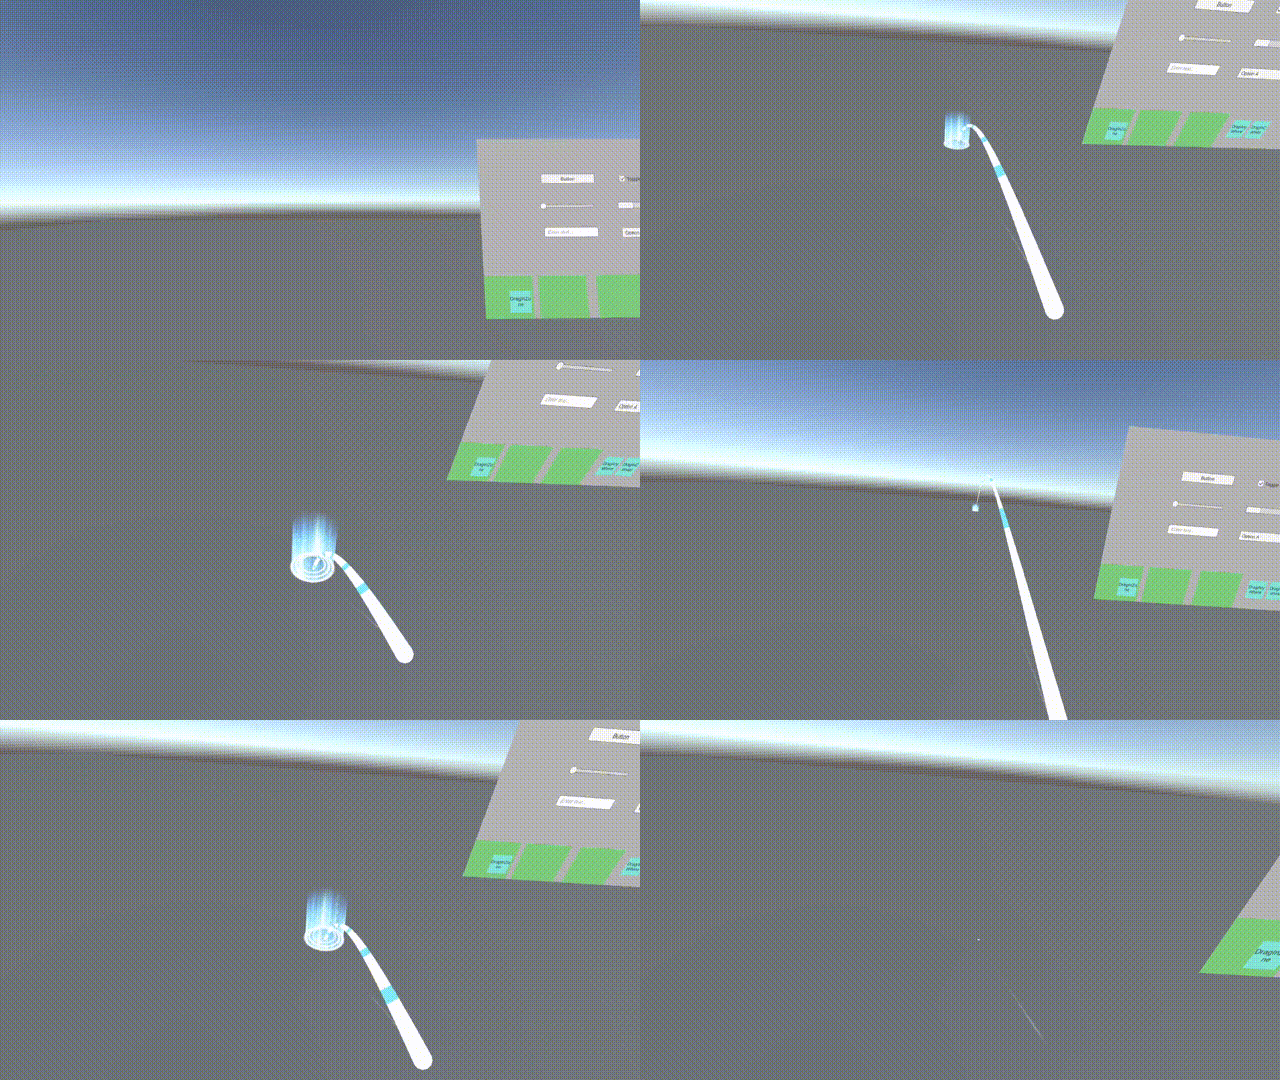
关于瞬移方面,效果方面我个人做了一些小的优化,具体效果如下图所示:
射线远距离抓取物体
1:在角色控制器上创建两个物体附着运动的焦点(两个焦点的位置信息保持一致即可),如下图所示:

2:再新建一个脚本,命名为AttachTest,将这个脚本挂载在需要被抓取的物体身上(被抓取物体身上应该要有碰撞体),脚本如下:
using System.Collections;
using System.Collections.Generic;
using Pvr_UnitySDKAPI;
using UnityEngine;

public class AttachTest : MonoBehaviour
{
    // Start is called before the first frame update

    //The focus of the object's "attach" movement(left hand / right hand)
    [Header("物体“附着”运动的焦点(左手/右手)")]
    public Transform node0;
    public Transform node1;

    //Controller(left hand / right hand)
    public GameObject controller0;
    public GameObject controller1;

    //The speed of the "attach" process
    public float attachSpeed;

    //The speed of throwing objects
    public float throwSpeed = 5;

    //Controller in use
    private GameObject currentController;

    //The focus of the object's "attach" movement
    private Transform currentNode;

    private int mainHandNess;

    private Ray ray;
    private RaycastHit hit;

    //The material in the highlighted state of the object
    //[SerializeField]
    private Material attachMaterial;
    //[SerializeField]
    private Material normalMaterial;

    //The key is pressed or not pressed
    private bool noClick = true;

    //The current state of motion of the object
    private bool moveState = false;

    //private Vector3 currentPosition;
    //private Vector3 lastPosition;
    //private Vector3 movementDirection;

    private Vector3 angularVelocity;
    private Vector3 linearVelocity;

    private Vector3 angularVelocityGetKey;
    private Vector3 angularVelocityAverage;

    void Start()
    {
        ray = new Ray();
        hit = new RaycastHit();

        attachMaterial = Resources.Load<Material>("Materials/Custom_AttachMaterial");
        normalMaterial = Resources.Load<Material>("Materials/Custom_NormalMaterial");
    }

    // Update is called once per frame
    void Update()
    {
        //Determined whether the handle is connected
        if (Controller.UPvr_GetControllerState(0) == ControllerState.Connected || Controller.UPvr_GetControllerState(1) == ControllerState.Connected)
        {
            //Get the current master control controller index
            mainHandNess = Pvr_UnitySDKAPI.Controller.UPvr_GetMainHandNess();

            if (mainHandNess == 0)
            {
                currentController = controller0;
                currentNode = node0;
            }

            if (mainHandNess == 1)
            {
                currentController = controller1;
                currentNode = node1;

            }


            ray.direction = currentController.transform.forward - currentController.transform.up * 0.25f;
            ray.origin = currentController.transform.Find("start").position;

            //Determine whether the ray interacts with this object
            if (Physics.Raycast(ray, out hit) && (hit.transform == transform))
            {
                if (noClick)
                {
                    transform.GetComponent<MeshRenderer>().material = attachMaterial;
                }

                {
                    //Judging whether the "Trigger" is pressed or not
                    if (Input.GetKey(KeyCode.Space) || Pvr_UnitySDKAPI.Controller.UPvr_GetKey(mainHandNess, Pvr_UnitySDKAPI.Pvr_KeyCode.TRIGGER))
                    {
                        moveState = true;
                        noClick = false;
                        transform.GetComponent<MeshRenderer>().material = normalMaterial;

                        //Completed the attach effect
                        transform.position = Vector3.Lerp(transform.position, currentNode.position, Time.deltaTime * attachSpeed);
                        transform.rotation = Quaternion.Lerp(transform.rotation,currentNode.rotation,Time.deltaTime *attachSpeed);
                        transform.SetParent(currentNode);
                        GetComponent<Rigidbody>().isKinematic = true;

                        //The reason for using "Input.GetKey" is to get a more accurate motion trend in 2 frams.
                        angularVelocityGetKey = Pvr_UnitySDKAPI.Controller.UPvr_GetAngularVelocity(mainHandNess);

                    }

                }
            }
            else
            {
                transform.GetComponent<MeshRenderer>().material = normalMaterial;
            }

            //Checking whether the "Trigger" is lifted or not
            if (Input.GetKeyUp(KeyCode.Space) || Pvr_UnitySDKAPI.Controller.UPvr_GetKeyUp(mainHandNess, Pvr_UnitySDKAPI.Pvr_KeyCode.TRIGGER))
            {
                if (moveState)
                {
                    noClick = true;

                    transform.SetParent(null);
                    GetComponent<Rigidbody>().isKinematic = false;

                    angularVelocity = Pvr_UnitySDKAPI.Controller.UPvr_GetAngularVelocity(mainHandNess);
                    angularVelocityAverage = (angularVelocityGetKey + angularVelocity) / 2;
                    linearVelocity = Pvr_UnitySDKAPI.Controller.UPvr_GetVelocity(mainHandNess);

                    GetComponent<Rigidbody>().angularVelocity = angularVelocityAverage * 0.0001f * throwSpeed;
                    GetComponent<Rigidbody>().velocity = linearVelocity * 0.0001f * throwSpeed;

                    moveState = false;
                }

            }


        }
    }
}
脚本相关变量、参数赋值如下图所示:

在Resources文件夹下新建一个名为Materials的文件夹,然后创建两个材质球,命名如下图所示,其中将NormalMaterial赋值给被抓取的物体即可。

获取手柄按键输入
要获取PicoNeo3的手柄按键输入,首先应该在脚本里引用命名空间(using Pvr_UnitySDKAPI),然后按照以下格式:
Controller.UPvr_GetKeyDown(int hand,Pvr_KeyCode.xxx);
其中0代表左手手柄,1代表右手手柄 具体按键所对应的名称如下图所示:


其他比较常用的手柄输入方式获取代码如下:
判断控制器是否连接可以使用 0代表左手 1代表右手
Controller.UPvr_GetControllerState(1) == ControllerState.Connected
手柄振动(振动强度:1 持续时间:500毫秒 右手柄)Controller.UPvr_VibrateController(1, 500, 1);
判断Joystick键是否向上:UPvr_GetJoystickUp(其他方向修改成对应的方向单词即可获取)
获取摇杆的拨动值:UPvr_GetAxis2D
获取手柄的角速度:UPvr_GetAngularVelocity
获取手柄的线速度:UPvr_GetVelocity(返回一个Vector3的值,这个值是以手柄正前方为z轴,右边为x轴,上面为y轴建立的一个三维坐标系值)
下表是指一体机头显上的按键与Unity里的键值对应关系。
| HMD按键 | Unity输入键 |
|---|---|
| 返回键 | KeyCode.Escape(Unity中使用:Input .GetKeyDown(KeyCode.Joystick1Button0)) |
| 确认键 | KeyCode.JoystickButton0(unity中获取,同上所示) |
| Home键 | KeyCode.Home(系统占用,默认不开放) |
想要了解更为详细的API接口函数,可取官网浏览,网址如下:
http://sdk.picovr.com/docs/UnitySDK/cn/chapter_seven.html
如何使用自定义的手柄模型
1:如果想要使用自定义的手柄模型(比如手枪、弹弓、魔杖、剑等道具),需要勾选此项(哪个手柄需要就勾选哪个)
 :2:将你的自定义手柄模型放到ControllerManager——PvrController0(1)——controler下,作为其子物体,然后调整合适的位置和旋转即可。

如何使用手柄抓取物体
此种抓取是一次性抓取,即抓取之后不能放下
1:首先给需要抓取的手添加刚体(不勾选重力,勾选IsKinematic)和碰撞体(碰撞体大小可以参考我下图所示进行调整,碰撞体为触发器),如下图所示:

2:参考自定义手柄模型部分,将需要被抓取的物体放在抓取手Controller下,作为其子物体,并将其隐藏。然后新建一个脚本,将下面所示方法复制进脚本中:
void OnTriggerStay(Collider collider)
{
    if (collider.name.Equals("PM40"))
    {
        if (Controller.UPvr_GetKeyDown(0, Pvr_KeyCode.TRIGGER))
        {
            collider.gameObject.SetActive(false);
            //需要隐藏的模型(一般情况下是手的模型)
            transform.GetChild(0).gameObject.SetActive(false);
            //拾取的模型
            transform.GetChild(1).gameObject.SetActive(true);
        }
    }
}
并将该脚本添加到这个controller上即可。

3:复制一个一模一样的抓取物体,放在场景中合适的位置,然后在这个被抓取的物体上添加刚体和碰撞体。

这里就另一方法也做下说明讲解,这种方法是可以实现多次抓取和放下的,但并不是很完美,有时会出现抓取之后不能放下的情况,而且不能通过一个按键控制抓取和放下。具体的实现和上面第一种方法基本一样,就是不需要在controller下放一个一模一样的被抓取物,只需要将脚本内容换成如下所示即可:
 Pvr_ControllerModuleInit conmodinit;
    Rigidbody ri;
    FixedJoint joint;
    void Start()
    {
        conmodinit = this.transform.parent.GetComponent<Pvr_ControllerModuleInit>();
    }

    void OnTriggerStay(Collider collider)
    {

        //扣下扳机拾取
               if (Controller.UPvr_GetKeyDown(0, Pvr_KeyCode.TRIGGER) ||
        Controller.UPvr_GetKeyDown(1, Pvr_KeyCode.TRIGGER))
               {
                   joint = this.gameObject.AddComponent<FixedJoint>();
                   joint.connectedBody = collider.GetComponent<Rigidbody>();
               }
               if (Controller.UPvr_GetKeyDown(0, Pvr_KeyCode.Y) || Controller.UPvr_GetKeyDown(1, Pvr_KeyCode.B))
               {
                   Destroy(this.joint);
               }
    }
有兴趣的朋友可自行优化