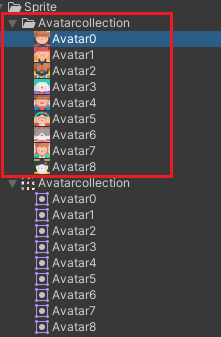
Unity版本:2020.3.12f1c1
图集切割并且输出单独PNG
目标

- 把头像集合切割成单独的头像图集
- 把切割好的图集输出成单独的PNG文件
大图集切割成小图方法
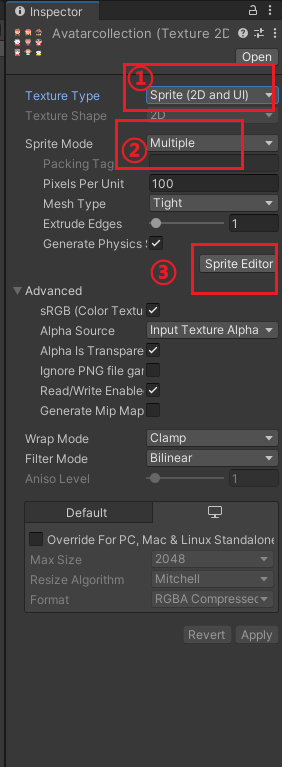

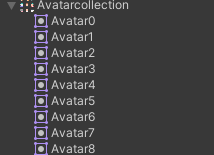
切割成功后,我这里单独修改了图集里面的PNG名字
输出单独的 PNG 图片
参考 Unity切割图集工具
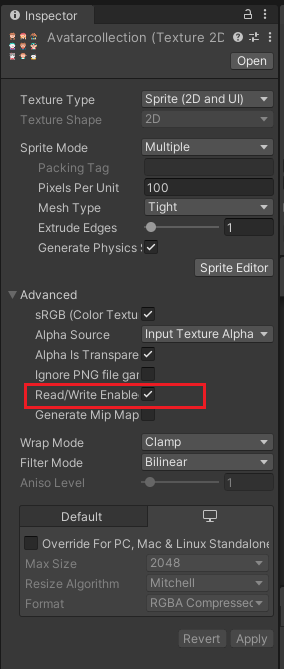
- Texture2D 设置
- 新建脚本:
	using UnityEngine;
	using System.Collections;
	using UnityEditor;
	using System.IO;
	using System.Collections.Generic;
	/// <summary>
	/// 切割
	/// </summary>
	public static class ImageSlicer
	{
	    [MenuItem("Assets/ImageSlicer/Process to Sprites")]
	    static void ProcessToSprite()
	    {
	        Texture2D image = Selection.activeObject as Texture2D;//获取旋转的对象
	        string rootPath = Path.GetDirectoryName(AssetDatabase.GetAssetPath(image));//获取路径名称
	        string path = rootPath + "/" + image.name + ".PNG";//图片路径名称


	        TextureImporter texImp = AssetImporter.GetAtPath(path) as TextureImporter;//获取图片入口


	        AssetDatabase.CreateFolder(rootPath, image.name);//创建文件夹


	        foreach (SpriteMetaData metaData in texImp.spritesheet)//遍历小图集
	        {
	            Texture2D myimage = new Texture2D((int)metaData.rect.width, (int)metaData.rect.height);

	            //abc_0:(x:2.00, y:400.00, width:103.00, height:112.00)
	            for (int y = (int)metaData.rect.y; y < metaData.rect.y + metaData.rect.height; y++)//Y轴像素
	            {
	                for (int x = (int)metaData.rect.x; x < metaData.rect.x + metaData.rect.width; x++)
	                    myimage.SetPixel(x - (int)metaData.rect.x, y - (int)metaData.rect.y, image.GetPixel(x, y));
	            }


	            //转换纹理到EncodeToPNG兼容格式
	            if (myimage.format != TextureFormat.ARGB32 && myimage.format != TextureFormat.RGB24)
	            {
	                Texture2D newTexture = new Texture2D(myimage.width, myimage.height);
	                newTexture.SetPixels(myimage.GetPixels(0), 0);
	                myimage = newTexture;
	            }
	            var pngData = myimage.EncodeToPNG();


	            //AssetDatabase.CreateAsset(myimage, rootPath + "/" + image.name + "/" + metaData.name + ".PNG");
	            File.WriteAllBytes(rootPath + "/" + image.name + "/" + metaData.name + ".PNG", pngData);
	            // 刷新资源窗口界面
	            AssetDatabase.Refresh();
	        }
	    }
	}
该代码在Unity 2020.3版本运行后报错:
unityexception: texture 'avatarcollection' is not readable, the texture memory can not be accessed from scripts. you can make the texture readable in the texture import settings.
解决方法:按照此 dalao 所写 Texture2D转字节数组出错问题
在函数 EncodeToPNG() 把 Texture2D 传进这个函数,然后再调用 EncodeToPNG() 即可
public static Texture2D DeCompress(Texture2D source)
 {
      RenderTexture renderTex = RenderTexture.GetTemporary(
                  source.width,
                  source.height,
                  0,
                  RenderTextureFormat.Default,
                  RenderTextureReadWrite.Linear);

      Graphics.Blit(source, renderTex);
      RenderTexture previous = RenderTexture.active;
      RenderTexture.active = renderTex;
      Texture2D readableText = new Texture2D(source.width, source.height);
      readableText.ReadPixels(new Rect(0, 0, renderTex.width, renderTex.height), 0, 0);
      readableText.Apply();
      RenderTexture.active = previous;
      RenderTexture.ReleaseTemporary(renderTex);
      return readableText;
  }
最终跑通运行的代码:
using UnityEngine;
using System.Collections;
using UnityEditor;
using System.IO;
using System.Collections.Generic;
/// <summary>
/// 切割
/// </summary>
public static class ImageSlicer
{
    [MenuItem("Assets/ImageSlicer/Process to Sprites")]
    static void ProcessToSprite()
    {
        Texture2D image = Selection.activeObject as Texture2D;//获取旋转的对象
        string rootPath = Path.GetDirectoryName(AssetDatabase.GetAssetPath(image));//获取路径名称
        string path = rootPath + "/" + image.name + ".PNG";//图片路径名称


        TextureImporter texImp = AssetImporter.GetAtPath(path) as TextureImporter;//获取图片入口


        AssetDatabase.CreateFolder(rootPath, image.name);//创建文件夹


        foreach (SpriteMetaData metaData in texImp.spritesheet)//遍历小图集
        {
            Texture2D myimage = new Texture2D((int)metaData.rect.width, (int)metaData.rect.height);

            //abc_0:(x:2.00, y:400.00, width:103.00, height:112.00)
            for (int y = (int)metaData.rect.y; y < metaData.rect.y + metaData.rect.height; y++)//Y轴像素
            {
                for (int x = (int)metaData.rect.x; x < metaData.rect.x + metaData.rect.width; x++)
                    myimage.SetPixel(x - (int)metaData.rect.x, y - (int)metaData.rect.y, image.GetPixel(x, y));
            }


            //转换纹理到EncodeToPNG兼容格式
            if (myimage.format != TextureFormat.ARGB32 && myimage.format != TextureFormat.RGB24)
            {
                Texture2D newTexture = new Texture2D(myimage.width, myimage.height);
                newTexture.SetPixels(myimage.GetPixels(0), 0);
                myimage = newTexture;
            }
            DeCompress(myimage);
            var pngData = myimage.EncodeToPNG();


            //AssetDatabase.CreateAsset(myimage, rootPath + "/" + image.name + "/" + metaData.name + ".PNG");
            File.WriteAllBytes(rootPath + "/" + image.name + "/" + metaData.name + ".PNG", pngData);
            // 刷新资源窗口界面
            AssetDatabase.Refresh();
        }
    }

    /// <summary>
    ///
    /// </summary>
    /// <param name="source"></param>
    /// <returns></returns>
    public static Texture2D DeCompress(Texture2D source)
    {
        RenderTexture renderTex = RenderTexture.GetTemporary(
                    source.width,
                    source.height,
                    0,
                    RenderTextureFormat.Default,
                    RenderTextureReadWrite.Linear);

        Graphics.Blit(source, renderTex);
        RenderTexture previous = RenderTexture.active;
        RenderTexture.active = renderTex;
        Texture2D readableText = new Texture2D(source.width, source.height);
        readableText.ReadPixels(new Rect(0, 0, renderTex.width, renderTex.height), 0, 0);
        readableText.Apply();
        RenderTexture.active = previous;
        RenderTexture.ReleaseTemporary(renderTex);
        return readableText;
    }
}
使用方法

输出整个图集的单独PNG文件
