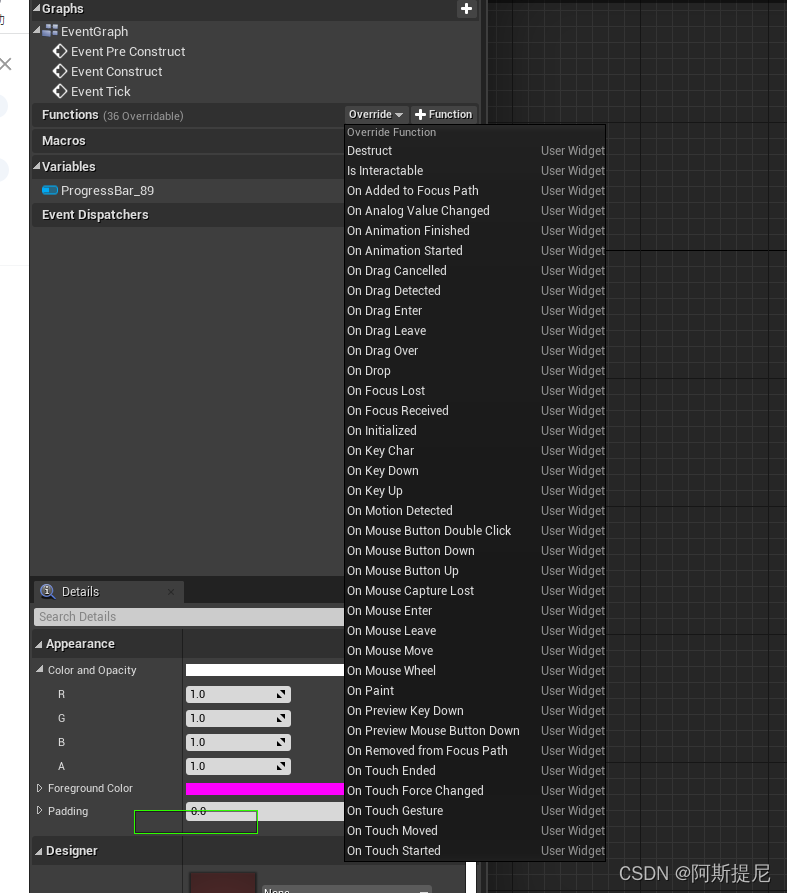
一、 Input事件列表
看了Input事件列表、本以为用OnDrag和OnDrop两个事件就能完成

二、准备UMG蓝图
- 创建目标蓝图ItemSlot,待拖动的Item,里面只有一张图片

- 创建移动中显示的蓝图ItemSlotDraging,相较于ItemSlot多了个Text标识用于区别显示

3. 创建目标Item蓝图载体,或者称为背景蓝图

三、编写代码逻辑
过程中共使用了三个输入事件OnMouseButtonDown、OnDragDetected、OnDrop
- 打开关卡蓝图,将UI蓝图渲染到屏幕上,允许输入事件,将鼠标显示出来

- 使用OnMouseButtonDown设置为左键按下拖拽触发的方式,根据OnMouseButtonDown的解释可以看出,这个方法应该写在目标拖拽蓝图中,即复写ItemSlot中的OnMouseButtonDown,注意ReturnNode需要传入一个参数


- 使用OnDragDetected编写拖动的逻辑,根据OnDragDetected的解释:当一个控件即将被拖动时调用,得知应该复写ItemSlot中的OnDragDetected方法


注:
- 拖动时创建控件ItemSlotDraging,传入ClassItemSlotDraging
- 将拖动生成的控件赋值给DragVisual,即拖拽时的显示
- CreateDragDropOperation中的Class选择DragDropOperation类或自己新建的DragDropOperation类型的蓝图
- CreateDragDropOperation中的Pivot与Offset决定了鼠标指针与移动控件的相对位置
- 这里将self传递过去相当与一个参数传递
- 通过OnDrop函数移动位置,根据OnDrop函数的解释:当玩家将一个东西丢弃到Widget上时出发,可知改Widget应该是背景蓝图,相当与该示例中的UI蓝图,所以应该复写UI中的OnDrop方法


注:
-
从Operation中取得Payload,这里存储着上一步传递过来的UI蓝图上的目标ItemSlot用于更改位置操作
-
从图四UI蓝图可以看出UI上的ItemSlot的位置是由CanvasPanelSlot的PostionX和PositionY决定的,所以这里先取到CanvasSlot再更改位置
四、结果


五、注意
- UI蓝图中的蓝底Image不仅仅是突出物品Item的显示,在本例中还控制了OnDrop的响应区域,因为UI中没有多余的控件了
- 因为UI蓝图中ItemSlot的Alignment是item的中间,所以OnDragDetected中的CreateDragDropOperation节点中的Pivot选择CenterCenter想呼应,会使刚拖拽或刚丢弃时的操作更顺滑,否则如果不对应会有明显的偏移。(Pivot还可以选择MouseDown,表示鼠标按下时的相对位置)