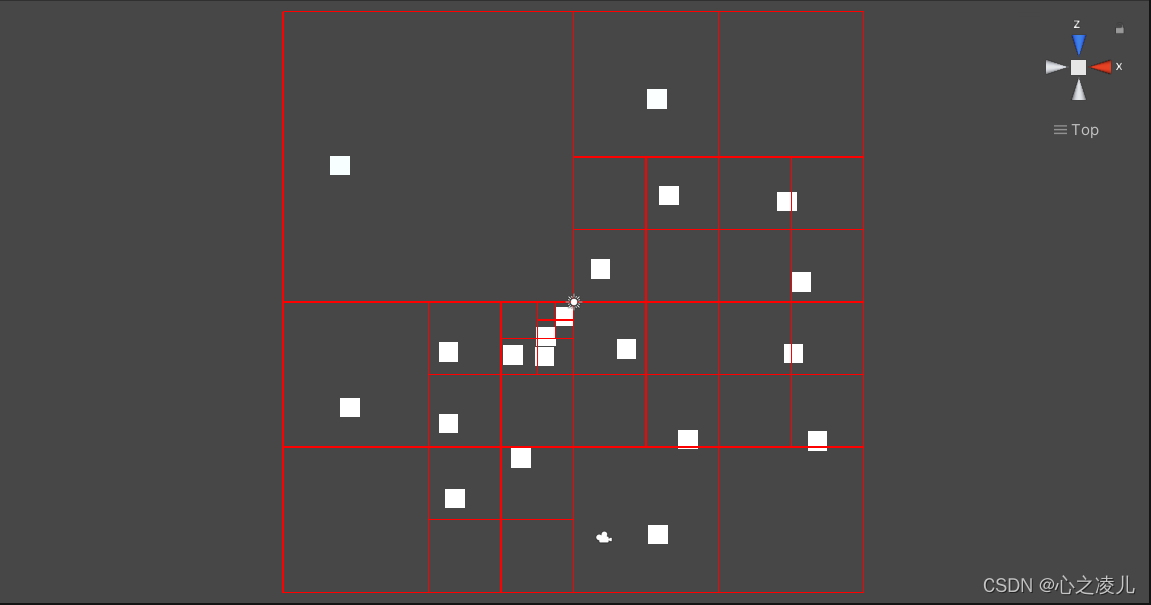
这次与以往不同的是,会以Unity版本为基础,扩展出UE4的四叉树工程版本
了解四叉树
四叉树作为一种树状数据结构,有很好的区域划分的特点,在局部刷新或状态判断上有广泛的应用,在复杂场景中可以通过分支剔除快速的卸载或添加区域性的数据
在百度百科的描述中写到,四叉树是在二维图片中定位像素的唯一适合的算法。因为二维空间(图经常被描述的方式)中,平面像素可以重复的被分为四部分,树的深度由图片、计算机内存和图形的复杂度决定
因此,作为唯一一种高效的空间索引算法,在游戏引擎的基础加载算法中有大量的应用。
四叉树的应用:
对于复杂场景来说,为了既保证游戏性能又不丢失场景细节,往往会对资源做一些层级处理,比如模型的LOD和贴图的MipMap等技术。
而对于一个大世界最基本的地形处理,就比单一的小模型来的复杂一些,除了区块性的加载地图之外,也有一些技术是对于区块本地的网格处理技术,比如Unity中Terrain网格的曲面细分技术,大概原理是根据相机距离地形的渲染距离不同来设置地形网格的三角面的复杂度,但是一张地形网格太大了,如果所有的区域都设置为相同的复杂度,同样也会造成很大的性能浪费,所以一张网格地图的内部会再一次执行区域划分的操作,划分的策略就是基于四叉树或八叉树为基本数据结构来划分区域:

但是需要注意的一点是,Unity中Terrain曲面细分的策略的复杂性除了与相机的距离之外,也同样与地形的高度有关。这很好理解,当网格在Y轴上拉伸,网格单位平面内的总面积就会变大,这时如果不提升该区域曲面细分的深度,渲染精度就达不到预期的效果。在Terrain某一区域与相机渲染的距离及该区域的地形高度两者会综合权重得到曲线细分的处理值,表现为四叉树或者八叉树在该区域节点的深度值。但是这种处理同样也会产生一些问题,如图:

在上图中,由于受到高度的影响,A区域的部分平坦地图虽然相比于B区域距离相机更远,但是精度却比B区域更远,这也是四叉树带来的负面效应,以分支结果为主题,绑定性强,如下面这张图,当一个区域的高度提升时,该区域对应的四叉树的深度也会增加,相应的其同一分支的节点深度也伴随增加,然后就会不可避免的提升了曲面细分的精度。但是从好的方向考虑的话,这一处理策略也使得Terrain在地形网格变化上有一定连续性

通过Unity创建四叉树:
- 项目代码GitHub地址:Unity-QTree
Node脚本:
首先需要通过创建一个Node脚本来实现节点的功能,代码开始前做一些准备工作描述
使用Bounds来做空间界定
四叉树的空间划分,本质就是一个立方体的结构,所以我们依托于Unity中Bounds做结点空间界定,其本身就是一个AABB盒子,也可以直接通过结构体来构造这个Bounds,但是Unity这边直接提供了集成好的代码,所以我们这边直接使用即可
定义初始变量,通过构造函数初始化:
 	public Bounds bound;
    public int layer;
    public Tree belongTree;
    public Node nodeFather;
    public Node[] childList;
    public List<ObjData> objList;

    public Node(Bounds bound,int layer,Tree belongTree,Node nodeFather=null)
    {
        this.bound = bound;
        this.layer = layer;
        this.belongTree = belongTree;
        this.nodeFather=nodeFather;
    }
对于节点执行操作时,首先就是子节点的创建,实现也很简单,只需要对父节点做平面四等分分割并确定子节点的Bounds,然后将对应的参数传入即可,子节点Bounds的计算过程如下:
center:父节点center在X轴方向与Z轴方向分别作size的四分之一偏移,不同的偏移方向对应不同子节点的centersize:父节点size的二分之一
将上面的描述转换为代码,结构为:
	public void CreateChildNode()
    {
        childList=new Node[4];
        int index = 0;
        for (int i = -1; i <= 1; i+=2)
        {
            for (int j = -1; j <= 1; j+=2)
            {
                Vector3 centerOffset = new Vector3(bound.size.x / 4 * i, 0, bound.size.z / 4 * j);
                Vector3 cSize = new Vector3(bound.size.x / 2, bound.size.y, bound.size.z / 2);
                Bounds cBound = new Bounds(bound.center + centerOffset, cSize);
                childList[index++] = new Node(cBound, layer + 1, belongTree,this);
            }
        }
    }
数据的插入,会根据节点当前状态做出对应反应:
当节点第一次插入数据时,将数据存储至ObjList。该节点再次执行插入操作时,就需要判断当前节点深度是否达到最大,如果该节点深度达到最大,同样直接将数据存储到ObjList。如果该节点深度没有最大,需要判断当前节点的子节点是否创建,未创建就创建子节点。存在子节点后就可以对子节点执行遍历,获取到数据所属的子节点区域,然后将数据插入到该子节点内,执行一个递归的操作:
	public void Insert(ObjData obj)
    {
        if (objList == null)
        {
            objList = new List<ObjData>();
            objList.Add(obj);
            obj.belongNode=this;
            return;
        }
        if (childList == null&& layer+1 < belongTree.maxLayer)
        {
            CreateChildNode();
            for (int i = 0; i < childList.Length; i++)
            {
                if (childList[i].bound.Contains(objList[0].transform.position))
                {
                    childList[i].Insert(objList[0]);
                    break;
                }
            }
            objList.Clear();
        }
        if (layer+1 == belongTree.maxLayer)
        {
            objList.Add(obj);
            return;
        }
        for (int i = 0; i < childList.Length; i++)
        {
            if (childList[i].bound.Contains(obj.transform.position))
            {
                childList[i].Insert(obj);
            }
        }
    }
ObjData 数据集主要是为了标定插入物体的坐标信息
最后就是对于节点做一个可视化操作,这里通过Gizmos辅助线的方式来实现,实现该节点的绘制时同时递归子节点的绘制函数,来完成当前分支的可视化,代码结构为:
 	public void DrawLine()
    {
        Gizmos.color = Color.red;
        Gizmos.DrawWireCube(bound.center,bound.size);
        if (childList == null) return;
        foreach (var child in childList)
        {
            child.DrawLine();
        }
    }
Tree脚本:
Tree作为节点管理脚本,主要是用来管理四叉树的根节点以及节点函数的调用,代码结构很简单:
public class Tree
{
    public int maxLayer;
    public Bounds bounds;
    public Node root;

    public Tree(int maxLayer,Bounds bounds)
    {
        this.maxLayer = maxLayer;
        this.bounds = bounds;
        root = new Node(bounds,0,this);
    }
    public void Insert(ObjData obj)
    {
        root.Insert(obj);
    }
    public void DrawLine()
    {
        root.DrawLine();
    }
}
MainRun
通过MainRun作为调用入口,来直接实现四叉树创建的过程,这里需要一些初始参数的输入与树的初始构建和插入节点的功能调用,同时做四叉树的可视化入口
public class MainRun : MonoBehaviour
{
    public Vector3 center;
    public Vector3 size;
    public int maxLayer;
    public List<ObjData> objList;
    private Tree tree;
    public void Awake()
    {
        tree = new Tree(maxLayer, new Bounds(center,size));
        foreach (var obj in objList)
        {
            tree.Insert(obj);
        }
    }
    public void OnDrawGizmos()
    {
        if (tree == null) return;
        tree.DrawLine();
    }
}
通过UE4创建四叉树
- 项目代码GitHub地址:UE4-QTree
虽然我特别喜欢做一些零基础的简述,但是也不可能每一个细节都覆盖到,所以如果刚好只了解C#的朋友,如果对于虚幻版本感兴趣,可以先去了解一些UE4中C++的一些基础知识。由于UE4的教程资料实在太少,这里也尽可能做更多的基础简述,使整个构建过程尽量的简单易理解
与Unity中不同的是,UE4中类的概念更加明确,在我们创建一个C++类时,就需要根据需求创建不同派生类或者空类,比如说Actor、Pawn、Character等等,如下图所示。而其中比较重要的Actor类类似于Unity中的继承于MonoBehaviour的脚本,提供了 BeginPlay和 Tick 两个重载方法,在功能上与Unity生命周期里面的Awake和Updata基本相同

Tools小工具:
通过点击None创建一个辅助类Tools,做一些协助方法,来拟合Unity的一些使用习惯,这在对于虚幻不是足够了解时,相对来说比较简单高效
在UE4中并未找到有关于Bounds或者类似的API,但是问题不大。前面也说到过,Bounds的主要功能就是封装一个AABB盒子的数据集,通过记录空间内的中心坐标center与边长size来确定唯一平行于坐标轴的长方体空间。既然UE4没有,就手动代码实现
这里直接通过一个结构体纪记录Bounds的数据集:
struct Bounds
{
public:
	FVector centerPos;
	FVector size;
	Bounds(FVector centerPos, FVector size)
	{
		this->centerPos = centerPos;
		this->size = size;
	}

};
在Unity中,使用Bounds的目的是记录空间划分的结果,而且有专门的API来判定某一坐标点是否存在于该Bounds内,所以这里也需要手动来实现一下,过程很简单,首先得到目标点相对于Bounds的中心点在XYZ三个轴的偏移量,然后分别与Bounds的边长size做对比,代码为:
bool Tools::IsActorInBounds(AActor* actor, Bounds* bound)
{
	FVector actorPos = actor->GetActorLocation();
	if (abs(actorPos.X - bound->centerPos.X)*2 > bound->size.X) return false;
	if (abs(actorPos.Y - bound->centerPos.Y)*2 > bound->size.Y) return false;
	if (abs(actorPos.Z - bound->centerPos.Z)*2 > bound->size.Z) return false;
	return true;
}
与Unity中Gizmos系统类似的是,UE4也提供了在编辑器模式下绘制辅助线的API:
DrawDebugBox(const UObject* WorldContextObject, FVector const Center, FVector Extent, FLinearColor Color, const FRotator Rotation, float LifeTime, float Thickness)
以此API为基础封装一个根据Bounds数据集绘制Cube辅助网格的方法,需要注意的是Kismet/KismetSystemLibrary.h为DrawDebugBox的命名空间
#include "Kismet/KismetSystemLibrary.h"

void Tools::DrawBounds(UObject* pawn,Bounds* bounds)
{
	FColor color(rand() % 256, rand() % 256, rand() % 256,255);
	UKismetSystemLibrary::DrawDebugBox(pawn,bounds->centerPos,bounds->size/2, FColor::Red);

}
上面的代码中需要注意一点,DrawDebugBox在传入Cube的size时,需要对于Bounds的size除以2,这是因为我们的Bounds的size使用的三条边的长度,而DrawDebugBox绘制Cube时,size代表的是Cube边长的一半。这里如果没有除2的操作,绘制的Cube的体积就会大八倍
Tree树结构:
与Unity版本基本类似,在.h文件内定义所需的字段:
- 根节点
Root - 树的最大深度
maxLayer - 根节点对应的
Bounds - 绘制节点需要的
UObject
public:
	Node* Root;
	int maxLayer;
	Bounds* bound;
	UObject* object;

public:
	Tree(Bounds* bound,int maxLayer, UObject* object);
	void Insert(AActor* actor);
然后在.cpp中实现:
Tree::Tree(Bounds* bound, int maxLayer, UObject* object)
{
	this->bound = bound;
	this->maxLayer = maxLayer;
	this->object = object;
	Root = new Node(bound, 0,this);
}
void Tree::Insert(AActor* actor)
{
	Root->InsertNode(actor);
}
Node树节点:
在代码结构上与Unity版本基本相同,定义相关的变量,并通过递归的技巧实现节点的创建与数据的插入,在.h里面的变量的定义与函数的创建
但是需要注意的,该类与Tree.h相互引用,与C#不同,C++中如果相互引用头文件会死循环。这里需要一点编程技巧来避免该问题,在Node节点脚本定义Tree,这样就可以避免在Node节点类引入Tree的头文件,代码如下:
class Tree;
class QTREE_API Node
{
public:
	Bounds* bound;
	int layer;
	Tree* belongTree;
	TArray<Node*> nodeChilds;
	TArray<AActor*> actorDatas;
	bool isNillNode=true;

public:
	Node(Bounds*,int,Tree* tree);
	~Node();
	void InsertNode(AActor* actor);
	void CreateChilds();
	void RefreshNode();
	}
创建节点主要是对于父节点的Bounds做空间划分生成子节点的Bounds,根据新生成Bounds完成子节点的创建
在下面的代码中需要注意一个小细节,虽然大致逻辑与Unity相同,但是在坐标系轴的区分上略有不同。虽然Unity与虚幻均使用左手坐标系,但是两者的轴方向并不相同。在Unity中通常用Y轴表示向上的方向,而在虚幻中则是通过Z轴表示,这也是两个引擎的存在差异的地方,所以在Unity中对于Z轴的处理到虚幻中就是要转换到对Y轴的处理了
void Node::CreateChilds()
{
	for (int i = -1;i<=1;i += 2)
	{
		for (int j = -1;j<=1;j += 2)
		{
			FVector centerOffset(bound->size.X / 4 * i,  bound->size.Y / 4 * j,0);
			FVector cSize(bound->size.X / 2, bound->size.Y/2, bound->size.Z);
			Bounds* boundCopy=new Bounds(bound->centerPos + centerOffset, cSize);
			Node* node = new Node(boundCopy, layer+1,belongTree);
			nodeChilds.Add(node);
		}
	}
}
对于数据的插入需要通过几个简单的判断做逻辑的区分:
- 若当前节点深度达到最大,直接将数据插入该节点,并跳过后续逻辑
- 若当前节点未执行数据插入,插入数据到该节点,跳过后续逻辑
- 若当前节点不存在子节点且深度未达到最大,创建子节点,并将当前节点内的数据插入对应的子节点
- 将新插入的数据插入对应子节点
void Node::InsertNode(AActor* actor)
{
	if (layer + 1 == belongTree->maxLayer)
	{
		actorDatas.Add(actor);
		return;
	}
	if (isNillNode)
	{
		actorDatas.Add(actor);
		isNillNode = false;
		return;
	}
	if (nodeChilds.Num() == 0 && layer + 1 < belongTree->maxLayer)
	{
		CreateChilds();
		for (auto& Elem : nodeChilds)
		{
			if (Tools::IsActorInBounds(actorDatas[0], Elem->bound))
			{
				Elem->InsertNode(actorDatas[0]);
				break;
			}
		}
		actorDatas.Empty();
	}
	for (auto& Elem : nodeChilds)
	{
		if (Tools::IsActorInBounds(actor, Elem->bound))
		{
			Elem->InsertNode(actor);
		}
	}
}
对于MainRun:
需要在场景中添加入口,创建Actor类的C++脚本,并拖入场景中,然后定义相关的变量,需要说明的是,在下面的代码中使用了TSet类型的数据结构,即列表,类似于Unity中的List。这里通过列表来存储一组Actor来作为四叉树划分的基本元素:
public:
	UPROPERTY(EditAnywhere)
	FVector centerPos;
	UPROPERTY(EditAnywhere)
	FVector size;
	UPROPERTY(EditAnywhere)
	UObject* object;
	UPROPERTY(EditAnywhere)
	TSet<AActor*> datas;
	AActor* actor;

void AMianRootRun::Tick(float DeltaTime)
{
	Super::Tick(DeltaTime);
	CreateTree();
}

void AMianRootRun::CreateTree()
{
	Bounds* bounds = new Bounds(centerPos, size);
	Tree* tree = new Tree(bounds, 4,object);
	for (auto& Elem : datas)
	{
		tree->Insert(Elem);
	}
}
类似于Unity中在Inspector面板对于public字段赋值,虚幻中对于添加UPROPERTY(EditAnywhere)宏的字段,也可以直接在编辑器对应的Detail面板赋值,如图所示:

在上图的参数赋值中有一个小细节很有意思,尤其在与Unity做对比的情况下,会觉得size字段所填入数值有点大,但是在UE4中,这个数字一点也不大。因为在Unity中长度的基本单位是米,而虚幻中长度的基本单位是厘米,这也是两个引擎的一点小差异
编译后运行,UE4引擎内显示:
