Unity渲染(三):Shader模糊
通过这里,你会学习到怎么将一张图片变得更加模糊
上一章:Unity渲染(二):Shader着色器基础入门之渲染Image图片
开发环境:Unity5.0或者更高

概述
1. 模糊原理
2. 代码解释与实现
3. 完整代码
4. 使用
1.1 模糊原理
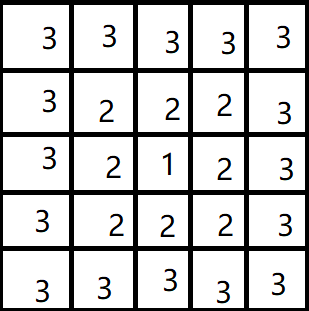
当前像素的颜色改为周围像素颜色的平均值,距离当前像素越远的权重越低,这样效果比较好

例如 上图的1格子的最终颜色为:八个2格子颜色加上十六个3格子的颜色 除以24,这就是均值模糊。
如果将3格子的颜色相加乘上0.3加上2格子的颜色乘以0.7,这就是越远的格子分配更低的权重,看起来效果会更好。接下来用Shader代码实现:
1.2 代码实现
首先我们定义一个用于模糊的函数,需要传3个参数:
sampler2D tex 表示需要模糊的图像
half2 uv 表示需要模糊图像的uv坐标
half2 blurSize 表示需要取周围像素的范围
KERNEL_SIZE 表示模糊程度,值越大表示效果越好,算法越复杂,对应上述格子图就是,取2格子的均值,或者取2+3格子的甲醛均值,又或者是更大范围的4格子的加权均值
fixed4 Blur(sampler2D tex, half2 uv, half2 blurSize)
{
	int KERNEL_SIZE = 3;

    int KERNEL_SIZE = 3;
	float4 o  = 0;
	float sum = 0;
	float weight;
	half2 texcood;
	for(int x = -KERNEL_SIZE/2; x <= KERNEL_SIZE/2; x++)
	{
    	for(int y = -KERNEL_SIZE/2; y <= KERNEL_SIZE/2; y++)
    	{
        	texcood = uv;
        	texcood.x += blurSize.x * x;
        	texcood.y += blurSize.y * y;
        	weight = 1.0/(abs(x)+abs(y)+2);
        	o += tex2D(tex, texcood)*weight;
        	sum += weight;
    	}
	}
	return o / sum;
}
在片元着色器中使用:
_MainTex 表示samper2D 的主贴图
_MainTex_TexelSize 表示主贴图的像素大小,由Unity内置 xxx_TexelSize
_Radius 表示需要模糊的半径,定义在Properties
fixed4 frag(v2f i) : SV_TARGET
{
    fixed4 col = Blur(_MainTex,i.uv,_Radius * _MainTex_TexelSize.xy);
    return col;
}
1.3 完整代码
Shader "Toturial/BlurPro"
{
    Properties
    {
        _MainTex("MainTex",2D) = "white"{}
        _Color("Color",Color) = (1,1,1,1)
        _Radius("半径",Range(0,10)) = 0
    }

    SubShader
    {
        Pass
        {
            Blend SrcAlpha OneMinusSrcAlpha

            CGPROGRAM

            #pragma vertex vert
            #pragma fragment frag

            fixed4 _Color;
            sampler2D _MainTex;
            float4 _MainTex_TexelSize;

            float _Radius;
            struct a2v
            {
                float4 vertex : POSITION;
                fixed4 color  : COLOR;
                float2 uv     : TEXCOORD0;
            };

            struct v2f
            {
                float4 pos   : SV_POSITION;
                fixed4 color : COLOR;
                float2 uv    : TEXCOORD0;
            };

            fixed4 Blur (sampler2D tex, half2 uv, half2 blurSize)
            {
                int KERNEL_SIZE = 3;

                float4 o  = 0;
                float sum = 0;
                float weight;
                half2 texcood;
                for(int x = -KERNEL_SIZE/2; x <= KERNEL_SIZE/2; x++)
                {
                    for(int y = -KERNEL_SIZE/2; y <= KERNEL_SIZE/2; y++)
                    {
                        texcood = uv;
                        texcood.x += blurSize.x * x;
                        texcood.y += blurSize.y * y;
                        weight = 1.0/(abs(x)+abs(y)+2);
                        o += tex2D(tex, texcood)*weight;
                        sum += weight;
                    }
                }
                return o / sum;
            }

            v2f vert(a2v v)
            {
                v2f o;
                o.pos = UnityObjectToClipPos(v.vertex);
                o.color = v.color;
                o.uv = v.uv;
                return o;
            }

            fixed4 frag(v2f i) : SV_TARGET
            {
                fixed4 col = Blur(_MainTex,i.uv,_Radius * _MainTex_TexelSize.xy);
                return col;
            }

            ENDCG
        }
    }
}
1.4 使用
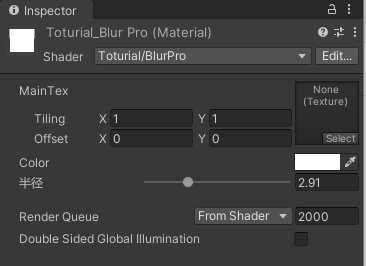
创建一个材质命名为Toturial_BlurPro,选择刚才编写的shader,

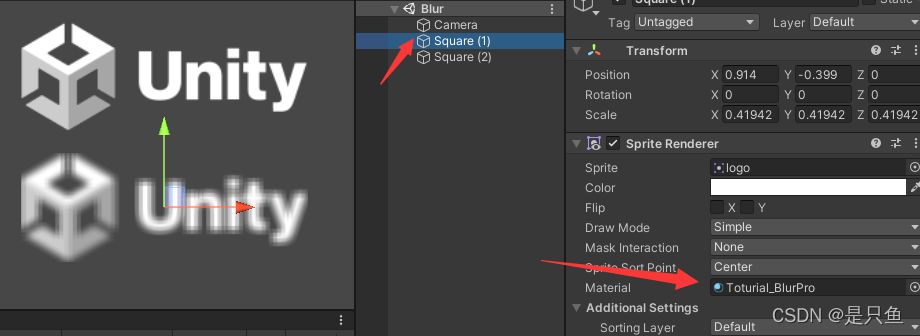
将材质赋给Sprite2D 或者Image,即可看到最终效果
