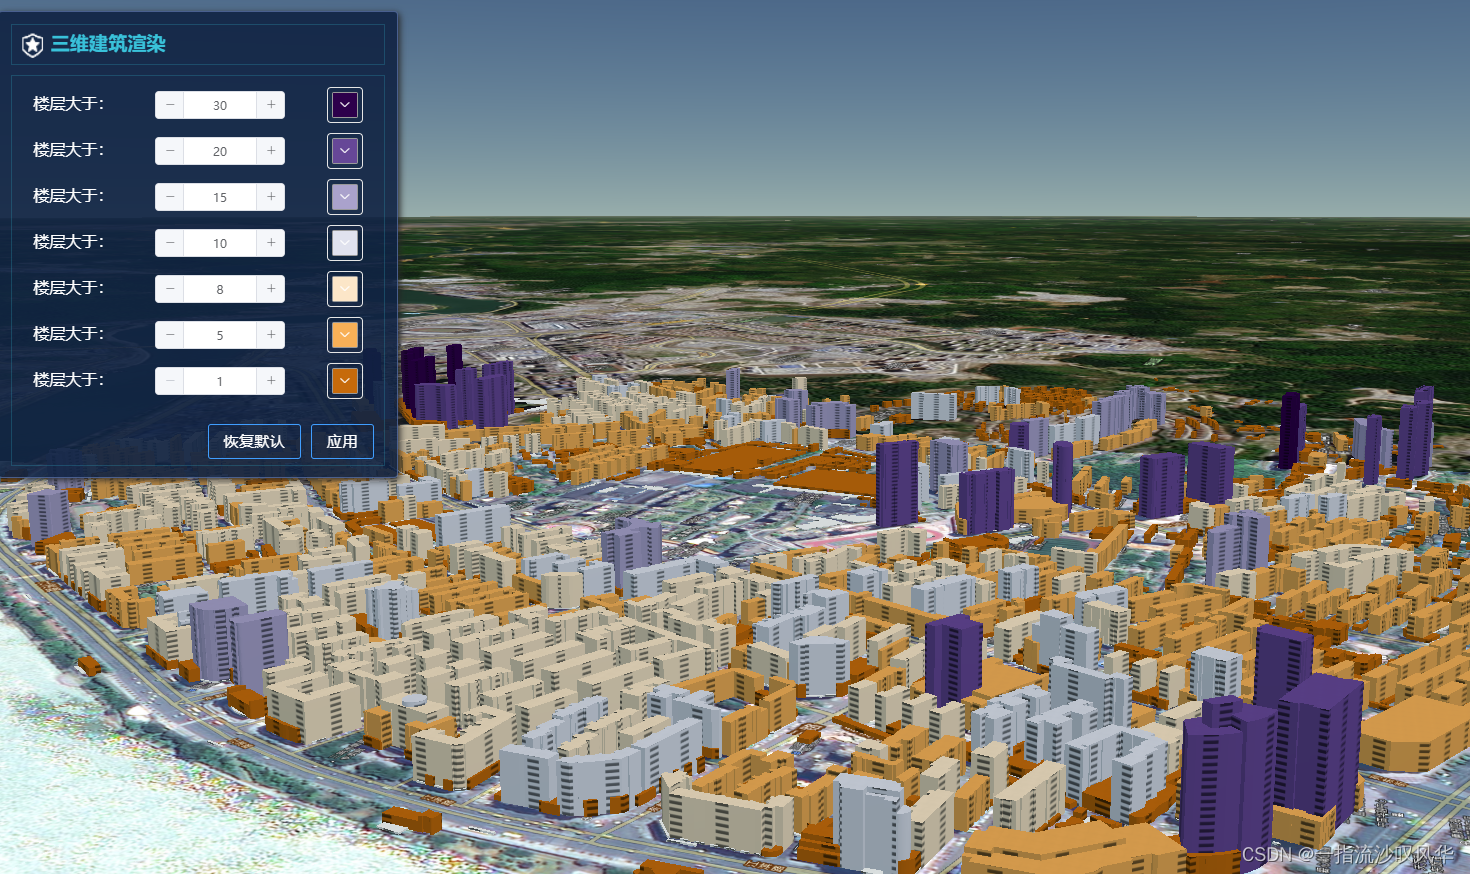
1、cesium加载城市建筑模型,3DTiles格式,如果设置基本颜色渲染很简单,只需要根据建筑物的属性进行颜色设置即可,cesium沙盒也有示例,代码如下:
 // 设置建筑物的样式
  var heightStyle = new Cesium.Cesium3DTileStyle({
    color: {
      conditions: [
      ['${floor} >= 30', 'rgba(45,0,75,0.5)'],
      ['${floor} >= 20', 'rgb(102,71,151)'],
      ['${floor} >= 15', 'rgb(170,162,204)'],
      ['${floor} >= 10', 'rgb(224,226,238)'],
      ['${floor} >= 8', 'rgb(252,230,200)'],
      ['${floor} >= 5', 'rgb(248,176,87)'],
      ['${floor} >= 1', 'rgb(198,106,11)']
      ]
      conditions: value
    }
效果:

2、cesium给建筑物设置类似泛光效果,可以在暗色地图突出显示建筑,这种光效看起来也蛮不错的,不过需要用到着色器(Shader)语言,根据别人写的着色器代码修改了一下,符合自己的使用,根据不同建筑物高度设置是否需要泛光,以及是否需要设置渐变色,这些简单的设置都可以在代码自行设置。不过着色器语言了解不多,以后慢慢在学习,核心代码如下:
// 传入3DTileS对象
setLight (tiles) {
      const shader = `
            varying vec3 v_positionEC;
             void main(void){
               vec4 position = czm_inverseModelView * vec4(v_positionEC,1); // 位置
               float glowRange = 100.0; // 光环的移动范围(高度)
               gl_FragColor = vec4(0.0, 0.3, 0.8, 0.8); // 颜色1
              //  gl_FragColor = vec4(220.0, 0.3, 0.8, 0.8); // 颜色2
               // 低于10米的楼不显示渐变色
                if(position.z < 10.0) {
                 gl_FragColor *= vec4(vec3(position.z / 10.0 * 2.0), 1.0);
               }else{
                 gl_FragColor *= vec4(vec3(position.z / 10.0), 0.8); // 渐变
               }
               // 设置动态光环
               float time = fract(czm_frameNumber / 36.0);
               time = abs(time - 0.5) * 3.0;
               float diff = step(0.005, abs( clamp(position.z / glowRange, 0.0, 1.0) - time));
               gl_FragColor.rgb += gl_FragColor.rgb * (1.0 - diff);
             }
             `
      tiles.tileVisible.addEventListener(function (tile) {
        const content = tile.content
        const featuresLength = content.featuresLength
        let feature
        for (var i = 0; i < featuresLength; i += 2) {
          feature = content.getFeature(i)
          const _model = feature.content._model
          _model._shouldRegenerateShaders = true
          Object.getOwnPropertyNames(_model._sourcePrograms).forEach(function (j) {
            const _modelSourceP = _model._sourcePrograms[0]
            _model._rendererResources.sourceShaders[_modelSourceP.fragmentShader] = shader
            const _modelSourceP1 = _model._sourcePrograms[1]
            _model._rendererResources.sourceShaders[_modelSourceP1.fragmentShader] = shader
          })
          _model._shouldRegenerateShaders = true
        }
      })
    }
效果:


