CardView-卡片布局
简介
CardView是一个带圆角和阴影的FrameLayout,继承关系如下:
java.lang.Object
   ?	android.view.View
 	   ?	android.view.ViewGroup
 	 	   ?	android.widget.FrameLayout
 	 	 	   ?	androidx.cardview.widget.CardView
重要的属性有:
- 圆角-对应xml属性:
app:cardCornerRadius, 对应字段:radius; - 阴影-对应xml属性:
app:cardElevation, 对应字段:elevation; - padding-对应xml属性:
app:contentPadding, 对应方法:setContentPadding();
举例
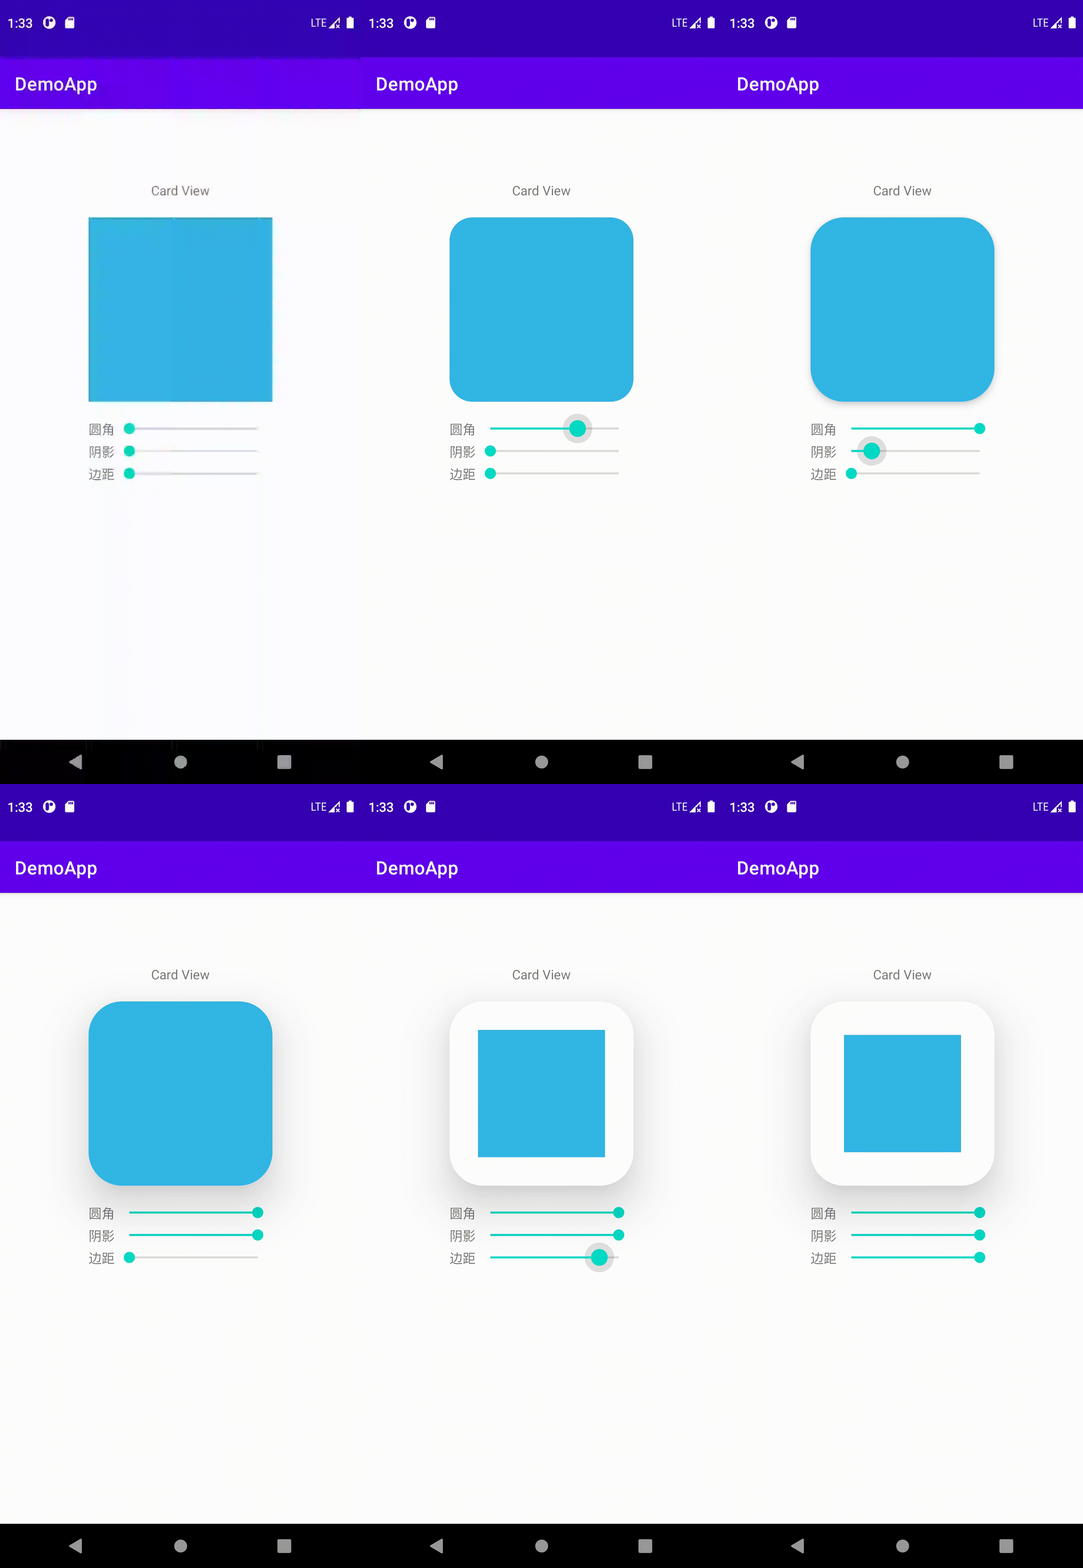
通过简介,大致对CardView有了一个初浅的认识,先来看一个简单的效果:

这个简单的例子中,使用SeekBar来动态控制CardView的圆角、阴影和padding。下面跟着源码看看实现原理:
-
创建布局文件
activity_card_view.xml如下:<?xml version="1.0" encoding="utf-8"?> <LinearLayout xmlns:android="http://schemas.android.com/apk/res/android" xmlns:app="http://schemas.android.com/apk/res-auto" xmlns:tools="http://schemas.android.com/tools" android:layout_width="match_parent" android:layout_height="match_parent" android:gravity="center" android:orientation="vertical" android:paddingBottom="200dp" tools:context=".newfeature.CardViewActivity"> <TextView android:layout_width="wrap_content" android:layout_height="wrap_content" android:text="Card View" /> <androidx.cardview.widget.CardView android:id="@+id/card_view" android:layout_width="200dp" android:layout_height="200dp" android:layout_marginTop="20dp" app:cardCornerRadius="0dp" app:cardElevation="0dp" app:contentPadding="0dp"> <View android:layout_width="match_parent" android:layout_height="match_parent" android:layout_gravity="center" android:background="@android:color/holo_blue_light" /> </androidx.cardview.widget.CardView> <LinearLayout android:layout_width="200dp" android:layout_height="wrap_content" android:layout_marginTop="20dp" android:orientation="horizontal"> <TextView android:layout_width="wrap_content" android:layout_height="wrap_content" android:text="圆角" /> <SeekBar android:id="@+id/sb_corner" android:layout_width="match_parent" android:layout_height="wrap_content" /> </LinearLayout> <LinearLayout android:layout_width="200dp" android:layout_height="wrap_content" android:layout_marginTop="5dp" android:orientation="horizontal"> <TextView android:layout_width="wrap_content" android:layout_height="wrap_content" android:text="阴影" /> <SeekBar android:id="@+id/sb_shadow" android:layout_width="match_parent" android:layout_height="wrap_content" /> </LinearLayout> <LinearLayout android:layout_width="200dp" android:layout_height="wrap_content" android:layout_marginTop="5dp" android:orientation="horizontal"> <TextView android:layout_width="wrap_content" android:layout_height="wrap_content" android:text="边距" /> <SeekBar android:id="@+id/sb_padding" android:layout_width="match_parent" android:layout_height="wrap_content" /> </LinearLayout> </LinearLayout>这里使用了一个简单的View进行填充,实际开发中可以根据需求替换为其他
View或者ViewGroup。 -
接下来是代码逻辑
CardViewActivity.kt:class CardViewActivity : AppCompatActivity() { lateinit var mCardView: CardView private lateinit var mSbCorner: SeekBar private lateinit var mSbShadow: SeekBar private lateinit var mSbPadding: SeekBar companion object { @JvmStatic fun startActivity(context: Context) { context.startActivity(Intent(context, CardViewActivity::class.java)) } } override fun onCreate(savedInstanceState: Bundle?) { super.onCreate(savedInstanceState) setContentView(R.layout.activity_card_view) mCardView = findViewById(R.id.card_view) mSbCorner = findViewById(R.id.sb_corner) mSbShadow = findViewById(R.id.sb_shadow) mSbPadding = findViewById(R.id.sb_padding) mSbCorner.setOnSeekBarChangeListener(BarChangeListener(WeakReference(this@CardViewActivity))) mSbShadow.setOnSeekBarChangeListener(BarChangeListener(WeakReference(this@CardViewActivity))) mSbPadding.setOnSeekBarChangeListener(BarChangeListener(WeakReference(this@CardViewActivity))) } class BarChangeListener(private val weakReference: WeakReference<CardViewActivity>) : SeekBar.OnSeekBarChangeListener { override fun onProgressChanged(seekBar: SeekBar?, progress: Int, fromUser: Boolean) { when (seekBar?.id) { R.id.sb_corner -> weakReference.get()?.mCardView?.radius = progress.toFloat() R.id.sb_shadow -> weakReference.get()?.mCardView?.elevation = progress.toFloat() R.id.sb_padding -> weakReference.get()?.mCardView?.setContentPadding(progress, progress, progress, progress) } } override fun onStartTrackingTouch(seekBar: SeekBar?) { } override fun onStopTrackingTouch(seekBar: SeekBar?) { } } }这里使用
SeekBar.OnSeekBarChangeListener的实例中的onProgressChanged()回调方法来动态设置CardView圆角、阴影和padding。
总结
项目开发中,使用CardView可以快速实现带立体感的页面和列表等功能,熟练掌握用法后能提高我们的开发效率。
