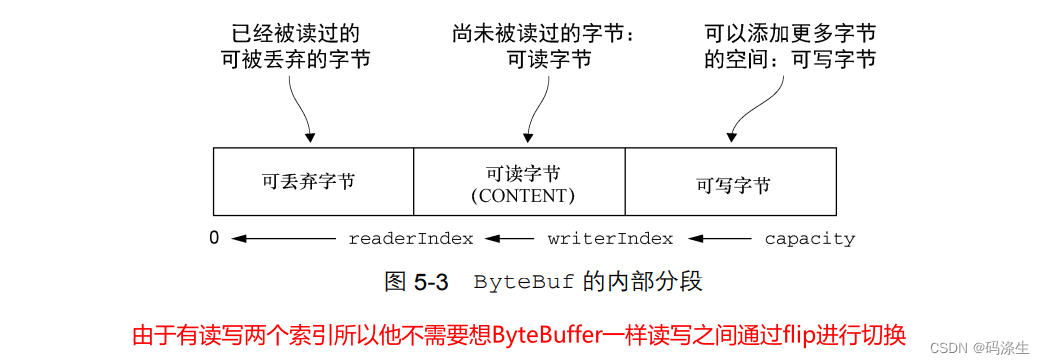
在Java的NIO中实现异步其中的一个关键就是利用ByteBuffer进行数据的缓冲,ByteBuffer进行缓冲的时候在读写数据之间需要进行切换。ByteBuf是Netty中又实现的一个与ByteBuffer功能相似的组件。这两个组件都应该是较为简单的,这里主要讲他们的实现机制以及如果要是面临大量数据读写的时候应该怎样使用。
一、ByteBuffer原理
ByteBuffer本质上是一个可以读写数据的内存块,可以理解成是一个容器对象(数组),他是通过几个关键的属性来协调读写流进行使用的:
- capacity:可以容纳的最大数量,在缓冲区创建的时候被设定不能够进行改变
- limit:表示缓冲区的当前终点,不能对缓冲区超过limit的位置进行读写操作,但是他是可以被修改的
- position:下一个要被读或是写元素的位置,每次读写缓冲区数据的时候这个值都会被改变为下次做准备
- mark:标记
关键方法介绍:
clear():
清除此缓冲区——将各个标记恢复到初始状态,但是数据并没有真正檫除
public final Buffer clear() {
    position = 0;
    limit = capacity;
    mark = -1;
    return this;
}
flip(): 翻转此缓冲区
public final Buffer flip() {
    //洗一次要进行数据读取的时候只能读取到上一次数据写到了的位置
    limit = position;
    position = 0;
    mark = -1;
    return this;
}
二、ByteBuffer缓冲读写的使用
在数据进行写入之情首先进行一下clear这样可以保证上次limit处于最大的状态可以为写提供更多的空间
public class NIOFileChannel03 {
    public static void main(String[] args) throws Exception {
        int flag = 0;
        FileInputStream fileInputStream = new FileInputStream("1.txt");
        FileChannel fileChannel01 = fileInputStream.getChannel();
        FileOutputStream fileOutputStream = new FileOutputStream("2.txt");
        FileChannel fileChannel02 = fileOutputStream.getChannel();
        ByteBuffer byteBuffer = ByteBuffer.allocate(1024);
        while (true) {
            byteBuffer.clear(); //清空buffer
            int read = fileChannel01.read(byteBuffer);
            System.out.println("read =" + read);
            if(read == -1) { //表示读完
                break;
            }
            //将buffer 中的数据写入到 fileChannel02 -- 2.txt
            byteBuffer.flip();
            fileChannel02.write(byteBuffer);
        }
        //关闭相关的流
        fileInputStream.close();
        fileOutputStream.close();
    }
}
三、ByteBuf原理
1、优点
- 自定义缓冲区数据类型
- 通过符合缓冲区实现透明的零拷贝
- 容量可以按需增长类似于StringBuilder
- 在读写两种模式之间切换不需要像ByteBuffer一样调用flip()方法
- 读和写使用了不同的索引
- 支持方法的链式调用
- 支持引用计数(可以与ChannelHandler中Buffer的释放相关知识联系起来)
- 支持池化 ?
2、
四、ByteBuf的使用
1、堆缓冲区
/**
 *@description: 堆缓冲区
 * 1、最常用的ByteBuf模式是将数据存储在JVM堆空间中——支撑数组
 * 2、能够在没有使用池化的情况下提供快速的分配与释放
 */
@Test
public void test01(){
    ByteBuf heapBuf = ByteBufAllocator.DEFAULT.buffer();
    //检查ByteBuf是否有一个支撑数组
    if (heapBuf.hasArray()){
        //如果有则对该数组进行应用,之后采用直接操作数组的方式对此进行操作
        byte[] array = heapBuf.array();
        //计算第一个字节的偏移量,那么arrayOffset返回的值代表的具体含义是什么呢
        int offset = heapBuf.arrayOffset()+heapBuf.readerIndex();
        int length = heapBuf.readableBytes();

    }
}
2、直接缓冲区
/**
*@Description: 直接缓冲区
 * 1、直接缓冲区避免了数据在使用的过程中需要多次赋值的一个过程
 * 2、直接缓冲区个人理解应该是在栈中的,所以他的分配以及释放都较为昂贵
 * 3、在网络传输的过程中之所以建议使用直接缓冲区是因为如果使用基于堆上的缓冲区时,在
 * 通过套接字发送他之前JVM将会在内部将待发送的数据从缓冲区赋值到一个直接缓冲区中
*/
@Test
public void test02(){
    ByteBuf directBuf = ByteBufAllocator.DEFAULT.buffer();
    if (!directBuf.hasArray()){
        int length = directBuf.readableBytes();
        byte[] arrays = new byte[length];
        directBuf.getBytes(directBuf.readerIndex(),arrays);
        //开始使用数组、偏移量、以及长度作为参数调用业务处理的方法进行处理

    }
}
3、复合缓冲区
/**
*@Description: 符合缓冲区
 * 1、他为ByteBuf提供了一个聚合视图,在这里你可以根据需要添加或是删除ByteBuf实例
 * 2、CompositeByteBuf提供了一个将多个缓冲区表示为单个合并缓冲区的虚拟表示
 * 3、可能同时包含直接分配内存以及非直接分配内存
 * 4、使用的场景就是我们有些信息可能是复用的,这样就可以灵活的组织ByteBuf的数据
*/
@Test
public void test03(){
    CompositeByteBuf compositeByteBuf = Unpooled.compositeBuffer();
    int length = compositeByteBuf.readableBytes();
    byte[] array = new byte[length];
    compositeByteBuf.getBytes(compositeByteBuf.readerIndex(),array);
    //之后的话还是利用数组以及偏移量之类的来直接操作

}

//这个是使用ByteBuffer方式实现的符合缓冲区模式
public void test04(){
    ByteBuffer header = ByteBuffer.allocate(8);
    ByteBuffer body = ByteBuffer.allocate(8);
    //如果按照这样的使用方法来看的话再建立一个这样的数组使用那岂不是脱裤子放屁多此一举么
    ByteBuffer[] message = new ByteBuffer[]{header,body};
    ByteBuffer message2 = ByteBuffer.allocate(header.remaining()+body.remaining());
    message2.put(header);
    message2.put(body);
    message2.flip();
}
4、随机访问索引
对索引的随机访问就像是对普通数组的访问一样,他既不会改变readerIndex也不会改变writeIndex,如果想要改变这两个属性可以通过readerIndex(index)以及writerIndex(index)来手动的移动这两者
@Test
public void test05(){
    ByteBuf buffer = ByteBufAllocator.DEFAULT.buffer(16);
    buffer.writeBytes("Hello,LML".getBytes());
    //for (int i = 0; i < buffer.readableBytes(); i++)
    for (int i = 0; i < buffer.capacity(); i++) {
        System.out.println((char) buffer.getByte(i));
    }
}
5、丢弃可读字节

调用discardReadBytes()方法可以释放被丢弃字节的内存空间,不过这个操作也会引起内存复制——将可读字节进行前移。所以此方法应该谨慎使用。
6、可读&可写字节
ByteBuf中是有两个索引的,相应的读写操作都将会引起读写索引的变化,这里主要展示一下如何读取所有的可读字节以及如何在可写的缓冲区中写入要写入的数据。
读写操作中get、set开头的动作从给定索引的位置开始,不会改变索引的位置的;read、write从给定的索引开始,并且且会根据已经访问过的字节数对索引进行调整。
@Test
public void test06(){
    ByteBuf buffer = ByteBufAllocator.DEFAULT.buffer(15);
    //两种不同类型的读操作
    buffer.writeBytes("Hello,LML".getBytes());
    while (buffer.readableBytes()>0){
        System.out.println((char) buffer.readByte());
    }
    while (buffer.isReadable()){
        System.out.println((char)buffer.readByte());
    }
    //ByteBuf中的数据进行读写操作并并及时的进行清理
    for (int i = 0; i < 4; i++) {
        System.out.println("----------------");
        buffer.discardReadBytes();
        while (buffer.writableBytes()>4){
            buffer.writeInt(new Random(7).nextInt(6));
        }
        while (buffer.isReadable()){
            System.out.println(buffer.readInt());
        }
    }
}
7、索引管理
JDK 的 InputStream 定义了 mark(int readlimit)和 reset()方法,这些方法分别 被用来将流中的当前位置标记为指定的值,以及将流重置到该位置。Netty中,我们可以通过调用 **markReaderIndex()、markWriterIndex()、resetWriterIndex() 和 resetReaderIndex()**来标记和重置 ByteBuf 的 readerIndex 和 writerIndex。这些和 InputStream 上的调用类似,只是没有 readlimit 参数来指定标记什么时候失效。 也可以通过调用 **readerIndex(int)或者 writerIndex(int)**来将索引移动到指定位置。试 图将任何一个索引设置到一个无效的位置都将导致一个 IndexOutOfBoundsException。 可以通过调用 clear()方法来将 readerIndex 和 writerIndex 都设置为 0。注意,这 并不会清除内存中的内容。
8、查找操作
/**
 *@description: 查找字节
 */
@Test
public void test07(){
    ByteBuf byteBuf = ByteBufAllocator.DEFAULT.buffer();
    byteBuf.writeBytes("LML,ET\rDS".getBytes());
    //基础的查找方法
    System.out.println(byteBuf.indexOf(0, 10, "T".getBytes()[0]));
    //通过ByteBufProcessor进行查找
    System.out.println(byteBuf.forEachByte(ByteBufProcessor.FIND_CR));
    System.out.println(byteBuf.forEachByte(0, 11, new ByteProcessor() {
        @Override
        public boolean process(byte value) throws Exception {
            //这里的使用方法就很怪了,竟然是!=
            return value!=(byte)'E';
        }
    }));
}
9、派生缓冲区——ByteBuf视图
创建派生缓冲区视图的方法有如下几种,但是下面的几种创建的派生缓冲区与原缓冲区用的底层存储结构都是相同的,一个的改变会引起其他的改变,只不过是他们拥有独立的读写索引等其他的外部属性
- duplicate()
- slice()
- slice(int,int)
- Unpooled.unmodifiableBuffer()
- order(ByteOrder)
- readSlice(int)
如果要是需要一个现有缓冲区的真实副本,应该使用copy的方法。通过此方法返回的缓冲区是真实的缓冲区副本,独立不受影响。
/**
 *@description: 缓冲视图的使用
 */
@Test
public void test08(){
    //视图的使用以及测试
    ByteBuf buf = Unpooled.copiedBuffer("Netty in Action rocks!", CharsetUtil.UTF_8);
    ByteBuf slice = buf.slice(4, 15);
    System.out.println(slice.toString(CharsetUtil.UTF_8));
    buf.setByte(0,'L');
    assert buf.getByte(4) == slice.getByte(0);

    //拷贝副本的使用以及测试
    ByteBuf buf2 = Unpooled.copiedBuffer("Netty in Action rocks!", CharsetUtil.UTF_8);
    ByteBuf copy = buf2.copy(0, 15);
    buf2.setByte(0,'t');
    //此处的断言将会报错,断言后面的内容将不会在继续执行
    assert buf2.getByte(0)==copy.getByte(0);
}
10、ByteBuf的分配
Netty中利用ByteBufAllocator实现了池化,个人理解他就像是一个ByteBuf的工厂,来帮助我们创建ByteBuf。
| 名称 | 描述 |
|---|---|
| buffer() buffer(int initialCapacity); buffer(int initialCapacity, int maxCapacity); | 返回一个基于堆或者直接内存 存储的 ByteBuf |
| heapBuffer() heapBuffer(int initialCapacity) heapBuffer(int initialCapacity, int maxCapacity) | 返回一个基于堆内存存储的 ByteBuf |
| directBuffer() directBuffer(int initialCapacity) directBuffer(int initialCapacity, int maxCapacity) | 返回一个基于直接内存存储的 ByteBuf |
| compositeBuffer() compositeBuffer(int maxNumComponents) compositeDirectBuffer() compositeDirectBuffer(int maxNumComponents); compositeHeapBuffer() compositeHeapBuffer(int maxNumComponents); | 返回一个可以通过添加最大到 指定数目的基于堆的或者直接 内存存储的缓冲区来扩展的 CompositeByteBuf |
| ioBuffer() | 返回一个用于套接字的 I/O 操 作的 ByteBuf |
ByteBufAllocator的两种实现是:PooledByteBufAllocator和UnpooledByteBufAllocator,第一种池化了ByteBuf实例以提高性能并最大程度的减少内存碎片,采用的是一种被称为jemalloc的已经被大量现代化操作系统所采用的高效方法来分配内存。后面的这种实现不池化ByteBuf,所以说每次他被调用的时候都会返回一个新的实例。Netty中默认实现的是池化的技术但是这个配置可以通过ChanelConfig或是引导类来进行配置。结合Context以及Channel通过他们可以获取ByteBufAllocator引用的两种方式是:
@Test
public void test09(){
    //通过Channel来获取分配对象引用实例
    NioSocketChannel channel = new NioSocketChannel();
    ByteBufAllocator alloc = channel.alloc();
    //通过Context来分配
    ChannelHandlerContext channelHandlerContext = null;
    channelHandlerContext.alloc();
}
当我们不能够通过上述或是其他的方式来获得一个ByteBufAllocator的时候可以通过使用Unpooled缓冲区来使用,此种使用的另一个场景就是不需要Netty的非网络项目。同时Netty还提供了ByteBufUtil的类其中hexdump方法可以以十六进制的方式打印ByteBuf的内容,也可以调用equals来判断两个ByteBuf实例的相等性。
11、引用计数
ByteBuf中引用计数的思想与JVM垃圾回收中引用计数的思想相似,同比理解即可。不过在Netty中可以让我们自己来操作维护一个对象他的引用计数的情况从而来决定他是不是会被回收。
@Test
public void test10(){
    ByteBuf byteBuf = Unpooled.directBuffer();
    System.out.println(byteBuf.refCnt());
    byteBuf.release();
    System.out.println(byteBuf.refCnt());
}
f实例的相等性。
11、引用计数
ByteBuf中引用计数的思想与JVM垃圾回收中引用计数的思想相似,同比理解即可。不过在Netty中可以让我们自己来操作维护一个对象他的引用计数的情况从而来决定他是不是会被回收。
@Test
public void test10(){
    ByteBuf byteBuf = Unpooled.directBuffer();
    System.out.println(byteBuf.refCnt());
    byteBuf.release();
    System.out.println(byteBuf.refCnt());
}
