Unity uGUI原理解析-BaseMeshEffect
BaseMeshEffect是用于实现网格效果的抽象类实现IMeshModifier接口,是Shadow、Outline等效果的基类。
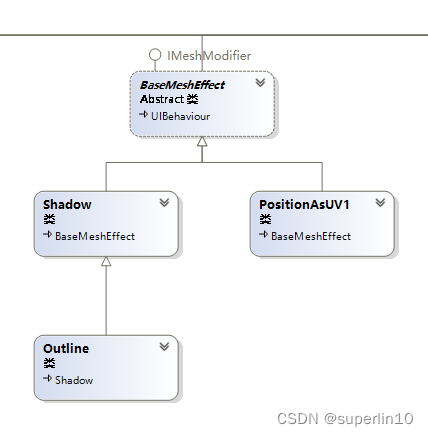
从Unity uGUI原理解析-Graphic可以知道,Graphic 在执行 DoMeshGeneration 时会获取到当前GameObject上的所有实现 IMeshModifier 的组件。 并且会调用 ModifyMesh 方法来修改当前Graphic 的Mesh数据。BaseMeshEffect 的类结构图如下:

BaseMeshEffect 源码解析
BaseMeshEffect 源码特别简单大致分为三个部分:
- 获取当前 GameObject 上的 Graphic 组件。
- 在
OnEnableOnDisableOnDidApplyAnimationProperties等时候使用SetVerticesDirty方法标记。 - 实现
IMeshModifier的ModifyMesh方法。当然这里是使用抽象方法进行实现。后续会有ShadowOutlinePositionAsUV1等子类来实现
[ExecuteAlways]
public abstract class BaseMeshEffect : UIBehaviour, IMeshModifier
{
    [NonSerialized]
    private Graphic m_Graphic;

    /// <summary>
    /// The graphic component that the Mesh Effect will aplly to.
    /// </summary>
    protected Graphic graphic
    {
        get
        {
            if (m_Graphic == null)
                m_Graphic = GetComponent<Graphic>();
            return m_Graphic;
        }
    }

    protected override void OnEnable()
    {
        base.OnEnable();
        if (graphic != null)
            graphic.SetVerticesDirty();
    }

    protected override void OnDisable()
    {
        if (graphic != null)
            graphic.SetVerticesDirty();
        base.OnDisable();
    }

    /// <summary>
    /// Called from the native side any time a animation property is changed.
    /// </summary>
    protected override void OnDidApplyAnimationProperties()
    {
        if (graphic != null)
            graphic.SetVerticesDirty();
        base.OnDidApplyAnimationProperties();
    }
    public abstract void ModifyMesh(VertexHelper vh);
}
Shadow源码解析
通过源码可以看到 Shadow 继承抽象类 BaseMeshEffect。 另外在设置 effectColor 和 effectDistance以及 useGraphicAlpha 时调用 graphic.SetVerticesDirty 方法来标记需要更新。
那么是如何绘制这个阴影的呢? 可以看下是是如何实现 ModifyMesh 方法的。 部分代码如下:
public class Shadow : BaseMeshEffect
{
    protected void ApplyShadowZeroAlloc(List<UIVertex> verts, Color32 color, int start, int end, float x, float y)
    {
        UIVertex vt;

        var neededCapacity = verts.Count + end - start; // 计算总的顶点数
        if (verts.Capacity < neededCapacity)
            verts.Capacity = neededCapacity;

        for (int i = start; i < end; ++i) // 遍历从 start 到 end 的顶点
        {
            vt = verts[i];
            verts.Add(vt); // 这里相当于是对顶点进行了一次拷贝

			// 对顶点位置进行重新计算
            Vector3 v = vt.position;
            v.x += x;
            v.y += y;
            vt.position = v;
            // 对颜色进行重新计算
            var newColor = color;
            if (m_UseGraphicAlpha)
                newColor.a = (byte)((newColor.a * verts[i].color.a) / 255);
            vt.color = newColor;
            // 原有的顶点数据
            verts[i] = vt;
        }
    }

    /// <summary>
    /// Duplicate vertices from start to end and turn them into shadows with the given offset.
    /// </summary>
    /// <param name="verts">Vert list to copy</param>
    /// <param name="color">Shadow color</param>
    /// <param name="start">The start index in the verts list</param>
    /// <param name="end">The end index in the vers list</param>
    /// <param name="x">The shadows x offset</param>
    /// <param name="y">The shadows y offset</param>
    protected void ApplyShadow(List<UIVertex> verts, Color32 color, int start, int end, float x, float y)
    {
        ApplyShadowZeroAlloc(verts, color, start, end, x, y);
    }

    public override void ModifyMesh(VertexHelper vh)
    {
    	// ...
        var output = ListPool<UIVertex>.Get();
        vh.GetUIVertexStream(output);

        ApplyShadow(output, effectColor, 0, output.Count, effectDistance.x, effectDistance.y);
        vh.Clear();
        vh.AddUIVertexTriangleStream(output);
        ListPool<UIVertex>.Release(output);
    }
}
可以看到 ApplyShadowZeroAlloc 这个方法是具体的实现地方。
实际的操作也很简单:
- 遍历所有顶点数据
- 拷贝一份顶点数据
- 修改顶点的偏移,对应 EffectDistance 这个参数
- 修改颜色信息,对应 Effect Color 以及 UseGraphicAlpha这两个参数
- 更新旧顶点数据
Outline源码解析
从Outline源码中可以看到是继承自Shadow这个类。Outline的实现简单来说就是在四周在绘制四遍。不用说这个方案顶点数量变成了5倍,优化方案可以看这篇文章。
public class Outline : Shadow
{

    public override void ModifyMesh(VertexHelper vh)
    {
        // ...
        var verts = ListPool<UIVertex>.Get();
        vh.GetUIVertexStream(verts);

        // 由于需要绘制
        var neededCpacity = verts.Count * 5;
        if (verts.Capacity < neededCpacity)
            verts.Capacity = neededCpacity;

        var start = 0;
        var end = verts.Count;
        ApplyShadowZeroAlloc(verts, effectColor, start, verts.Count, effectDistance.x, effectDistance.y);

        start = end;
        end = verts.Count;
        ApplyShadowZeroAlloc(verts, effectColor, start, verts.Count, effectDistance.x, -effectDistance.y);

        start = end;
        end = verts.Count;
        ApplyShadowZeroAlloc(verts, effectColor, start, verts.Count, -effectDistance.x, effectDistance.y);

        start = end;
        end = verts.Count;
        ApplyShadowZeroAlloc(verts, effectColor, start, verts.Count, -effectDistance.x, -effectDistance.y);

        vh.Clear();
        vh.AddUIVertexTriangleStream(verts);
        ListPool<UIVertex>.Release(verts);
    }
}
PositionAsUV1源码解析
将原始顶点位置设置为生成的顶点的uv1。主要是给shader提供数据的(法线贴图坐标),没什么好看的。
public class PositionAsUV1 : BaseMeshEffect
{
    public override void ModifyMesh(VertexHelper vh)
    {
        UIVertex vert = new UIVertex();
        for (int i = 0; i < vh.currentVertCount; i++)
        {
            vh.PopulateUIVertex(ref vert, i);
            vert.uv1 =  new Vector2(vert.position.x, vert.position.y);
            vh.SetUIVertex(vert, i);
        }
    }
}
案例参考
Unity3D UGUI优化:制作镜像图片(1)
Unity3D UGUI优化:制作镜像图片(2)
Unity3D UGUI优化:制作镜像图片(2)
UGUI Text渐变、弯曲、文字跳动(BaseMeshEffect拓展)