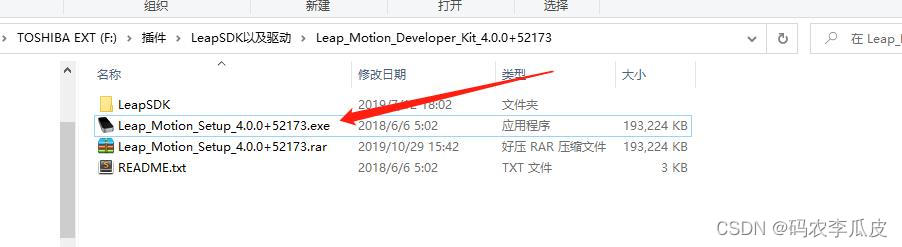
������Ӳ���İ�װ,��װӲ����Ӧ������Leap_Motion_Setup_4.0.0+52173.exe,������ʾĬ�ϰ�װ,��װ��֮��,����leapmotionӲ��,����ɫ�Ƶ�һ�泯���Լ�����������LeapMotionControlPanel,���������½ǿ���һ����ɫ��ͼ��,����ͼ,��˵��������������ʹ���ˡ�


������ͼ�겻����ɫ��,�ǻ�ɫ��˵��Ӳ��������ͷ��������,������øɾ��IJ���Ӳ��������ͷ���в��ý���������ʾ�Ǻ�ɫ�ĵ�����ͱȽϴ���,˵��Ӳ��������������,����Դ�LeapMotionControlPanel�Ŀ��ӻ�ҳ����в�������,����ͼ,Ҳ�ǵü��һ��USB��������,����Dz��ڵ��Ե�USB3.0�Ľӿڡ�
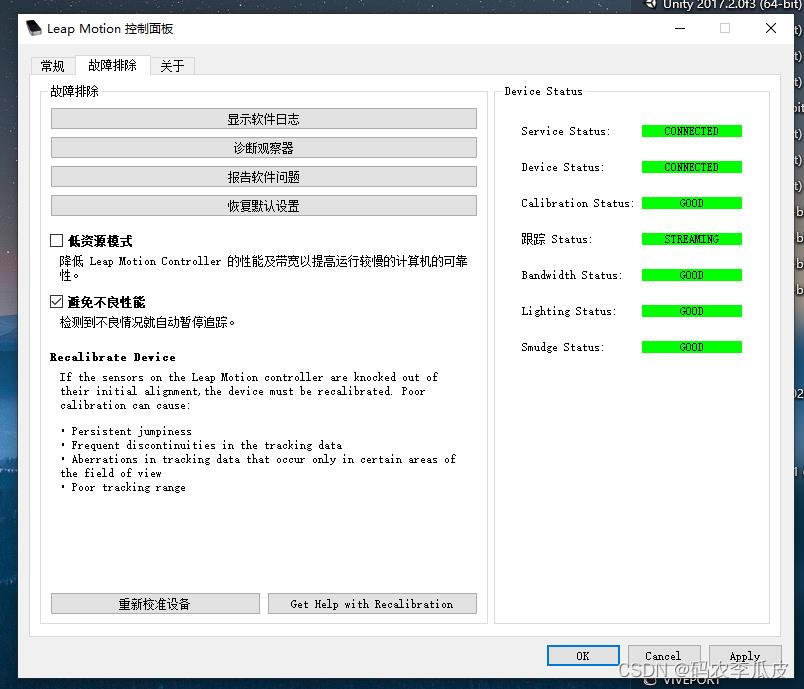
Ӳ����������������,����Ϳ��Կ�ʼ����Ŀ����ˡ�
�������½�һ������,���õ���2019.4�汾��,�����ù��̺�Ϳ��Ե���Leapmotion��SDK����,SDK������ȥLeapmotion�Ĺ��������Լ���Unity�汾ȥ���к��ʵ����ء�һ�㵼�����ģ��Ϳ��Խ��п����ˡ�SDK�����������Ҳ�Ǻܷḻ��,���Ը����Լ�����Ҫ����ѧϰ��
���ʱ���������в����Demo,���ֹ�����������,��ô���������ǾͿ��Լ��������ˡ�

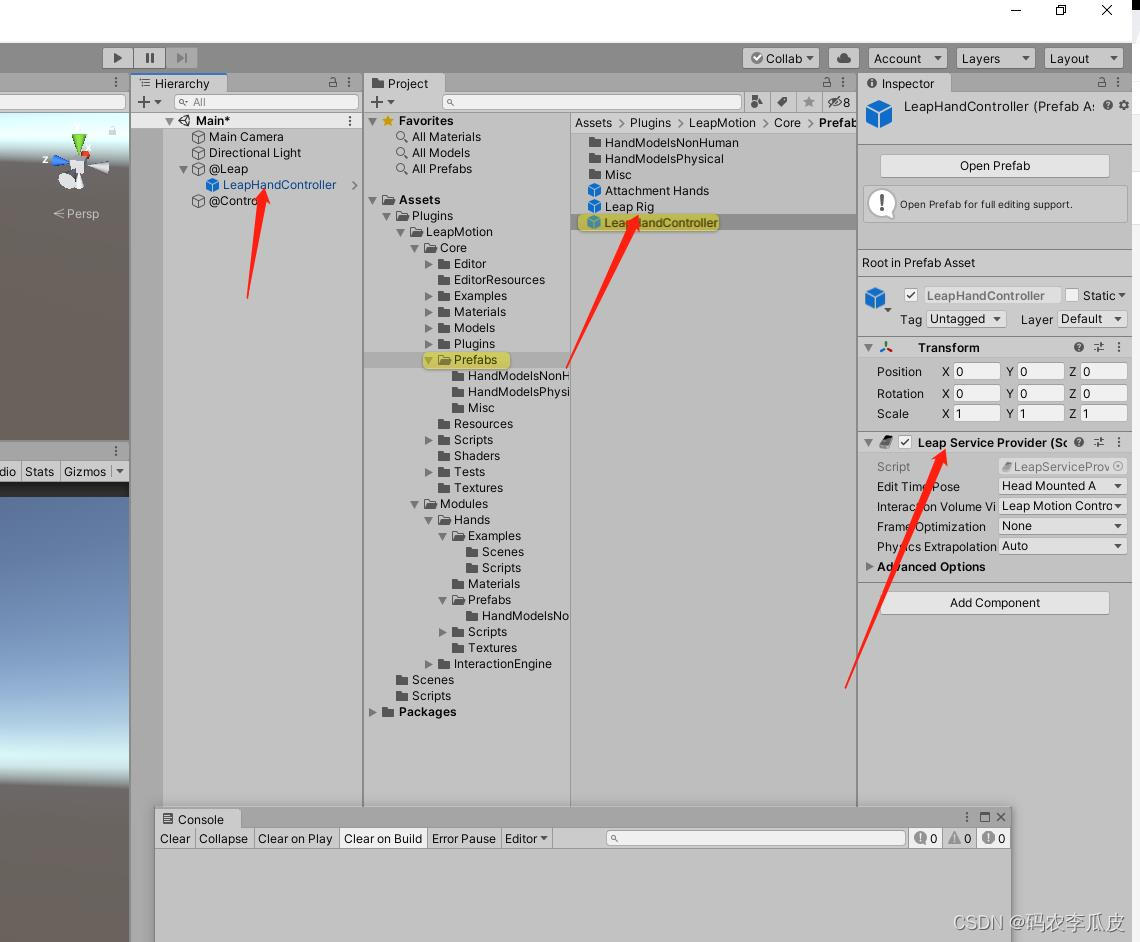
���������½�һ���յij�����������ܵ�Leapmotion�������ź�,�����������LeapProvider,������½���һ��������@Leap������Leapmotin�ĺ������,����Ԥ���������ҵ���LeapHandController,���������@Leap��,�������ǾͿ��Խ��ܵ�Ӳ���������ź��ˡ�
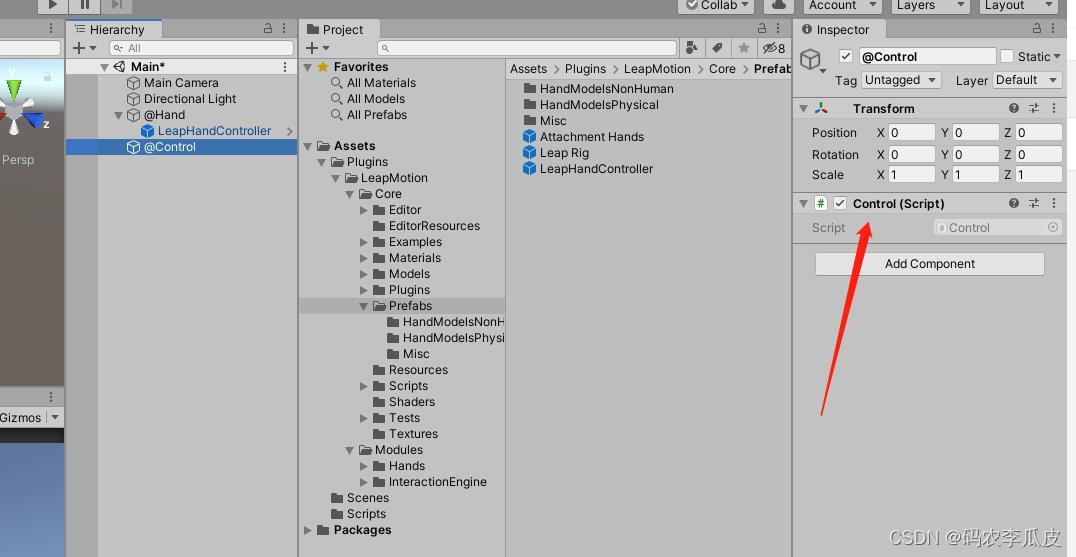
����������д�ű���,���½���һ���ű�Control,������ص���@Control����,�ڽű�����д���ǵĺ�����Ȼ������,���ܶ��������ġ�
/***********************************
* Description:����
* Mountpoint:���ص�
* File Name: Control.cs
* Version:�汾
* Author:#AuthorName
* E_mail: 1061986324@qq.com
* CreateTime: #CreateTime
***********************************/
using Leap;
using Leap.Unity;
using System.Collections;
using System.Collections.Generic;
using UnityEngine;
namespace LJF
{
//�淶������������װ�����Ʒ������η�
public class Control : MonoBehaviour
{
private LeapProvider lp;
private Frame fr;
private Hand hand;
private float ttm = 0;
private void Start()
{
lp = FindObjectOfType<LeapProvider>() as LeapProvider;
}
private void Update()
{
fr = lp.CurrentFrame;
if (fr.Hands.Count >= 1)
{
List<Hand> handList = fr.Hands;
hand = handList[0];
if (isMoveLeft(hand))
{
ttm += Time.deltaTime;
if (ttm >= 0.2f)
{
ttm = 0;
Debug.Log("��");
}
}
}
}
[Tooltip("Velocity (m/s) move toward ")]
protected float deltaVelocity = 0.7f;
//1.�ֻ������
protected bool isMoveLeft(Hand hand) // �ֻ������
{
//x���ƶ����ٶ� deltaVelocity = 0.7f isStationary (hand) �ж�hand�Ƿ��ֹ
return hand.PalmVelocity.x < -deltaVelocity && !isStationary(hand);
}
//2.�ֻ����ұ�
protected bool isMoveRight(Hand hand)// �ֻ����ұ�
{
return hand.PalmVelocity.x > deltaVelocity && !isStationary(hand);
}
//3.�ֻ����ϱ�
protected bool isMoveUp(Hand hand) //������
{
return hand.PalmVelocity.y > deltaVelocity && !isStationary(hand);
}
//4.�ֻ����±�
protected bool isMoveDown(Hand hand) //������
{
return hand.PalmVelocity.y < -deltaVelocity && !isStationary(hand);
}
//5.�̶ֹ�����
protected bool isStationary(Hand hand)// �̶�������
{
return hand.PalmVelocity.Magnitude < smallestVelocity;
}
[Tooltip("Velocity (m/s) move toward ")] //�ٶ�(m/s)����
protected float smallestVelocity = 0.4f;
//6.�Ƿ�ץȡ
protected bool isGrabHand(Hand hand) //�Ƿ�ץȡ
{
return hand.GrabStrength > 0.8f; //ץȡ��
}
//8.�����Ƿ�ȫ�ſ�
protected bool isOpenFullHand(Hand hand) //����ȫչ��~
{
//Debug.Log (hand.GrabStrength + " " + hand.PalmVelocity + " " + hand.PalmVelocity.Magnitude);
return hand.GrabStrength == 0;
}
}
}
������Dz���Ҫ�ֵ�ģ��,ֻ���������������źŽ���������,����ľ��Ѿ�������,���������Ҫ�ֵ�ģ����ô�������������ɡ�
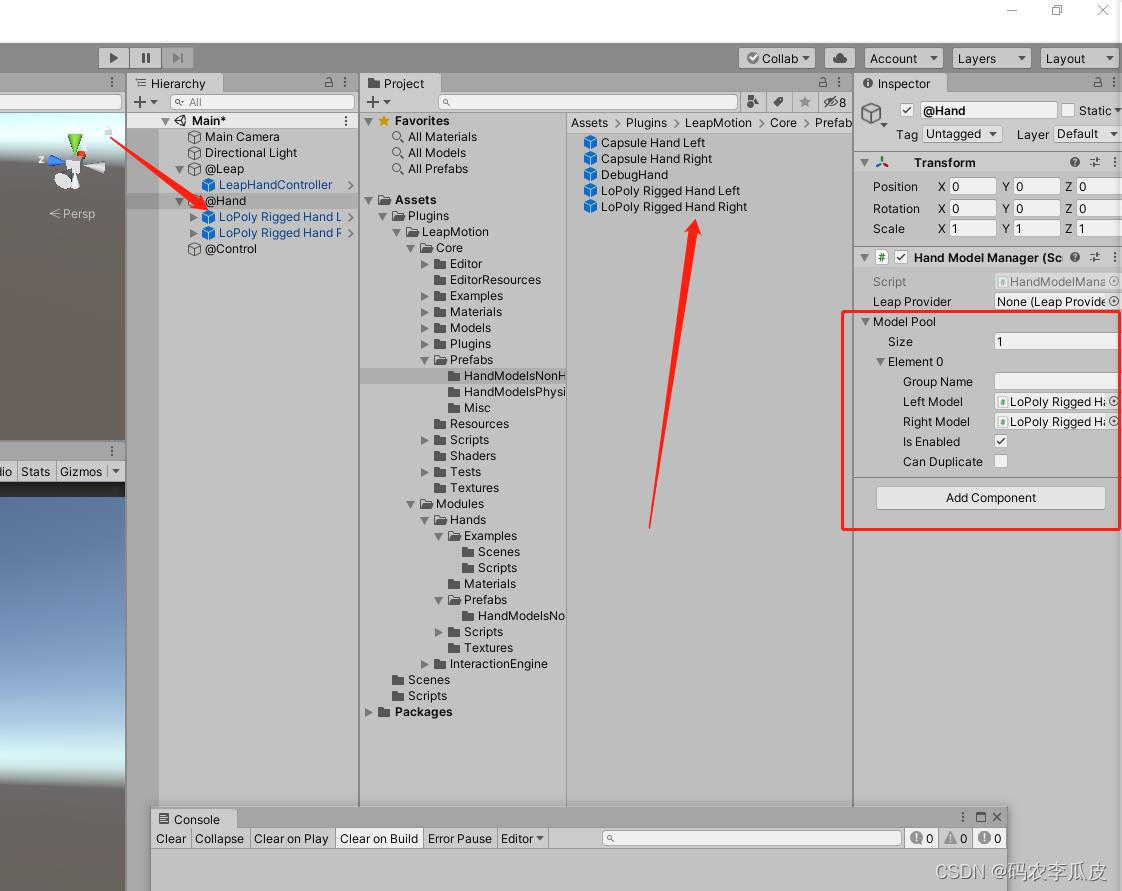
�����Ҫ�ֵ�ģ�ͽ��п���,��ô���ǿ��Դ���һ��������@Hand,�������ؽű�HandModelManager,Ȼ����leapmotion��Ԥ���������ҵ������ֵ�ģ�ͽ���Ҳ�ŵ�@hand����,Ȼ�����������ӵ�HandModelManager��������,�ǵù�ѡisEnable�������Ҫ������ģ�͵�λ��,���ʱ����ֱ�ӵ����ֵ�Ԥ����λ����û���õ�,����λ�����ܺ���ģ��LeapProvider���Ƶ�,���ǿ���ͨ�������������Ǵ�����@Leap��λ���������ֵ�λ�á�
������ǻ���Ҫ��ȡһЩ�ֵ��ֵ��ж��¼�,����������ͼ�ļ��е���Щ�ű�������ʵ�֡���Щ������Ҫ��ҿ���ֱ��������
�����õĵIJ������������߷ŵ���������������,��Ҫ�Ŀ�����������ȡ��
����:https://pan.baidu.com/s/17jM7HcP12r3zbbrbmEdBkg
��ȡ��:manp
�C���ٶ����̳�����ԱV1�ķ���