建立相应的继承自Character的类,然后进入相应的.h文件中,以下便是大概的结构
.h文件结构
// Fill out your copyright notice in the Description page of Project Settings.

#pragma once

#include "CoreMinimal.h"
#include "GameFramework/Character.h"
#include "BlasterCharacter.generated.h"

UCLASS()
class BLASTER_API ABlasterCharacter : public ACharacter
{
	GENERATED_BODY()

public:
	// Sets default values for this character's properties
	ABlasterCharacter();

	// Called every frame
	virtual void Tick(float DeltaTime) override;

	// Called to bind functionality to input
	virtual void SetupPlayerInputComponent(class UInputComponent* PlayerInputComponent) override;

protected:
	// Called when the game starts or when spawned
	virtual void BeginPlay() override;

private:
	// 这里添加组件

public:
	// 这里写一堆 getter 和 setter

};
在添加组件处添加相关组件,如弹簧臂和摄像机组件。
UPROPERTY(VisibleAnywhere, Category = Camera)
class USpringArmComponent* CameraBoom;
UPROPERTY(VisibleAnywhere, Category = Camera)
class UCameraComponent* FollowCamera;
注意class这个前向声明,否则报错如下:

其中关于UPROPERTY,官方文档这样描述:
属性使用标准的C++变量语法声明,前面用UPROPERTY宏来定义属性元数据和变量说明符。
UPROPERTY([specifier, specifier, ...], [meta(key=value, key=value, ...)])
Type VariableName;
其中VisibleAnywhere说明此属性在所有属性窗口中可见,但无法被编辑。此说明符与"Edit"说明符不兼容。
相应内容在.cpp文件的构造函数中初始化。
相关的参考资料可看【UE4 C++ 基础知识】<1> UPROPERTY宏、属性说明符、元数据说明符
.cpp文件结构
// Fill out your copyright notice in the Description page of Project Settings.


#include "BlasterCharacter.h"

// Sets default values
ABlasterCharacter::ABlasterCharacter()
{
 	// Set this character to call Tick() every frame.  You can turn this off to improve performance if you don't need it.
	PrimaryActorTick.bCanEverTick = true;

	// 在这进行相关组件的初始化

}

// Called when the game starts or when spawned
void ABlasterCharacter::BeginPlay()
{
	Super::BeginPlay();

}

// Called every frame
void ABlasterCharacter::Tick(float DeltaTime)
{
	Super::Tick(DeltaTime);

}

// Called to bind functionality to input
void ABlasterCharacter::SetupPlayerInputComponent(UInputComponent* PlayerInputComponent)
{
	Super::SetupPlayerInputComponent(PlayerInputComponent);

}
绑定摄像机和弹簧臂
其他不太相关的可以看看这个文章Ue4初学笔记
对弹簧臂和摄像机组件的初始化方式如下
CameraBoom = CreateDefaultSubobject<USpringArmComponent>(TEXT("CameraBoom"));
CameraBoom->SetupAttachment(GetMesh());
CameraBoom->TargetArmLength = 600.f;
CameraBoom->bUsePawnControlRotation = true;
// 创建摄像机并附加到弹簧臂
FollowCamera = CreateDefaultSubobject<UCameraComponent>(TEXT("FollowCamera"));
FollowCamera->SetupAttachment(CameraBoom, USpringArmComponent::SocketName);
当然,需要包含相应的头文件,把相关语句写在上方#include处
#include "Camera/CameraComponent.h"
#include "GameFramework/SpringArmComponent.h"
由于角色会蹲下,此时摄像机应当改变其位置,所以摄像机不会绑定到根组件,而是绑定到胶囊体。但是为了效果,不要直接绑定到胶囊体。利用弹簧臂组件,可将摄像机以低于其追踪Pawn的速度加速和减速,从而获得更平滑的摄像机附加点。其同时拥有内置功能,可防止摄像机穿过固体对象,用于处理如玩家在第三人称游戏里退到角落时等情况。虽然弹簧臂组件并非必要的组件,但它能够轻松让摄像机在游戏中移动时变得更加平滑。
关于USpringArmComponent::SocketName,弹簧臂内置一个特殊的插槽,可供我们添加对象,这样就不必将对象直接添加到组件的根节点上。
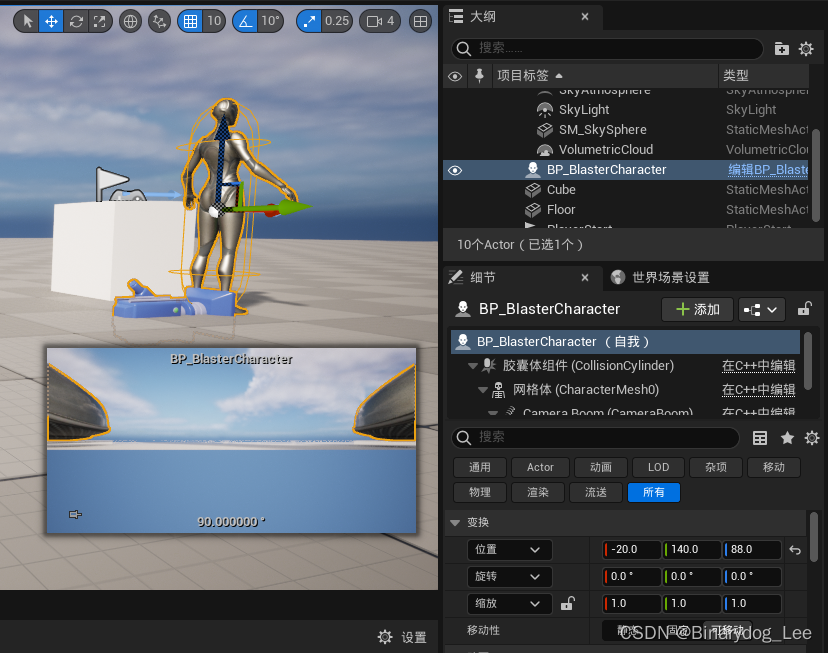
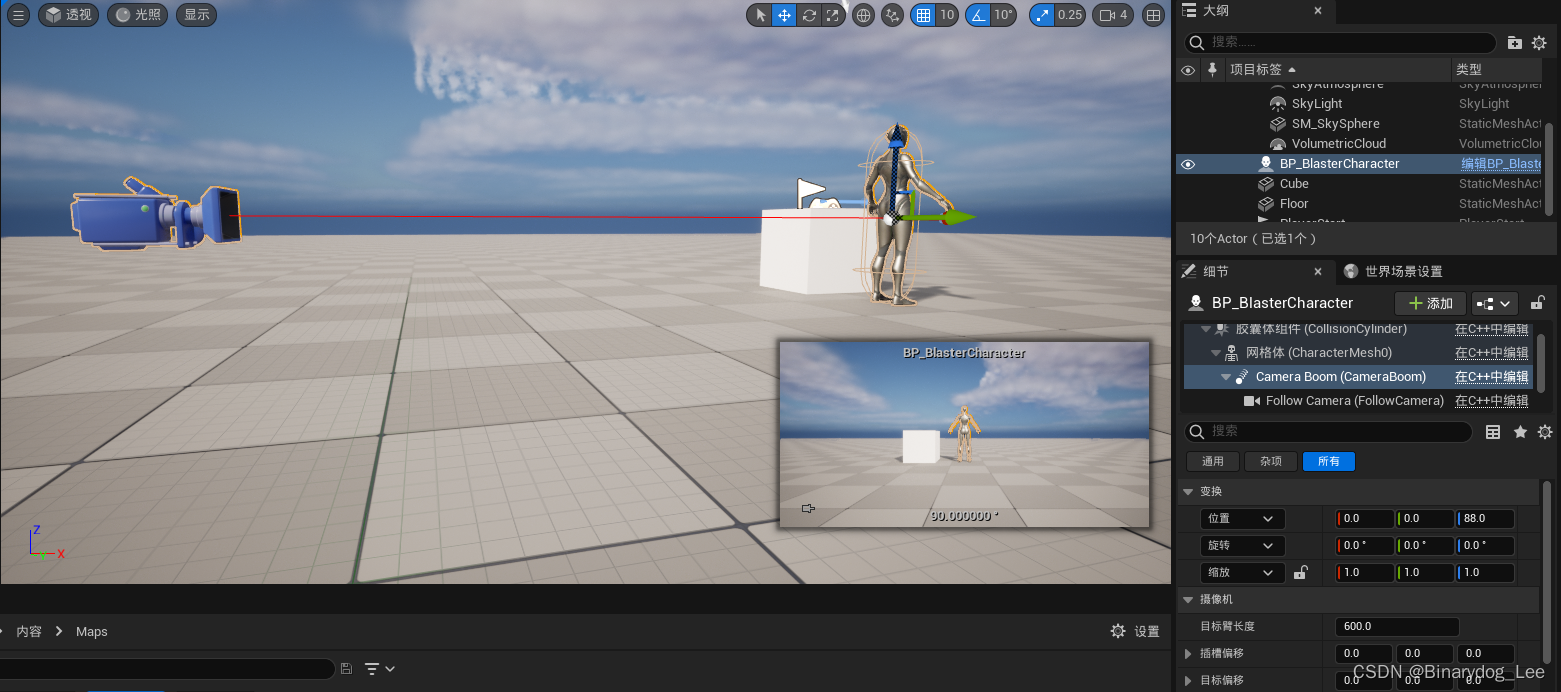
此时相机位置仍需调节,将弹簧臂Z轴修改为88(是这个网格体的一半高度)即可恢复正常
输入
项目设置
来到编辑->项目设置
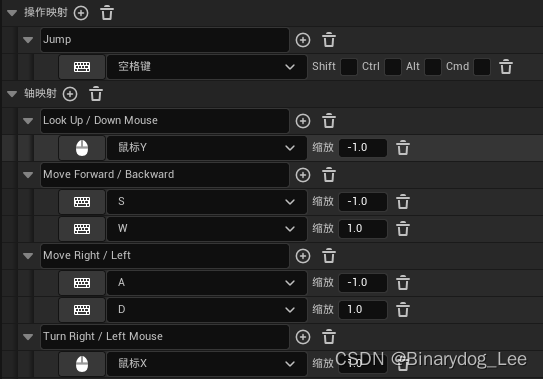
主要问题就是Look Up这个,Y轴输入缩放是-1,因为这样才能鼠标前移变成向上看
.h文件代码
.h文件添加
void MoveForward(float Value);
void MoveRight(float Value);
void Turn(float Value);
void LookUp(float Value);
.cpp文件代码
.cpp文件中在SetupPlayerInputComponent中增加内容变成如下这样,其实就是绑定轴和行为
void ABlasterCharacter::SetupPlayerInputComponent(UInputComponent* PlayerInputComponent)
{
	Super::SetupPlayerInputComponent(PlayerInputComponent);

	PlayerInputComponent->BindAction("Jump", IE_Pressed, this, &ACharacter::Jump);
	// bind movement functions to axis mapping
	PlayerInputComponent->BindAxis("MoveForward", this, &ABlasterCharacter::MoveForward);
	PlayerInputComponent->BindAxis("MoveRight", this, &ABlasterCharacter::MoveRight);
	PlayerInputComponent->BindAxis("Turn", this, &ABlasterCharacter::Turn);
	PlayerInputComponent->BindAxis("LookUp", this, &ABlasterCharacter::LookUp);
}
其中BindAction接受一个EInputEvent,相关定义不难在官方文档查到,已复制到下面。

enum EInputEvent
{
    IE_Pressed        =0,
    IE_Released       =1,
    IE_Repeat         =2,
    IE_DoubleClick    =3,
    IE_Axis           =4,
    IE_MAX            =5,
}

此外BindAxis接受的第一个参数AxisName,根据目测应当和上方在编辑器项目设置中设置的轴映射的名字一一对应上。
然后是实现四个移动函数部分
void ABlasterCharacter::MoveForward(float Value)
{
	if (Controller != nullptr && Value != 0.f)
	{
		const FRotator YawRotation(0.f, Controller->GetControlRotation().Yaw, 0.f);
		const FVector Direction(FRotationMatrix(YawRotation).GetUnitAxis(EAxis::X));
		AddMovementInput(Direction, Value);
	}
}

void ABlasterCharacter::MoveRight(float Value)
{
	if (Controller != nullptr && Value != 0.f)
	{
		const FRotator YawRotation(0.f, Controller->GetControlRotation().Yaw, 0.f);
		const FVector Direction(FRotationMatrix(YawRotation).GetUnitAxis(EAxis::Y));
		AddMovementInput(Direction, Value);
	}
}

void ABlasterCharacter::Turn(float Value)
{
	AddControllerYawInput(Value);
}

void ABlasterCharacter::LookUp(float Value)
{
	AddControllerPitchInput(Value);
}

第一个参数就是方向,第二个参数是比率,不要在这里用2*Value这种来增大比率,这要在别处(角色移动组件)进行的。
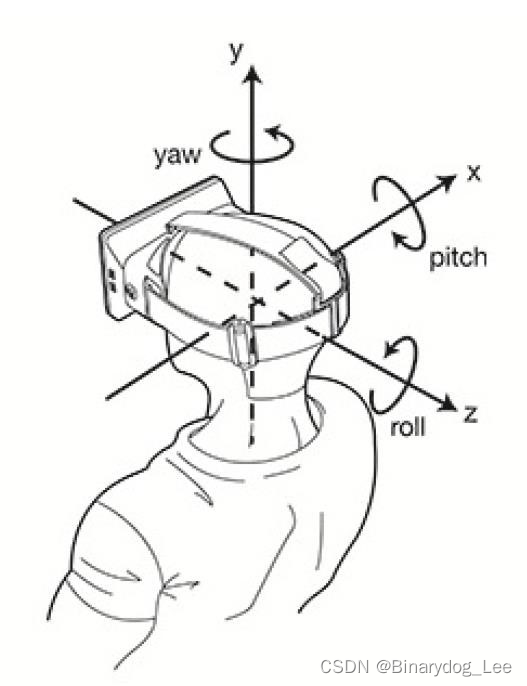
Pitch 是俯仰角、Yaw 是偏航角、Roll 是滚动角。通过这三个角就能控制物体的旋转,确定一个物体的朝向。FRotator 是 UE 用来封装三个欧拉角 Picth、Yaw、Roll 的类。FRotator 有三个参数Pitch、Yaw、Roll。依次对应的是绕Y、Z、X轴旋转。
因此不难解释Turn函数的实现使用的是AddControllerYawInput(),而LookUp函数实现使用的是AddControllerPitchInput。
整个FRotator的构造,目的就是获取由鼠标带来的Yaw的改变,构造出来的结果也是平行于地面的。但是由于它不是一个向量,所以需要转换为FVector(可以理解为极坐标转化为直角坐标)
至于FRotationMatrix(YawRotation).GetUnitAxis(EAxis::Y)的作用,官方文档也说的云里雾里,只是给出了使用案例。总归就是从鼠标旋转角度(平行与水平面分量下的)获取到相应轴的方向的移动方向向量。
显然对于MoveForward来说,向前则对于X轴的正方向。而MoveRight来说,右移则对应Y轴正方向。这解释了为什么代码中有EAxis::X和EAxis::Y。
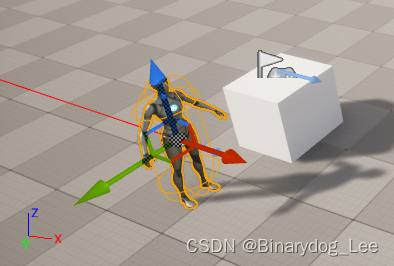
具体内容可看UE5中的旋转:三个欧拉角Picth、Yaw、Roll及FRotator
题外话,关于Controller可以看这篇文章《InsideUE4》GamePlay架构(五)Controller
再题外话,FRotationMatrix可以看这篇文章【UE4_C++】<11-5>使用UE4的API—— 使用FRotationMatrix 使一个对象转向另一个对象
其他一些工作
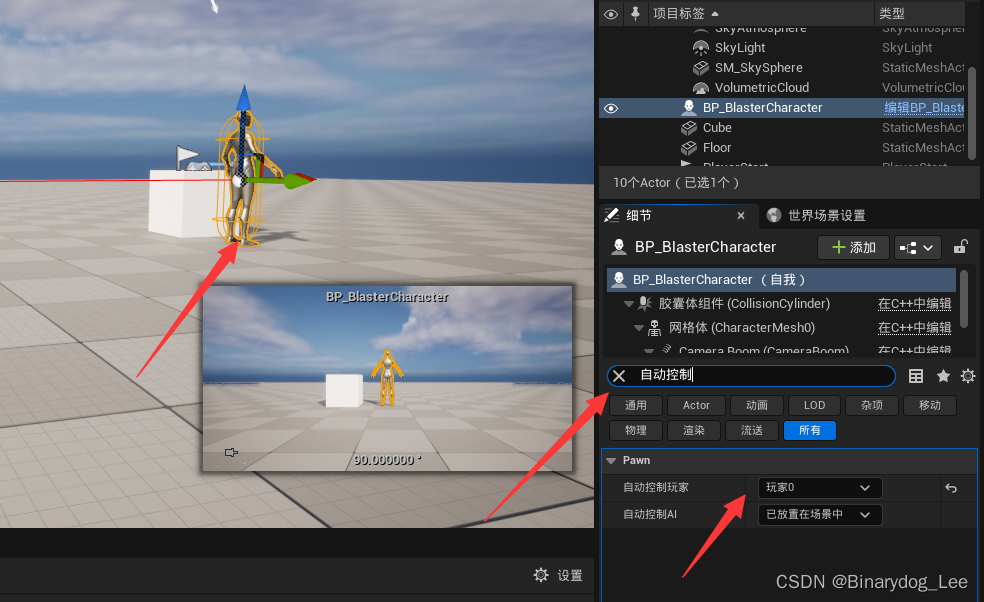
下一步
此时已经有一个A-Pose的人物可以在场景中移动了。尽管模型可以上下左右移动,但是不具有任何动画,这就是后面要做的内容了。
此时代码总览如下:
````.h文件```
// Fill out your copyright notice in the Description page of Project Settings.

#pragma once

#include "CoreMinimal.h"
#include "GameFramework/Character.h"
#include "BlasterCharacter.generated.h"

UCLASS()
class BLASTER_API ABlasterCharacter : public ACharacter
{
	GENERATED_BODY()

public:
	// Sets default values for this character's properties
	ABlasterCharacter();

	// Called every frame
	virtual void Tick(float DeltaTime) override;

	// Called to bind functionality to input
	virtual void SetupPlayerInputComponent(class UInputComponent* PlayerInputComponent) override;

protected:
	// Called when the game starts or when spawned
	virtual void BeginPlay() override;

	void MoveForward(float Value);
	void MoveRight(float Value);
	void Turn(float Value);
	void LookUp(float Value);

private:
	UPROPERTY(VisibleAnywhere, Category = Camera)
	class USpringArmComponent* CameraBoom;
	UPROPERTY(VisibleAnywhere, Category = Camera)
	class UCameraComponent* FollowCamera;

public:
	// for getter and setter

};
.cpp文件:
// Fill out your copyright notice in the Description page of Project Settings.


#include "BlasterCharacter.h"
#include "Camera/CameraComponent.h"
#include "GameFramework/SpringArmComponent.h"

// Sets default values
ABlasterCharacter::ABlasterCharacter()
{
 	// Set this character to call Tick() every frame.  You can turn this off to improve performance if you don't need it.
	PrimaryActorTick.bCanEverTick = true;

	CameraBoom = CreateDefaultSubobject<USpringArmComponent>(TEXT("CameraBoom"));
	CameraBoom->SetupAttachment(GetMesh());
	CameraBoom->TargetArmLength = 600.f;
	CameraBoom->bUsePawnControlRotation = true;

	FollowCamera = CreateDefaultSubobject<UCameraComponent>(TEXT("FollowCamera"));
	FollowCamera->SetupAttachment(CameraBoom, USpringArmComponent::SocketName);
	FollowCamera->bUsePawnControlRotation = false;
}

// Called when the game starts or when spawned
void ABlasterCharacter::BeginPlay()
{
	Super::BeginPlay();

}

// Called to bind functionality to input
void ABlasterCharacter::SetupPlayerInputComponent(UInputComponent* PlayerInputComponent)
{
	Super::SetupPlayerInputComponent(PlayerInputComponent);

	PlayerInputComponent->BindAction("Jump", IE_Pressed, this, &ACharacter::Jump);
	// bind movement functions to axis mapping
	PlayerInputComponent->BindAxis("MoveForward", this, &ABlasterCharacter::MoveForward);
	PlayerInputComponent->BindAxis("MoveRight", this, &ABlasterCharacter::MoveRight);
	PlayerInputComponent->BindAxis("Turn", this, &ABlasterCharacter::Turn);
	PlayerInputComponent->BindAxis("LookUp", this, &ABlasterCharacter::LookUp);
}

void ABlasterCharacter::MoveForward(float Value)
{
	if (Controller != nullptr && Value != 0.f)
	{
		const FRotator YawRotation(0.f, Controller->GetControlRotation().Yaw, 0.f);
		const FVector Direction(FRotationMatrix(YawRotation).GetUnitAxis(EAxis::X));
		AddMovementInput(Direction, Value);
	}
}

void ABlasterCharacter::MoveRight(float Value)
{
	if (Controller != nullptr && Value != 0.f)
	{
		const FRotator YawRotation(0.f, Controller->GetControlRotation().Yaw, 0.f);
		const FVector Direction(FRotationMatrix(YawRotation).GetUnitAxis(EAxis::Y));
		AddMovementInput(Direction, Value);
	}
}

void ABlasterCharacter::Turn(float Value)
{
	AddControllerYawInput(Value);
}

void ABlasterCharacter::LookUp(float Value)
{
	AddControllerPitchInput(Value);
}

// Called every frame
void ABlasterCharacter::Tick(float DeltaTime)
{
	Super::Tick(DeltaTime);

}