1.动画
-
transform: translate平移(100px) rotate旋转(45deg) 缩放scale(0.5) skew倾斜(30deg)
-
原点transform-origin: center center;(默认为元素左上角)
-
transition过渡动画
? ?播放过度动画至少包含 transition-property transition-duration
? ?指定css属性能够产生过度动画?
? ? ? ? ? ? transition-property: left, transform;
? ? ? ? ? ? ?transition-property 还有两个待选项
? ? ? ? ? ? ? ? ? ? ? ? ?none: 无
? ? ? ? ? ? ? ? ? ? ? ? ?all: 所有属性都能播放过渡动画
? ? ?动画播放的时长
? ? ? ? ? ?transition-duration: 2s;
? ? ??动画播放的速度曲线
? ? ? ? ? ? ? ? linear: 匀速直线运动
? ? ? ? ? ? ? ? ease-in: 慢进
? ? ? ? ? ? ? ? ease-out: 慢出
? ? ? ? ? ? ? ? ease-in-out: 慢进慢出
? ? ? ? ? ? ? ? cubic-bezier: 曲线函数
? ??动画播放延迟
? ? ? ? ? ? transition-delay: 3s;
? ? ?合成属性
? ? ? ? ?语法: transition: property duration timing-function delay;
案例:钟表综合应用
<!DOCTYPE html>
<html lang="en">

<head>
    <meta charset="UTF-8">
    <meta http-equiv="X-UA-Compatible" content="IE=edge">
    <meta name="viewport" content="width=device-width, initial-scale=1.0">
    <title>Document</title>
    <style>
        div.box {
            width: 500px;
            height: 500px;
            background-color: black;
            border: 15px solid rgb(128, 128, 128);
            border-radius: 50%;
            position: relative;
            background-image: url(../img/钟表背景图片.jpeg);
            background-position: -43px -139px;
        }

        .mini {
            width: 20px;
            height: 20px;
            background-color: white;
            border-radius: 20px;
            position: absolute;
            top: 5px;
            left: 240px;
            transform-origin: center 245px;
        }


        .h {
            width: 10px;
            height: 180px;
            background-color: black;
            position: absolute;
            top: 150px;
            left: 268px;
            transform: rotate(210deg);
            transform-origin: center 120px;
        }

        .m {
            width: 10px;
            height: 200px;
            background-color: chartreuse;
            position: absolute;
            top: 130px;
            left: 268px;
            transform: rotate(236deg);
            transform-origin: center 140px;
        }

        .s {
            width: 10px;
            height: 220px;
            background-color: #FCA896;
            position: absolute;
            top: 110px;
            left: 267px;
            transform: rotate(90deg);
            transform-origin: center 160px;
        }

        .point {
            width: 50px;
            height: 50px;
            background-color: #FCA896;
            border-radius: 30px;
            position: absolute;
            top: 248px;
            left: 250px;
            /* display: none; */
        }

        .h-3 {
            width: 0;
            height: 0;
            border-width: 20px;
            border-style: solid;
            border-color: transparent transparent black transparent;
            position: absolute;
            top: -41px;
            left: -15px;
        }

        .m-3 {
            width: 0;
            height: 0;
            border-width: 20px;
            border-style: solid;
            border-color: transparent transparent chartreuse transparent;
            position: absolute;
            top: -41px;
            left: -15px;
        }

        .s-3 {
            width: 0;
            height: 0;
            border-width: 20px;
            border-style: solid;
            border-color: transparent transparent #FCA896 transparent;
            position: absolute;
            top: -41px;
            left: -15px;

        }
    </style>
</head>

<body>
    <div class="box"></div>

    <div class="h">
        <div class="h-3"></div>
    </div>
    <div class="m">
        <div class="m-3"></div>
    </div>
    <div class="s">
        <div class="s-3"></div>
    </div>
    <div class="point"></div>
    <script>
        let box = document.querySelector('.box')
        let deg = -6

        for (let i = 0; i < 60; i++) {
            let div = document.createElement('div')
            div.className = 'mini'
            deg += 6
            div.style.transform = `rotate(${deg}deg)`
            box.appendChild(div)
            if (i % 5 == 0) {
                div.style.height = '40px'
            }
        }
        let hour = document.querySelector('.h')
        let minute = document.querySelector('.m')
        let second = document.querySelector('.s')
        let a = new Date()
        let h = a.getHours();
        let m = a.getMinutes()
        let s = a.getSeconds()
        console.log(a);
        console.log(h, m, s);
        //圈数
        let hround = 0
        let mround = 0
        let sround = 0
        function clock() {
            hour.style.transform = `rotate(${hround * 360 + h * 30}deg)`
            minute.style.transform = `rotate(${mround * 360 + m * 6}deg)`
            second.style.transform = `rotate(${sround * 360 + s * 6}deg)`
        }
        clock();
        setInterval(() => {
            s++
            if (s >= 60) {
                m++
                sround++
                s = 0
            }
            if (m >= 60) {

                h++
                mround++
                m = 0
            }
            if (h >= 12) {
                h = 0
                hround++
            }
            clock()
        }, 1000)
    </script>
</body>

</html>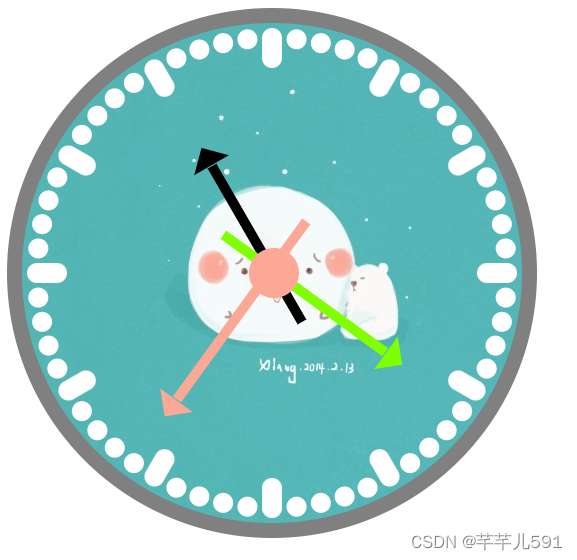
钟表
效果图?
?2.3D变换
?3d变换 是让我们的元素看上去在三维空间中发生变换(平移 旋转 缩放 倾斜)
参考:https://developer.mozilla.org/zh-CN/docs/Web/CSS/transform-style
? ? 总结:
? ? 要使用3d变换需要依序执行以下步骤:
? ? 1. 搭建3d场景,在父元素上设置:transform-style: preserve-3d;
? ? 2. 在父元素上设置透视距离:perspective: 100px;
? ? 3. 给场景添加演员,给场景元素添加子元素
? ? 4. 在子元素上使用3d变换
例如:
<!DOCTYPE html>
<html lang="en">

<head>
    <meta charset="UTF-8">
    <meta http-equiv="X-UA-Compatible" content="IE=edge">
    <meta name="viewport" content="width=device-width, initial-scale=1.0">
    <title>Document</title>
    <style>
        body {
            margin: 0;
        }

        .scene {
            height: 100vh;
            transform-style: preserve-3d;
            perspective: 300px;
            perspective-origin: center center;

            display: flex;
            justify-content: center;
            align-items: center;
        }

        .face {
            width: 200px;
            height: 200px;
            background-color: #f00;
            opacity: 0.2;

            position: absolute;

            color: #fff;
            font-size: 32px;

            display: flex;
            justify-content: center;
            align-items: center;
        }

        .left {
            transform-origin: left center;
            transform: rotateY(90deg);
            background-color: #ff0;
        }

        .right {
            transform-origin: right center;
            transform: rotateY(-90deg);
            background-color: #0f0;
        }

        .top {
            transform-origin: center top;
            transform: rotateX(-90deg);
            background-color: #00f;
        }

        .bottom {
            transform-origin: center bottom;
            transform: rotateX(90deg);
            background-color: #0ff;
        }

        .back {
            transform: translateZ(-200px);
            background-color: #f0f;
        }
    </style>
</head>

<body>
    <div class="scene">
        <div class="face">前</div>
        <div class="face back">后</div>
        <div class="face left">左</div>
        <div class="face right">右</div>
        <div class="face top">上</div>
        <div class="face bottom">下</div>
    </div>
</body>

</html>
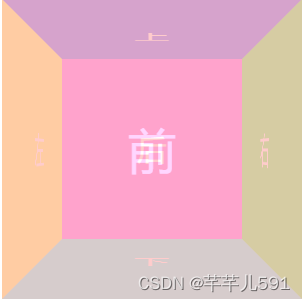
效果图:
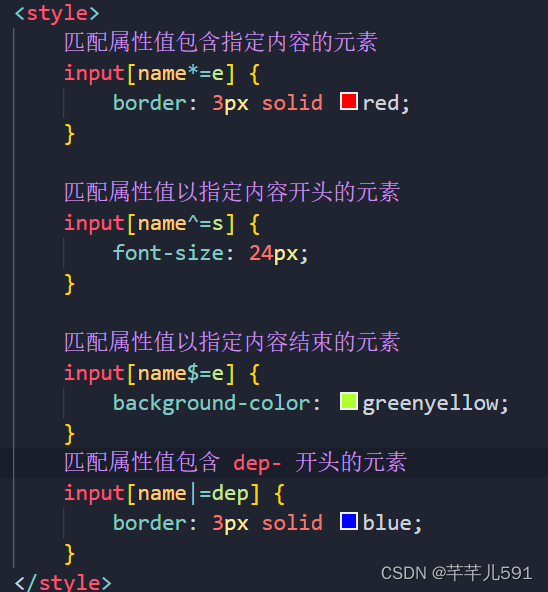
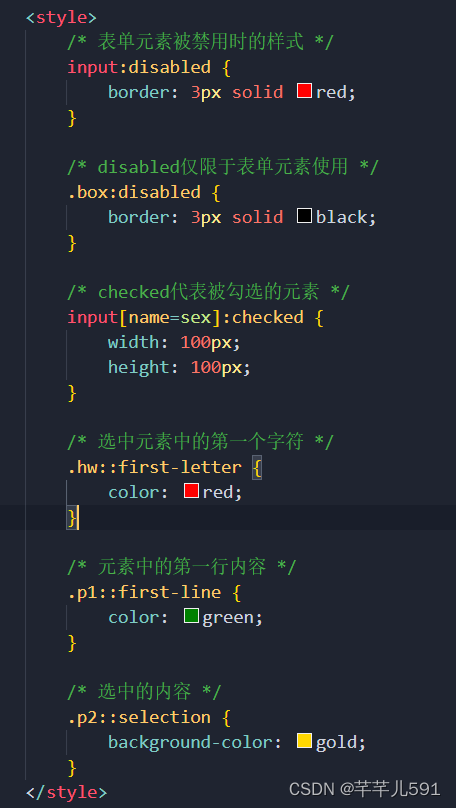
?属性选择器补充:
?伪类选择器补充:
?渐变色
参考:https://developer.mozilla.org/zh-CN/docs/Web/CSS/gradient
?线性渐变
? ? ? ? ? ? 语法: linear-gradient(direction, color1, color2, color3 ... )
? ? ? ? ? ? ? ? direction: 渐变色的朝向 以 to 开头, 或者可以添加角度值; 默认值为 to top
? ? ? ? ? ? ? ? color1 color2 ...: 渐变的颜色序列
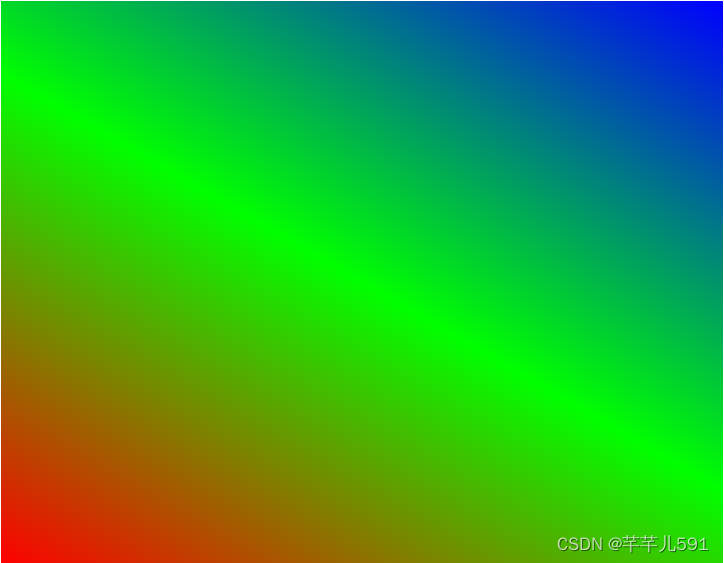
线性渐变
? background-image: linear-gradient(30deg, #f00, #0f0, #00f);
效果图:
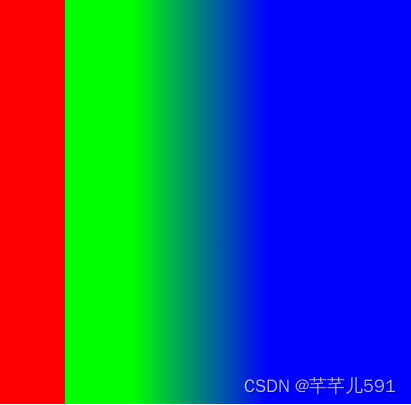
? /* 颜色值后可以添加像素距离,该像素值代表着该颜色所处的位置,该位置颜色将到下一个位置的颜色之间进行渐变 */
? ? ? ? ? ? background-image: linear-gradient(to right, #f00, #f00 50px, #0f0 50px, #0f0 100px, #00f 200px);
效果图:
?
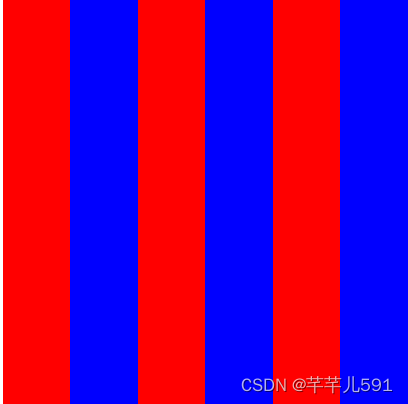
?/* 重复线性渐变 */
? ? ? ? ? ? background-image: repeating-linear-gradient(to right, #f00, #f00 50px, #00f 50px, #00f 100px);
效果图:
?
?/* 径向渐变 */
? ? ? ? ? ? background-image: radial-gradient(#f00, orange, #0f0, #ff0, #f0f);
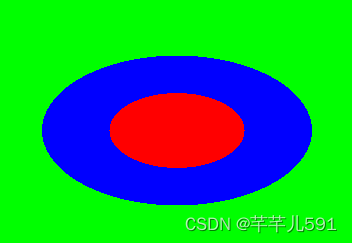
? ? ? ? ? ? background-image: radial-gradient(#f00, #f00 50px, #00f 50px, #00f 100px, #0f0 100px, #0f0 200px);
效果图:
?
/* 重复径向渐变 */
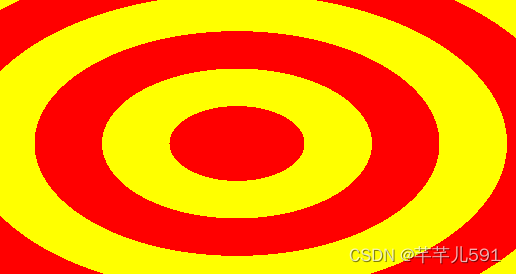
? ? ? ? ? ? background-image: repeating-radial-gradient(#f00, #f00 50px, #ff0 50px, #ff0 100px);
效果图:
?
?分栏布局

?
响应式布局
当屏幕大小为600-900px时,背景颜色改为橙色
?@media screen and (min-width: 600px) and (max-width: 900px) {
? ? ? ? ? ? .box {
? ? ? ? ? ? ? ? background-color: orange?
? ? ? ? ? ? }
? ? ? ? }
canvas
?使用canvas的步骤
? ? 1. 创建canvas标签
? ? 2. 给canvas标签设置 width height 属性
? ? ? ? ? ?<canvas width="400" height="300"></canvas>
? ? 3. 通过js 获取canvas标签
? ? ? ? ? ? const canvas = document.querySelector('canvas')
? ? 4. 通过canvas标签获取context画布上下文(画布对象)
? ? ? ? ? ?const ctx = canvas.getContext('2d')
? ? 5. 通过context绘制画布
?? ? ? ? ? ? ?例如:?绘制一个实心矩形
? ? ? ? ? ? ? ??ctx.fillRect(100, 50, 100, 100)
? ? ? ? ? ? ? ? ctx.fillRect(x, y, w, h)
? ? ? ? ? ? ? ? ? ? ? ? ? ?x: 水平坐标
? ? ? ? ? ? ? ? ? ? ? ? ? ? y: 竖直坐标
? ? ? ? ? ? ? ? ? ? ? ? ? ? 坐标原点在canvas左上角
? ? ? ? ? ? ? ? ? ? ? ? ? ? w: 宽度
? ? ? ? ? ? ? ? ? ? ? ? ? ?? h: 高度
? ? // 清空矩形, 用于清空画布
? ? ctx.clearRect(0, 0, 800, 600)
? ? ?绘制实心文字
? ? ?语法:ctx.fillText(text, x, y, max-width)
? ? ?text: 要渲染的文本
? ? ??x,y: 文本渲染的坐标位置
? ? ? max-width: 文本最大宽度,当大于该宽度,文本字体将自动缩小以自适应宽度
? ? ??ctx.fillText('祖国万岁!!', 200, 100, 100)
划线:
<!DOCTYPE html>
<html lang="en">

<head>
    <meta charset="UTF-8">
    <meta http-equiv="X-UA-Compatible" content="IE=edge">
    <meta name="viewport" content="width=device-width, initial-scale=1.0">
    <title>Document</title>
    <style>
        canvas {
            border: 3px solid #000;
        }
    </style>
</head>

<body>
    <canvas width="800" height="600"></canvas>
</body>

<script>
    const canvas = document.querySelector('canvas')
    const ctx = canvas.getContext('2d')


    // 设置颜色和线宽
    ctx.strokeStyle = '#ff0'
    ctx.lineWidth = 15

    // 画线分两个步骤:
    // 1. 描点(设置路径)
    // 2. 画线(将所描的点连接起来)

    // 步骤一
    // 使用 beginPath 开启路径
    ctx.beginPath()
    // 移动笔头但不会记录路径上的线条
    ctx.moveTo(400, 100)
    // 用线绘制到下一个点
    ctx.lineTo(200, 200)
    ctx.lineTo(600, 200)
    ctx.lineTo(400, 100)

    // 将路径封闭
    ctx.closePath()

    // 注意:beginPath在画新的路径的时候必须调用,closePath选择性调用


    // 步骤二
    // 为了显示图形需要调用以下函数
    // 将路径所包围的图形用纯色来填充
    // ctx.fill()
    // 将路径用镂空线条进行绘制
    ctx.stroke()


    ctx.strokeStyle = '#f00'

    ctx.beginPath()

    ctx.moveTo(400, 400)
    ctx.lineTo(500, 400)

    // 角度转弧度的公式: rad = (PI / 180) * deg
    // 弧线
    // ctx.arc(x, y, r, start, end)
    // x: 圆心横坐标
    // y: 圆心纵坐标
    // r: 圆半径
    // start: 起始弧度 0度时的方向为水平向右 顺时针为正方向
    // end: 结束弧度
    ctx.arc(400, 400, 100, 0, Math.PI / 180 * 30)
    ctx.closePath()

    ctx.fill()
    // ctx.stroke()
</script>

</html>
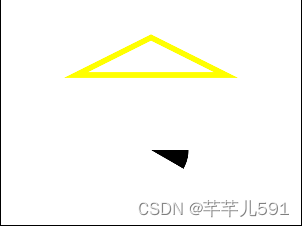
效果图:
?注意:
fillStyle 可以修改所有使用fill的函数所填充的颜色
strokeStyle 可以修改所有stroke函数的描边颜色
补充的额外方法
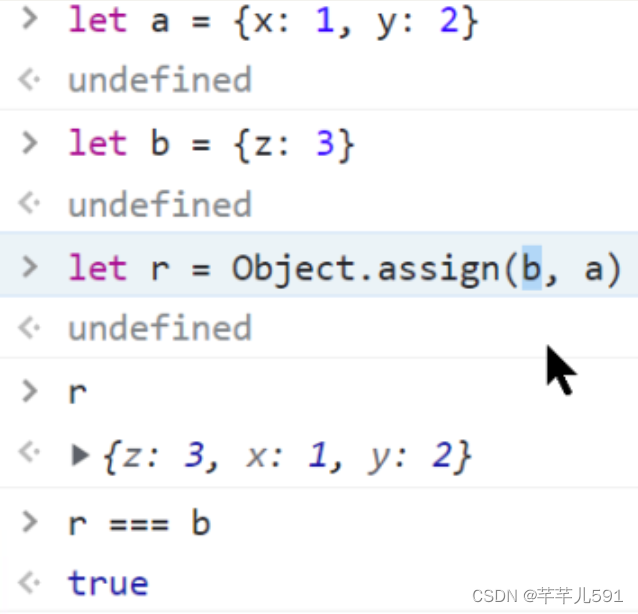
?assign()方法? ? ? ? ? ? ? ? ??assign(b,a)将a对象添加到b对象中去,返回值为b
