Unity Pico Neo3 基础开发流程
Pico 基础模块
Pico 开发者平台
链接: PICO 开发者平台
链接: PICO 文档中心
链接: Pico GitHub
链接: PicoXR SDK 官方存储库
如果是第一次进入需要先注册成为开发者。
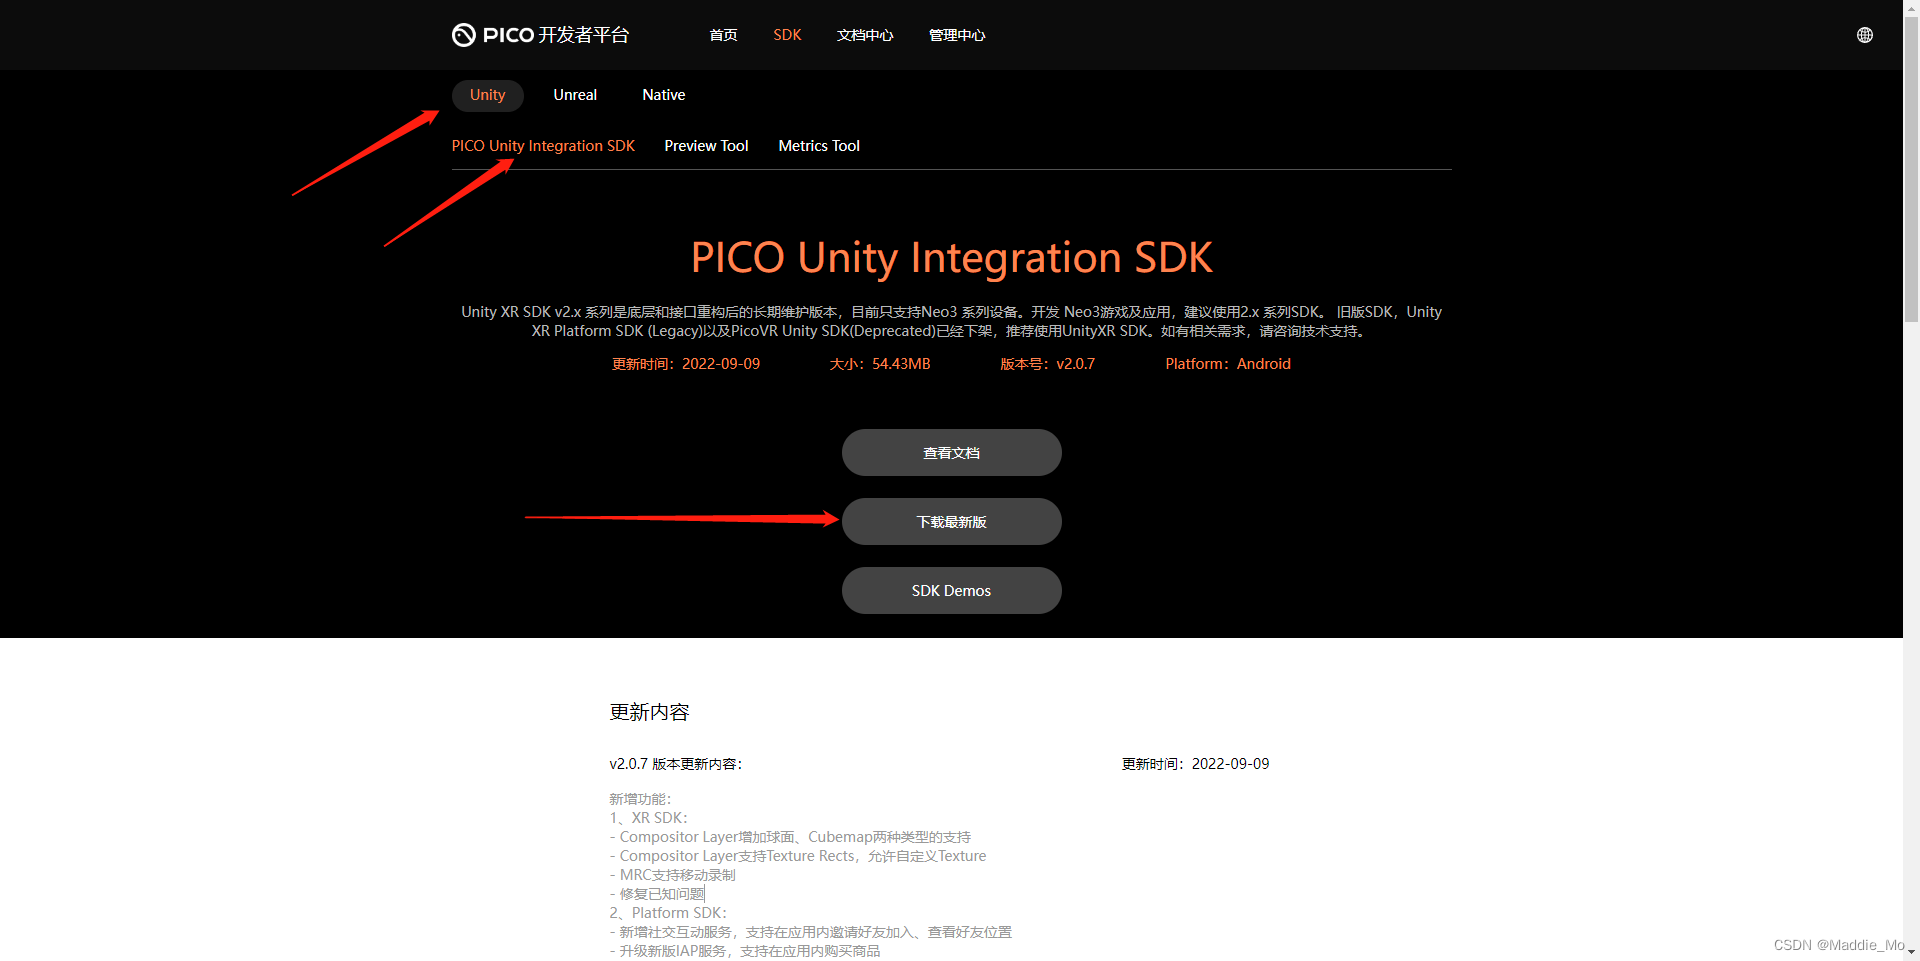
然后下载SDK。

这个是 Unity相关的 SDK
注意下载的平台,并下载最新版。

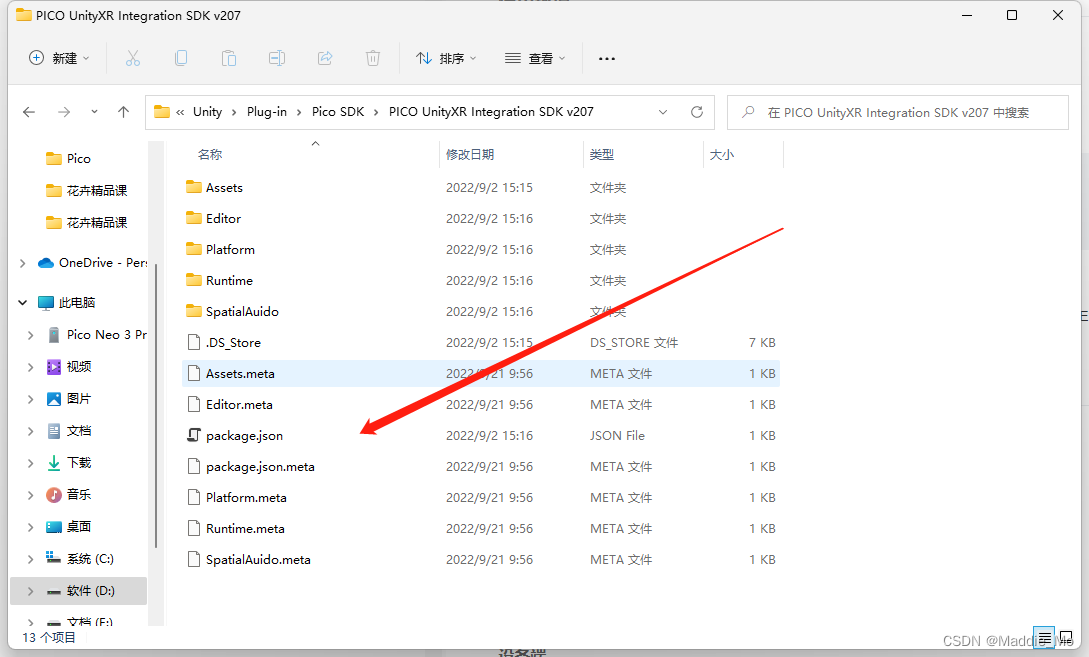
我这里下载的是:PICO UnityXR Integration SDK v207。
解压: 最有用的就是这个 package.json 文件。
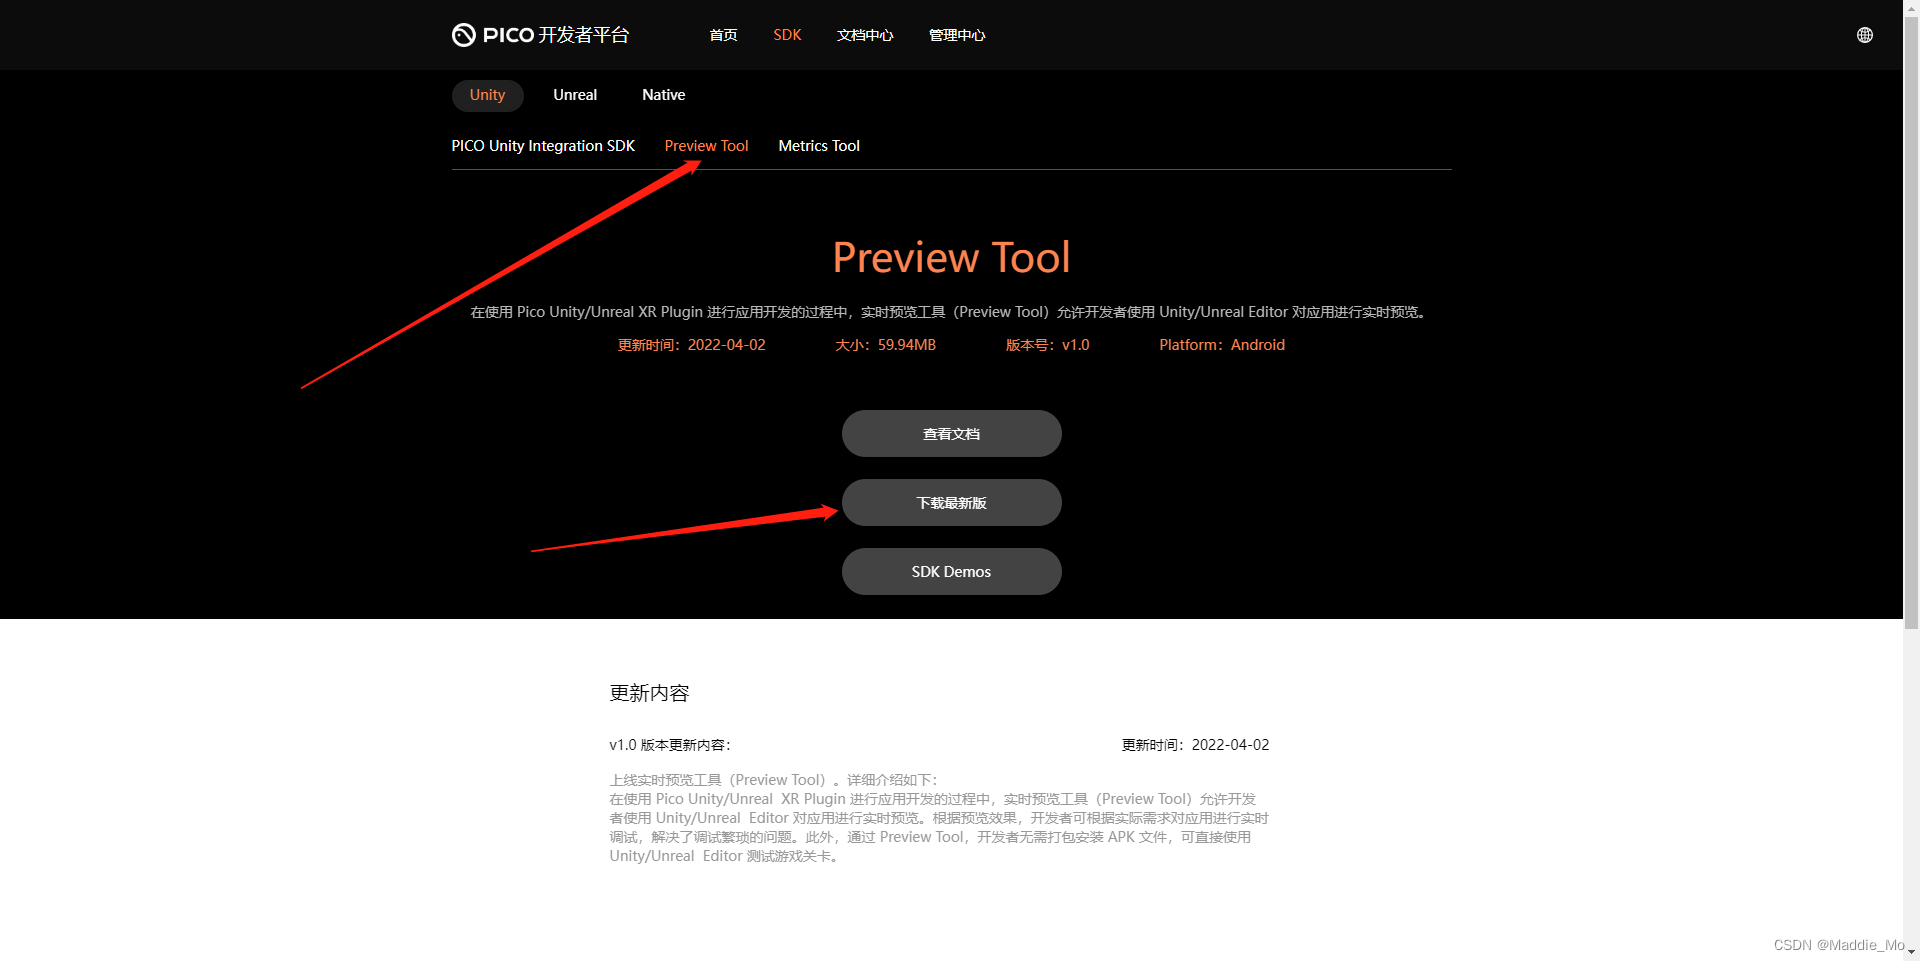
这个是 实时预览 和 Pico Neo3 串流工具。
解压之后的文件夹状态:
再把 PreviewTool_0402_Release.7z 解压。
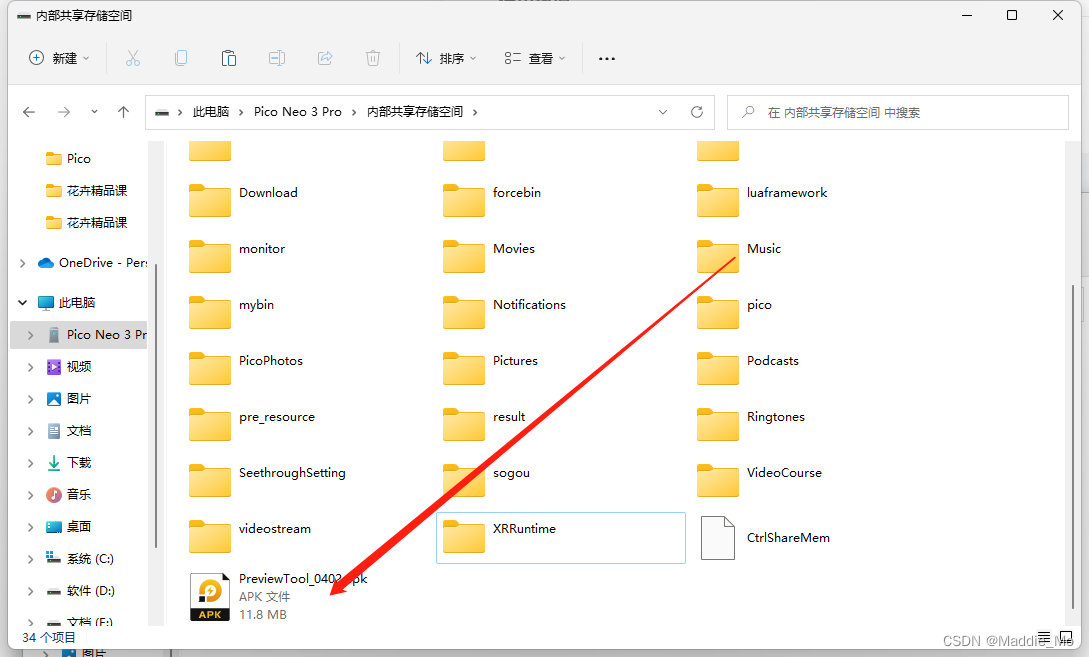
PreviewTool_0402.apk : 这个文件是 Pico Neo3 的安装包
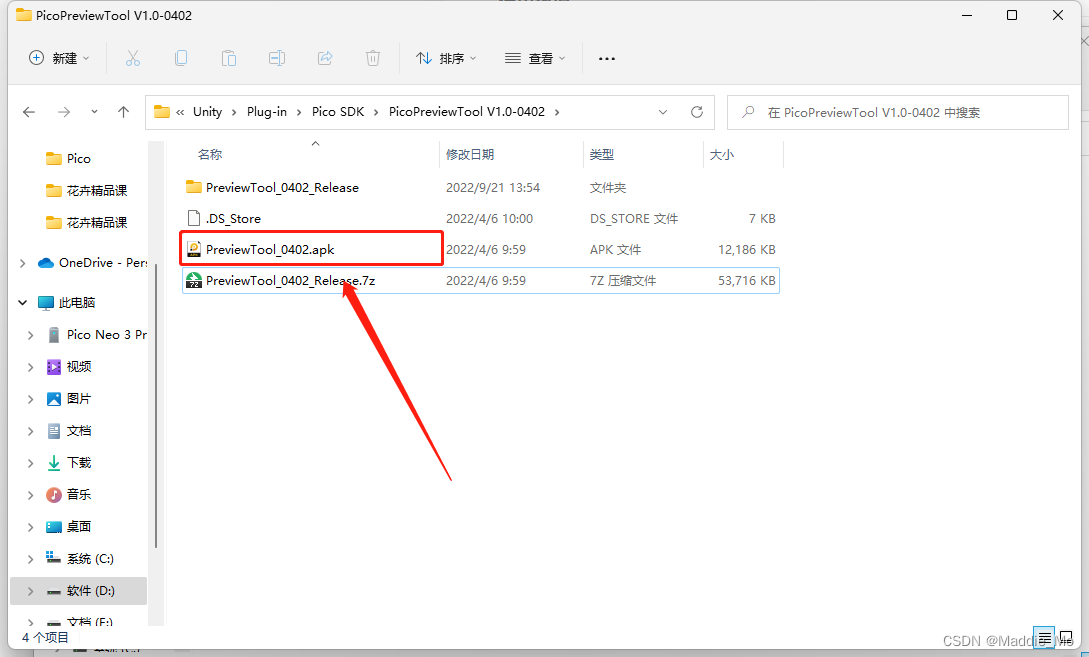
在用 USB 数据线 连接到 PicoNeo3 把PreviewTool_0402.apk 文件复制到内部存储器中。
打开 PicoNeo3 并安装
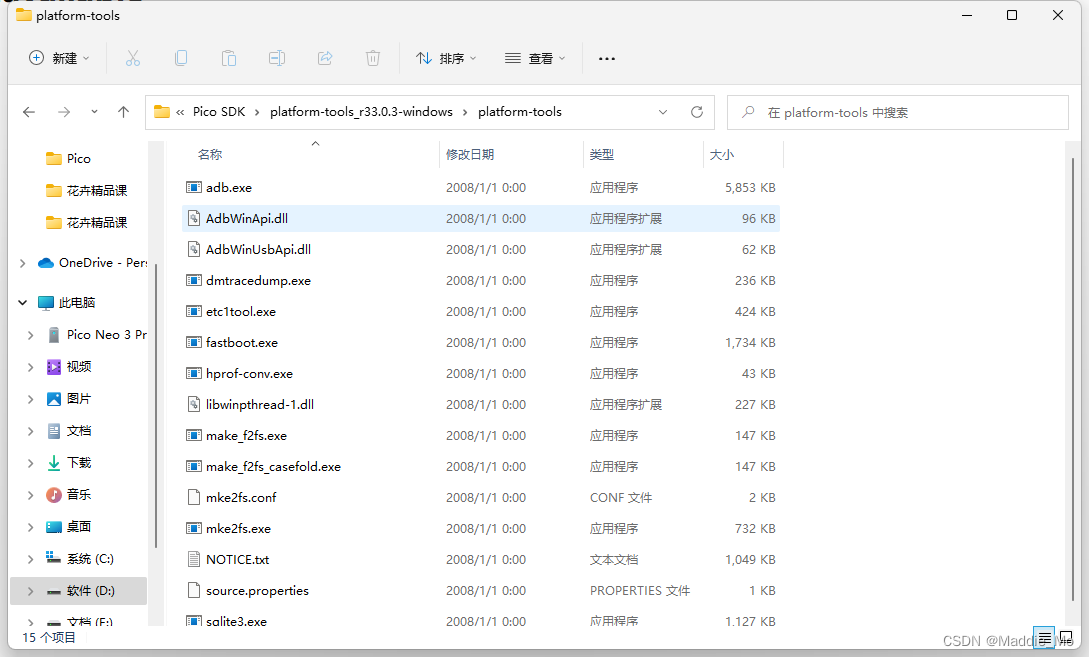
下载 Android Debug Bridge(ADB) 调试工具包。
如果无法下载就尝试一下 下面这个链接。
链接: Android Debug Bridge(ADB) CSDN
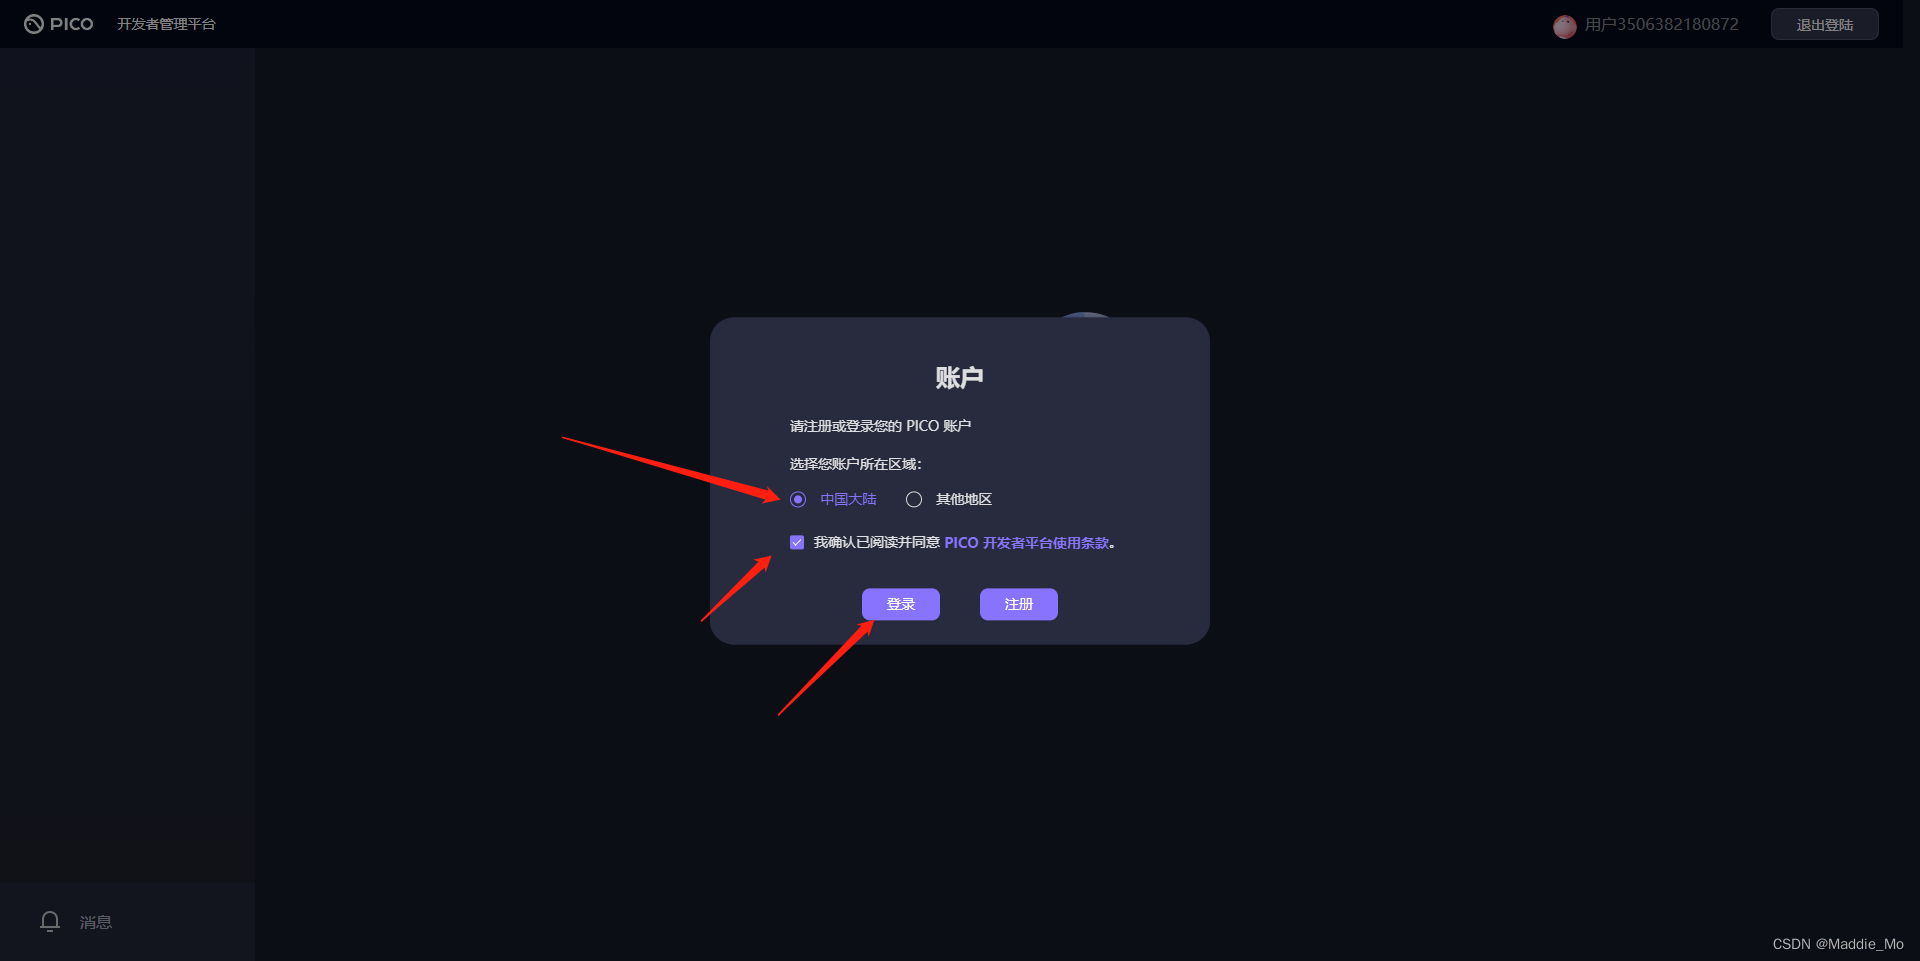
Pico 管理中心
在 Pico 开发者平台 点击管理中心

进行账号密码登录,没有的话就注册一个
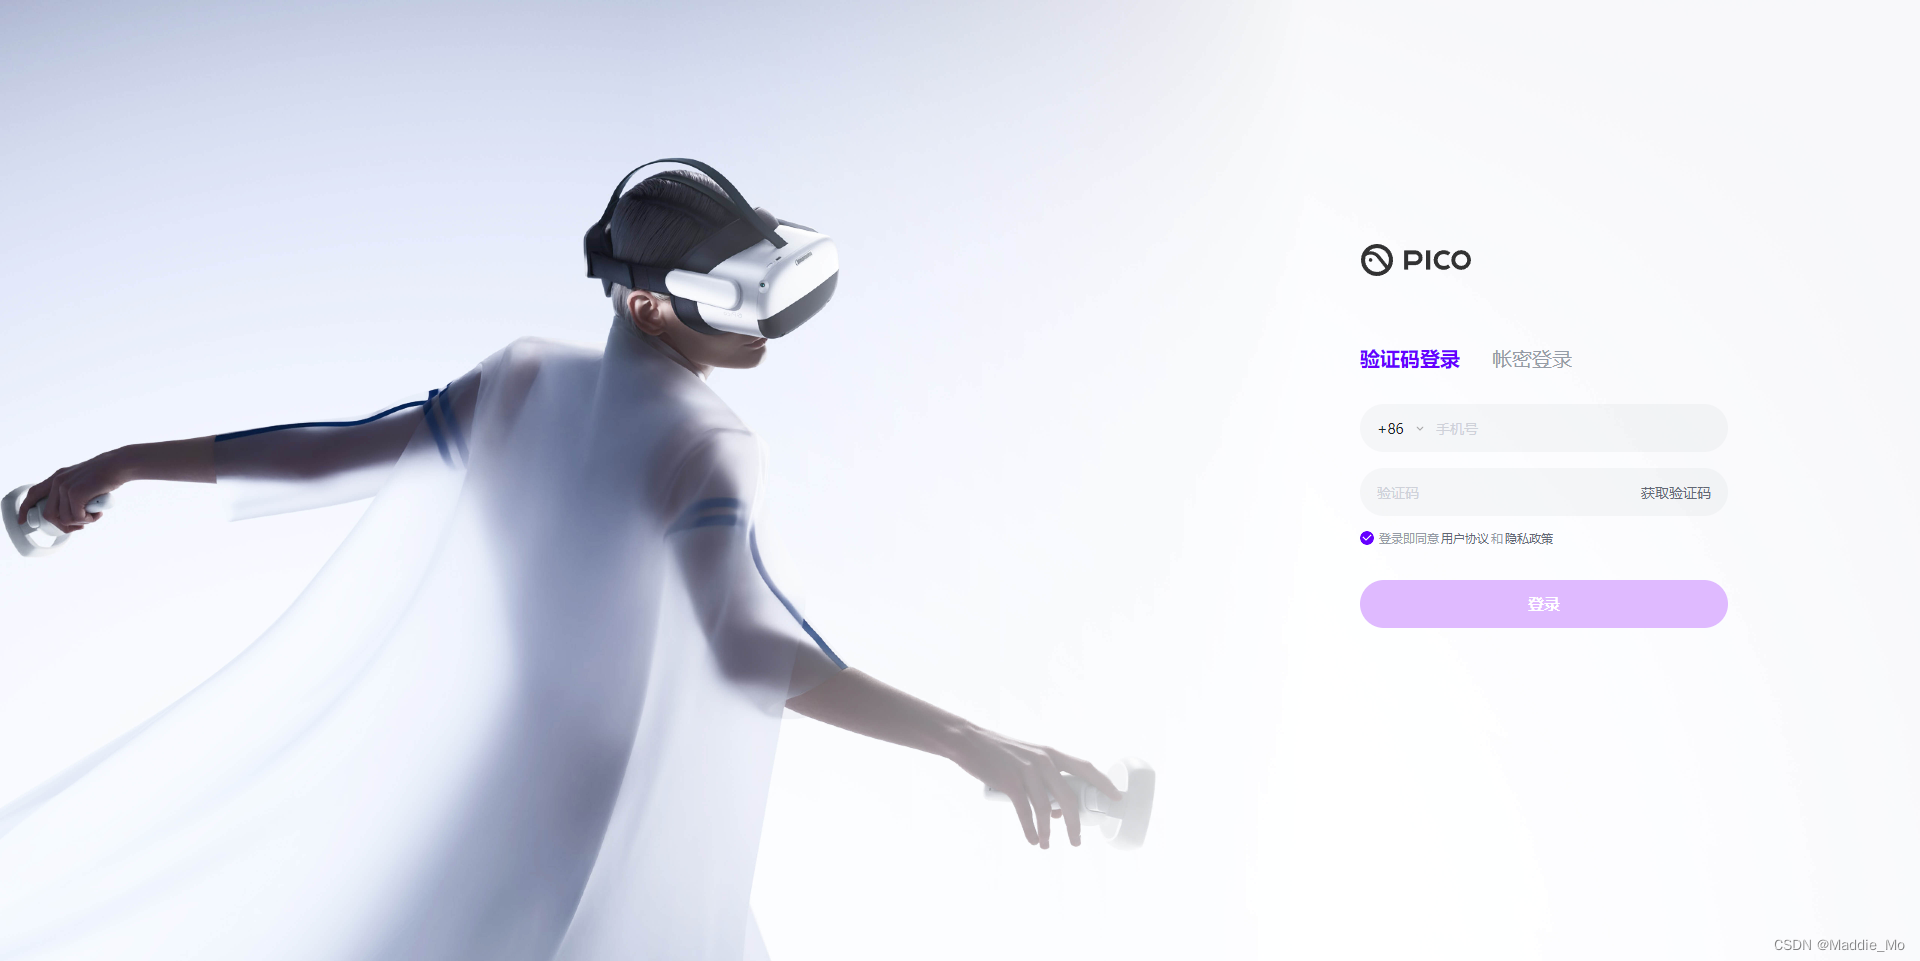
登录之后 点击创建一个新的应用
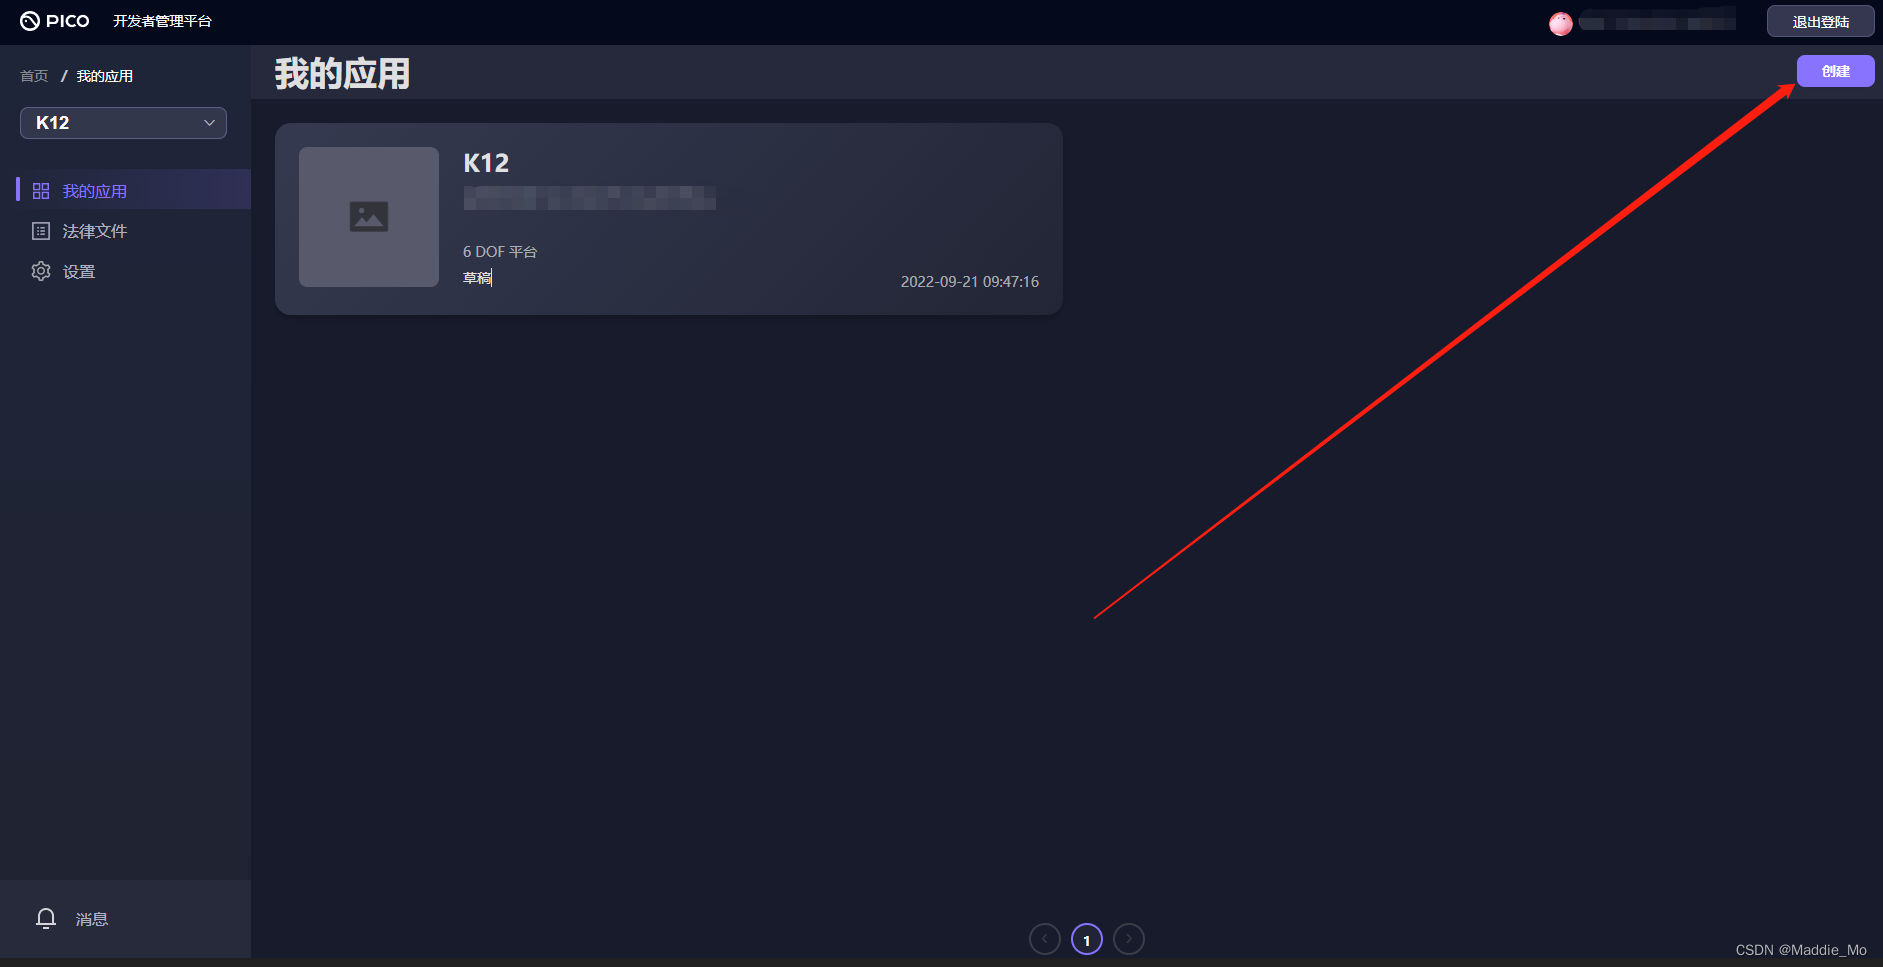
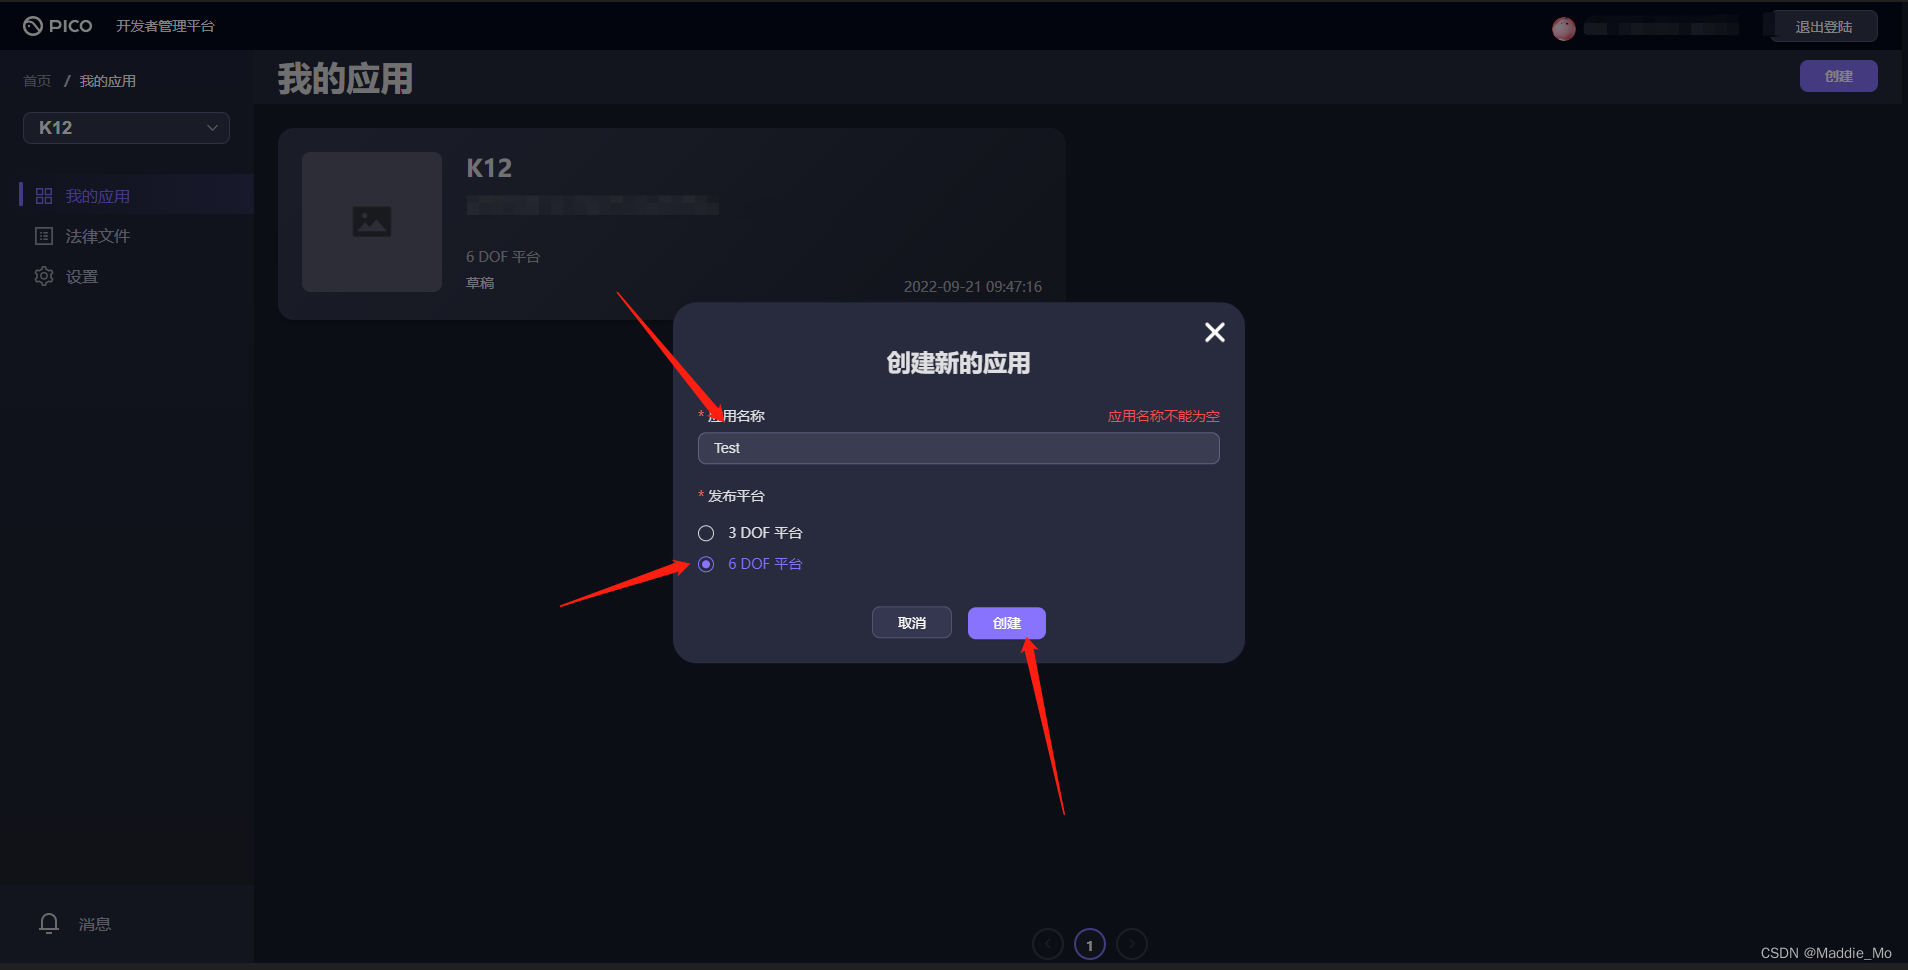
创建应用时最好 选择 6DOF
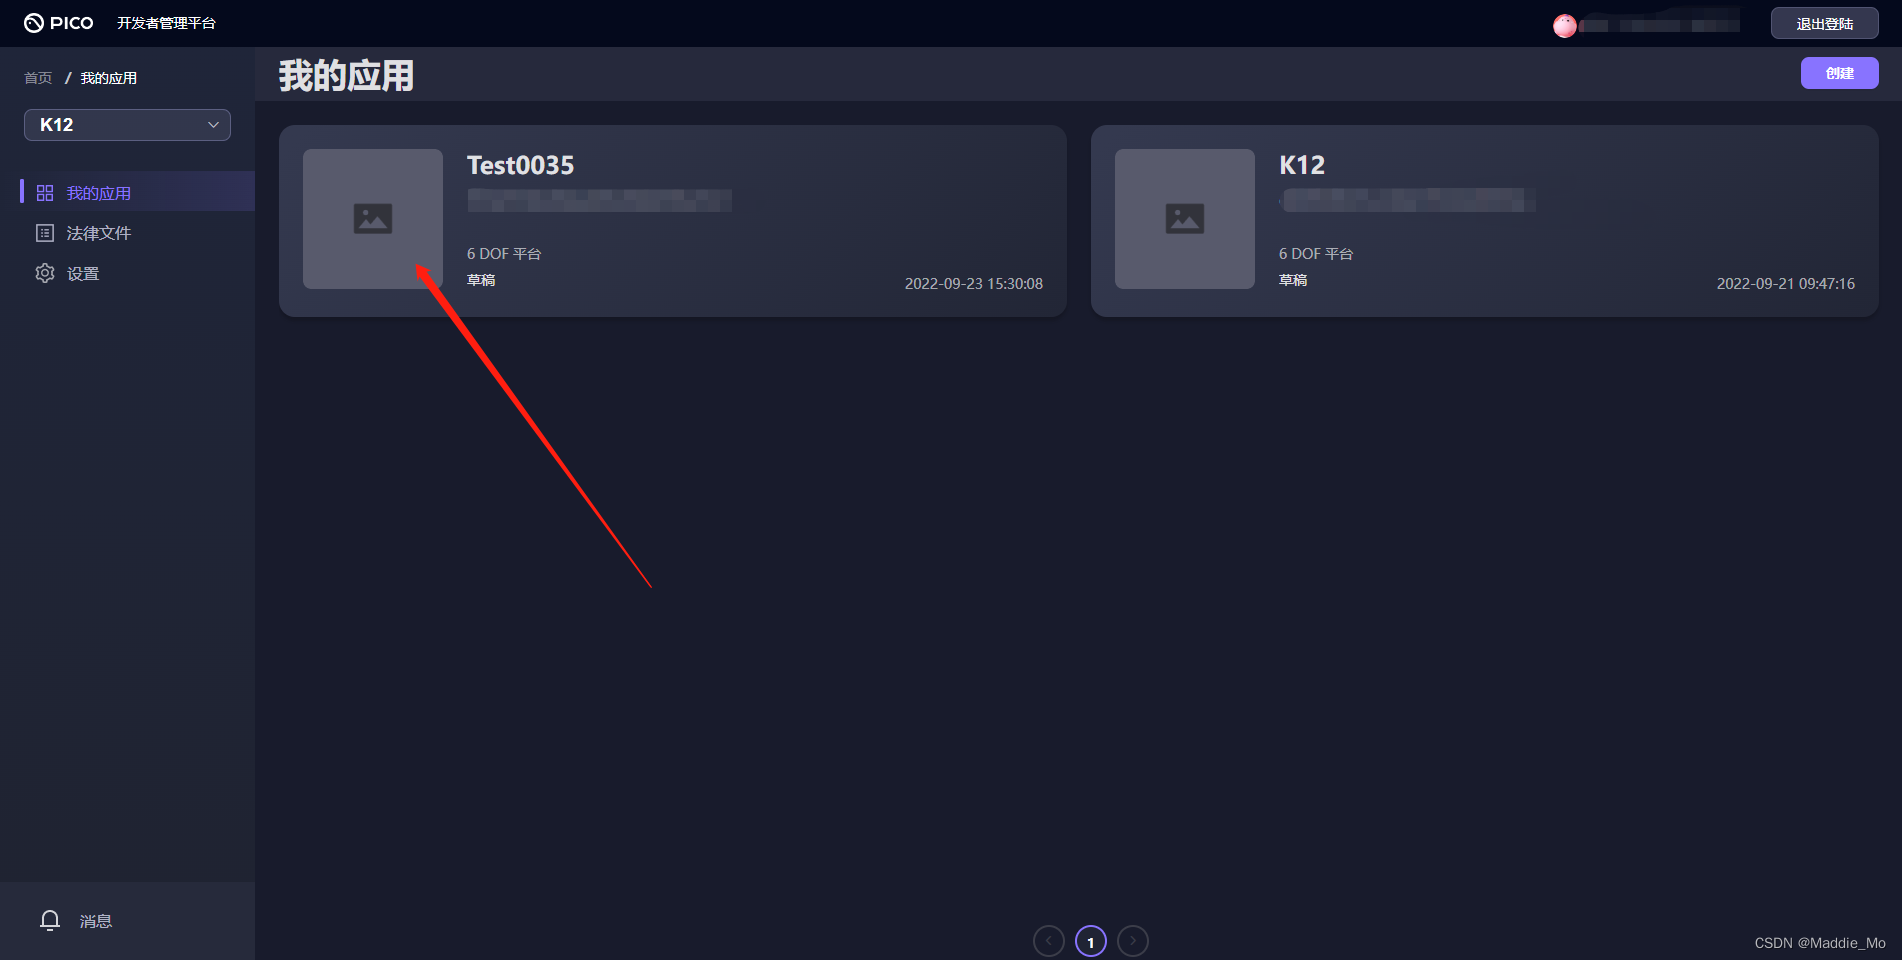
创建完毕之后,点击刚刚创建好的应用。
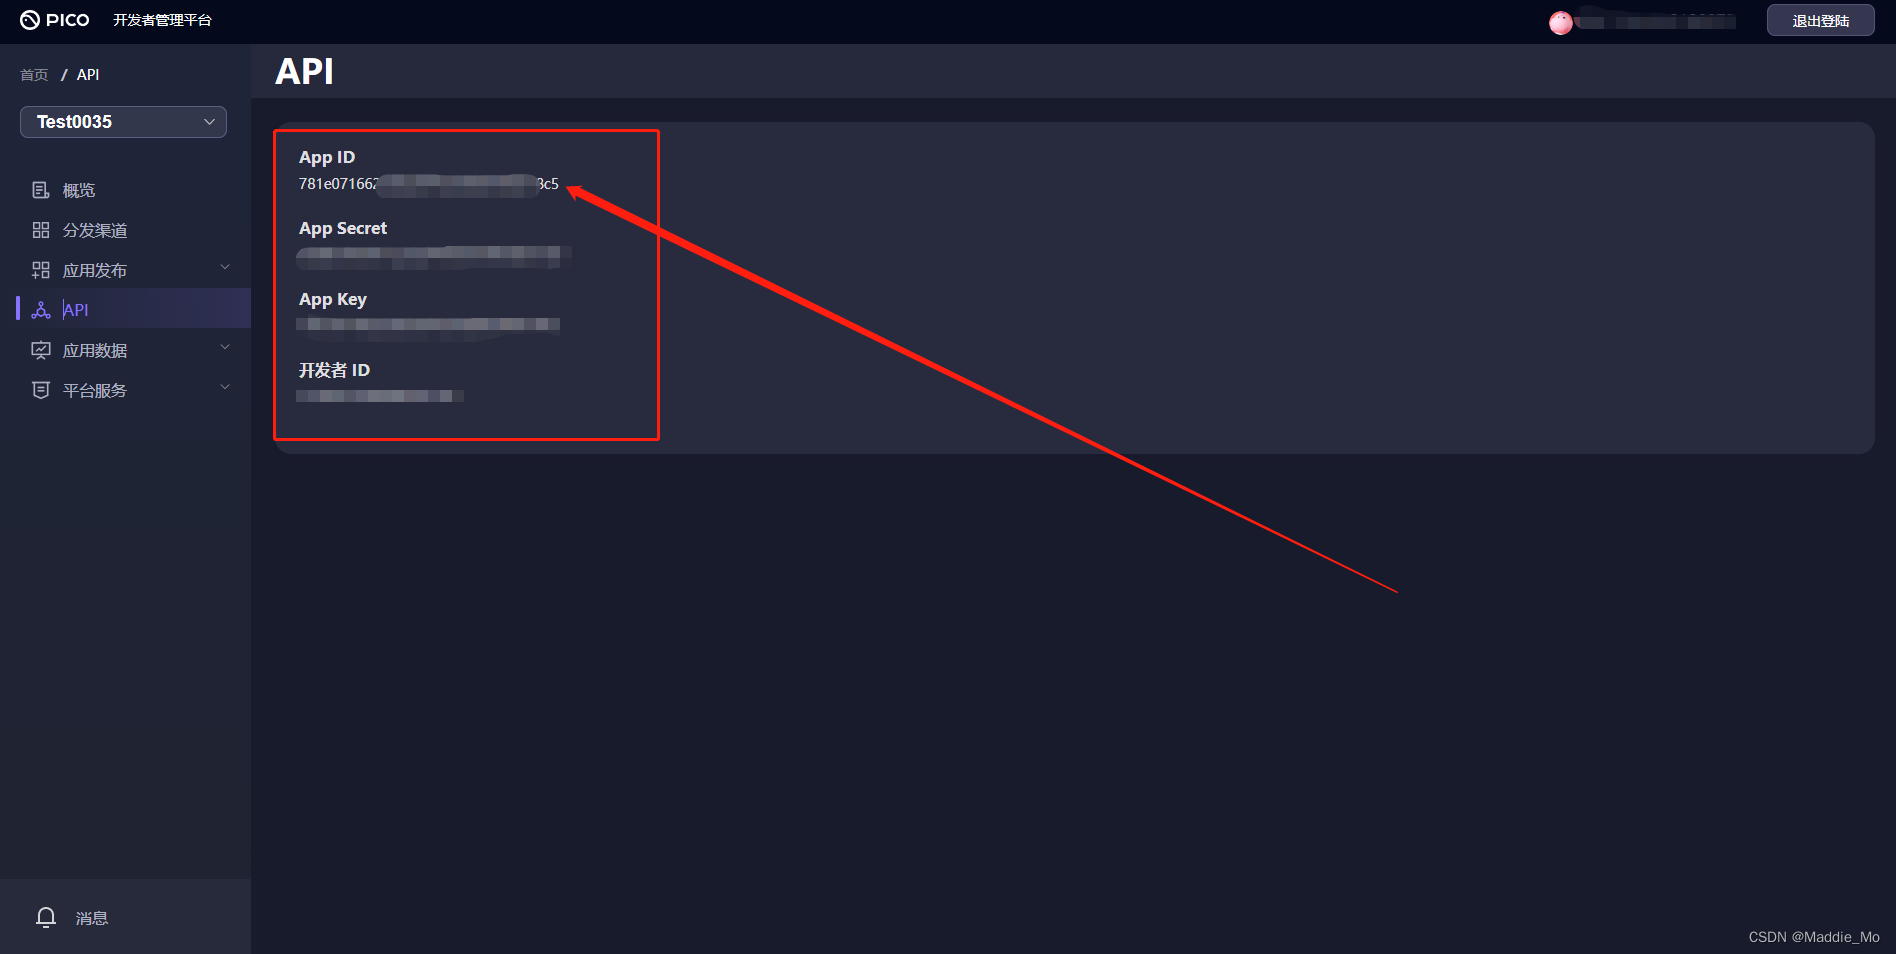
点击 当前应用 API
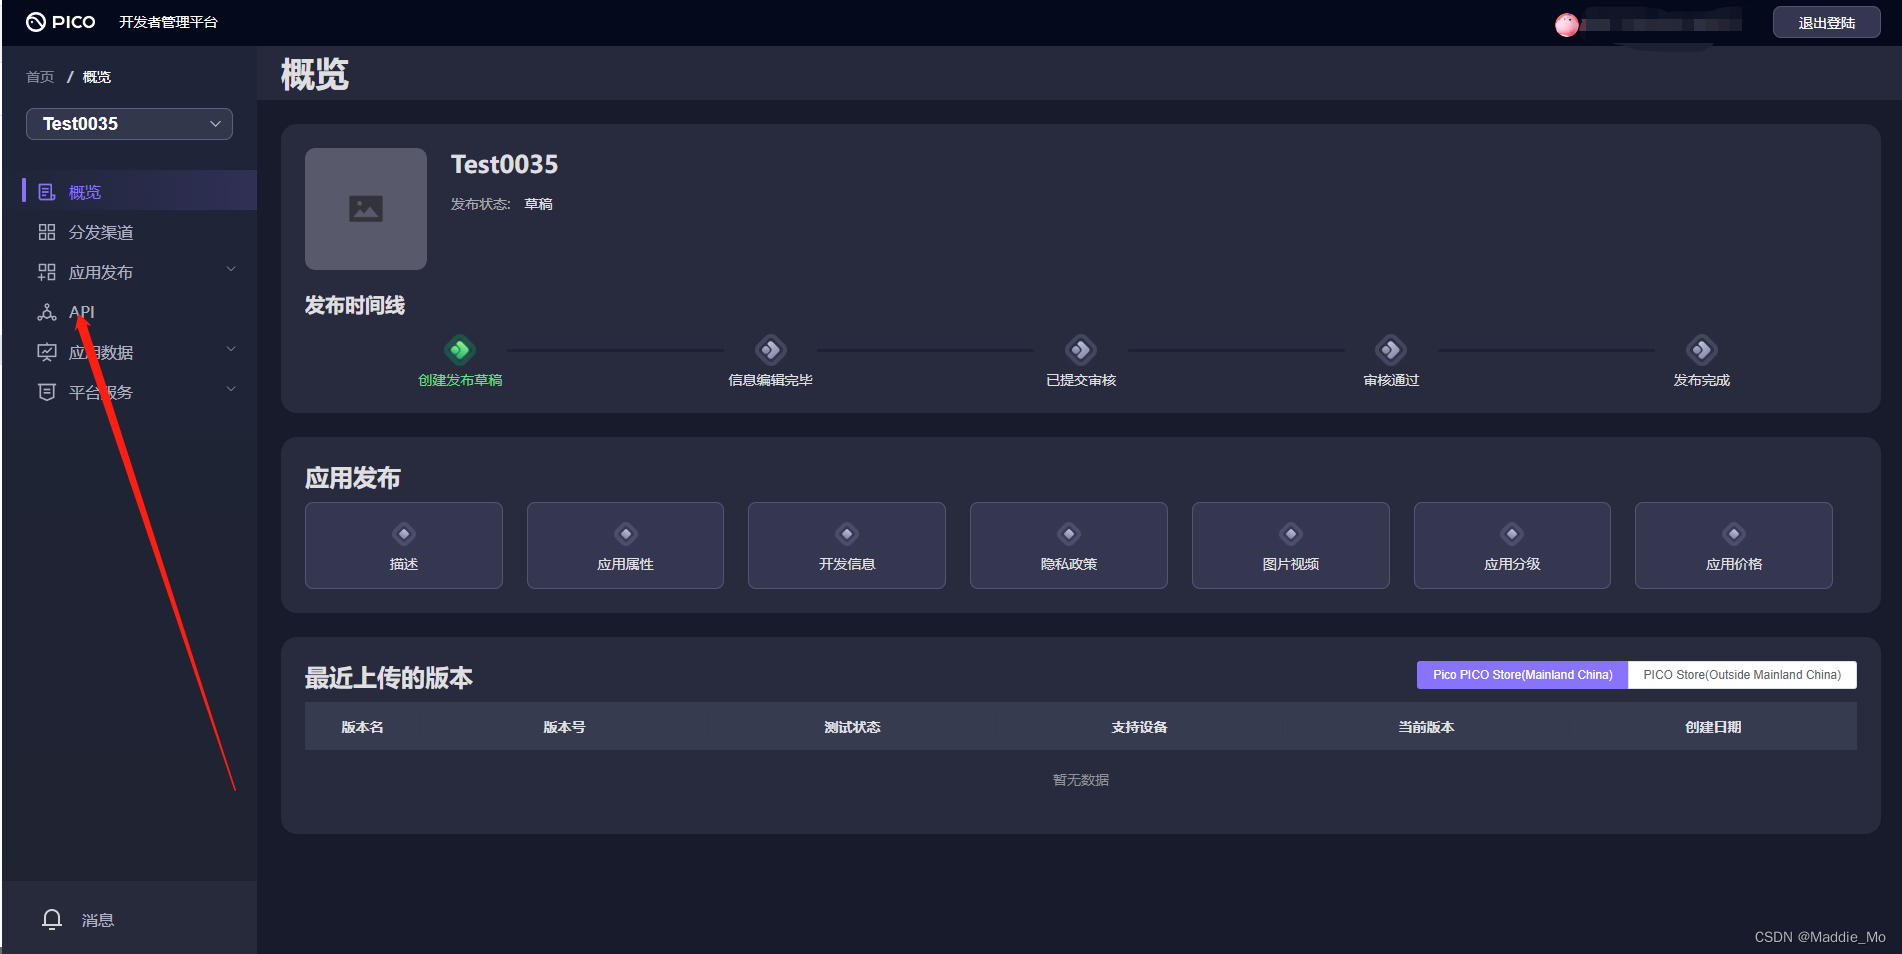
这里的 API 就是后期发布应用时会用到的。
Pico 实时预览 测试
1. 使用 USB 数据线连接 PICO VR 一体机与 PC。
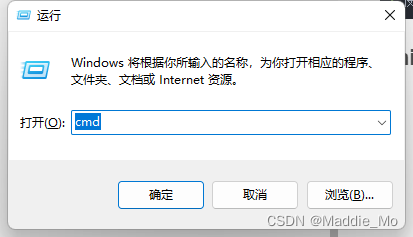
2. 使用 Win + R 输入 cmd 打开 命令行工具
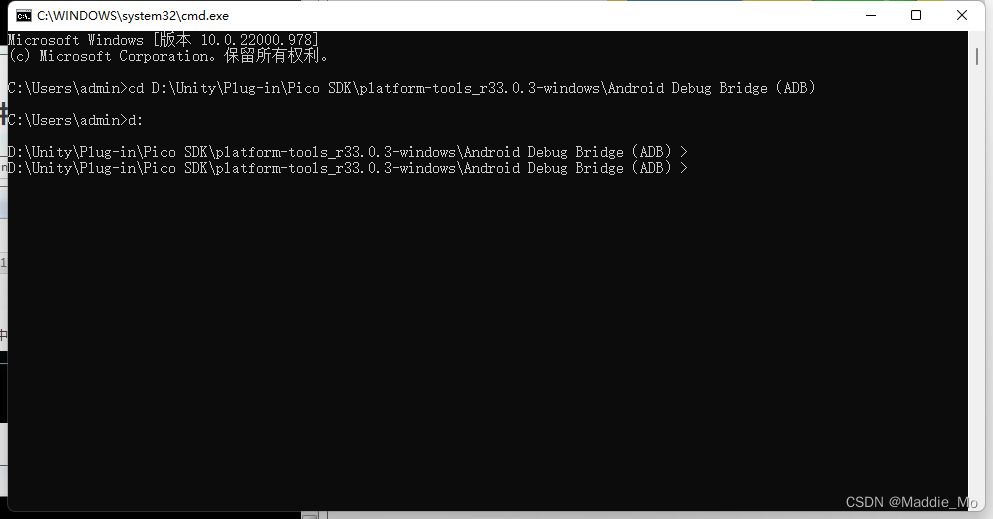
3. 在命令行窗口中 输出:cd D:\Unity\Plug-in\Pico SDK\platform-tools_r33.0.3-windows\Android Debug Bridge(ADB)
   再次输入:d:
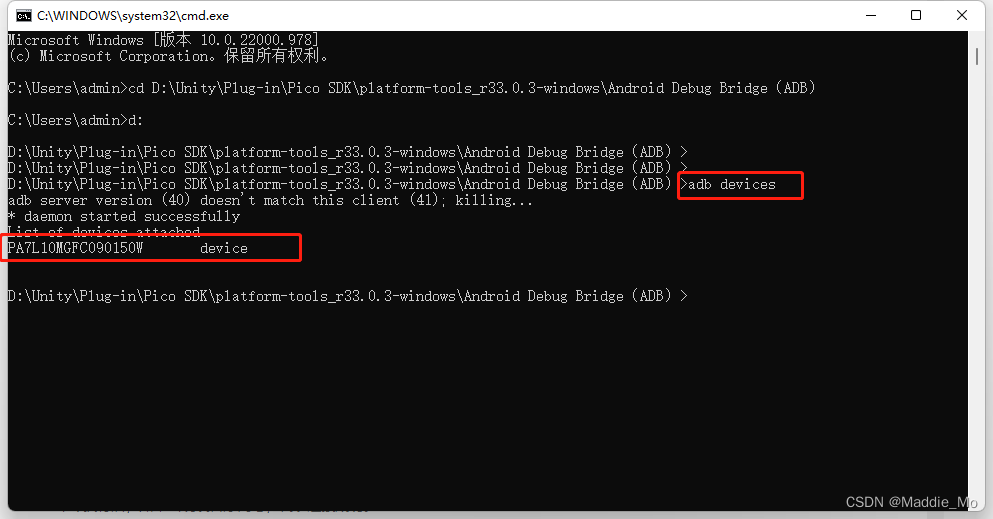
4. 状态检查 输入:adb devices。
  (若第一次执行该命令,此时 PICO VR 一体机屏幕上会通过对话框提示 “是否允许USB Debugger”,点击 同意。)
  (命令执行后,如果出现设备序列号,代表连接成功。)
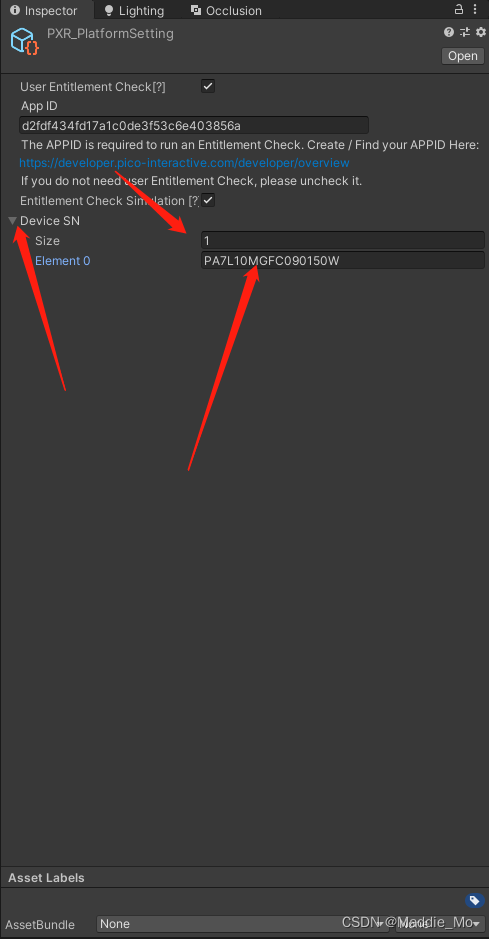
  (这个序列号等会要在 Unity 中使用。)
5. 在PicoNeo3 中点击文件管理->安装包->PreviewTool_0402.apk 进行PreviewTool安装。
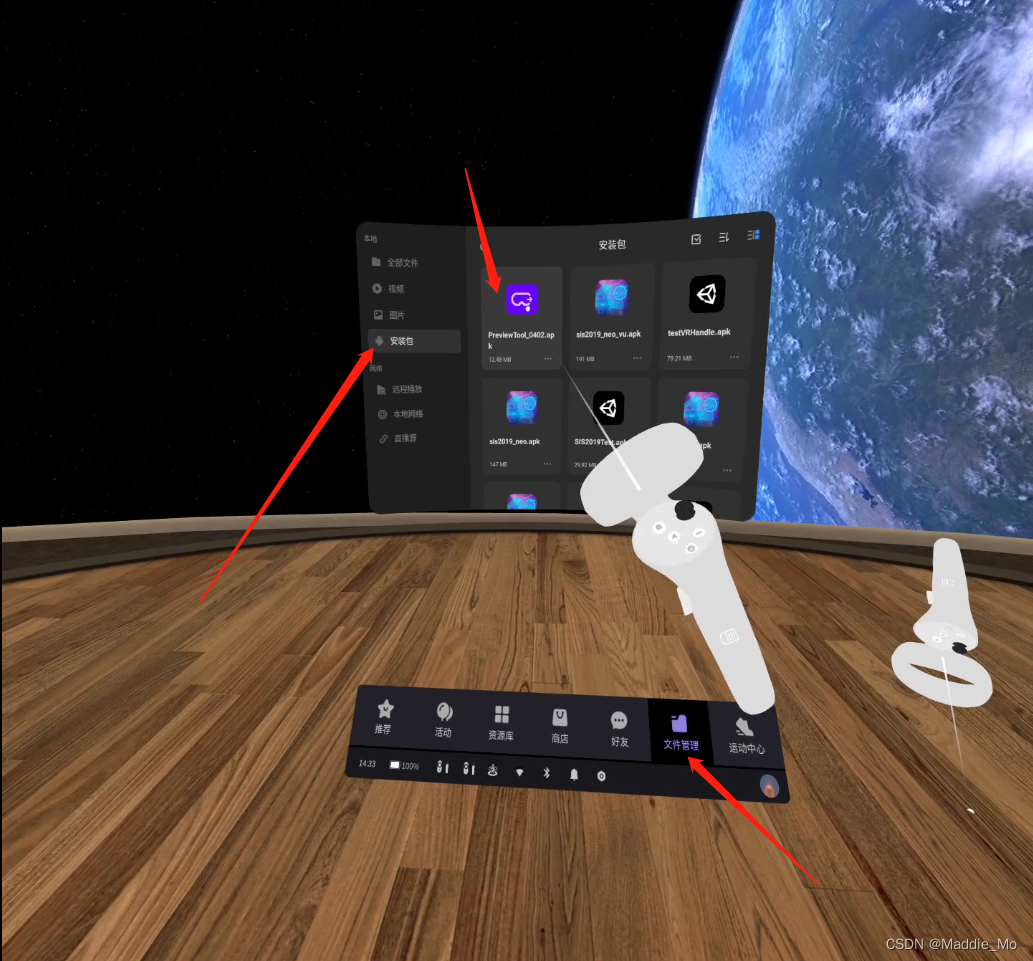
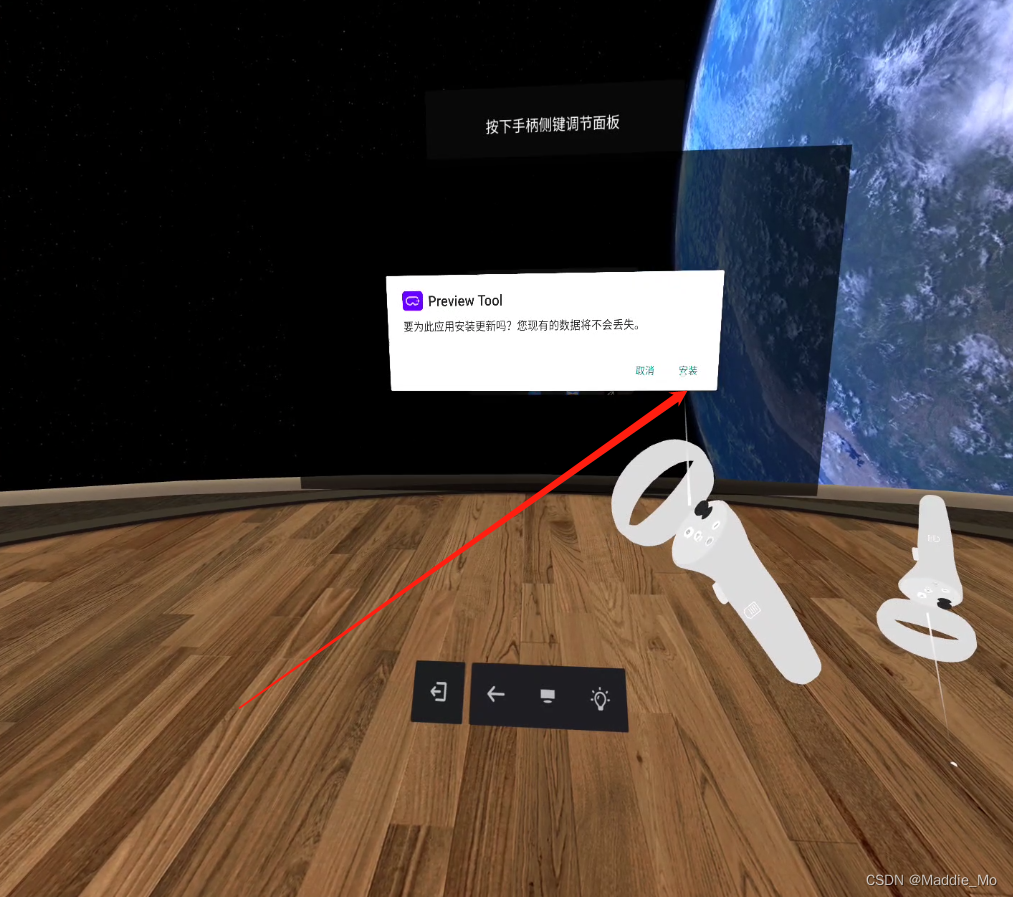
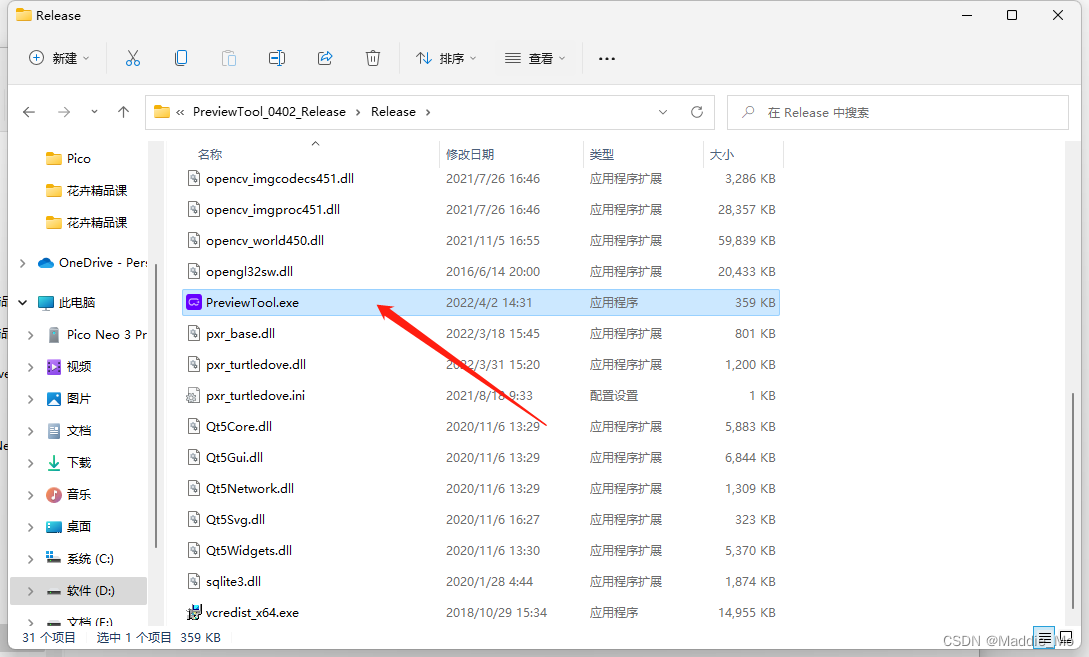
6. 在 ***\PicoPreviewTool V1.0-0402\PreviewTool_0402_Release\Release 文件夹下 双击打开 PreviewTool.exe
7. 两种链接模式:
   无线连接 :需保证 PC 与 VR 一体机处于同一 Wi-Fi 环境下。
   (推荐) 有线连接 :需使用 USB 数据线连接 PC 与 VR 一体机。
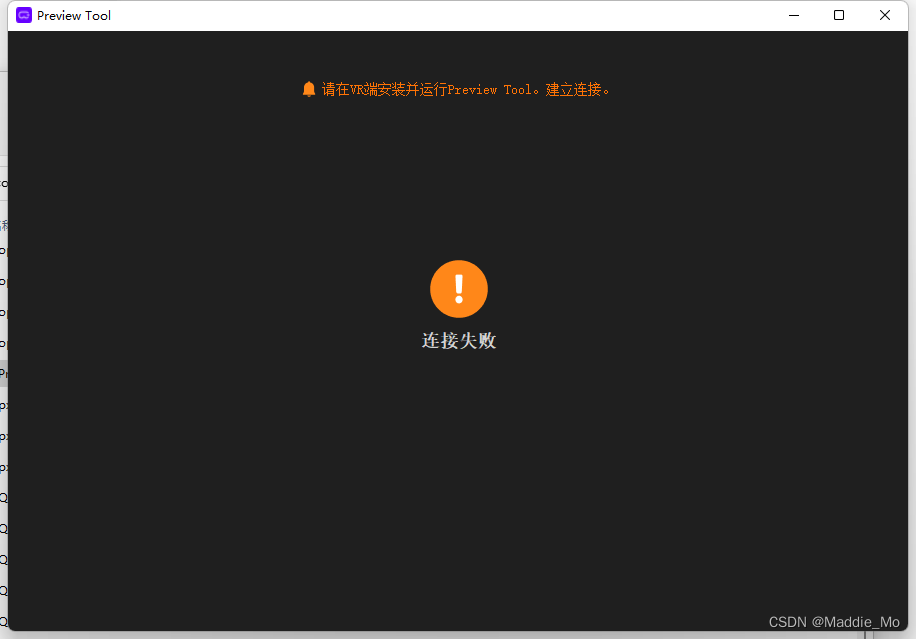
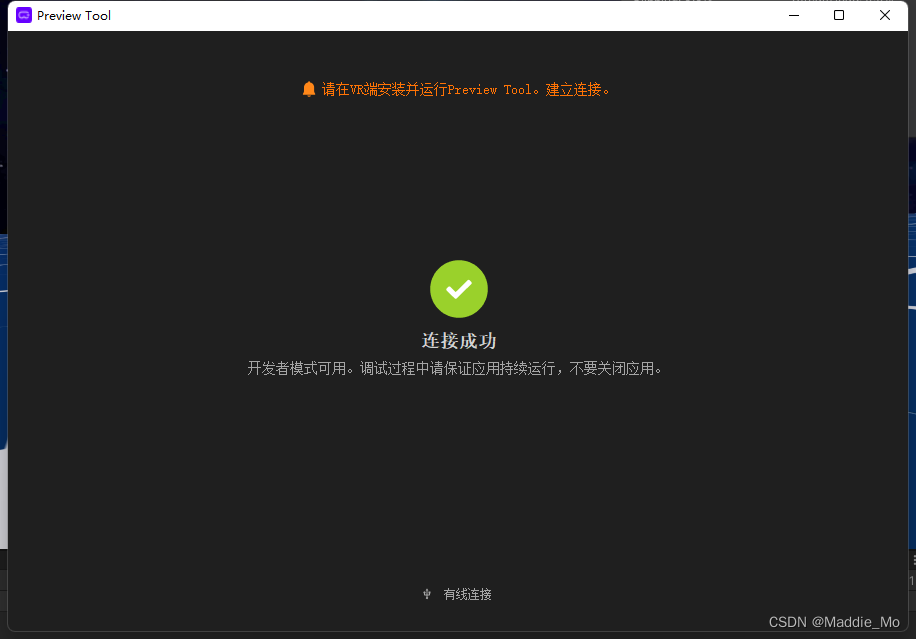
链接成功状态。
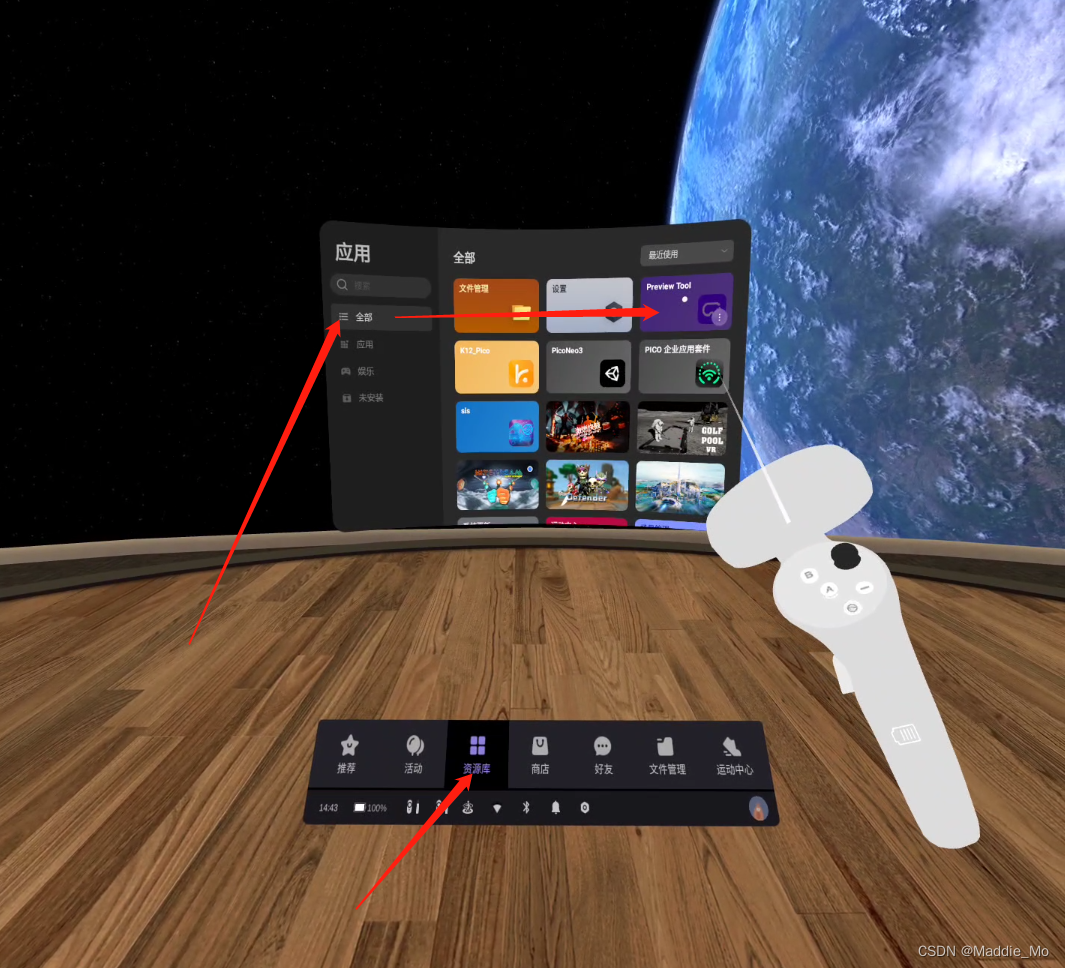
8. 在PicoNeo3打开 PreviewTool 工具
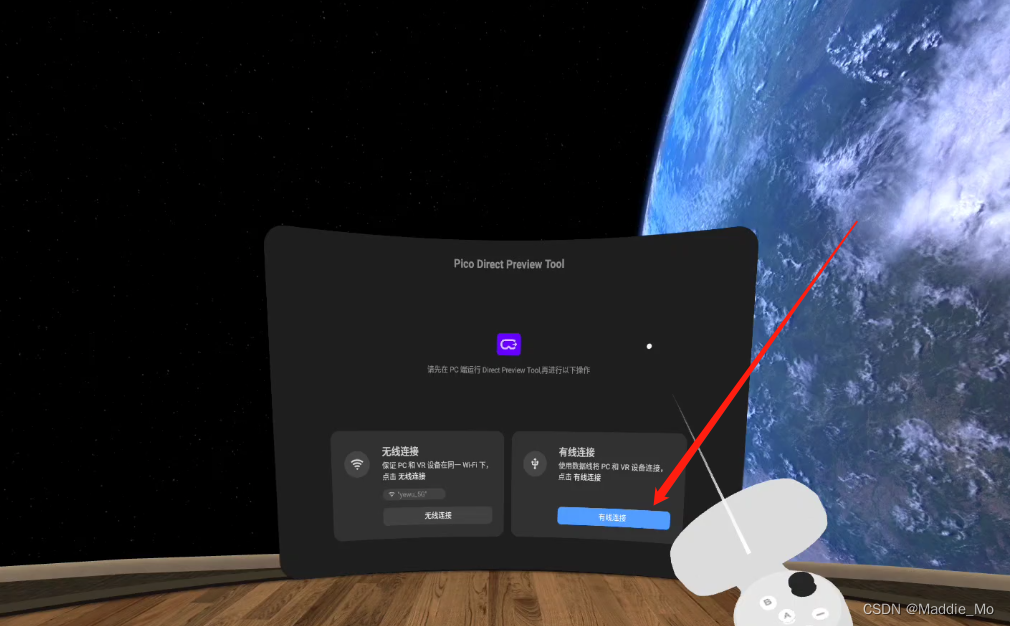
9. 选择有线连接 连接完毕之后,整个画面就会变黑。
   点击 Unity 编辑器界面顶部的 播放 按钮。
   VR 一体机上就会呈现与 PC 同步的场景画面。
Unity 模块
链接: 配置开发环境 Pico 官方文档
项目创建
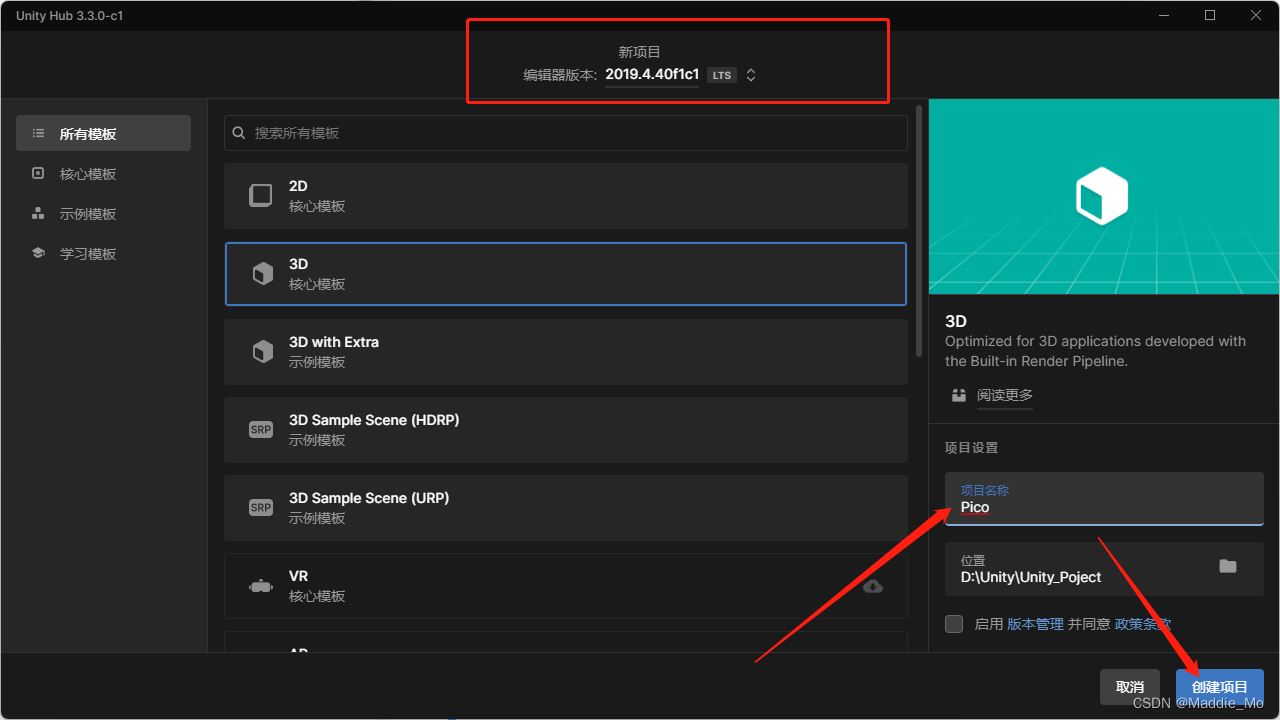
1. Unity 编辑器(Unity Editor)须使用 2019.4.0 及以上版本。(因为要使用 XR 模块)
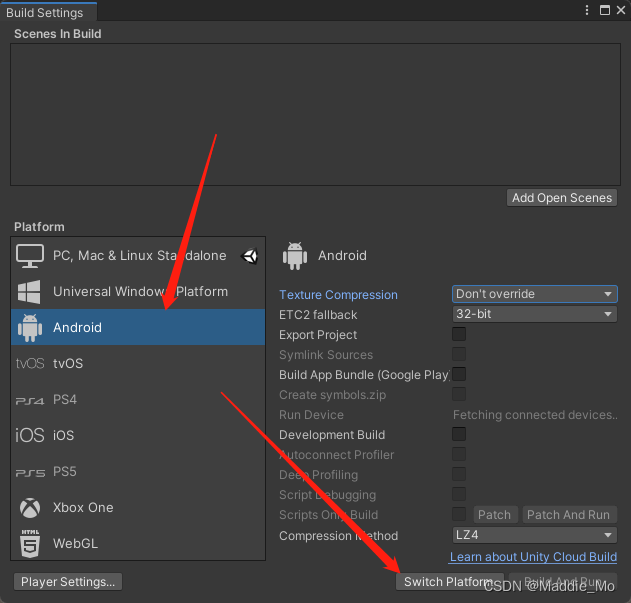
2. 先进行安卓平台 切换。
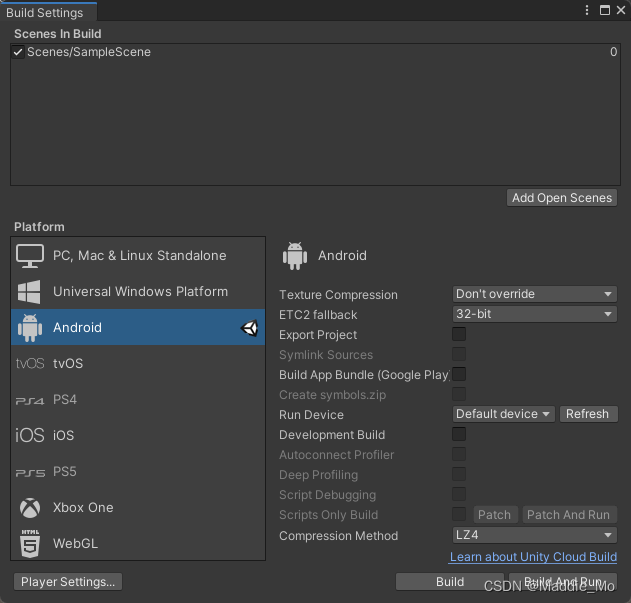
切换后的状态。
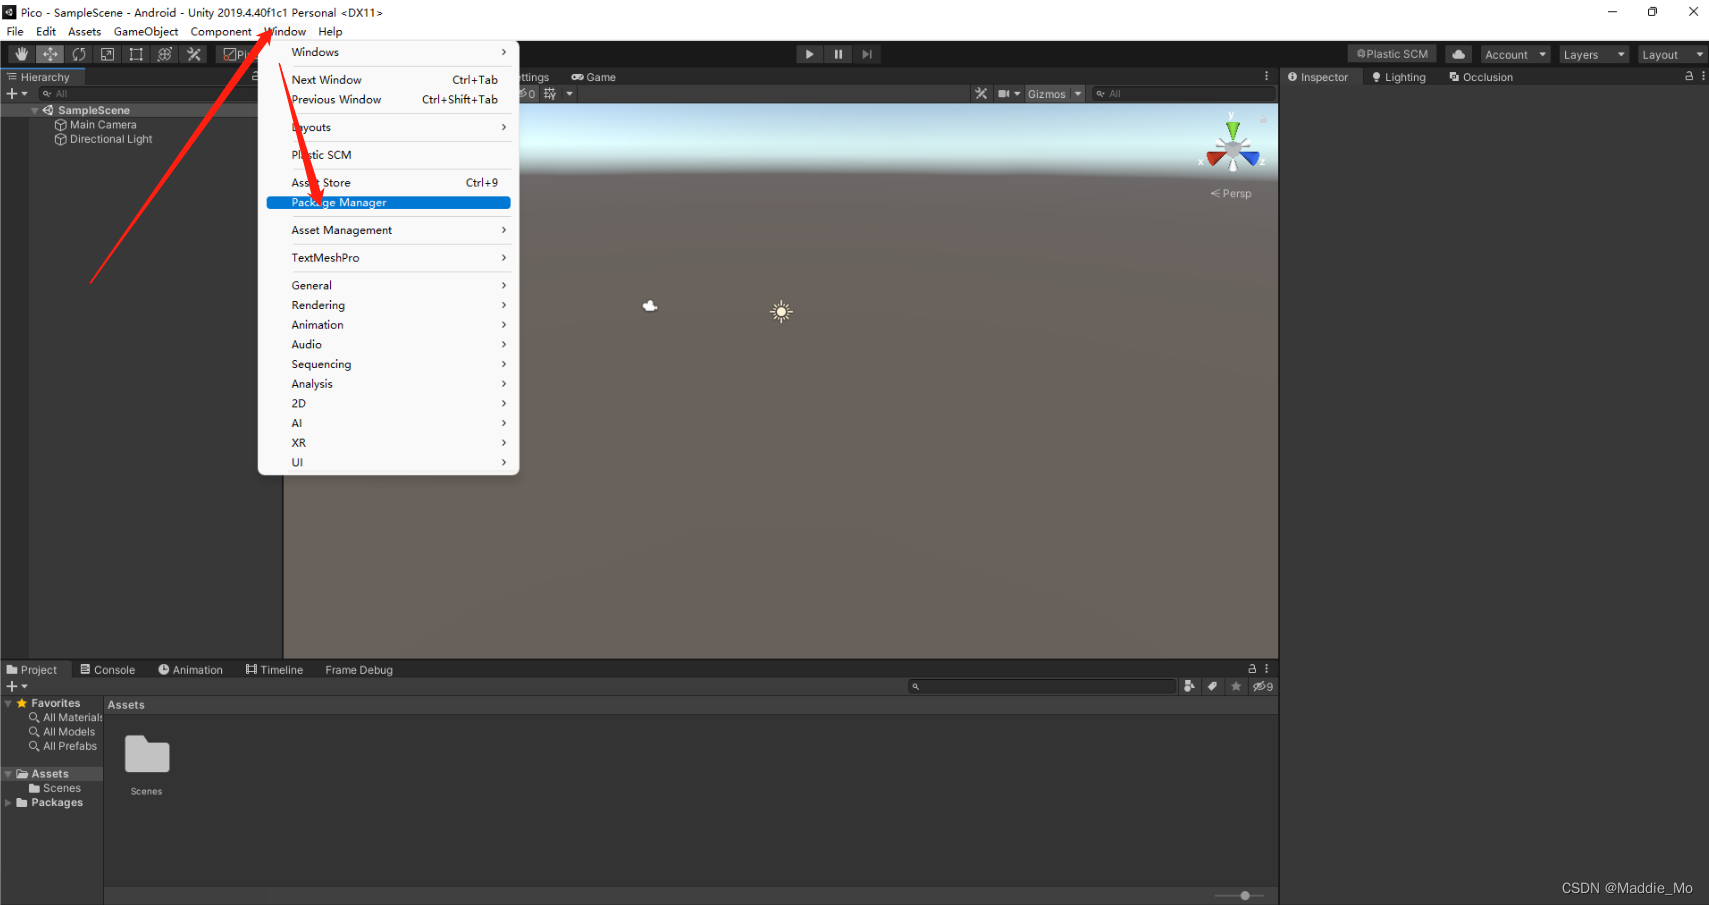
3. 打开 Package Manager。
4. 点击 Add package from disk
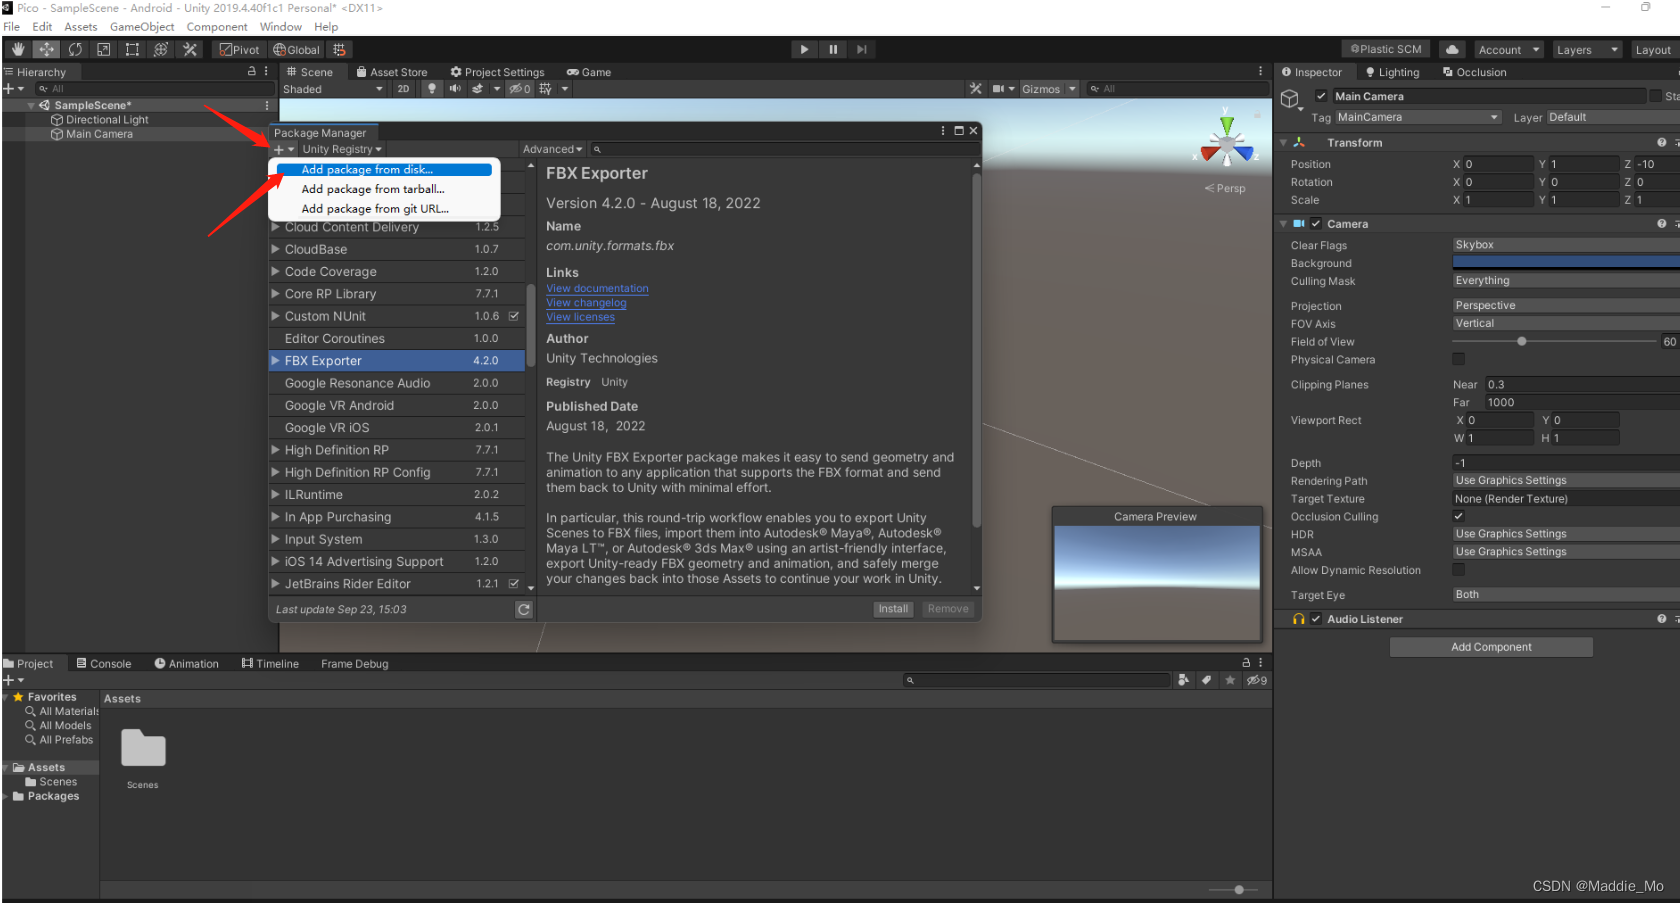
5. 选择 package.json 文件并导入。
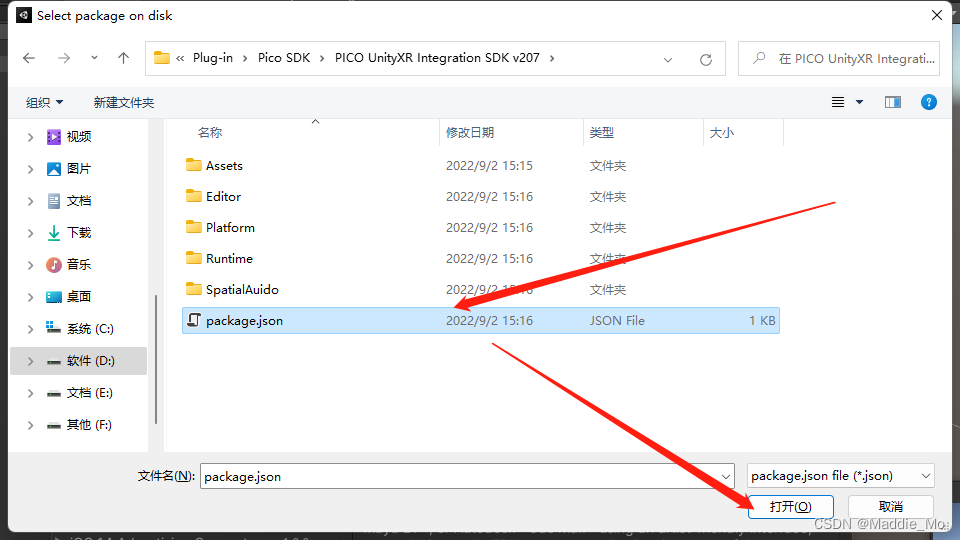
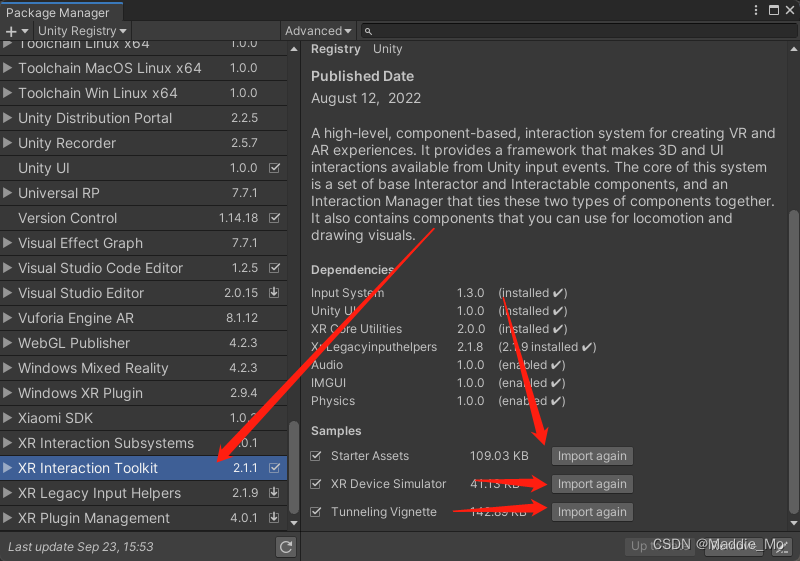
6. 下载 XR Interaction Toolkit 并下载 Starter Assets、XR Device Simulator、Tunneling Vignette。
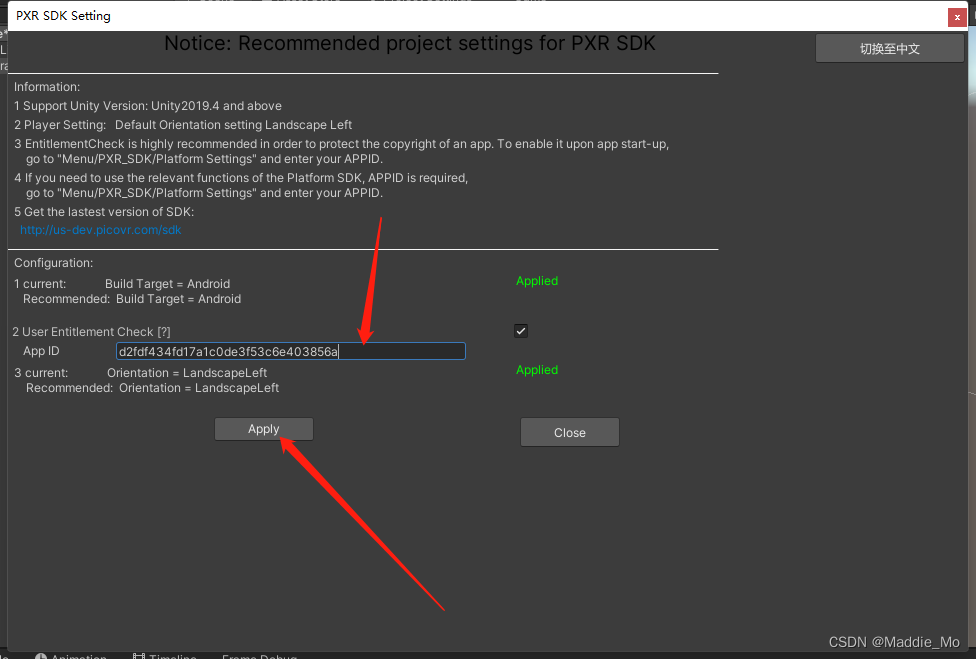
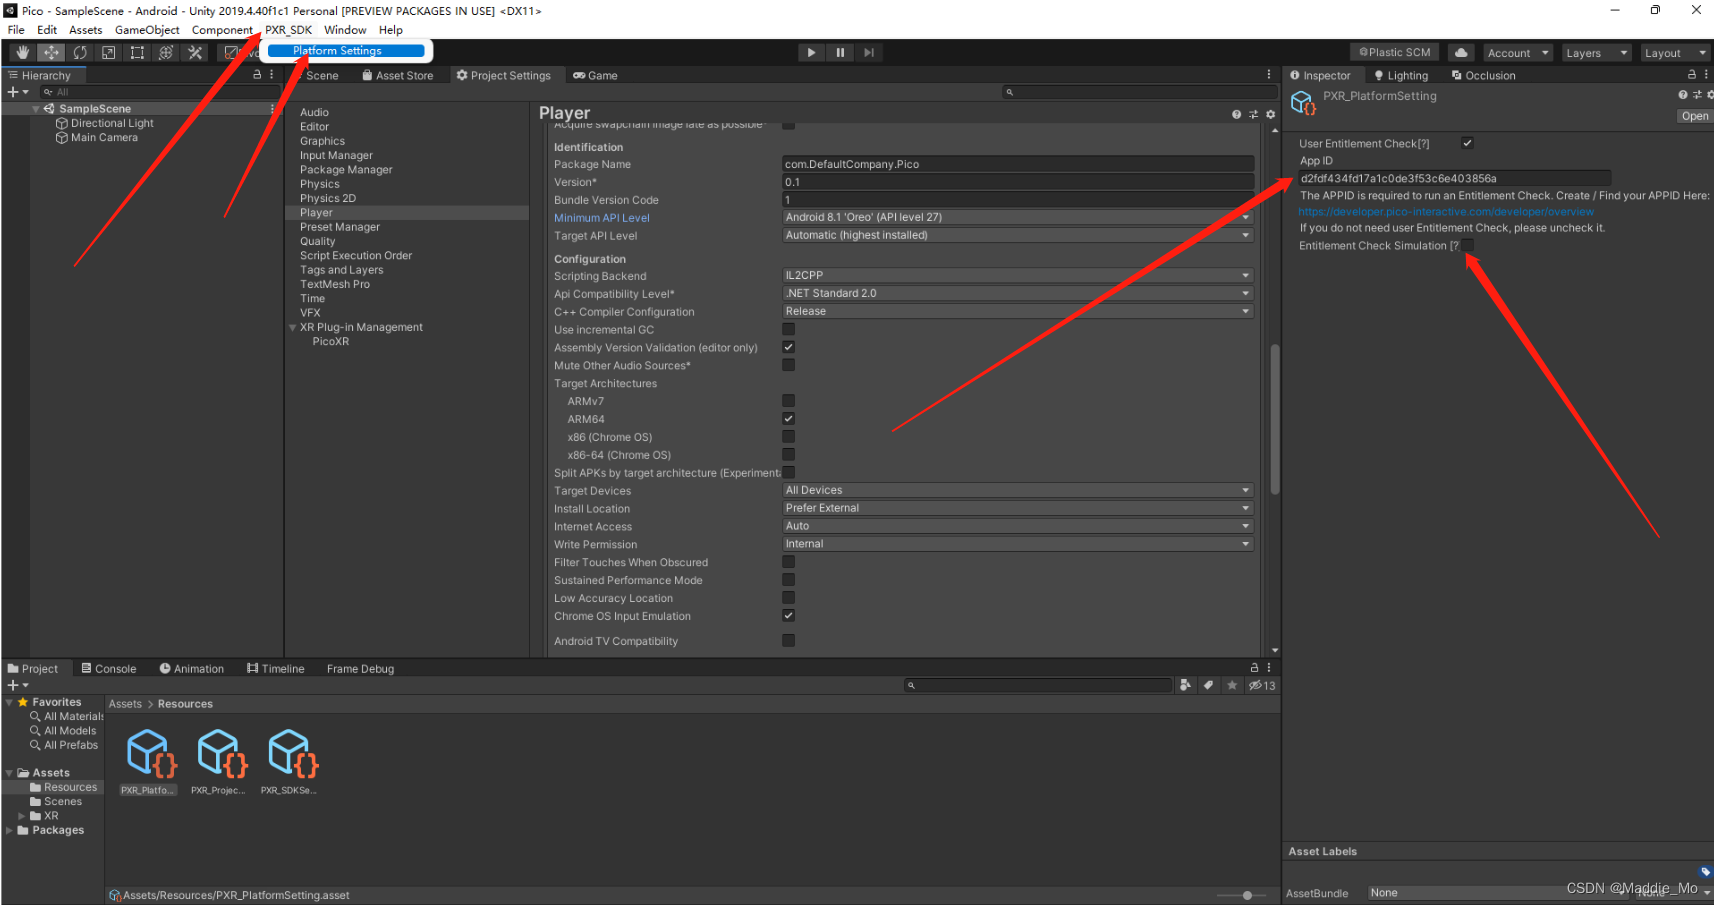
7. 在 App ID 字段处,填入应用 ID。点击 Apply。
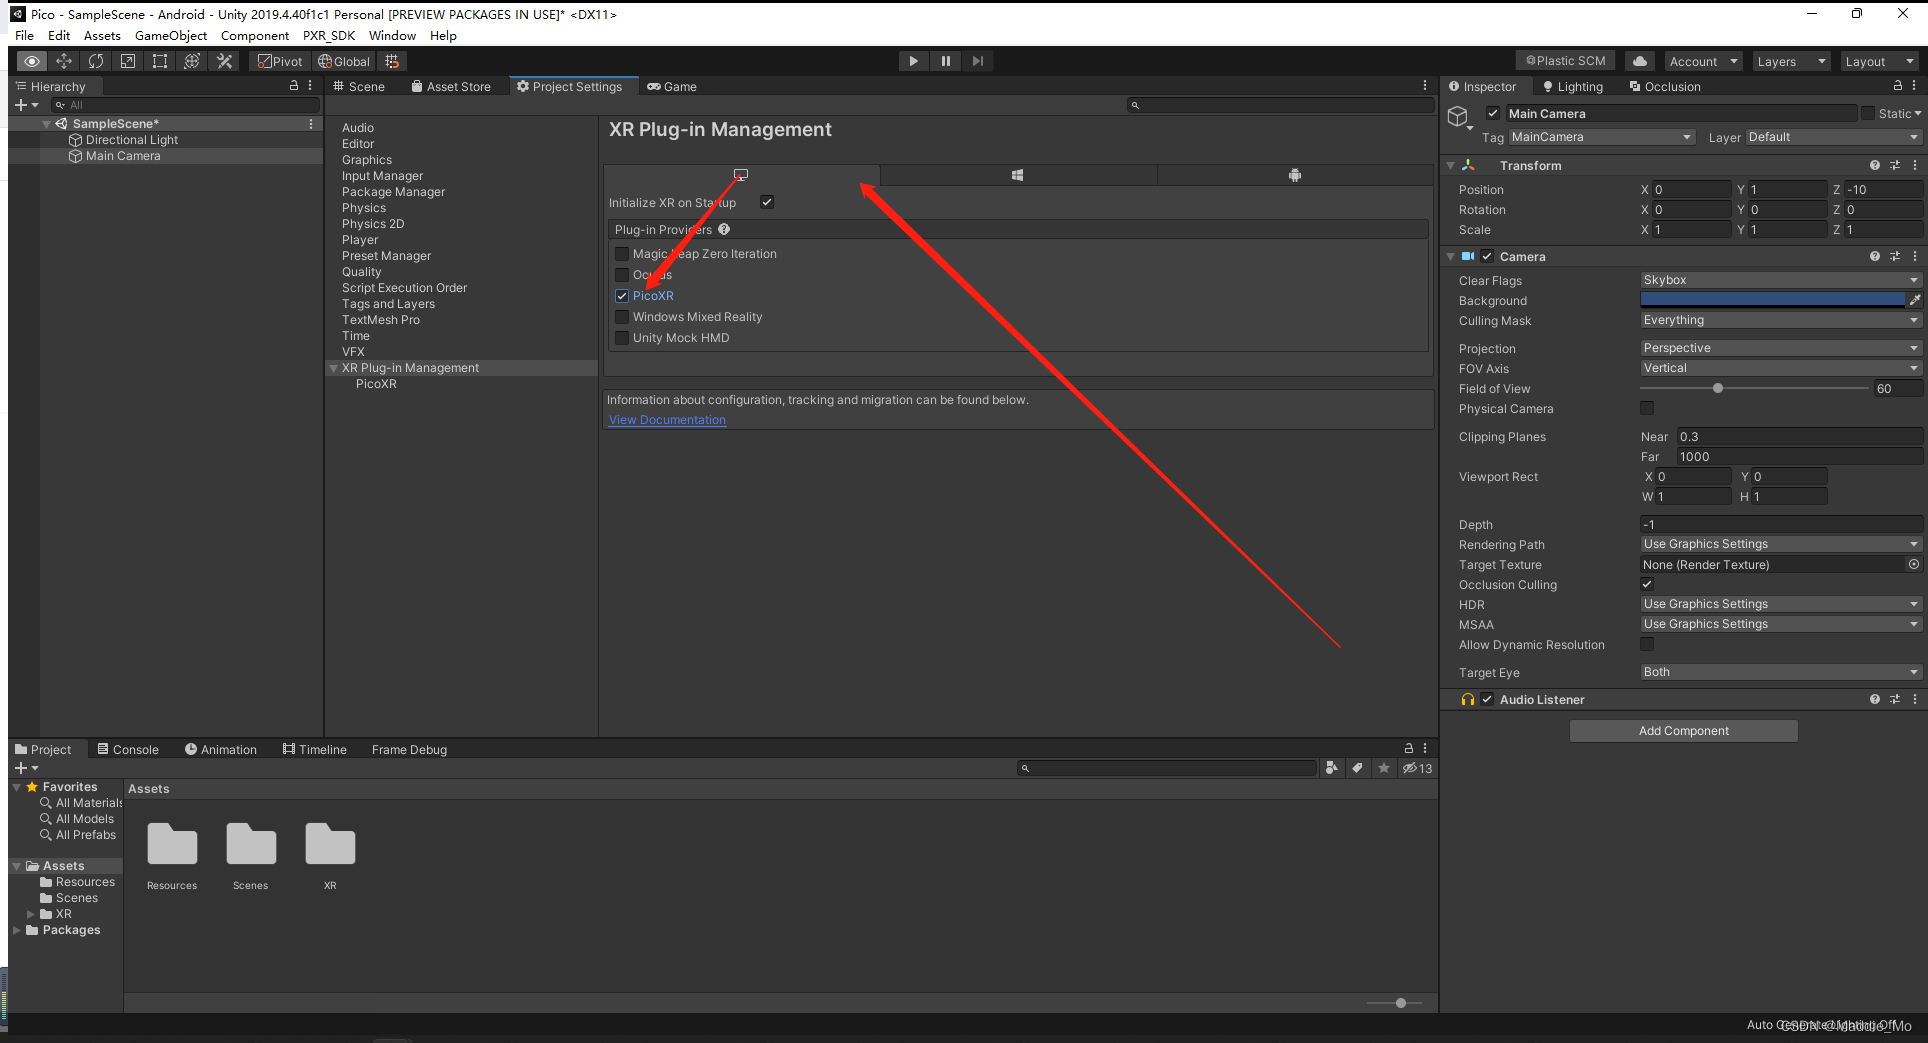
8. 在安卓平台 勾选 PicoXR
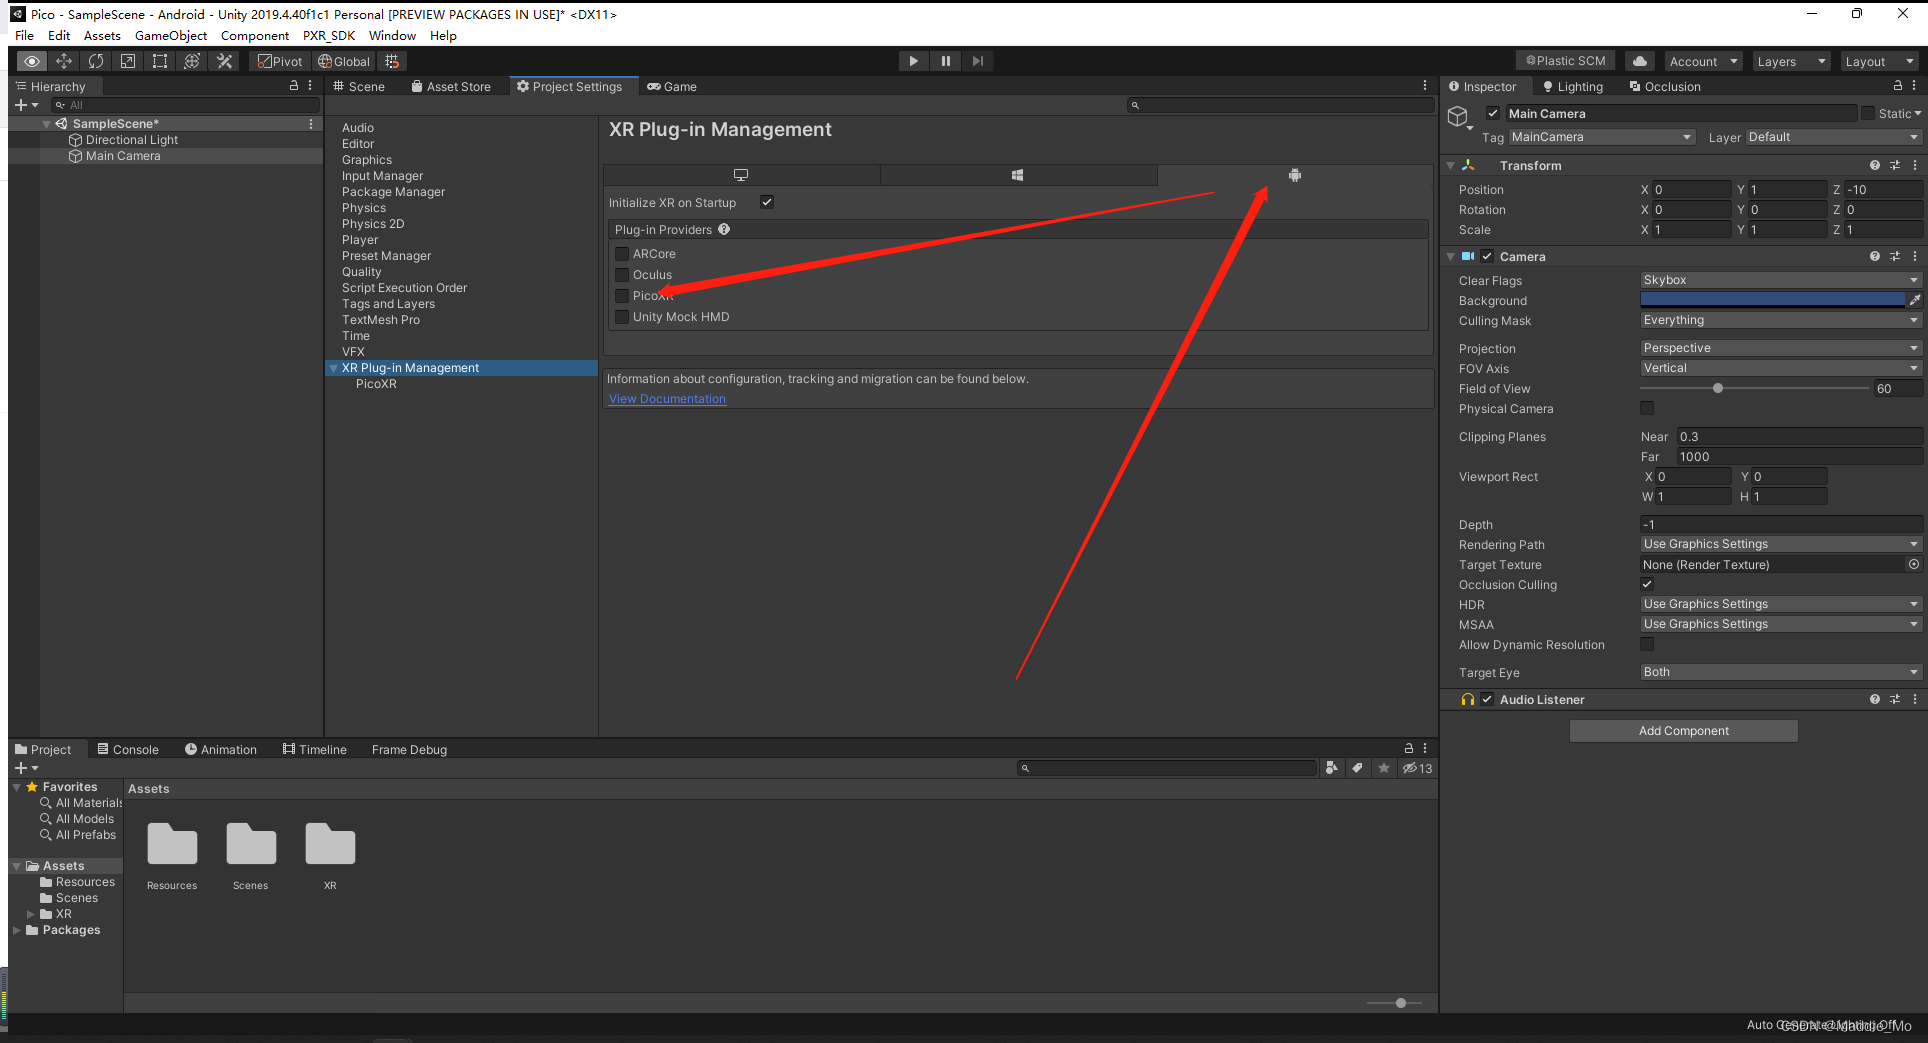
9. 在微软平台 勾选 PicoXR
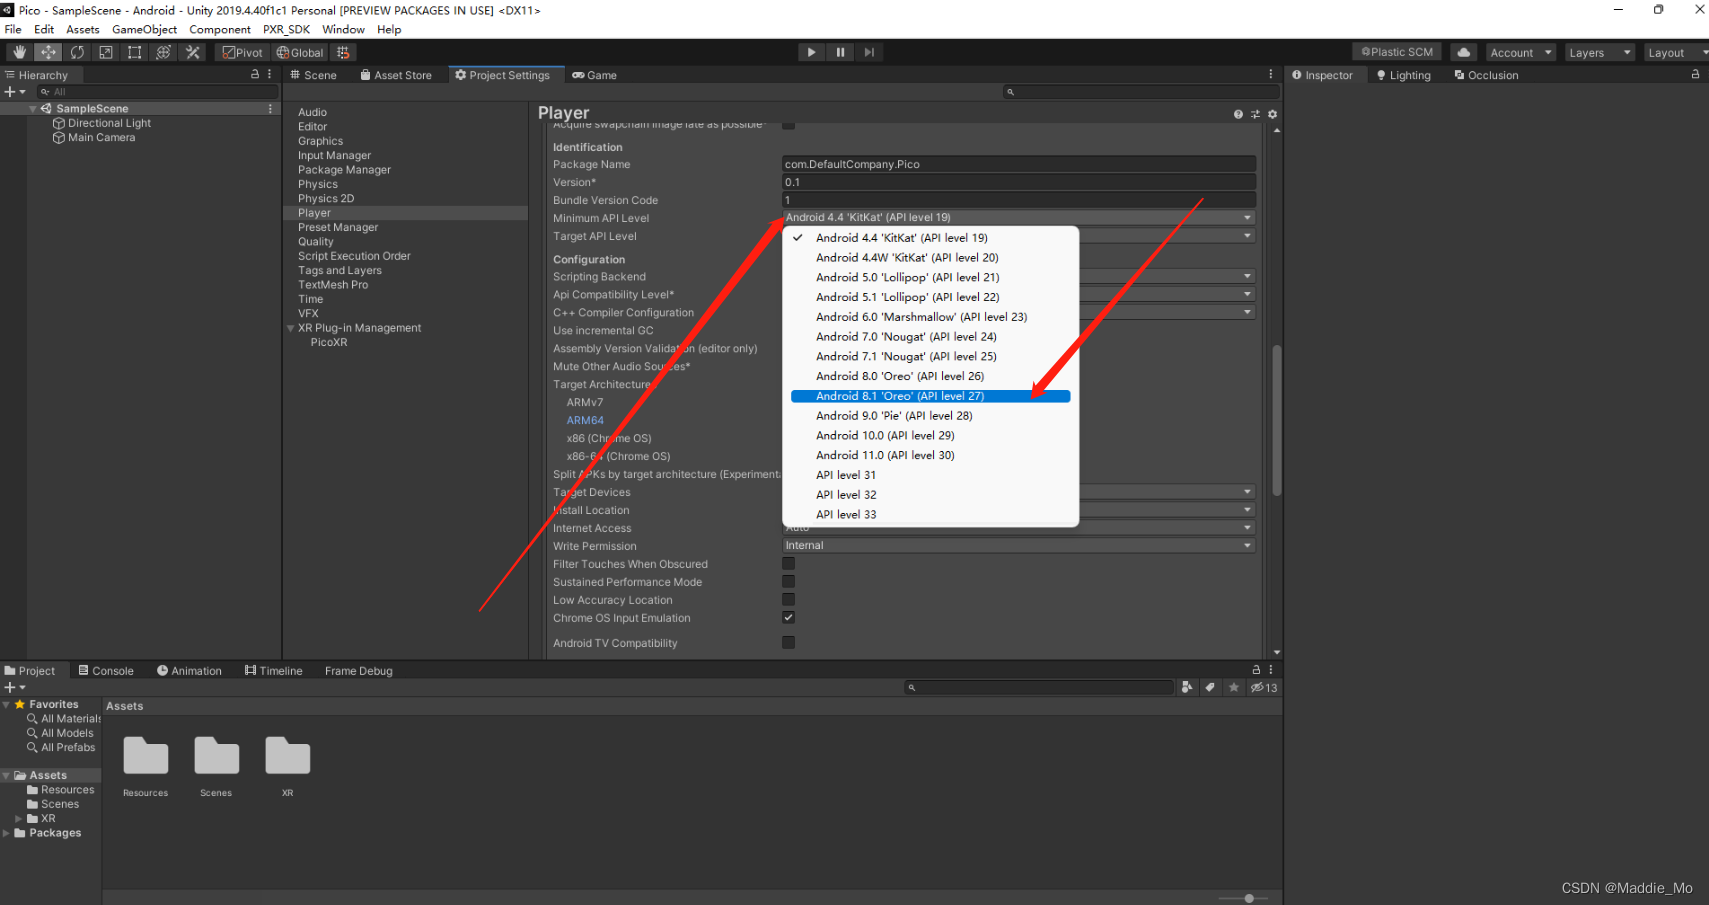
10. Other Settings 标签,在 Identification 设置区域:
   Minimum API Level (最低API级别)更改为 API level 27。
   Target API Level 设置为 Automatic (highest installed)。
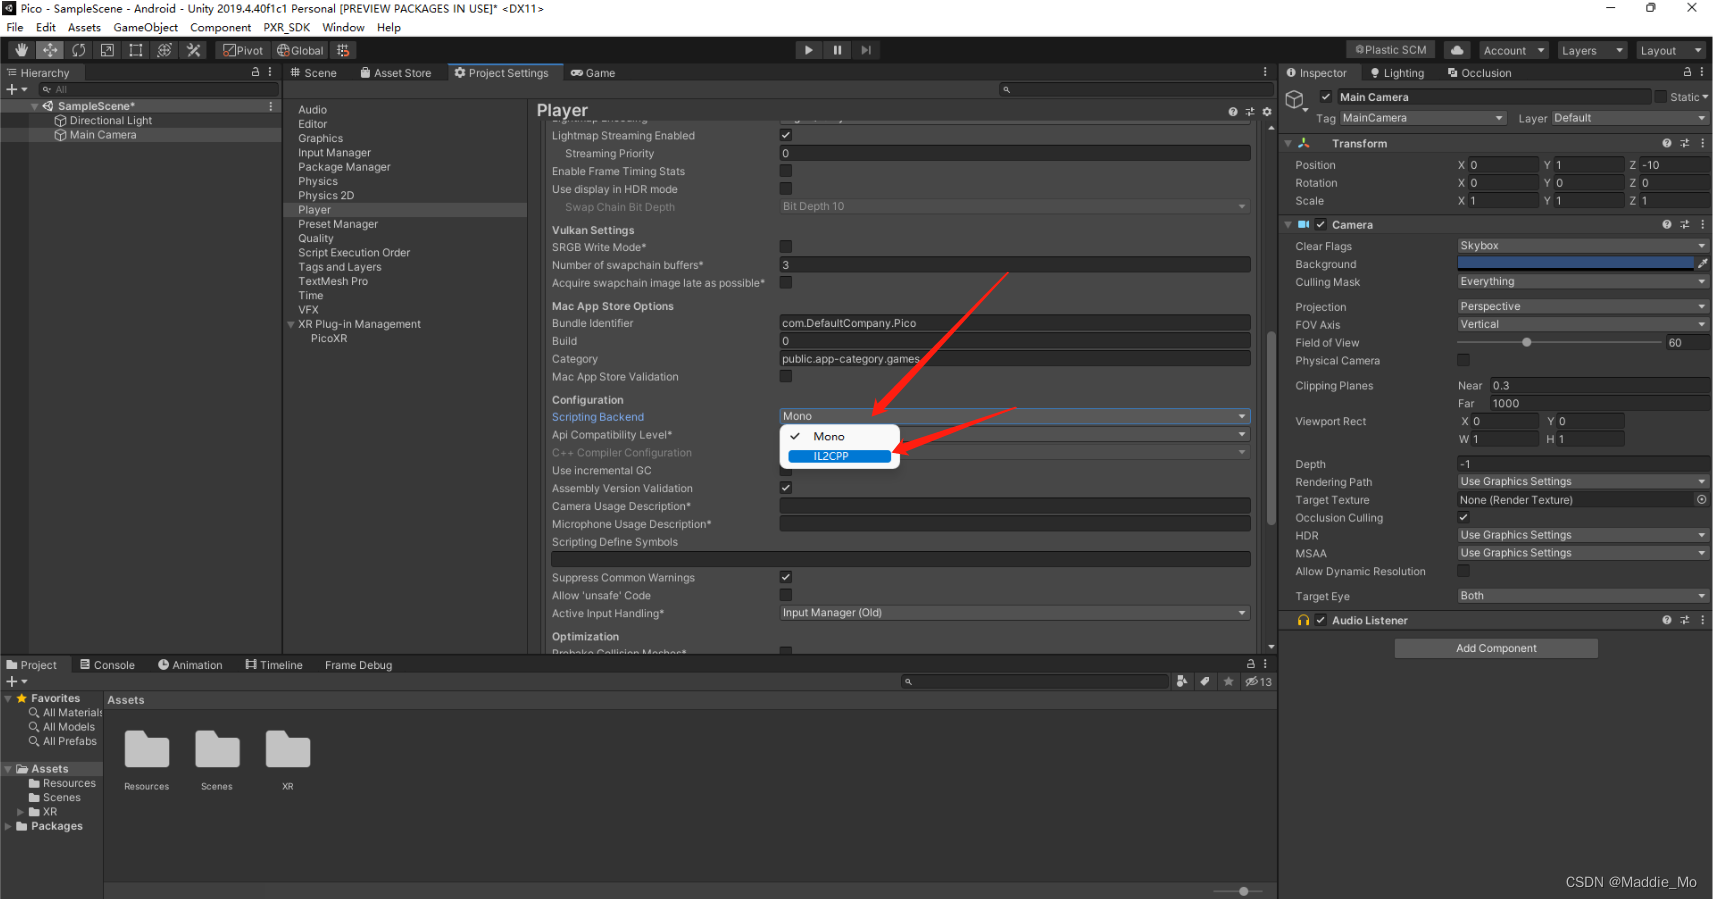
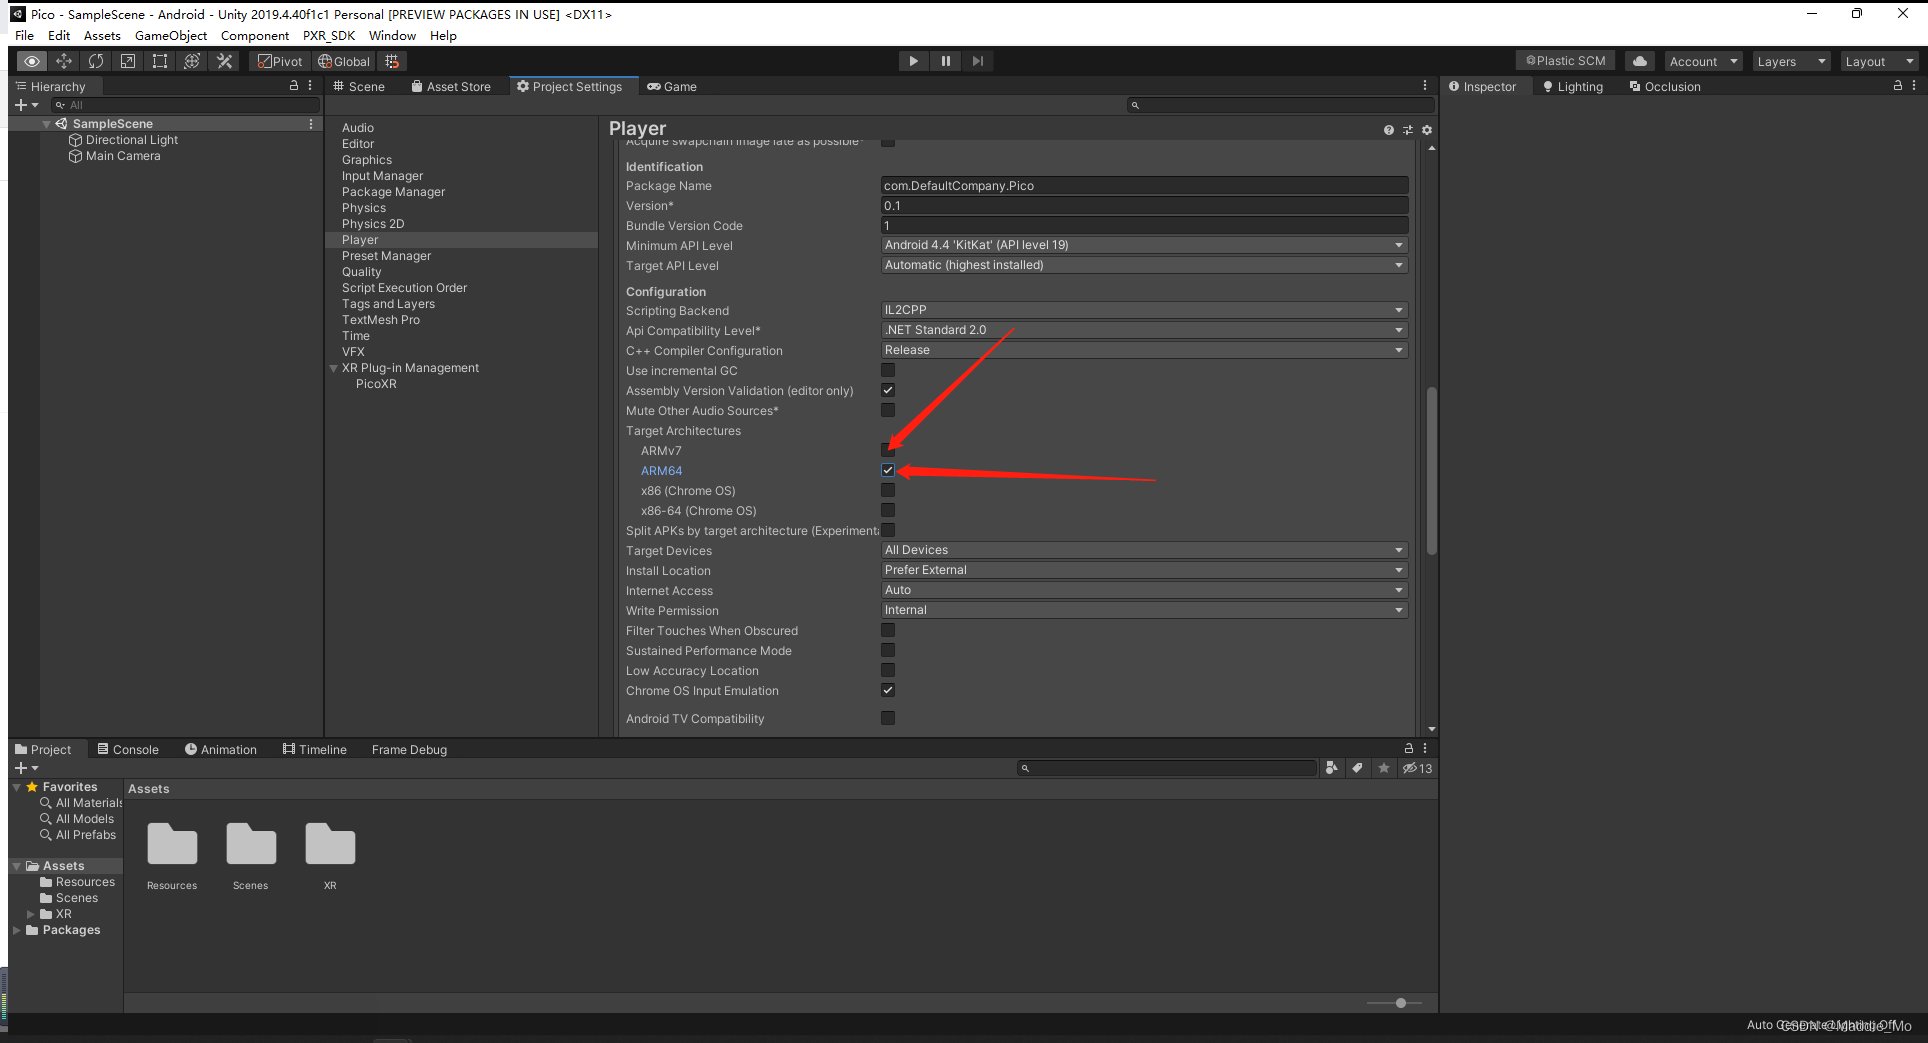
11. 在 Configuration 设置区域:
    Scripting Backend 设置为 IL2CPP。
    Target Architectures 设置为 ARM64 ,并取消勾选 ARMv7。
12. 在菜单栏 点击 PXR_SDK -> Platform Setting -> Authorization Check Simulation(授权检查模拟)
13. 添加设备 SN 码 就是在命令行工具中 获取到的那个 机器码
基础XR 模块
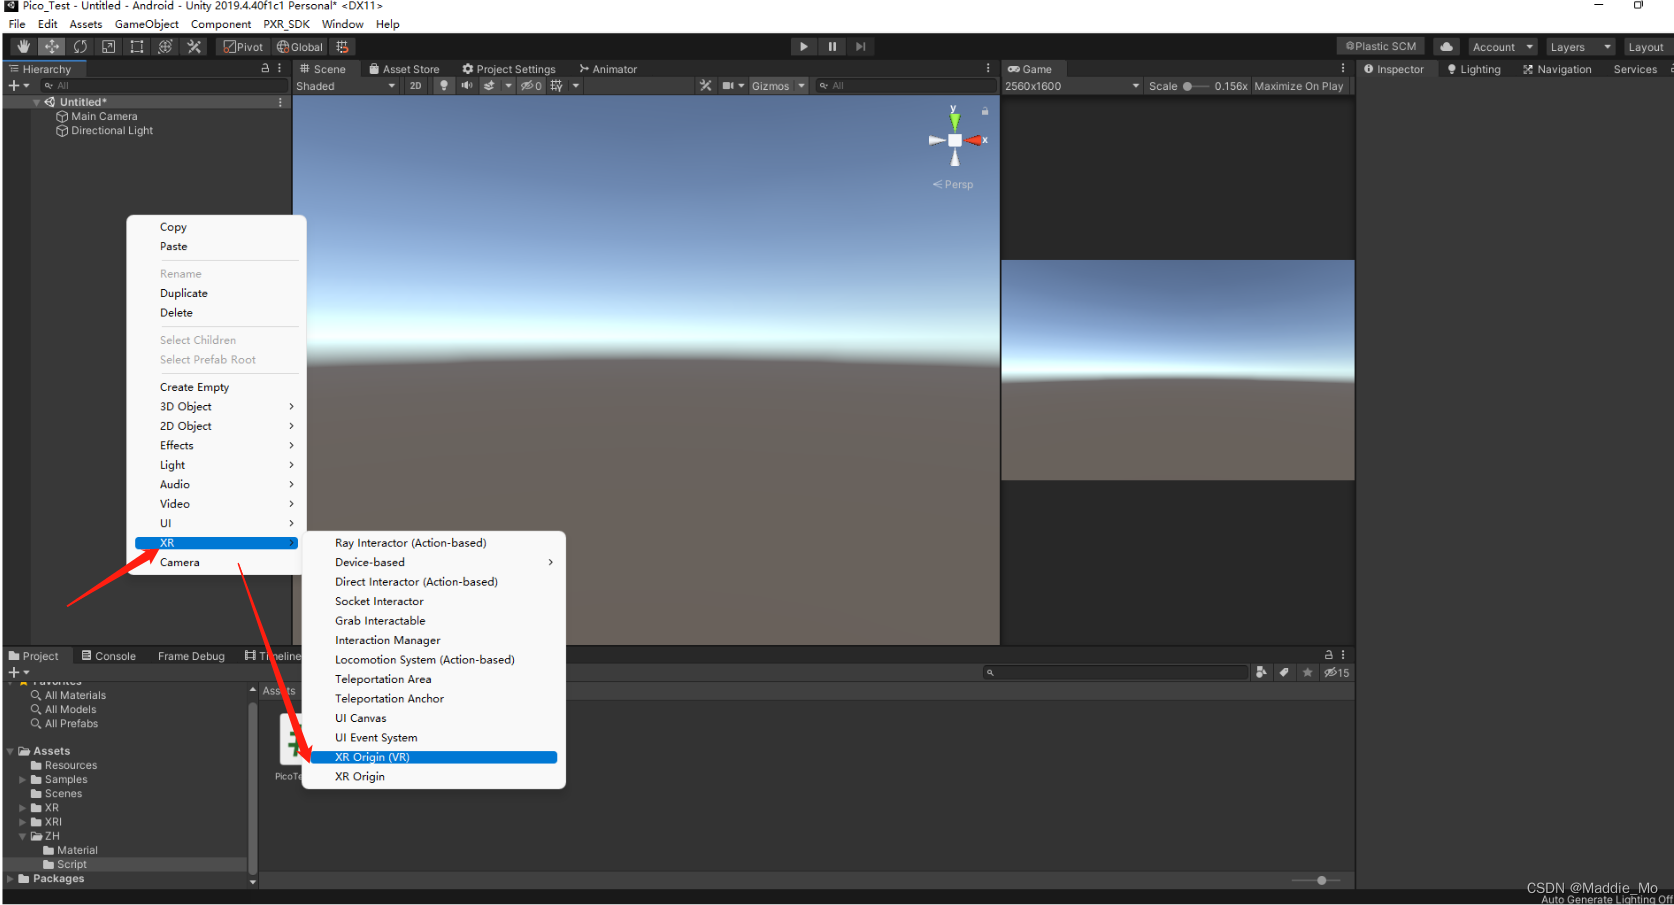
1. 在 Hierarchy窗口 右键 -> XR -> XR origin
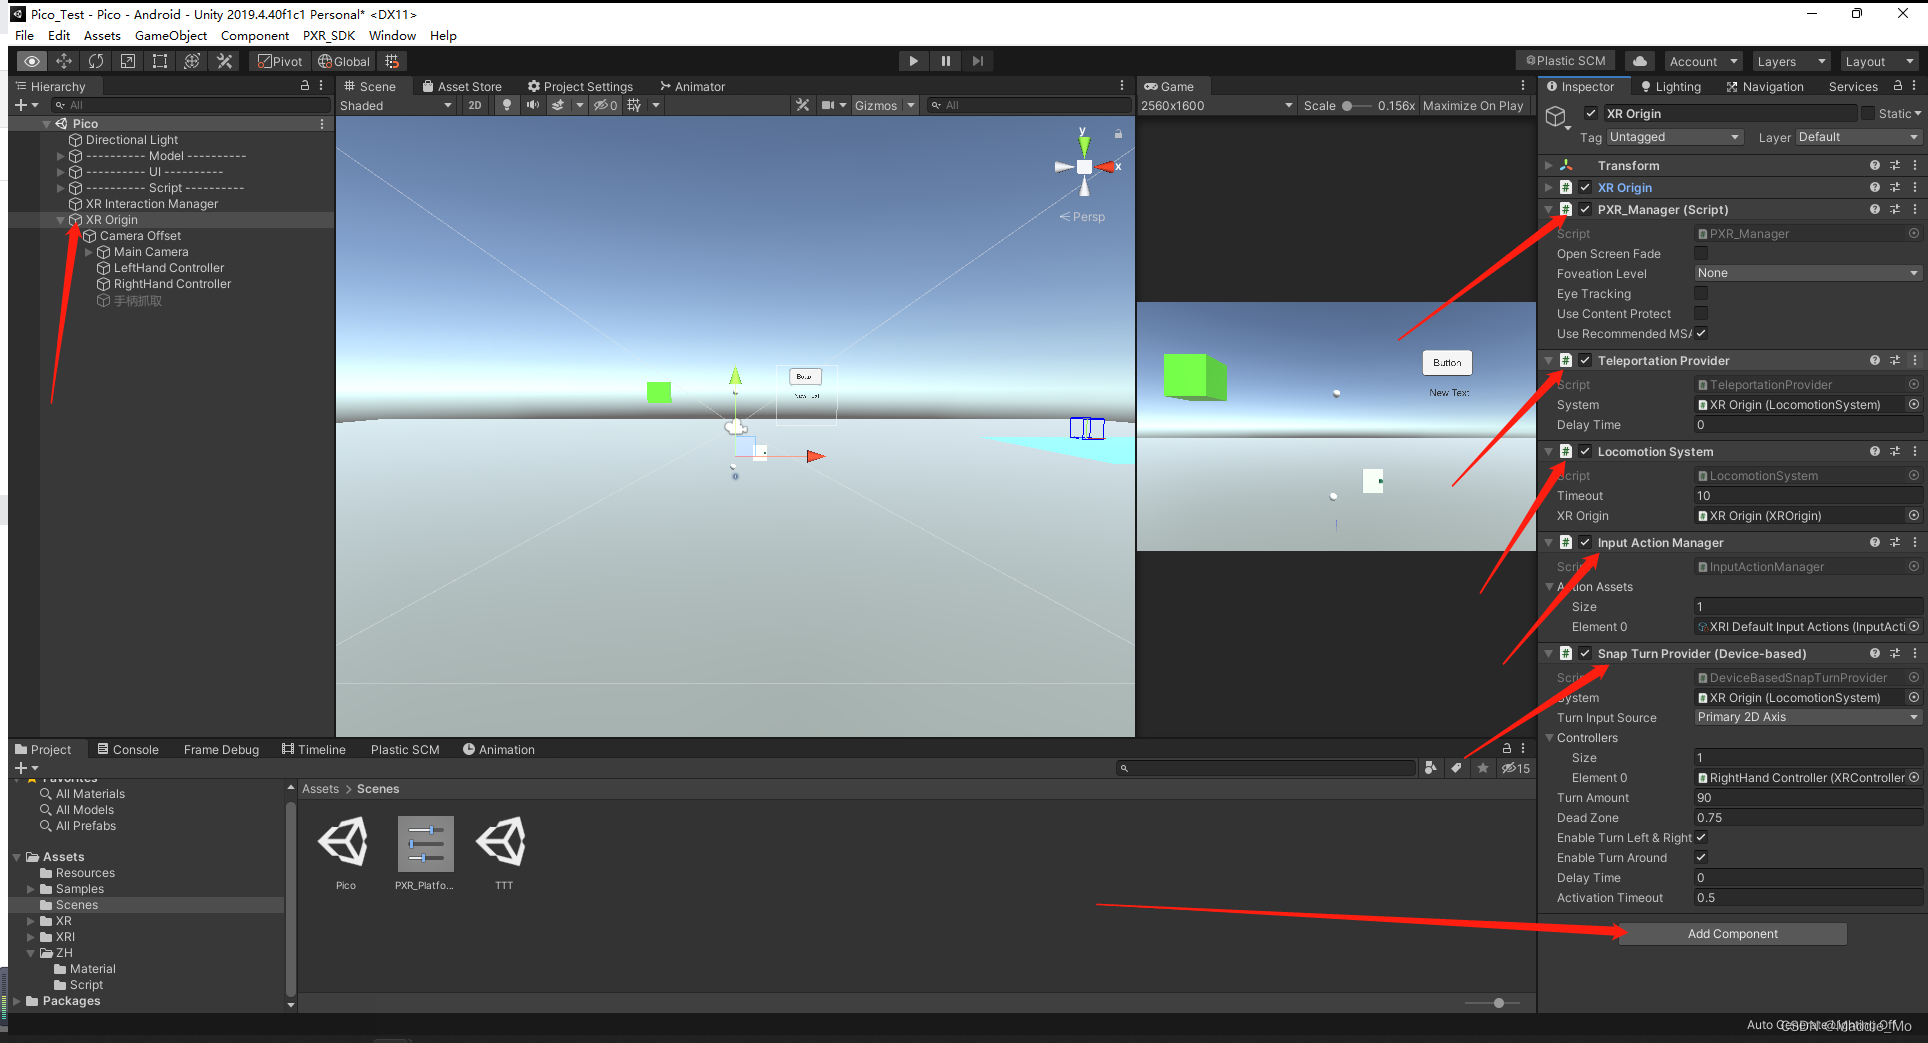
2. 添加组件:
   XR_Origin:原点
   PXR_Manager:PXR 管理
   TeleportationProvider:传送
   LocomotionSystem:运动系统
   InputActionManager:输入操作
   DeviceBasedSnapTurnProvider:基于设备的快速转向
3. 在 Hierarchy 窗口选中 LeftHand Controller\RightHand Controller
   剔除XRController(Action-based)组件。
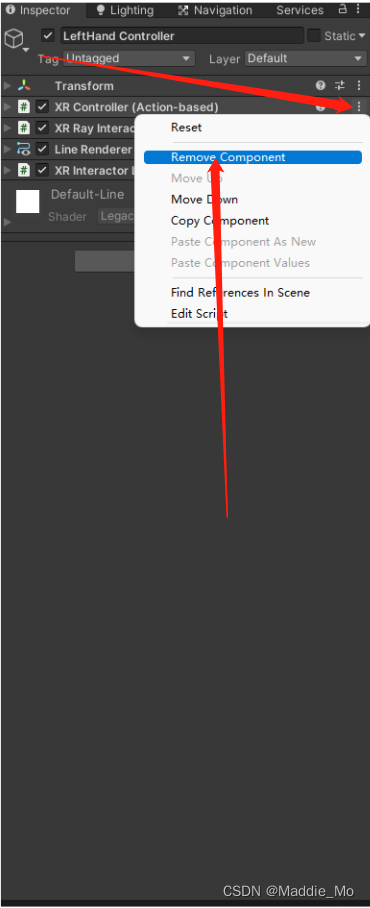
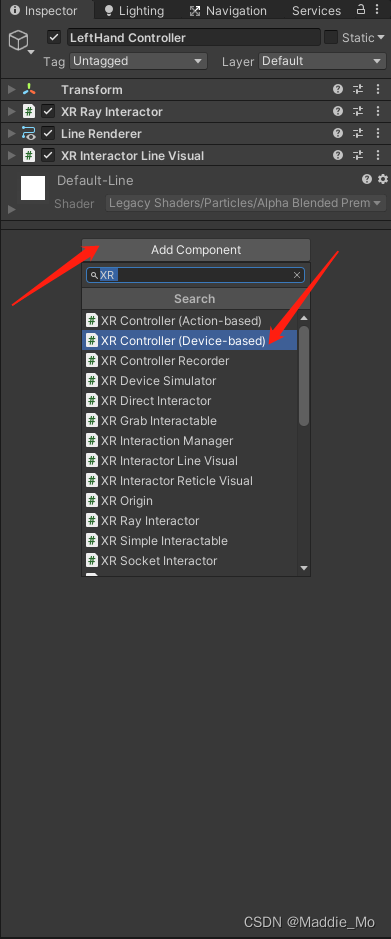
4. 添加 XRController(Device-based)组件。
   RightHand Controller 也一样。
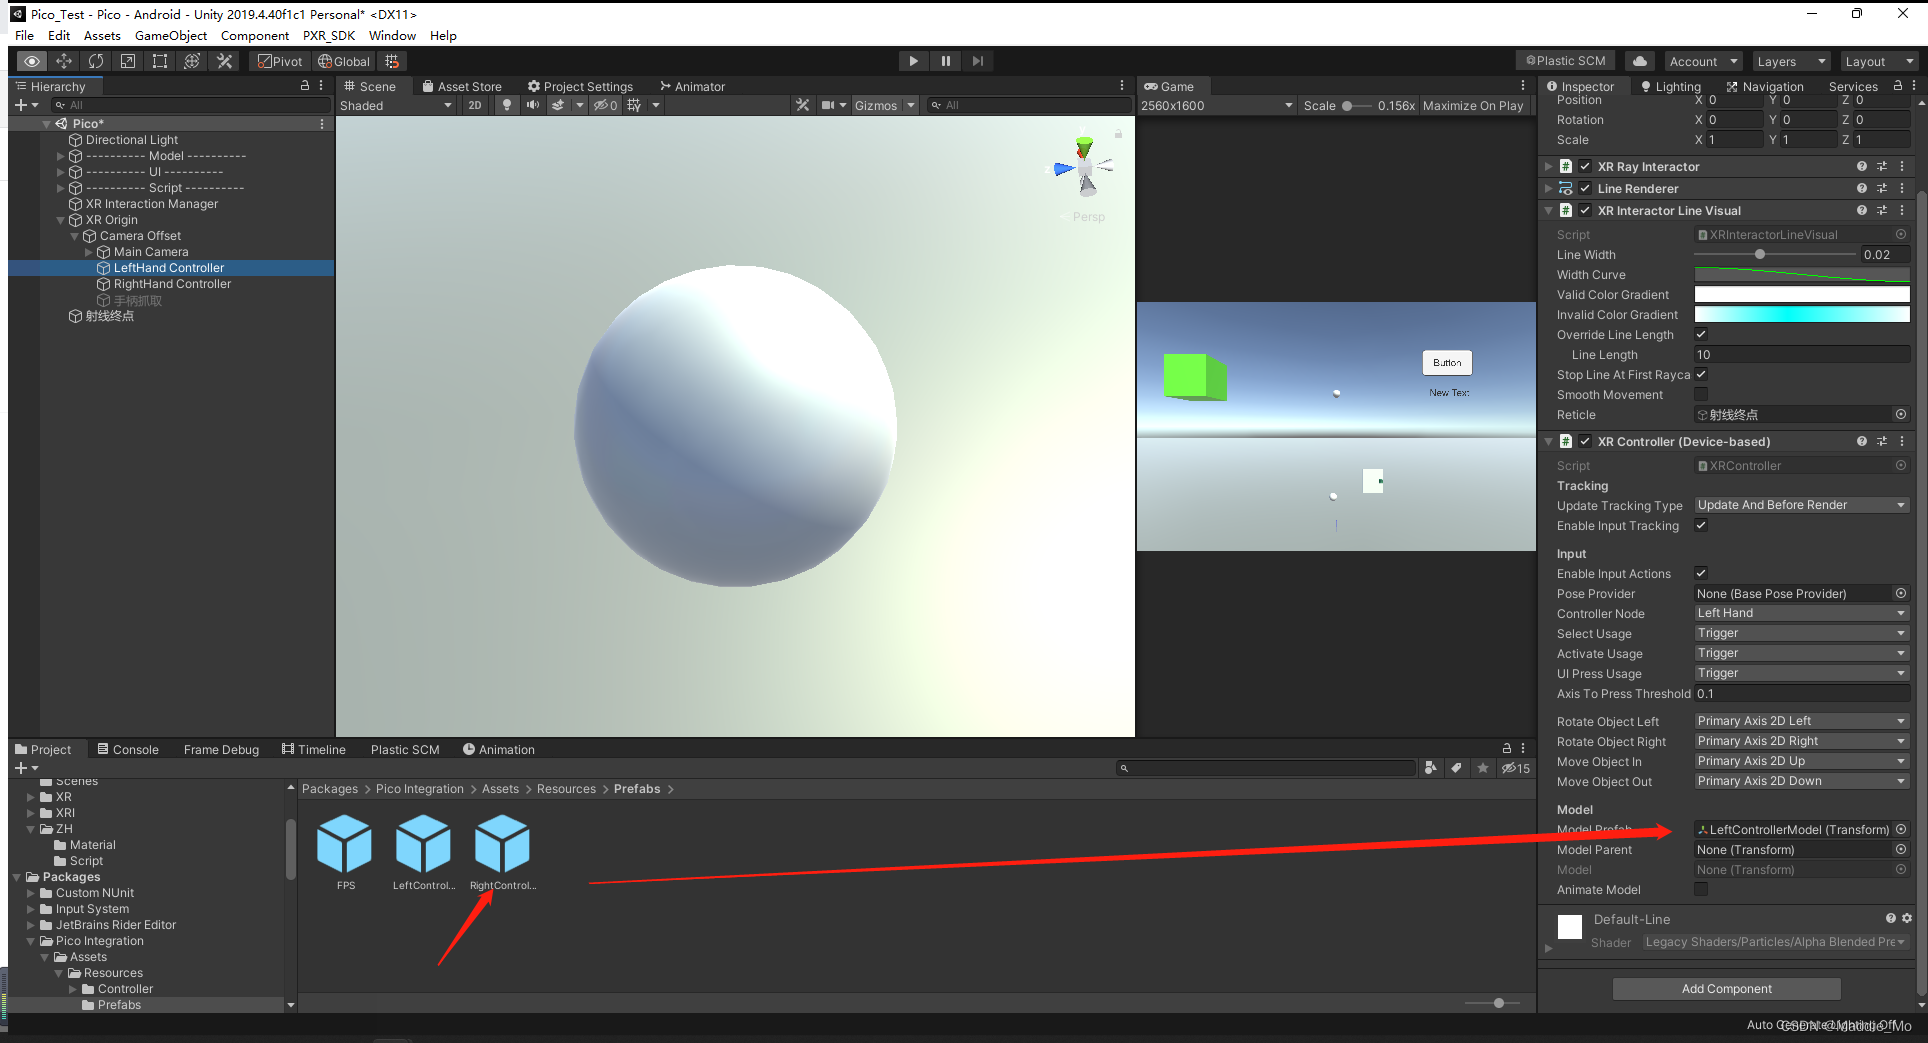
5. 注意在 XRController(Device-based)组件上添加 Model 模型,不然就会只有射线。
   RightHand Controller 也一样。
   Model 模型在:Packages/Pico intergration/Assets/Resources/Prefabs 文件夹下
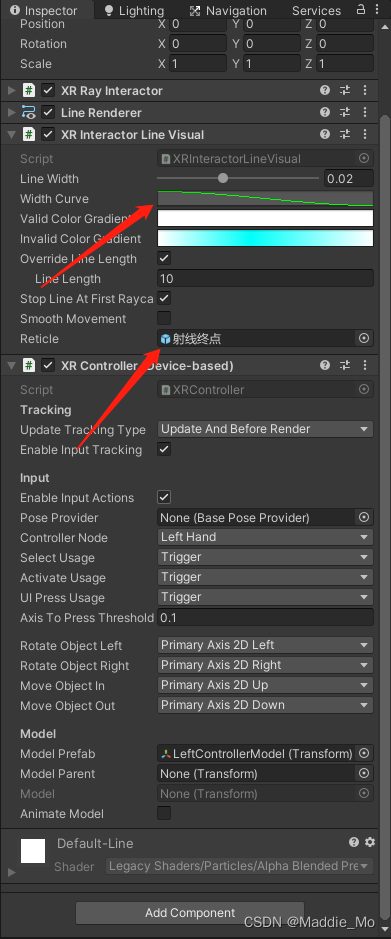
6. XR Interactor Line Visual:射线风格化
   更改 Width Curve 风格化:下行线 的效果是 手柄宽,射线终点窄。
   Reticle:射线终点,如果不设置就是单纯的射线,如果设置就是你设置的模型。
   我这里是使用的 Sphere 小球,大小 0.01f。
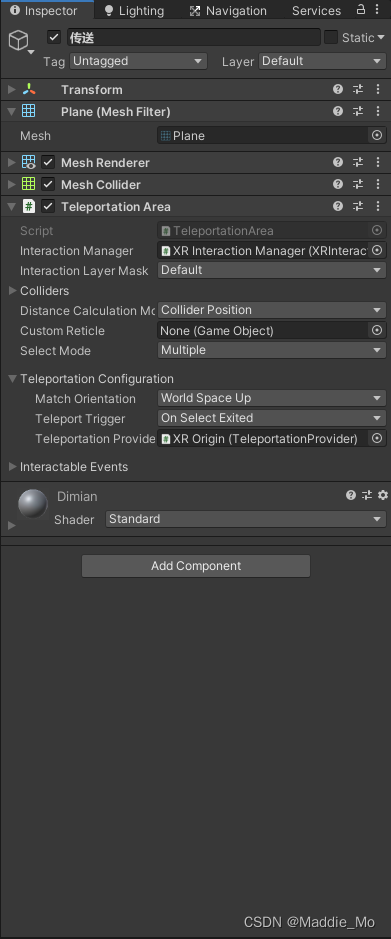
传送 模块
在 Hierarchy 窗口 创建一个 Plane 把Transform组件 Reset一下。
并添加 TeleportationArea:传送区域 组件。
锚点传送 模块
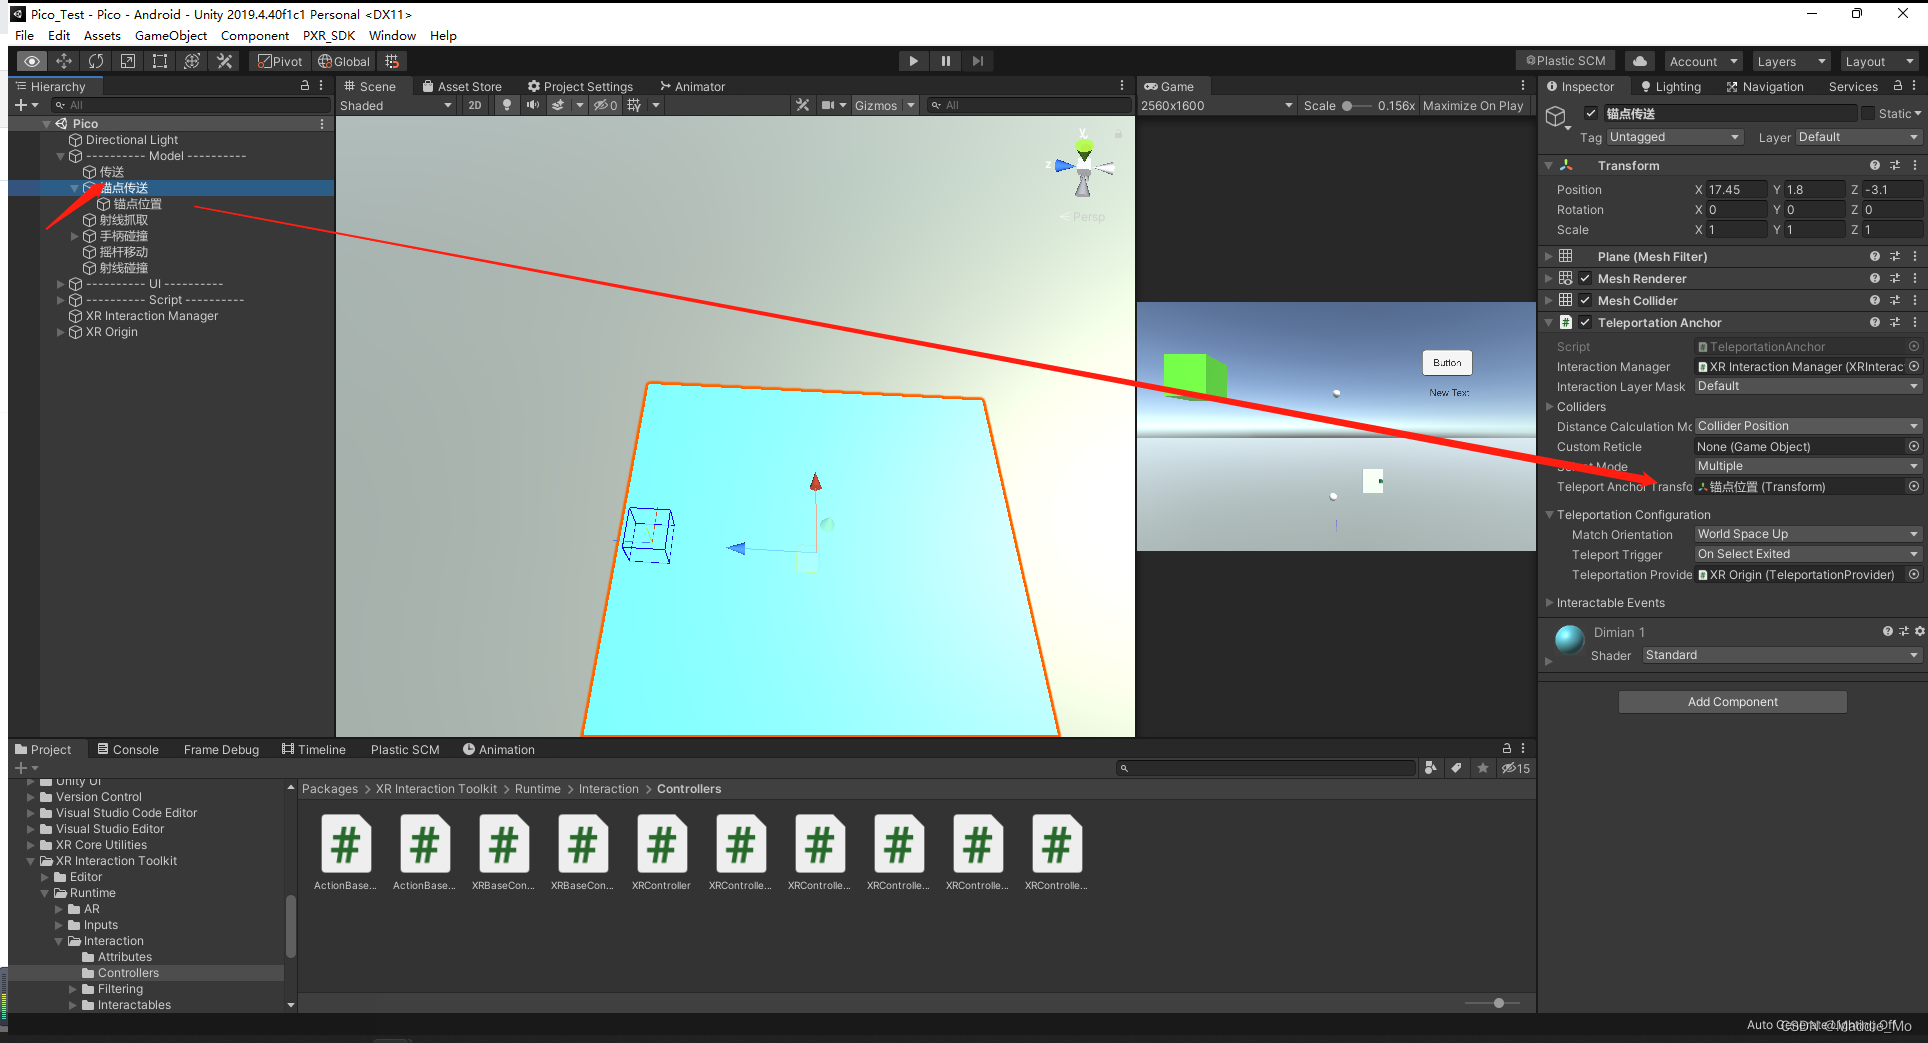
在 Hierarchy 窗口 创建一个 Plane 更改名字(改不改都行)
再在此物体下创建一个空物体作为锚点位置(那个蓝色的小框)。
在 Plane 上添加 TeleportationAnchor:锚点传送 组件
并把锚点位置 空物体赋予给 Telepor Anchor Transform(锚点物体)。
射线抓取 模块
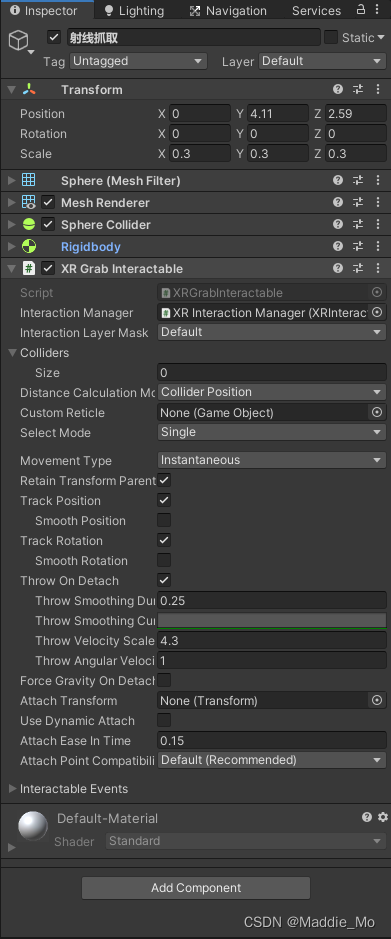
在 Hierarchy 窗口 创建一个 Sphere 更改名字(改不改都行)
在 Sphere 上添加 XR Grb Interactable:抓取 组件
手柄碰撞抓取 模块
和上面的差不多
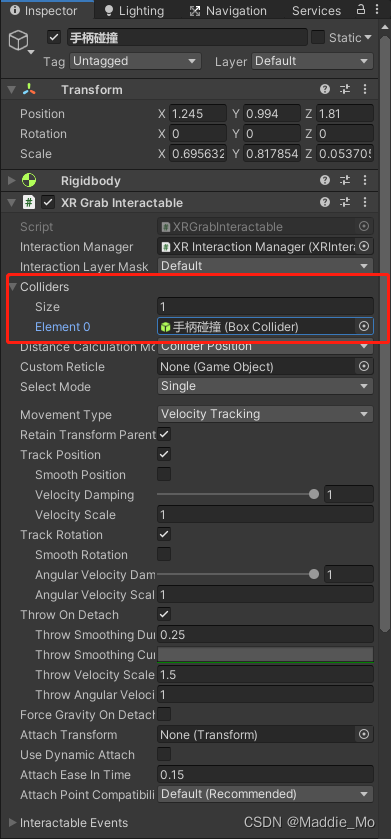
在 Hierarchy 窗口 创建一个 Cube 更改名字(改不改都行)
在 Cube上添加 XR Grb Interactable:抓取 组件。
区别就是 注意添加手柄碰撞抓取。
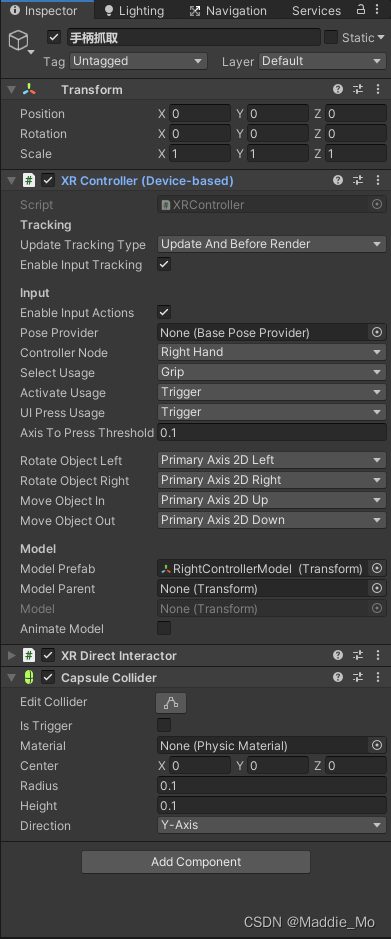
当然手柄也要做出响应的变化:
把你需要响应的手只保留 XR Controller(Device-based)组件。
并添加 XR Direct InterActor 和 Capsule Collider 组件。
Capsule Collider 组件的 Radius 和 Height 设置为 0.1f。
XR UI模块
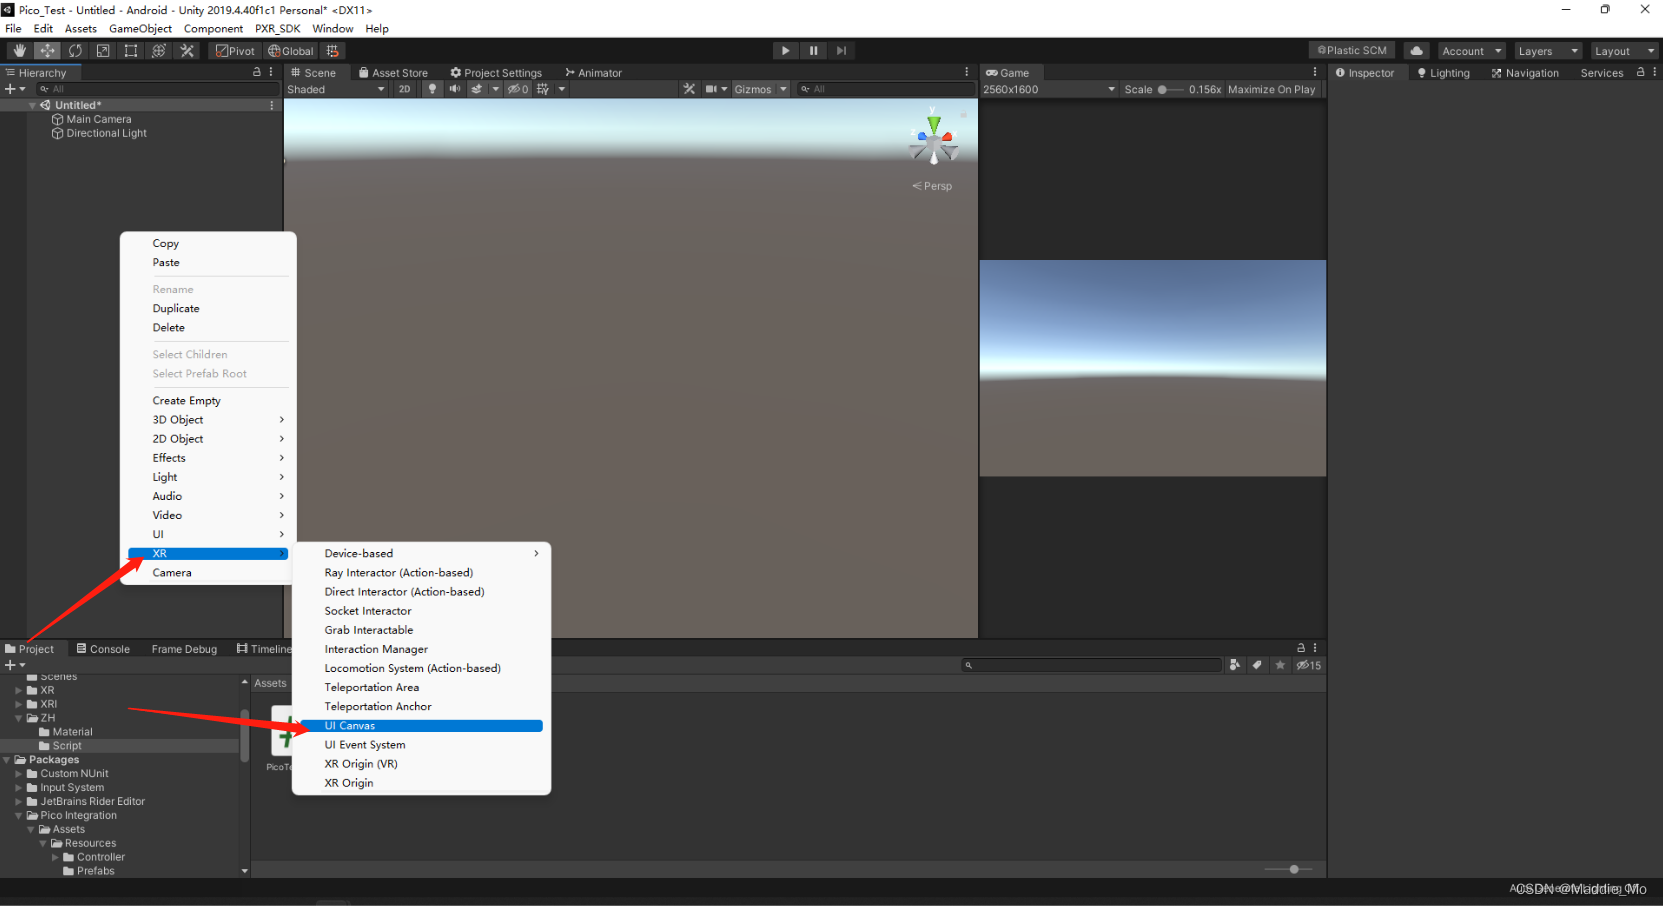
在Hierarchy 窗口 右键 XR -> UI Canvas 进行 UI 模块创建。
为什么要在 XR 的模块下创建 UI 呢? 他和普通的 UI 差别在哪里呢?
首先使用 常规 UI 创建画布 那么 XR模式先就无法响应。
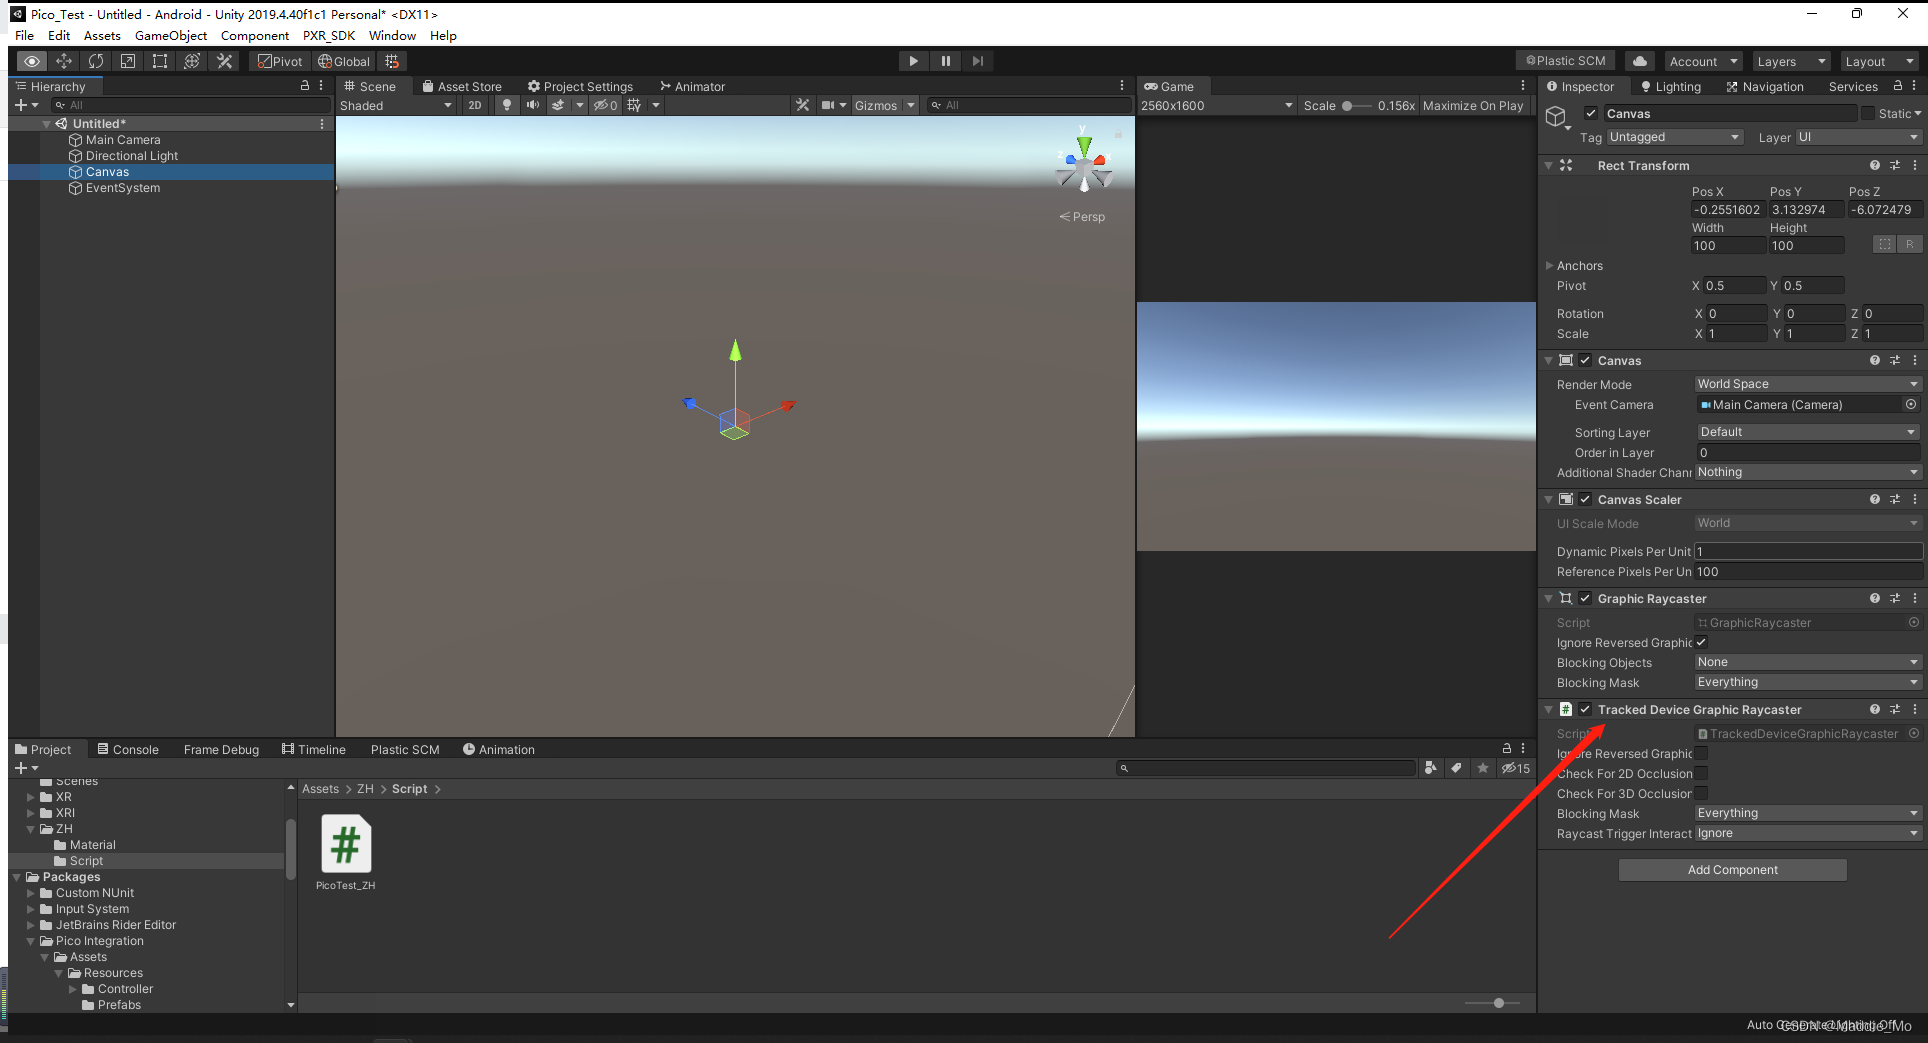
其次 XR 模块下创建的 UI 画布 带了一个TrackedDeviceGraphicRaycaster(跟踪设备图形射线)组件
也就是这个组件接管了 普通 UI 画布的射线管理系统,要是没有这个组件 那么所有的 UI 事件都无法响应。
EventSystem 事件系统:
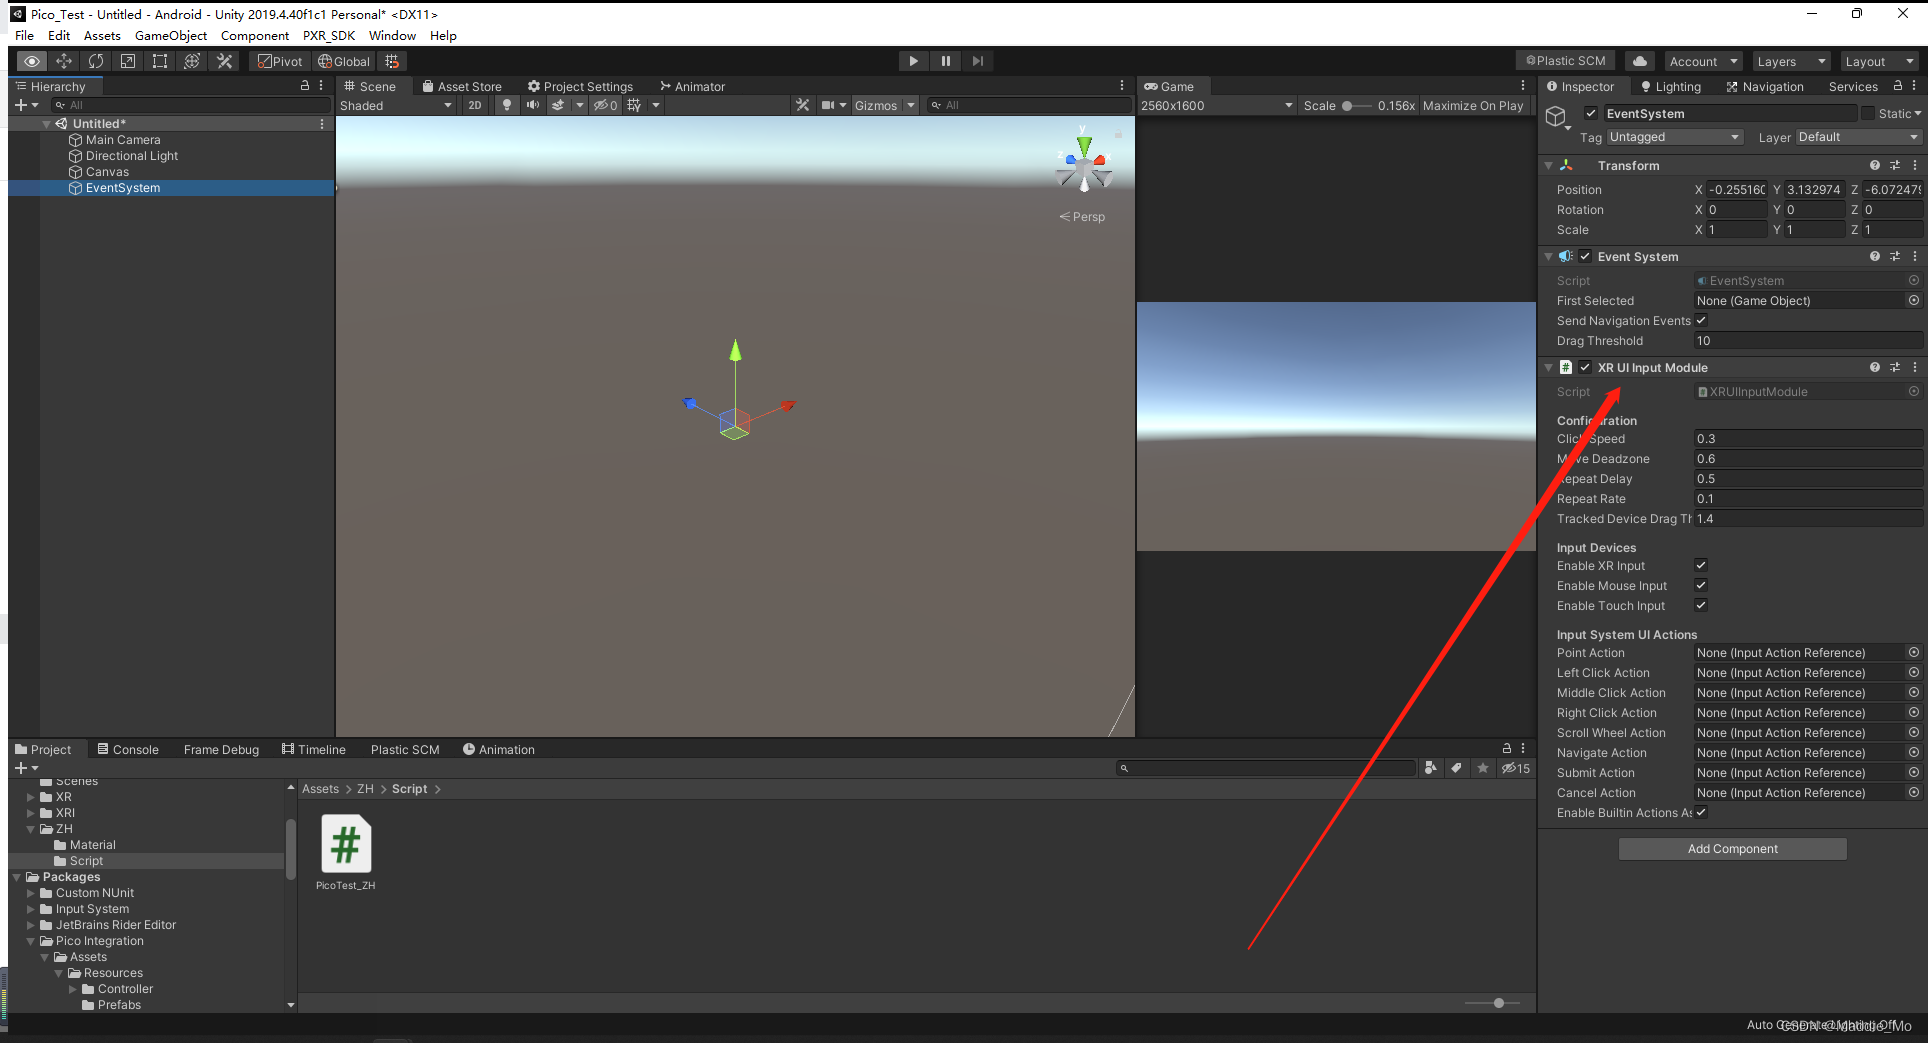
和普通 事件系统的差异化就是 XRUIInputModule(UI 输入 模块)原本的是 StandaloneInputModule组件。
如果你发现你的UI 射线无法点击也无法响应,就查看一下是不是这里出了问题。
射线碰撞事件响应 模块
在 Hierarchy 窗口 创建一个 Cube 更改名字(改不改都行)
在 Cube上添加 XR SImple Interactable:响应组件(不添加也行,不添加就代码添加)。
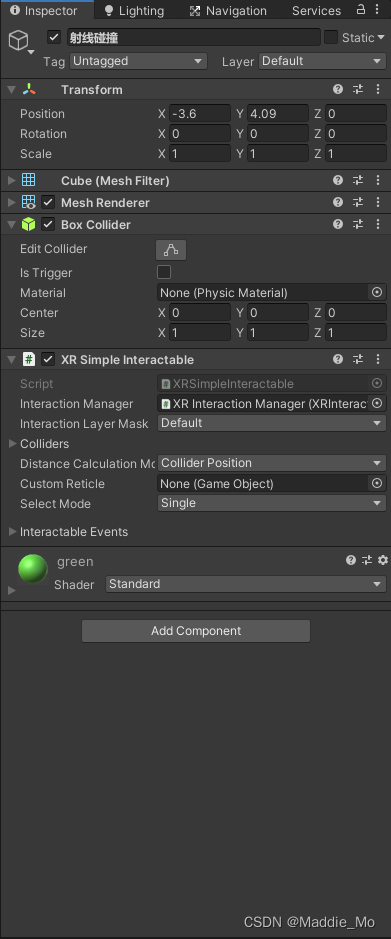
响应并实现:
(SelectEnterEventArgs Data) => { OnPointerClick(Data); }
可直接省略为 (Data) => { OnPointerClick(Data); }
 void Start()
    {
        GameObject.Find("射线碰撞").GetComponent<XRSimpleInteractable>().selectEntered.AddListener((SelectEnterEventArgs Data) => { OnPointerClick(Data); });
        GameObject.Find("射线碰撞").GetComponent<XRSimpleInteractable>().selectExited.AddListener((SelectExitEventArgs Data) => { OnPointerClick(Data); });
        GameObject.Find("射线碰撞").GetComponent<XRSimpleInteractable>().hoverEntered.AddListener((HoverEnterEventArgs Data) => { OnPointerClick(Data); });
        GameObject.Find("射线碰撞").GetComponent<XRSimpleInteractable>().hoverExited.AddListener((HoverExitEventArgs Data) => { OnPointerClick( Data); });

        //GameObject.Find("射线碰撞").GetComponent<XRSimpleInteractable>().selectEntered.AddListener((Data) => { OnPointerClick(Data); });
        //GameObject.Find("射线碰撞").GetComponent<XRSimpleInteractable>().selectExited.AddListener((Data) => { OnPointerClick(Data); });
        //GameObject.Find("射线碰撞").GetComponent<XRSimpleInteractable>().hoverEntered.AddListener((Data) => { OnPointerClick(Data); });
        //GameObject.Find("射线碰撞").GetComponent<XRSimpleInteractable>().hoverExited.AddListener((Data) => { OnPointerClick(Data); });

    }

       /// <summary>
    /// 射线进入并按键
    /// </summary>
    /// <param name="Data"></param>
    public void OnPointerClick(SelectEnterEventArgs Data)
    {
        GameObject.Find("Text").GetComponent<Text>().text = "射线进入并按键";
    }

    /// <summary>
    /// 射线退出松开按键
    /// </summary>
    /// <param name="Data"></param>
    public void OnPointerClick(SelectExitEventArgs Data)
    {
        GameObject.Find("Text").GetComponent<Text>().text = "射线进入松开按键";
    }

    /// <summary>
    /// 射线悬停
    /// </summary>
    /// <param name="Data"></param>
    public void OnPointerClick(HoverEnterEventArgs Data)
    {
        GameObject.Find("Text").GetComponent<Text>().text = "射线悬停";
    }

    /// <summary>
    /// 射线悬停退出
    /// </summary>
    /// <param name="Data"></param>
    public void OnPointerClick(HoverExitEventArgs Data)
    {
        GameObject.Find("Text").GetComponent<Text>().text = "射线悬停退出";
    }
Pico XR 健值操作
using System.Collections;
using System.Collections.Generic;
using Unity.XR.PXR;
using UnityEngine;
using UnityEngine.UI;
using UnityEngine.XR;
using UnityEngine.XR.Interaction.Toolkit;
/// <summary>
/// XR 健值操作
/// </summary>
public class PicoKeysOperation_ZH : MonoBehaviour
{
    [Header("左手控制器")]
    public XRController _LeftController;
    [Header("右手控制器")]
    public XRController _RightController;

    //摇杆移动输出值
    private Vector2 _Result;
    //移动物体
    private Transform _TargetTra;
    void Start()
    {
        _TargetTra = GameObject.Find("摇杆移动").transform;

        GameObject.Find("射线碰撞").GetComponent<XRSimpleInteractable>().selectEntered.AddListener((Data) => { OnPointerClick(Data); });
        GameObject.Find("射线碰撞").GetComponent<XRSimpleInteractable>().selectExited.AddListener((Data) => { OnPointerClick(Data); });
        GameObject.Find("射线碰撞").GetComponent<XRSimpleInteractable>().hoverEntered.AddListener((Data) => { OnPointerClick(Data); });
        GameObject.Find("射线碰撞").GetComponent<XRSimpleInteractable>().hoverExited.AddListener((Data) => { OnPointerClick(Data); });
    }

    /// <summary>
    /// 射线进入并按键
    /// </summary>
    /// <param name="Data"></param>
    public void OnPointerClick(SelectEnterEventArgs Data)
    {
        GameObject.Find("Text").GetComponent<Text>().text = "射线进入并按键";
    }

    /// <summary>
    /// 射线退出松开按键
    /// </summary>
    /// <param name="Data"></param>
    public void OnPointerClick(SelectExitEventArgs Data)
    {
        GameObject.Find("Text").GetComponent<Text>().text = "射线进入松开按键";
    }

    /// <summary>
    /// 射线悬停
    /// </summary>
    /// <param name="Data"></param>
    public void OnPointerClick(HoverEnterEventArgs Data)
    {
        GameObject.Find("Text").GetComponent<Text>().text = "射线悬停";
    }

    /// <summary>
    /// 射线悬停退出
    /// </summary>
    /// <param name="Data"></param>
    public void OnPointerClick(HoverExitEventArgs Data)
    {
        GameObject.Find("Text").GetComponent<Text>().text = "射线悬停退出";
    }

    void Update()
    {
        //是否成功返回
        //获取手部控制器的 摇杆值
        var _Success = _LeftController.inputDevice.TryGetFeatureValue(CommonUsages.primary2DAxis, out _Result);
        if (_Success)
        {
            //物体移动
            _TargetTra.position = new Vector3(_TargetTra.position.x + _Result.x * Time.deltaTime, _TargetTra.position.y, _TargetTra.position.z + _Result.y * Time.deltaTime);
        }


        // X键 按下
        if (_LeftController.inputDevice.TryGetFeatureValue(CommonUsages.primaryButton, out bool _PrimaryBool))
        {
            if (_PrimaryBool)
            {
                GameObject.Find("Text").GetComponent<Text>().text = "左手 按下 primaryButton X键";
            }

        }
        // A键 按下
        if (_RightController.inputDevice.TryGetFeatureValue(CommonUsages.primaryButton, out bool _RightPrimaryBool))
        {
            if (_RightPrimaryBool)
            {
                GameObject.Find("Text").GetComponent<Text>().text = "右手按下 primaryButton A键";
            }
        }
        //Y键 按下
        if (_LeftController.inputDevice.TryGetFeatureValue(CommonUsages.secondaryButton, out bool _SecondaryBool))
        {
            if (_SecondaryBool)
            {
                GameObject.Find("Text").GetComponent<Text>().text = "按下 secondaryButton Y键";
            }

        }
        //B键 按下
        if (_RightController.inputDevice.TryGetFeatureValue(CommonUsages.secondaryButton, out bool _RightSecondaryBool))
        {
            if (_RightSecondaryBool)
            {
                GameObject.Find("Text").GetComponent<Text>().text = "按下 secondaryButton B键";
            }

        }


        //握柄键
        if (_LeftController.inputDevice.TryGetFeatureValue(CommonUsages.grip, out float _Value))
        {
            if (_Value > 0.8f)
            {
                //Debug.LogWarning($"握柄键按下:{_Value}");
                GameObject.Find("Text").GetComponent<Text>().text = $"Grip键 按下:{_Value}";
            }
        }
        //握柄键 按下
        if (_LeftController.inputDevice.TryGetFeatureValue(CommonUsages.gripButton, out bool _GripBool))
        {

            if (_GripBool)
            {
                //Debug.LogWarning("按下握柄键");
                GameObject.Find("Text").GetComponent<Text>().text = "按下握柄键";
            }
        }


        //扳机键
        if (_LeftController.inputDevice.TryGetFeatureValue(CommonUsages.trigger, out float _TriggerValue))
        {
            if (_TriggerValue > 0.8f)
            {
                //Debug.LogWarning($"扳机键按下:{_TriggerValue}");
                GameObject.Find("Text").GetComponent<Text>().text = $"Trigger键 按下:{_TriggerValue}";
            }
        }
        //扳机键按下
        if (_LeftController.inputDevice.TryGetFeatureValue(CommonUsages.triggerButton, out bool _TriggerBool))
        {
            if (_TriggerBool)
            {
                //Debug.LogWarning("按下扳机键");
                GameObject.Find("Text").GetComponent<Text>().text = "按下 Trigger键";
            }
        }

        //菜单键按下
        if (_LeftController.inputDevice.TryGetFeatureValue(CommonUsages.menuButton, out bool _MenuBool))
        {
            if (_MenuBool)
            {
                Debug.LogWarning("按下菜单键");
                GameObject.Find("Text").GetComponent<Text>().text = "按下 Menu键";
            }

        }
        if (InputHelpers.IsPressed(_RightController.inputDevice, InputHelpers.Button.MenuButton, out bool _RightMenuBool))
        {
            if (_RightMenuBool)
            {
                Debug.LogWarning("右手按下 Menu键");
                GameObject.Find("Text").GetComponent<Text>().text = "右手按下 Menu键";
            }
        }

        //第二种方法
        //如果 扳机键按下的值超过 0.8f 就触发
        if (InputHelpers.IsPressed(_RightController.inputDevice, InputHelpers.Button.Trigger, out bool Ispressed, 0.8f))
        {
            if (Ispressed)
            {
                Debug.LogWarning(" _RightController Trigger键 超过 0.8f");

                GameObject.Find("Text").GetComponent<Text>().text = "Trigger键 超过 0.8f";
            }
        }

    }
}
Unity Pico 简单应用
    [Header("头盔")]
    public Transform _PicoCamera;

    [Header("Pico 左手控制")]
    public XRController _LeftController;
    [Header("Pico 右手控制")]
    public XRController _RightController;
    [
    Header("场景 UI")]
    public Canvas _SceneUI;

    [Header("背景音乐 ")]
    public AudioSource _Audio;

    //背景音乐控制
    private int _AudioNumber;

    // UI 偏移控制
    private Vector3 _PosVec=new Vector3(3.1f, 1.0f, 3.51f), _EulerAngles;
    //按键控制
    //为什么有这个按键控制,是因为XR 的按键响应不是只响应一次  而是会响应多次。
    //所以使用 双重布尔值进行 限制判定。
    bool _KeyDownBool, _KeyDownBool2, _KeyDownBoolMenue, _KeyDownBoolMenue2;

    private void Awake()
    {
        _Instants = this;

        Initialize();
    }

    void Update()
    {
        //X \ A 键  音乐控制
        if (_LeftController.inputDevice.TryGetFeatureValue(CommonUsages.primaryButton, out bool _LeftPrimaryBool) )
        {

            if (_LeftPrimaryBool)
            {
                _KeyDownBool = true;
            }

            if (!_LeftPrimaryBool && _KeyDownBool2)
            {
                //背景音乐 控制
                _AudioNumber++;
                if (_AudioNumber == 1)
                {
                    _Audio.Pause();
                    //文字转语音
                    StartCoroutine(TextToSpeech_ZH._World.GetAudioClip("背景音乐暂停。"));

                }
                else if (_AudioNumber == 2)
                {
                    _Audio.Play();
                    //文字转语音
                    StartCoroutine(TextToSpeech_ZH._World.GetAudioClip("背景音乐播放。"));
                    _AudioNumber = 0;
                }
            }
        }
        if (_RightController.inputDevice.TryGetFeatureValue(CommonUsages.primaryButton, out bool _RightPrimaryBool))
        {
            if (_RightPrimaryBool)
            {
                _KeyDownBool = true;
            }

            if (!_RightPrimaryBool&& _KeyDownBool)
            {
                //背景音乐 控制
                _AudioNumber++;
                if (_AudioNumber == 1)
                {
                    _Audio.Pause();
                    //文字转语音
                    StartCoroutine(TextToSpeech_ZH._World.GetAudioClip("背景音乐暂停。"));
                }
                else if (_AudioNumber == 2)
                {
                    _Audio.Play();
                    //文字转语音
                    StartCoroutine(TextToSpeech_ZH._World.GetAudioClip("背景音乐播放。"));
                    _AudioNumber = 0;
                }
                _KeyDownBool = false;
            }
        }

        //菜单键 按下
        if (_LeftController.inputDevice.TryGetFeatureValue(CommonUsages.menuButton, out bool _LeftMenuBool))
        {
            if (_LeftMenuBool)
            {
                _KeyDownBoolMenue2 = true;
            }
            if (!_LeftMenuBool&& _KeyDownBoolMenue2)
            {
                //菜单 UI 显示
                _SceneUI.gameObject.SetActive(true);

                //菜单 UI 固定位置显示
                _SceneUI.transform.position = new Vector3(_PicoCamera.parent.parent.position.x, _PicoCamera.parent.parent.position.y + _PosVec.y, _PicoCamera.parent.parent.position.z) + _PicoCamera.parent.parent.forward * _PosVec.z;
                _SceneUI.transform.LookAt(new Vector3(_PicoCamera.parent.parent.position.x, _SceneUI.transform.position.y, _PicoCamera.parent.parent.position.z) + _EulerAngles);

				//文字转语音
                StartCoroutine(TextToSpeech_ZH._World.GetAudioClip("菜单已打开"));

                _KeyDownBoolMenue = false;
            }
        }
        if (_RightController.inputDevice.TryGetFeatureValue(CommonUsages.menuButton, out bool _RightMenuBool))
        {
            if (_RightMenuBool)
            {
                _KeyDownBoolMenue = true;
            }

            if (!_RightMenuBool&& _KeyDownBoolMenue)
            {
                //菜单 UI 显示
                _SceneUI.gameObject.SetActive(true);

                //菜单 UI 固定位置显示
                _SceneUI.transform.position = new Vector3(_PicoCamera.parent.parent.position.x, _PicoCamera.parent.parent.position.y + _PosVec.y, _PicoCamera.parent.parent.position.z) + _PicoCamera.parent.parent.forward * _PosVec.z;
                _SceneUI.transform.LookAt(new Vector3(_PicoCamera.parent.parent.position.x, _SceneUI.transform.position.y, _PicoCamera.parent.parent.position.z) + _EulerAngles);

				//文字转语音
                StartCoroutine(TextToSpeech_ZH._World.GetAudioClip("菜单已打开"));

                _KeyDownBoolMenue = false;
            }
        }
    }
 /// <summary>
    /// 初始化
    /// </summary>
    public void Initialize()
    {
    	// PicoCamera
        if (_PicoCamera == null)
        {
            _PicoCamera = Camera.main.transform;
        }
        //左手控制器
        if (_LeftController == null)
        {
            _LeftController = _PicoCamera.parent.Find("LeftHand Controller").GetComponent<XRController>();
        }
        //右手控制器
        if (_RightController==null)
        {
            _RightController = _PicoCamera.parent.Find("RightHand Controller").GetComponent<XRController>();
        }
		//背景音乐
        if (_Audio == null)
        {
            _Audio = GameObject.Find("---------- Audio ----------").transform.Find("Audio").GetComponent<AudioSource>();
        }

        //菜单 UI
        if (_SceneUI == null)
        {
            _SceneUI = GameObject.Find("菜单 UI").GetComponent<Canvas>();
            _SceneUI.gameObject.SetActive(false);
        }
        else
        {
            _SceneUI.gameObject.SetActive(false);
        }
    }
暂时先这样吧,如果有时间的话就会更新,实在看不明白就留言,看到我会回复的。
路漫漫其修远兮,与君共勉。