netty解决TCP粘包和拆包
1. TCP粘包现象出现的原因
TCP 是面向连接,面向流,可以提供高可靠性,在发送数据的时候,因为TCP发送数据是按照数据块的,为了提供发送的效率,发送端会将多个小的数据数据包合并在一块(主要是Nagle算法),更好的发送数据。这样就出现了一个新的问题,接收端不能识别出来原始数据,这就是粘包。
 说明:
说明:
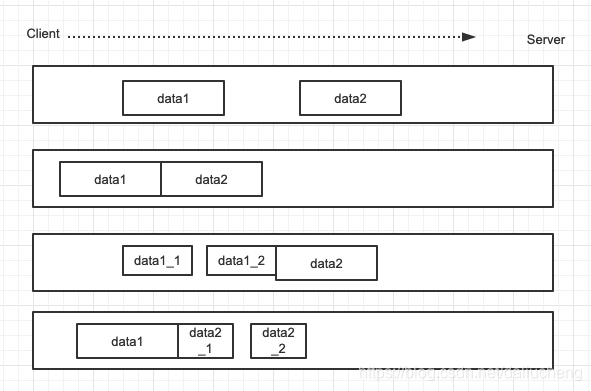
- 第一行所示,data1和data2都是两次独立的包,没有发生粘包。
- 第二行所示,data1和data2 两个粘在一块,发生粘包。
- 第三行所示,data1分为一半,前面一半,是一个独立的包,后面的是data1的另一半和data2粘联在一块。
- 第四行所示,data2分为一半,和第三行一样。也发生了粘包。
1.1 现象重显
class TestTCpZhan{
    //服务端
    public synchronized void  startServer(){
		//NioEventLoopGroup 是一个NioEventLoop的集合,每一个NioEventLoop都
		//都是一个独立的channel和select
        NioEventLoopGroup boosGroup = new NioEventLoopGroup(1);
        NioEventLoopGroup workGroup = new NioEventLoopGroup();

        try {
            ServerBootstrap serverBootstrap = new ServerBootstrap();
            serverBootstrap.group(boosGroup,workGroup)
                    .channel(NioServerSocketChannel.class)
                    //这配置对应的是 tcp连接函数中的backLog参数
                    //用来初始化服务器可连接队列的大小
                    //服务端处理客户端连接请求都是顺序处理的
                    //所以,同一时刻就只能处理一个,处理不下的就是放在这个队列里面
                    .option(ChannelOption.SO_BACKLOG,128)
                    //这个配置的是保持长连接。
                    .childOption(ChannelOption.SO_KEEPALIVE, true)
                    .childHandler(new ChannelInitializer<SocketChannel>() {
                        @Override
                        protected void initChannel(SocketChannel socketChannel) throws Exception {
                            socketChannel.pipeline()
                                    .addLast(new SimpleChannelInboundHandler<ByteBuf>() {
                                        @Override
                                        protected void channelRead0(ChannelHandlerContext channelHandlerContext, ByteBuf byteBuf) throws Exception {
                                            System.out.println("服务端收到消息" + byteBuf.toString(StandardCharsets.UTF_8));
                                            channelHandlerContext.writeAndFlush(Unpooled.copiedBuffer(UUID.randomUUID().toString(),StandardCharsets.UTF_8));
                                        }

                                        @Override
                                        public void exceptionCaught(ChannelHandlerContext ctx, Throwable cause) throws Exception {
                                            cause.printStackTrace();
                                            ctx.close();
                                        }
                                    });
                        }
                    });
            PrintUtil.printInfo("server is start");
            ChannelFuture future = serverBootstrap.bind(7777).sync();
            future.channel().closeFuture().sync();
        } catch (InterruptedException e) {
            e.printStackTrace();
        } finally {
            workGroup.shutdownGracefully();
            boosGroup.shutdownGracefully();
        }


    }
    //客户端
    public void startClient(){
        NioEventLoopGroup workGroup = new NioEventLoopGroup();
        try {
            Bootstrap bootstrap = new Bootstrap();
            bootstrap.group(workGroup)
                    .channel(NioSocketChannel.class)
                    .handler(new ChannelInitializer<SocketChannel>() {
                        @Override
                        protected void initChannel(SocketChannel socketChannel) throws Exception {
                            socketChannel.pipeline()
                                    .addLast(new SimpleChannelInboundHandler<ByteBuf>() {
                                        //读取数据
                                        @Override
                                        protected void channelRead0(ChannelHandlerContext channelHandlerContext, ByteBuf byteBuf) throws Exception {
                                            System.out.println("客户端收到服务端的消息为:" + byteBuf.toString(StandardCharsets.UTF_8));
                                        }
                                        //channel 准备好之后,先调用channel add,之后就是这个 active。
                                        @Override
                                        public void channelActive(ChannelHandlerContext ctx) throws Exception {
                                            //在这里准备好之后,开始发送数据
                                            //这里先发送数据,这里
                                            for (int i = 0; i < 10; i++) {
                                                ctx.writeAndFlush(Unpooled.copiedBuffer("hello:server" + i,StandardCharsets.UTF_8));
                                            }
                                        }

                                        @Override
                                        public void exceptionCaught(ChannelHandlerContext ctx, Throwable cause) throws Exception {
                                            cause.printStackTrace();
                                            ctx.close();
                                        }
                                    });
                        }
                    });
            ChannelFuture channelFuture = bootstrap.connect(new InetSocketAddress(7777)).sync();
            channelFuture.channel().closeFuture().sync();

        } catch (InterruptedException e) {
            e.printStackTrace();
        } finally {
            workGroup.shutdownGracefully();
        }
    }
}
- 结果

按照上面的代码逻辑,一次发送数据,应该返回一个回应,但是从运行结果上看,只发了两次数据,收到两次响应,可以看到数据压缩了。发生了粘包。
2. 解决思路
- 使用自定义的协议和编解码器来做。
- 每次规定读取多少字节的数据,就能消除粘包。
3. netty解决方法
- 自定义协议
/**
 * 自定义消息协议
 *
 * @author lc
 * @date 2021/08/02
 *///自定义的消息传输的协议
class MyMessageProtocol{
    /**
     * 长度
     */
    private int length;
    /**
     * 内容
     */
    byte[] content;

    /**
     * 得到长度
     *
     * @return int
     */
    public int getLength() {
        return length;
    }

    /**
     * 设置的长度
     *
     * @param length 长度
     */
    public void setLength(int length) {
        this.length = length;
    }

    /**
     * 获取内容
     *
     * @return {@link byte[]}
     */
    public byte[] getContent() {
        return content;
    }

    /**
     * 设置内容
     *
     * @param content 内容
     */
    public void setContent(byte[] content) {
        this.content = content;
    }
}
- 代码
注意,这里的代码分为客户端和服务端,我直接把两个写在一块了,并且在服务端添加了编解码器,在代码里面添加了注释。
class NettyResolveTcpZhan{
    //服务端
    public synchronized void  startServer(){

        NioEventLoopGroup boosGroup = new NioEventLoopGroup(1);
        NioEventLoopGroup workGroup = new NioEventLoopGroup();

        try {
            ServerBootstrap serverBootstrap = new ServerBootstrap();
            serverBootstrap.group(boosGroup,workGroup)
                    .channel(NioServerSocketChannel.class)
                    .option(ChannelOption.SO_BACKLOG,128)
                    .childOption(ChannelOption.SO_KEEPALIVE, true)
                    .childHandler(new ChannelInitializer<SocketChannel>() {
                        @Override
                        protected void initChannel(SocketChannel socketChannel) throws Exception {
                            socketChannel.pipeline()
                                    //添加一个自定义的编解码器。
                                    //这个编解码器能缓存接受来的消息,然后做自定义的数据读取
                                    //首先要明确,这里的编解码器都是pipeline中的handle。
                                    .addLast(new ByteToMessageCodec<MyMessageProtocol>() {
                                        //编码
                                        @Override
                                        // 参数一:context,参数二:实体类,这就是从出战的上一个handle中处理过后的实体类,参数三: handle关联的byteBuf。
                                        protected void encode(ChannelHandlerContext channelHandlerContext, MyMessageProtocol messageProtocol, ByteBuf byteBuf) throws Exception {
                                            //这里的byteBuf就是通过channelHandlerContext来创建出来的,
                                            //直接往byteBuf里面写数据。
                                            PrintUtil.printInfo("ByteToMessageCodec#encode:"+ messageProtocol.toString());
                                            //这里给客户端的响应也是 和客户端发送消息一样。
                                            byteBuf.writeInt(messageProtocol.getLength());
                                            byteBuf.writeBytes(messageProtocol.getContent());
                                        }
                                        //解码
                                        @Override
                                        //参数1:context,参数2:byteBuf,就是这个channel关联的byteBuf,参数3:入站方向的下一个handle的入参集合。
                                        protected void decode(ChannelHandlerContext channelHandlerContext, ByteBuf byteBuf, List<Object> list) throws Exception {

                                            //这里的读取顺序和客户端发送的都是一样的,
                                            //注意,这里先是读取了 length,表示 这段数据的长度,然后在从byteBuf中读取length长度的数据。
                                            int length = byteBuf.readInt();
                                          PrintUtil.printInfo("ByteToMessageCodec#decode:" + length);
                                            byte[] content = new byte[length];
                                            byteBuf.readBytes(content);
                                            MyMessageProtocol myMessageProtocol = new MyMessageProtocol();
                                            myMessageProtocol.setLength(length);
                                            myMessageProtocol.setContent(content);
                                            list.add(myMessageProtocol);
                                        }
                                    })
                                    .addLast(new SimpleChannelInboundHandler<MyMessageProtocol>() {
                                        @Override
                                        protected void channelRead0(ChannelHandlerContext channelHandlerContext, MyMessageProtocol byteBuf) throws Exception {
                                            System.out.println("服务端收到消息" + byteBuf.toString());
                                            byte[] responseMessageBytes = UUID.randomUUID().toString().getBytes(StandardCharsets.UTF_8);
                                            MyMessageProtocol myMessageProtocol = new MyMessageProtocol();
                                            myMessageProtocol.setContent(responseMessageBytes);
                                            myMessageProtocol.setLength(responseMessageBytes.length);
                                            //这里为啥可以用这种方式,直接writeAndFlush,而不是经过byteBuf
                                            //因为还有编码器来处理。在编码器里面处理了,本质上肯定是不能离开byteBuf的。
                                            channelHandlerContext.writeAndFlush(myMessageProtocol);
                                        }

                                        @Override
                                        public void exceptionCaught(ChannelHandlerContext ctx, Throwable cause) throws Exception {
                                            cause.printStackTrace();
                                            ctx.close();
                                        }
                                    });
                        }
                    });
            PrintUtil.printInfo("server is start");
            ChannelFuture future = serverBootstrap.bind(7777).sync();
            future.channel().closeFuture().sync();
        } catch (InterruptedException e) {
            e.printStackTrace();
        } finally {
            workGroup.shutdownGracefully();
            boosGroup.shutdownGracefully();
        }


    }
    //客户端
    public void startClient(){
        NioEventLoopGroup workGroup = new NioEventLoopGroup();
        try {
            Bootstrap bootstrap = new Bootstrap();
            bootstrap.group(workGroup)
                    .channel(NioSocketChannel.class)
                    .handler(new ChannelInitializer<SocketChannel>() {
                        @Override
                        protected void initChannel(SocketChannel socketChannel) throws Exception {
                            socketChannel.pipeline()
                                    //这里要注意,我现在更加的确信,只有byteBuf才是最 netty传输最根本的。
                                    //这里为啥不用MyMessageProtocol,因为我没有在这个handle之前增加编解码器。
                                    //如果直接用MyMessageProtocol的话,这里的channelRead0 是读取不到数据的。
                                    //我这里是为了偷懒,我就没有写编解码。要是写的话,也是挺简单的,就把server那里的直接复制粘贴就好了。
                                    .addLast(new SimpleChannelInboundHandler<ByteBuf>() {
                                        //读取数据
                                        @Override
                                        protected void channelRead0(ChannelHandlerContext channelHandlerContext, ByteBuf byteBuf) throws Exception {
                                            String message = byteBuf.toString(StandardCharsets.UTF_8);
                                            System.out.println("客户端收到响应:" + message);
                                        }
                                        //channel 准备好之后,先调用channel add,之后就是这个 active。
                                        @Override
                                        public void channelActive(ChannelHandlerContext ctx) throws Exception {
                                            //在这里准备好之后,开始发送数据
                                            //这里先发送数据,这里
                                            for (int i = 0; i < 10; i++) {
                                                //客户端其实很简单,就是封装好消息,然后发送就可以。主要的功能在于服务端
                                                String message = "hello:server" + i;
                                                byte[] messageBytes = message.getBytes(StandardCharsets.UTF_8);
                                                int messageLength = messageBytes.length;
                                                MyMessageProtocol myMessageProtocol = new MyMessageProtocol();
                                                myMessageProtocol.setContent(messageBytes);
                                                myMessageProtocol.setLength(messageLength);
                                                //这里直接放myMessageProtocol,不像之前,用byteBuffer,直接发送 byteBuf。
                                                // 之前的发送的byteBuf其实也是通过一个工具类来包装的  ByteBuf byteBuf = Unpooled.copiedBuffer();
                                               // 需要知道,netty的byteByf都是通过分配器的分配的,里面有参数,来区分,是直接内存还是堆外内存。
                                                ByteBuf buffer = Unpooled.buffer();
                                                buffer.writeInt(messageLength);
                                                buffer.writeBytes(messageBytes);

                                                //这里要注意,不能直接的放myMessageProtocol,还是得通过 buffer 来写
                                                //第一次的时候我也适用myMessageProtocol 但是发现服务端就没有接收到。。
                                                //所以经过我的一波操作,就变成了现在的这个样子
                                                //还是利用byteBuf来写,这里利用这种方式来写
                                                //在服务端也就是通过这样的方式来读,但是具体的原理这里我没有看
                                                ctx.writeAndFlush(buffer);
                                            }
                                        }

                                        @Override
                                        public void exceptionCaught(ChannelHandlerContext ctx, Throwable cause) throws Exception {
                                            cause.printStackTrace();
                                            ctx.close();
                                        }
                                    });
                        }
                    });
            ChannelFuture channelFuture = bootstrap.connect(new InetSocketAddress(7777)).sync();
            channelFuture.channel().closeFuture().sync();

        } catch (InterruptedException e) {
            e.printStackTrace();
        } finally {
            workGroup.shutdownGracefully();
        }
    }
}
总体的解决方案就是
自定义协议,告诉netty,一个消息的长度是多少,剩下的操作就是在编解码器这里操作了。
- 结果
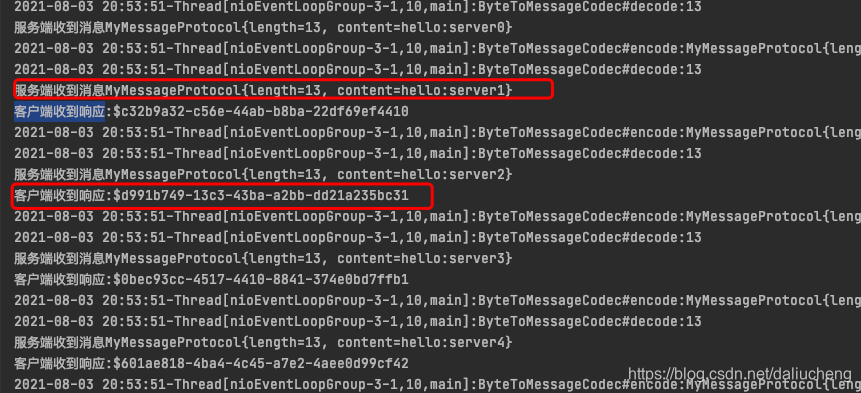 可以看到,就没有上面出现的问题了。很好的解决掉了tcp粘包的问题。
补充
和粘包对应的是拆包,意思就是把粘在一起的包拆开。上面操作就是通过自定义协议来处理粘包也就是正确的拆包。