K8S官方文档


docker的namespace:是利用宿主机内核的namespace功能实现容器的资源隔离
k8s的namespace:是基于名称实现项目容器的隔离,叫命名空间
master节点组件:
kube-apiserver:Kubernetes API server 为 api 对象验证并配置数据,包括 pods、 services、replicationcontrollers和其它 api 对象,API Server 提供 REST 操作和到集群共享状态的前端,所有其他组件通过它进行交互。
kube-scheduler:是一个拥有丰富策略、能够感知拓扑变化、支持特定负载的功能组件,它对集群的可用性、性能表现以及容量都影响巨大。scheduler需要考虑独立的和集体的资源需求、服务质量需求、硬件/软件/策略限制、亲和与反亲和规范、数据位置、内部负载接口、截止时间等等。如有必要,特定的负载需求可以通过API暴露出来。
kube-controller-manager:Controller Manager作为集群内部的管理控制中心,负责集群内的Node、Pod副本、服务端点(Endpoint)、命名空间(Namespace)、服务账号(ServiceAccount)、资源定额(ResourceQuota)的管理,当某个Node意外宕机时,Controller Manager会及时发现并执行自动化修复流程,确保集群始终处于预期的工作状态。
etcd:etcd 是CoreOS公司开发目前是Kubernetes默认使用的key-value数据存储系统,用于保存所有集群数据,支持分布式集群功能,生产环境使用时需要为etcd数据提供定期备份机制。
node节点组件:
kube-proxy:Kubernetes 网络代理运行在 node 上,它反映了 node 上 Kubernetes API 中定义的服务,并可以通过一组后端进行简单的 TCP、UDP 流转发或循环模式(round robin))的 TCP、UDP 转发,用户必须使用apiserver API 创建一个服务来配置代理,其实就是kube-proxy通过在主机上维护网络规则并执行连接转发来实现Kubernetes服务访问。
kubelet:是主要的节点代理,它会监视已分配给节点的pod,具体功能如下:
向master汇报node节点的状态信息
接受指令并在Pod中创建 docker容器
准备Pod所需的数据卷
返回pod的运行状态
在node节点执行容器健康检查
部署K8S,基本环境准备
| 主机 | ip |
|---|---|
| k8s-master01 | 192.168.15.201 |
| k8s-master02 | 192.168.15.202 |
| k8s-master03 | 192.168.15.203 |
| ha1 | 192.168.15.204 |
| ha2 | 192.168.15.205 |
| harbor | 192.168.15.206 |
| k8s-node01 | 192.168.15.207 |
| k8s-node02 | 192.168.15.208 |
| k8s-node03 | 192.168.15.209 |
注意:服务器内存至少为2个G。
系统优化
注意:禁用swap,selinux,iptables,并优化内核参数及资源限制参数,所有主机全部执行
# 关闭防火墙
systemctl disable --now firewalld

# 关闭Selinux
setenforce 0

# 关闭swap交换分区
# 临时关闭swap分区
swapoff -a
# 永久关闭swap分区
sed -i.bak '/swap/s/^/#/' /etc/fstab
# 修改/etc/fstab 让kubelet忽略swap分区
echo 'KUBELET_EXTRA_ARGS="--fail-swap-on=false"' > /etc/sysconfig/kubelet

# 查看swap交换分区(确认关闭状态)
[root@k8s-master-01 ~]# free -h
              total        used        free      shared  buff/cache   available
Mem:           2.9G        205M        2.6G        9.4M        132M        2.6G
Swap:            0B          0B          0B
vim /etc/sysctl.conf
# Controls source route verification
net.ipv4.conf.default.rp_filter = 1
net.ipv4.ip_nonlocal_bind = 1
net.ipv4.ip_forward = 1

# Do not accept source routing
net.ipv4.conf.default.accept_source_route = 0

# Controls the System Request debugging functionality of the kernel
kernel.sysrq = 0

# Controls whether core dumps will append the PID to the core filename.
# Useful for debugging multi-threaded applications.
kernel.core_uses_pid = 1

# Controls the use of TCP syncookies
net.ipv4.tcp_syncookies = 1

# Disable netfilter on bridges.
net.bridge.bridge-nf-call-ip6tables = 0
net.bridge.bridge-nf-call-iptables = 0
net.bridge.bridge-nf-call-arptables = 0

# Controls the default maxmimum size of a mesage queue
kernel.msgmnb = 65536

# # Controls the maximum size of a message, in bytes
kernel.msgmax = 65536

# Controls the maximum shared segment size, in bytes
kernel.shmmax = 68719476736

# # Controls the maximum number of shared memory segments, in pages
kernel.shmall = 4294967296


# TCP kernel paramater
net.ipv4.tcp_mem = 786432 1048576 1572864
net.ipv4.tcp_rmem = 4096        87380   4194304
net.ipv4.tcp_wmem = 4096        16384   4194304
net.ipv4.tcp_window_scaling = 1
net.ipv4.tcp_sack = 1

# socket buffer
net.core.wmem_default = 8388608
net.core.rmem_default = 8388608
net.core.rmem_max = 16777216
net.core.wmem_max = 16777216
net.core.netdev_max_backlog = 262144
net.core.somaxconn = 20480
net.core.optmem_max = 81920


# TCP conn
net.ipv4.tcp_max_syn_backlog = 262144
net.ipv4.tcp_syn_retries = 3
net.ipv4.tcp_retries1 = 3
net.ipv4.tcp_retries2 = 15

# tcp conn reuse
net.ipv4.tcp_tw_reuse = 1
net.ipv4.tcp_tw_recycle = 0
net.ipv4.tcp_fin_timeout = 30
net.ipv4.tcp_timestamps = 0

net.ipv4.tcp_max_tw_buckets = 20000
net.ipv4.tcp_max_orphans = 3276800
net.ipv4.tcp_synack_retries = 1
net.ipv4.tcp_syncookies = 1

# keepalive conn
net.ipv4.tcp_keepalive_time = 300
net.ipv4.tcp_keepalive_intvl = 30
net.ipv4.tcp_keepalive_probes = 3
net.ipv4.ip_local_port_range = 10001    65000

# swap
vm.overcommit_memory = 0
vm.swappiness = 10

#net.ipv4.conf.eth1.rp_filter = 0
#net.ipv4.conf.lo.arp_ignore = 1
#net.ipv4.conf.lo.arp_announce = 2
#net.ipv4.conf.all.arp_ignore = 1
#net.ipv4.conf.all.arp_announce = 2
vim /etc/security/limits.conf
root            soft    core            unlimited
root               hard    core            unlimited
root             soft    nproc           1000000
root             hard    nproc           1000000
root             soft    nofile          1000000
root               hard    nofile          1000000
root               soft    memlock         32000
root               hard    memlock         32000
root                soft    msgqueue        8192000
root               hard    msgqueue        8192000
系统优化完成后,全部重启服务器
reboot
安装docker
ha1和ha2不用安装docker,其他主机都要安装docker
# 卸载之前安装过得docker(若之前没有安装过docker,直接跳过此步)
sudo yum remove docker docker-common docker-selinux docker-engine

# 安装docker需要的依赖包 (之前执行过,可以省略)
wget -O /etc/yum.repos.d/docker-ce.repo https://repo.huaweicloud.com/docker-ce/linux/centos/docker-ce.repo

# 安装docker软件
yum install docker-ce -y

# 配置镜像下载加速器
mkdir /etc/docker
cat > /etc/docker/daemon.json << EOF
{
  "registry-mirrors": ["https://hahexyip.mirror.aliyuncs.com"]
}
EOF

# 启动docker并加入开机自启动
systemctl enable docker && systemctl start docker

# 查看docker是否成功安装
docker version
安装docker-compose
在harbor主机安装docker-compose
# 下载安装Docker Compose
curl -L https://download.fastgit.org/docker/compose/releases/download/1.27.4/docker-compose-`uname -s`-`uname -m` > /usr/local/bin/docker-compose

# 添加执行权限
chmod +x /usr/local/bin/docker-compose

# 检查安装版本
docker-compose --version

# bash命令补全
curl -L https://raw.githubusercontent.com/docker/compose/1.25.5/contrib/completion/bash/er-compose > /etc/bash_completion.d/docker-compose
部署过程
基础环境准备
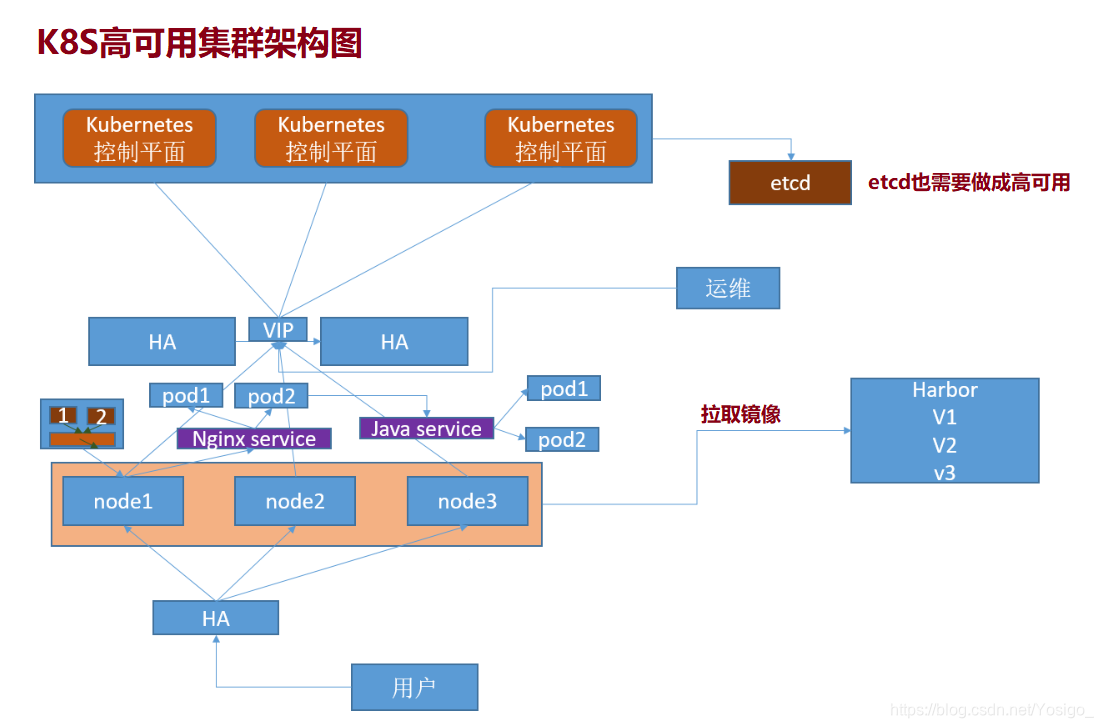
部署harbor及haproxy高可用反向代理
在所有master安装指定版本的kubeadm 、kubelet、kubectl、docker
在所有node节点安装指定版本的kubeadm 、kubelet、docker,在node节点kubectl为可选安装,看是否需要在node执行kubectl命令进行集群管理及pod管理等操作
master节点运行kubeadm init初始化命令
验证master节点状态
在node节点使用kubeadm命令将自己加入k8s master(需要使用master生成token认证)
验证node节点状态
创建pod并测试网络通信
部署web服务Dashboard
k8s集群升级案例
在ha1和ha2主机上分别安装keepalived和haproxy
yum -y install keepalived haproxy
修改ha1的keepalived配置文件
- vim /etc/keepalived/keepalived.conf
! Configuration File for keepalived

global_defs {
   notification_email {
     acassen
   }
   notification_email_from Alexandre.Cassen@firewall.loc
   smtp_server 192.168.200.1
   smtp_connect_timeout 30
   router_id LVS_DEVEL
}

vrrp_instance VI_1 {
    state MASTER
    interface eth0
    virtual_router_id 55
    priority 100
    advert_int 1
    authentication {
        auth_type PASS
        auth_pass 1111
    }
    virtual_ipaddress {
        192.168.15.188 dev eth0 label eth0:1
    }
}
修改ha2的keepalived配置文件
- vim /etc/keepalived/keepalived.conf
! Configuration File for keepalived

global_defs {
   notification_email {
     acassen
   }
   notification_email_from Alexandre.Cassen@firewall.loc
   smtp_server 192.168.200.1
   smtp_connect_timeout 30
   router_id LVS_DEVEL
}

vrrp_instance VI_1 {
    state BACKUP
    interface eth0
    virtual_router_id 55
    priority 80
    advert_int 1
    authentication {
        auth_type PASS
        auth_pass 1111
    }
    virtual_ipaddress {
        192.168.15.188 dev eth0 label eth0:1
    }
}
分别重启ha1和ha2的keepalived服务
systemctl restart keepalived && systemctl enable keepalived
修改ha1的haproxy配置文件
- vim /etc/haproxy/haproxy.cfg
listen stats
 mode http
 bind 0.0.0.0:9999
 stats enable
 log global
 stats uri     /haproxy-status     # 入口URL
 stats auth   admin:123   # 用户名、密码

listen k8s-6443
 bind 192.168.15.188:6443
 mode tcp
 balance roundrobin
  # apiserver的默认端口号为6443
 server 192.168.15.201 192.168.15.201:6443 check inter 2s fall 3 rise 5
 server 192.168.15.202 192.168.15.202:6443 check inter 2s fall 3 rise 5
 server 192.168.15.203 192.168.15.203:6443 check inter 2s fall 3 rise 5
修改ha2的haproxy配置文件
- vim /etc/haproxy/haproxy.cfg
listen stats
 mode http
 bind 0.0.0.0:9999
 stats enable
 log global
 stats uri     /haproxy-status     # 入口URL
 stats auth   admin:123   # 用户名、密码

listen k8s-6443
 bind 192.168.15.188:6443
 mode tcp
 balance roundrobin
 # apiserver的默认端口号为6443
 server 192.168.15.201 192.168.15.201:6443 check inter 2s fall 3 rise 5
 server 192.168.15.202 192.168.15.202:6443 check inter 2s fall 3 rise 5
 server 192.168.15.203 192.168.15.203:6443 check inter 2s fall 3 rise 5
分别重启ha1和ha2的haproxy服务
systemctl restart haproxy && systemctl enable haproxy
在harbor主机上部署harbor服务
链接:harbor-offline-installer-v2.1.0.tgz
提取码:1234
mkdir /apps
cd /apps
rz -E harbor-offline-installer-v2.1.0.tgz
tar -xvf harbor-offline-installer-v2.1.0.tgz
cd harbor/
cp harbor.yml.tmpl harbor.yml

vim harbor.yml
...
hostname: harbor.nana.com       # harbor的域名
# https:		# 13行
# port: 443		# 15行
# certificate: /your/certificate/path	# 17行
# private_key: /your/private/key/path	# 18行
harbor_admin_password: 123		# 密码

 ./install.sh
在所有的master节点和所有的node节点都添加harbor.yml的域名解析
- vim /etc/hosts
192.168.15.206 harbor.nana.com
在本地电脑主机添加域名解析
C:\Windows\System32\drivers\etc\hosts
192.168.15.206 		harbor.nana.com

在所有的master主机和所有的node主机安装kubeadm,kubectl,kubelet
cat <<EOF > /etc/yum.repos.d/kubernetes.repo
[kubernetes]
name=Kubernetes
baseurl=https://mirrors.aliyun.com/kubernetes/yum/repos/kubernetes-el7-x86_64/
enabled=1
gpgcheck=1
repo_gpgcheck=1
gpgkey=https://mirrors.aliyun.com/kubernetes/yum/doc/yum-key.gpg https://mirrors.aliyun.com/kubernetes/yum/doc/rpm-package-key.gpg
EOF
setenforce 0
# 安装旧版本的K8S,方便我们后面做升级
yum install -y kubeadm-1.18.18-0 kubectl-1.18.18-0 kubelet-1.18.18-0
systemctl enable kubelet && systemctl start kubelet
master节点运行kubeadm init初始化命令:
# completion  	 bash命令补全,需要安装bash-completion
mkdir /data/scripts -p
kubeadm completion bash > /data/scripts/kubeadm_completion.sh
source /data/scripts/kubeadm_completion.sh

vim /etc/profile
...
source /data/scripts/kubeadm_completion.sh
....

source /etc/profile
vim images-download.sh
#!/bin/bash
docker pull registry.cn-hangzhou.aliyuncs.com/google_containers/kube-apiserver:v1.18.18
docker pull registry.cn-hangzhou.aliyuncs.com/google_containers/kube-controller-manager:v1.18.18
docker pull registry.cn-hangzhou.aliyuncs.com/google_containers/kube-scheduler:v1.18.18
docker pull registry.cn-hangzhou.aliyuncs.com/google_containers/kube-proxy:v1.18.18
docker pull registry.cn-hangzhou.aliyuncs.com/google_containers/pause:3.2
docker pull registry.cn-hangzhou.aliyuncs.com/google_containers/etcd:3.4.13-0
docker pull registry.cn-hangzhou.aliyuncs.com/google_containers/coredns:1.6.7
下载镜像
bash images-download.sh
