需要使用到两台Debian服务器,一台作为ca端,一台作为Apache端
ca端IP:192.168.200.129
Apache端IP:192.168.200.131
以下是CA端配置:
安装openssl
root@CA-SERVER:~# apt install -y openssl备份及修改ssl配置文件
root@CA-SERVER:~# cd /etc/ssl/
root@CA-SERVER:/etc/ssl# cp openssl.cnf openssl.cnf_bak
root@CA-SERVER:/etc/ssl# vim openssl.cnf

?这个地方修改为存放证书的目录,下面是修改后的

?创建对应的目录
root@CA-SERVER:/etc/ssl# cd /
root@CA-SERVER:/# mkdir CA
复制文件模板到新创建的文件中
root@CA-SERVER:/# cd CA
root@CA-SERVER:/CA# cp -rf /etc/ssl/* ./
生成根密钥
root@CA-SERVER:/CA# openssl genrsa -out private/cakey.pem 2048
Generating RSA private key, 2048 bit long modulus (2 primes)
.............+++++
.....................+++++
e is 65537 (0x010001)
生成根证书
root@CA-SERVER:/CA# openssl req -new -x509 -key private/cakey.pem -out cacert.pem
You are about to be asked to enter information that will be incorporated
into your certificate request.
What you are about to enter is what is called a Distinguished Name or a DN.
There are quite a few fields but you can leave some blank
For some fields there will be a default value,
If you enter '.', the field will be left blank.
-----
Country Name (2 letter code) [AU]:CN
State or Province Name (full name) [Some-State]:
Locality Name (eg, city) []:
Organization Name (eg, company) [Internet Widgits Pty Ltd]:Inc
Organizational Unit Name (eg, section) []:www.skills.com
Common Name (e.g. server FQDN or YOUR name) []:Skill Global Root CA
Email Address []:
下面是Apache端的设置
安装Apache2
root@debian:~# apt install -y apache2
创建网站根目录
root@debian:/# mkdir -p /data/htdocs/sdskills新建首页
root@debian:/data/htdocs/sdskills# echo "It work!" > index.html
备份并修改Apache2配置文件
root@debian:/# cd /etc/apache2/
root@debian:/etc/apache2# cp apache2.conf apache2.conf_bak
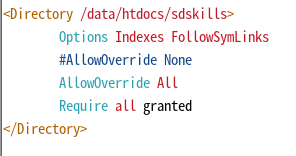
root@debian:/etc/apache2# vim apache2.conf
需要修改下面的这部分

?修改Apache网站根目录
root@debian:/etc/apache2# cd sites-available/
root@debian:/etc/apache2/sites-available# vim 000-default.conf
修改这条语句

?重启Apache服务
root@debian:/data/htdocs/sdskills# systemctl restart apache2.service 测试一下

?可以正常访问,接下来就要给Apache配置ssl了
apache端安装openssl
root@debian:/data/htdocs# apt install -y openssl同样在根目录下创建一个CA目录用来存放证书,修改/etc/ssl/openssl.cnf文件,然后同样将配置文件模板复制过来
root@debian:/data/htdocs# cd /
root@debian:/# mkdir CA
root@debian:/CA# cd /etc/ssl/
root@debian:/etc/ssl# vim openssl.cnf

?
root@debian:/# cd CA
root@debian:/CA# cp -rf /etc/ssl/* ./
生成密钥
root@debian:/CA# openssl genrsa -out apache.key 2048
Generating RSA private key, 2048 bit long modulus (2 primes)
................................+++++
................................................................................................................................................+++++
e is 65537 (0x010001)
生成证书请求
root@debian:/CA# openssl req -new -key apache.key -out apache.csr
You are about to be asked to enter information that will be incorporated
into your certificate request.
What you are about to enter is what is called a Distinguished Name or a DN.
There are quite a few fields but you can leave some blank
For some fields there will be a default value,
If you enter '.', the field will be left blank.
-----
Country Name (2 letter code) [AU]:CN
State or Province Name (full name) [Some-State]:
Locality Name (eg, city) []:
Organization Name (eg, company) [Internet Widgits Pty Ltd]:sdskills
Organizational Unit Name (eg, section) []:Operations Departments
Common Name (e.g. server FQDN or YOUR name) []:*.sdskills.com
Email Address []:

Please enter the following 'extra' attributes
to be sent with your certificate request
A challenge password []:
An optional company name []:
?
然后需要将生成的证书请求文件发送到ca端,这里使用的是scp的方式,一般linux发行版都会自带ssh客户端,所以只需要在ca端上安装ssh-server就可以了
root@CA-SERVER:/CA# apt install -y openssh-server修改sshd配置文件
root@CA-SERVER:/CA# cd /etc/ssh/
root@CA-SERVER:/etc/ssh# cp sshd_config sshd_config_bak
root@CA-SERVER:/etc/ssh# vim sshd_config
?将下面这行

修改为
 ?
?
重启sshd服务?
root@CA-SERVER:/etc/ssh# systemctl restart sshd.service?这样ssh就可以使用root用户登录了
然后在Apache端上将证书请求文件发送到ca端
root@debian:/CA# scp /CA/apache.csr 192.168.200.129:/CA
root@192.168.200.129's password:
apache.csr                                    100% 1013     1.4MB/s   00:00
Apache端可以直接用ssh登录到ca端,方便一点
root@debian:/CA# ssh 192.168.200.129签署证书
root@CA-SERVER:/CA# openssl x509 -req -in apache.csr -CA /CA/cacert.pem -CAkey /CA/private/cakey.pem  -CAcreateserial -out apache.cst
Signature ok
subject=C = CN, ST = Some-State, O = sdskills, OU = Operations Departments, CN = *.sdskills.com
Getting CA Private Key
然后用scp命令将签署好的证书发回Apache上使用
root@CA-SERVER:/CA# exit
注销
Connection to 192.168.200.129 closed.
root@debian:/CA# scp 192.168.200.129:/CA/apache.cst ./
root@192.168.200.129's password:
apache.cst                                    100% 1229   487.0KB/s   00:00
修改ssl配置文件
root@debian:/CA# cd /etc/apache2/sites-available/
root@debian:/etc/apache2/sites-available# cp default-ssl.conf default-ssl.conf_bak
root@debian:/etc/apache2/sites-available# vim default-ssl.conf
修改网站的根目录

?
?还要修改这部分

?修改为

?创建一个软链接
root@debian:/etc/apache2/sites-available# ln -s default-ssl.conf /etc/apache2/sites-enabled/001-default.conf 启用ssl模块
root@debian:/etc/apache2/sites-available# a2enmod ssl
Considering dependency setenvif for ssl:
Module setenvif already enabled
Considering dependency mime for ssl:
Module mime already enabled
Considering dependency socache_shmcb for ssl:
Enabling module socache_shmcb.
Enabling module ssl.
See /usr/share/doc/apache2/README.Debian.gz on how to configure SSL and create self-signed certificates.
To activate the new configuration, you need to run:
  systemctl restart apache2
root@debian:/etc/apache2/sites-available# a2ensite default-ssl
Enabling site default-ssl.
To activate the new configuration, you need to run:
  systemctl reload apache2
?最后重启Apache服务
root@debian:/etc/apache2/sites-available# systemctl restart apache2.service 查看Apache运行状态
root@debian:/etc/apache2/sites-available# systemctl status apache2.service
● apache2.service - The Apache HTTP Server
     Loaded: loaded (/lib/systemd/system/apache2.service; enabled; vendor preset: enabled)
     Active: active (running) since Fri 2021-11-26 16:08:59 CST; 24s ago
       Docs: https://httpd.apache.org/docs/2.4/
    Process: 5007 ExecStart=/usr/sbin/apachectl start (code=exited, status=0/SUCCESS)
   Main PID: 5011 (apache2)
      Tasks: 55 (limit: 4626)
     Memory: 9.6M
        CPU: 32ms
     CGroup: /system.slice/apache2.service
             ├─5011 /usr/sbin/apache2 -k start
             ├─5012 /usr/sbin/apache2 -k start
             └─5013 /usr/sbin/apache2 -k start

11月 26 16:08:59 debian systemd[1]: Starting The Apache HTTP Server...
11月 26 16:08:59 debian apachectl[5010]: AH00558: apache2: Could not reliably determine the>
11月 26 16:08:59 debian systemd[1]: Started The Apache HTTP Server.
lines 1-17/17 (END)
看起来不错,测试一下试试,对了,还需要在本地配置dns服务器,这里就不演示了

配置重定向,当用户使用http访问时自动跳转到https安全连接
root@debian:/etc/apache2# vim apache2.conf将AllowOverride None修改为AllowOverride All

?然后来到网站根目录下,新建文件.htaccess
root@debian:/etc/apache2# cd /data/htdocs/sdskills/
root@debian:/data/htdocs/sdskills# vim .htaccess
写入以下内容
RewriteEngine on
RewriteCond %{HTTPS} !=on
RewriteRule ^(.*) https://www.sdskills.com
激活重定向模块
root@debian:/data/htdocs/sdskills# a2enmod rewrite
Enabling module rewrite.
To activate the new configuration, you need to run:
  systemctl restart apache2
最后重启Apache2服务
root@debian:/data/htdocs/sdskills# systemctl restart apache2.service 如果不出什么意外的话(doge),使用http访问站点是会默认跳转到https的