一、测试连接服务器
1.打开cmd,输入ping 10.1.230.74

2.输入telnet,进入telnet界面

3.输入set localecho,打开本地回显:

4.连接服务器,输入命令open 10.1.230.74 3900

二、设计客户端
1.新建项目

2.设计界面

3.代码实现
(1)实现连接到服务器并接受数据
双击进入游戏的Button
代码:
private void button1_Click(object sender, EventArgs e)
        {
            try
            {
                //向指定的IP地址的服务器发出连接请求
                tcpClient.Connect("10.1.230.41", 3900);
                listBox1.Items.Add("连接成功!");
                stream = tcpClient.GetStream();
                byte[] data = new byte[1024];
                //判断网络流是否可读
                if (stream.CanRead)
                {
                    int len = stream.Read(data, 0, data.Length);
                    string msg = Encoding.Default.GetString(data, 0, data.Length);
                    string str = "\r\n";
                    char[] str1 = str.ToCharArray();
                    string[] msg1 = msg.Split(str1);
                    for (int j = 0; j < msg1.Length; j++)
                    {
                        listBox1.Items.Add(msg1[j]);
                         music_play();
                    }
                }
            }
            catch
            {
                listBox1.Items.Add("连接失败!");
            }
        }
(2)实现客户端发送数据到服务器
双击发送的button
代码:
private void button12_Click(object sender, EventArgs e)
        {
            music_play();
            if (tcpClient.Connected)
            {
                //向服务器发送数据
                string msg = textBox1.Text;
                Byte[] outbytes = System.Text.Encoding.Default.GetBytes(msg + "\n");
                stream.Write(outbytes, 0, outbytes.Length);
                byte[] data = new byte[1024];
                //接收服务器回复数据
                if (stream.CanRead)
                {
                    int len = stream.Read(data, 0, data.Length);
                    string msg1 = Encoding.Default.GetString(data, 0, data.Length);
                    string str = "\r\n";
                    char[] str1 = str.ToCharArray();
                    string[] msg2 = msg1.Split(str1);
                    for (int j = 0; j < msg2.Length; j++)
                    {
                        listBox1.Items.Add(msg2[j]);
                    }
                }
            }
            else
            {
                listBox1.Items.Add("连接已断开");
            }
            textBox2.Clear();
        }
(3)播放背景音乐
在项目结构中找到Form1.resx文件并打开

选择音频,添加资源

注意文件类型是.wav,这里不能简单改后缀名,要用格式转换工具进行转换。

在代码中添加播放函数
 private void music_play()
        {
            SoundPlayer sp = new SoundPlayer();
            sp.SoundLocation = @"jbtw.wav";       //你的音乐文件名称,且注意必须是wav文件
            sp.PlayLooping();
        }
定时自动更换游戏背景图片
回到Form1.cs[设计]的窗口
在工具箱中找到Timer控件,将它拖动到窗口空白区域
点击timer1,找到设置中的Interval,设置为30000,将Enable设为true。

准备好背景图片,在这里使用的是jpg图片,将图片分别命名为从1开始的数字。

双击timer1
添加代码:
 private void timer1_Tick(object sender, EventArgs e)
        {
            Thread th = new Thread(pic_play);
            th.IsBackground = true;
            th.Start();
        }
添加图片切换函数
void pic_play()
        {
            picture++;   //记得在前面定义变量picture
            string picturePath = @"D:\新建文件夹\" + picture + ".jpg";
            //设置图片填充
            pictureBox1.SizeMode = PictureBoxSizeMode.Zoom;
            pictureBox1.Image = Image.FromFile(picturePath);
            if (picture == 6)
                picture = 0;
        }
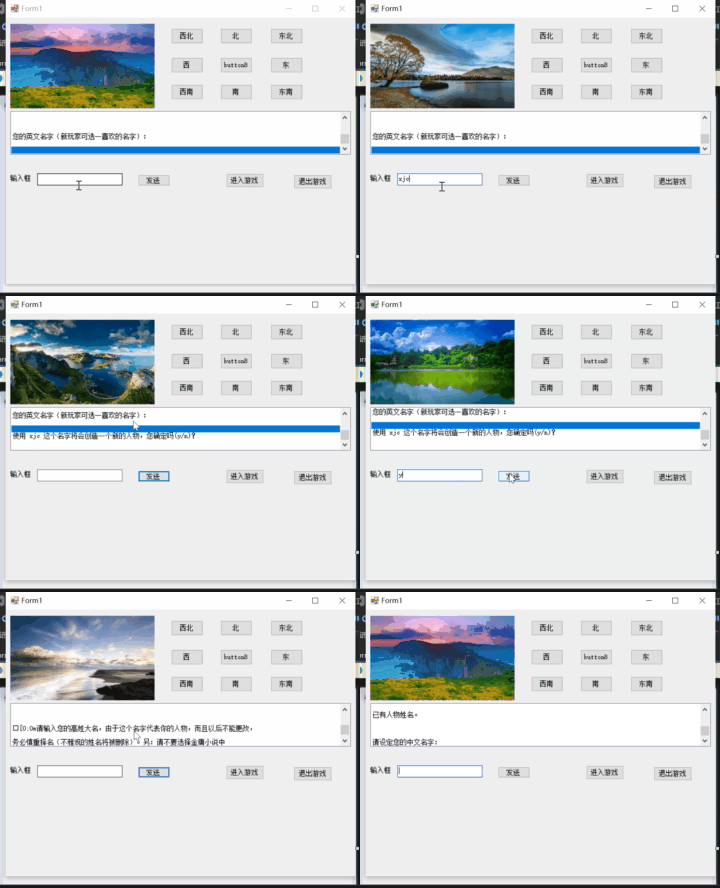
运行效果:

三、总结
编写一个网游客户端,游戏服务器的校园内网IP地址为 10.1.230.74,端口为3900,采用TCP连接。
连接成功后,可以将服务器发来的消息不停地显示在 listbox 中;
客户端要发给服务器的数据,通过 textbox输入 或者点击button;
能够播放背景音乐;
每隔30秒,变换一次游戏背景图片。
四、参考链接
https://blog.csdn.net/qq_45659777/article/details/121483467?spm=1001.2014.3001.5501