基于远程过程调用RPC+Flask的学生信息管理系统
1. 预备知识
1.1 什么是Flask
??从一个简单的Flask应用开始介绍Flask是什么,代码如下:
from flask import Flask
app = Flask(__name__)

@app.route('/')
def hello_world():
    return 'Hello World!'

if __name__ == '__main__':
    app.run()
??以上代码做了什么呢?
from flask import Flask首先,我们导入了 Flask 类。这个类的实例将会是我们的 WSGI 应用程序。app = Flask(__name__)接下来,我们创建一个该类的实例,第一个参数是应用模块或者包的名称。 如果你使用单一的模块(如本例),你应该使用__name__,因为模块的名称将会因其作为单独应用启动还是作为模块导入而有不同( 也即是__main__'或实际的导入名)。这是必须的,这样 Flask 才知道到哪去找模板、静态文件等等。详情见 Flask的文档。@app.route('/') def hello_world(): return 'Hello World!'然后,我们使用 route() 装饰器告诉 Flask 什么样的URL 能触发我们的函数。
这个函数的名字也在生成 URL 时被特定的函数采用,这个函数返回我们想要显示在用户浏览器中的信息。if __name__ == '__main__': app.run()最后我们用 run() 函数来让应用运行在本地服务器上。 其中if __name__ =='__main__':确保服务器只会在该脚本被 Python 解释器直接执行的时候才会运行,而不是作为模块导入的时候。
1.2什么是RPC
??RPC采用客户机/服务器模式。请求程序就是一个客户机,而服务提供程序就是一个服务器。那么客户端和服务器是如何通信的呢?
??首先,客户机调用进程发送一个有进程参数的调用信息到服务进程,然后等待应答信息。在服务器端,进程保持睡眠状态直到调用信息的到达为止。当一个调用信息到达,服务器获得进程参数,计算结果,发送答复信息,然后等待下一个调用信息。最后,客户端调用进程接收答复信息,获得进程结果,然后调用执行继续进行。
??RPC 中采用的通信模型称为Stub/Skeleton结构,如下图所示。
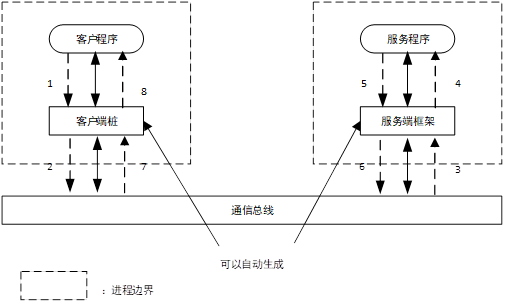
??在Stub/Skeleton 结构的支撑下,客户程序与服务程序按照图中所示的8个步骤完成一次服务的调用:
①:客户程序将调用请求发送给客户端桩,对于客户程序来说,桩就是服务程序在客户端的代理。
②:客户端桩负责将远程调用请求进行编组并通过通信总线发送给服务端。
③:调用请求经通信总线传送到服务端框架。
④:服务端框架将调用请求解组并分派给真正的远程对象实现(服务程序)。
⑤:服务程序完成客户端的调用请求,将结果返回给服务端框架。
⑥:服务端框架将调用结果编组并通过通信总线发送给客户端桩。
⑦:客户端桩将调用结果解组并返回给客户程序。
⑧:客户程序得到调用结果。
2. 一个支持增删改查操作的简易学生信息管理系统
??基于以上原理,客户端向服务器端发送请求,同时把相关的参数传递给服务器端,服务器端接收请求和相关的参数并调用相关的函数实现某项功能,最后服务器端再发送处理好的数据给客户端。因此,学生信息管理系统的服务器端应能够接收客户端发送的学生信息的“增删查改”这四中请求,应对应于4个功能函数。
??本文采用远程过程调用RPC技术实现一个简易版的学生信息管理系统。PyCharm中新建SIMS项目,新建SIMS.py文件作为客户端,新建SIMS_Server.py作为服务端,以下对客户端以及服务器端的操作都指的是修改SIMS.py和SIMS_Server.py文件。
2.1 准备工作
2.1.1 创建数据库和student表
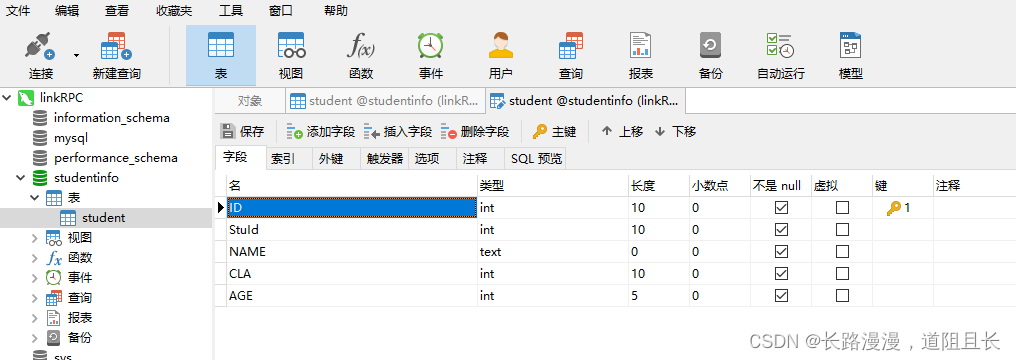
??笔者使用第三方软件navicat建立新的MySQL连接linkPRC,创建studentInfo数据库,并创建student表。表的设计如下图所示。
2.1.2 客户端页面设计
??学生信息管理系统的主要效果如下图所示:
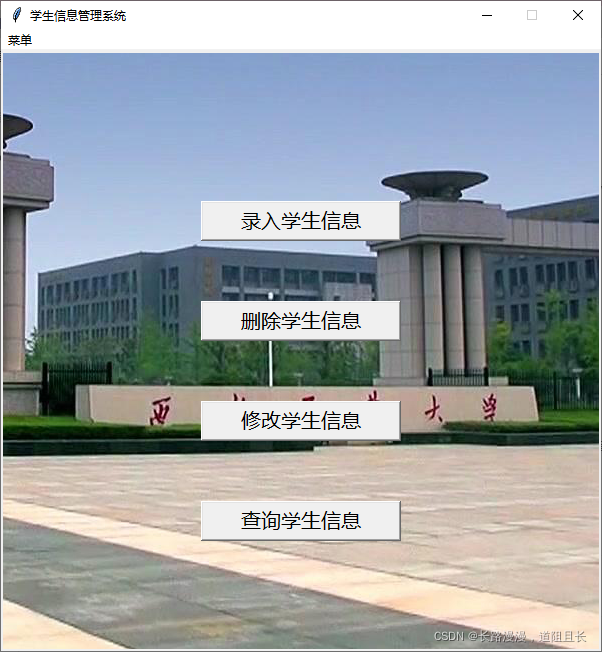
??SIMS.py新增代码如下:
from tkinter import *
from tkinter import messagebox
from PIL import Image,ImageTk
import tkinter
import requests
import json

root = Tk()
# 禁止最大化按钮(只显示最小化按钮和关闭按钮)
root.resizable(False,False)
root.minsize(600,600) # 最小尺寸
root.maxsize(600,600) # 最大尺寸
root.title("学生信息管理系统")
root.config(width=600)
root.config(height=600)
# 添加窗口背景图片
canvas = tkinter.Canvas(root,
                        width = 600,  # 指定Canvas组件的宽度
                        height = 600,  # 指定Canvas组件的高度
                        bg = 'white'  # 指定Canvas组件的背景色
                        )
#记得在运行时修改文件所在位置
image = Image.open('F:\\1.jpg')

im = ImageTk.PhotoImage(image) #用photoImage打开图片
canvas.create_image(200, 170, image=im)  # 使用creat_image将图片添加到Canvas
canvas.pack()


···


#创建顶级菜单及其下拉菜单
menubar=Menu(root)
filemenu=Menu(menubar,tearoff=False)
filemenu.add_command(label="增加",command=insert_stu)
filemenu.add_command(label="删除",command=delete_stu)#command接删除函数/下面接修改函数
filemenu.add_command(label="修改",command=change_stu)
filemenu.add_command(label="查询",command=sel_stu)

filemenu.add_separator()
filemenu.add_command(label="退出",command=root.destroy)
menubar.add_cascade(label="菜单",menu=filemenu)

#显示菜单
root.config(menu=menubar)

buttoninsert_stu=Button(root,text="录入学生信息",font=("微软雅黑 -20"),command=insert_stu)
buttoninsert_stu.place(x=200,y=150,height=40,width=200)

buttondelete_stu=Button(root,text="删除学生信息",font=("微软雅黑 -20"),command=delete_stu)
buttondelete_stu.place(x=200,y=250,height=40,width=200)

buttonchange_stu=Button(root,text="修改学生信息",font=("微软雅黑 -20"),command=change_stu)
buttonchange_stu.place(x=200,y=350,height=40,width=200)

buttonsel_stu=Button(root,text="查询学生信息",font=("微软雅黑 -20"),command=sel_stu)
buttonsel_stu.place(x=200,y=450,height=40,width=200)

root.mainloop()
2.1.3 服务器端连接数据库
??为了便于后续服务器方便对学生数据的管理,这里统一对python3连接数据库做了处理。连接数据库的代码如下。
'''连接数据库'''
def linkDB():
    # 打开数据库连接
    db = pymysql.connect(host='127.0.0.1',
                         port=3306,
                         user='root',
                         passwd='123456',
                         db='studentinfo')

    # 使用 cursor() 方法创建一个游标对象cur
    cur = db.cursor(cursor=pymysql.cursors.DictCursor)

    return db,cur
2.1.4 服务器端初始化程序
??建立好数据库及学生信息表后,在SIMS_Server.py中初始化程序的代码如下:
from __future__ import unicode_literals
from flask import Flask, request
import pymysql

# 创建应用程序对象
app = Flask(__name__)
app.config['JSON_AS_ASCII'] = False
2.2 录入学生信息
2.2.1 客户端的录入学生信息模块
??在SIMS.py中添加录入学生信息模块,页面效果如下图所示

??在SIMS.py中新增录入学生信息函数,用于实现录入学生信息页面的展示以及向服务器端发送“录入学生信息的请求”。代码如下:
增加学生信息
def insert_stu():  #录入学生信息
    root1=Tk()
    root1.title("录入学生信息")
    root1.config(width=600)
    root1.config(height=600)

    #创建关联字符变量
    varName=StringVar(root1,value='')
    varId=StringVar(root1,value='')
    varClass=StringVar(root1,value='')
    varAge=StringVar(root1,value='')

    #创建标签组件
    label=Label(root1,text="姓名:",font=("微软雅黑 -20"))
    label.place(x=120,y=60,height=40,width=80)

    label=Label(root1,text="学号:",font=("微软雅黑 -20"))
    label.place(x=120,y=110,height=40,width=80)


    label=Label(root1,text="班级:",font=("微软雅黑 -20"))
    label.place(x=120,y=160,height=40,width=80)


    label=Label(root1,text="年龄:",font=("微软雅黑 -20"))
    label.place(x=120,y=210,height=40,width=80)

    #创建文本框组件,同时设置关联的变量
    #    姓名entryName
    #    学号entryId
    #    班级entryClass
    #    年龄entryAge

    entryName=Entry((root1),textvariable=varName)
    entryName.place(x=200,y=60,height=40,width=200)

    entryId=Entry((root1),textvariable=varId)
    entryId.place(x=200,y=110,height=40,width=200)

    entryClass=Entry((root1),textvariable=varClass)
    entryClass.place(x=200,y=160,height=40,width=200)

    entryAge=Entry((root1),textvariable=varAge)
    entryAge.place(x=200,y=210,height=40,width=200)

    def buttonOK():
        i=0

        stu_id = eval(entryId.get())#学号输入
        stu_name =str(entryName.get())#姓名录入
        stu_class =eval(entryClass.get())#班级录入
        stu_age=eval(entryAge.get())#年龄录入

        print(stu_id)
        print(type(stu_id))

        # 查找完成若有重复的学号,则警告。否则录入数据库
        response = requests.get(url='http://127.0.0.1:5000/selectStudent',params={"StuId":stu_id})
        if response.content == b'fail':
            i = 0
        else:
            i = 1

        if i==1:
            messagebox.showerror('警告',message='学号重复,请重新输入')
        else:
            try:
                # 请求头
                header = {
                    "Content-Type": "application/json"
                }
                # json 类型的参数
                addJson = {
                    "StuId": stu_id,
                    "NAME": stu_name,
                    "CLA": stu_class,
                    "AGE": stu_age
                }
                responseAdd = requests.post(url='http://127.0.0.1:5000/addStudent', json=addJson, headers=header)
                print(responseAdd.content.decode('utf-8'))
                messagebox.showinfo(title='恭喜',message='录入成功!')
                root1.destroy()
            except:
                messagebox.showerror('警告',message='未录入成功')


    buttonbuttonOK=Button(root1,text="录入学生信息",font=("微软雅黑 -20"),command=buttonOK)
    buttonbuttonOK.place(x=200,y=300,height=40,width=200)
    def cancel():
        varName.set('')
        varId.set('')
        varClass.set('')
        varAge.set('')


    #取消键
    buttonCancel=Button(root1,text="取消",font=("微软雅黑 -20"),command=cancel)
    buttonCancel.place(x=200,y=350,height=40,width=200)

    #退出键
    buttondel=Button(root1,text="退出",font=("微软雅黑 -20"),command=root1.destroy)
    buttondel.place(x=200,y=400,height=40,width=200)
    root1.mainloop()
2.2.2 服务器端的录入学生信息模块
??在SIMS_Server.py中新增一个请求方法,用于接收添加学生信息的请求。该功能的流程图如下图所示。
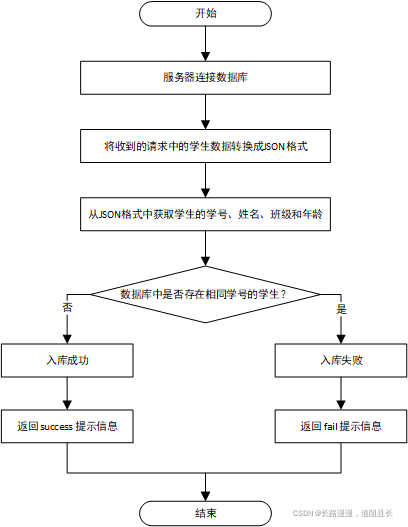
??代码如下:
#添加学生信息
@app.route('/addStudent', methods=['POST'])
def addStudent():
    # 连接数据库
    db, cur = linkDB()
    # request 获取原始提交的json内容
    #学生信息的json格式为 { ”StuId":int, "NAME":text, "CLA":int, "AGE":int }
    stuInfo = request.json
    varStuId = stuInfo['StuId']
    varNAME = stuInfo['NAME']
    varCLA = stuInfo['CLA']
    varAGE = stuInfo['AGE']
    # 查找完成若有重复的学号,则警告。否则录入数据库
    num = cur.execute("SELECT * from student where StuId =  " + str(varStuId) + ' ;')
    if num > 0:
        # 学号重复,录入失败
        return 'fail'
    else:
        try:
            # 录入成功
            db.begin()
            sql1 = "INSERT INTO student(StuId,NAME,CLA,AGE)"
            sql1 += "VALUES(%d,'%s',%d,%d)" % (varStuId, varNAME, varCLA, varAGE)
            cur.execute(sql1)
            db.commit()
            return 'success'
        except:
            # 录入失败
            return 'fail'
2.2.3 录入学生信息RPC测试
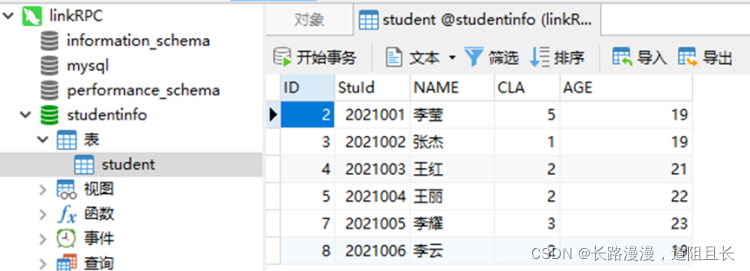
??student数据表的初始状态如下图所示:
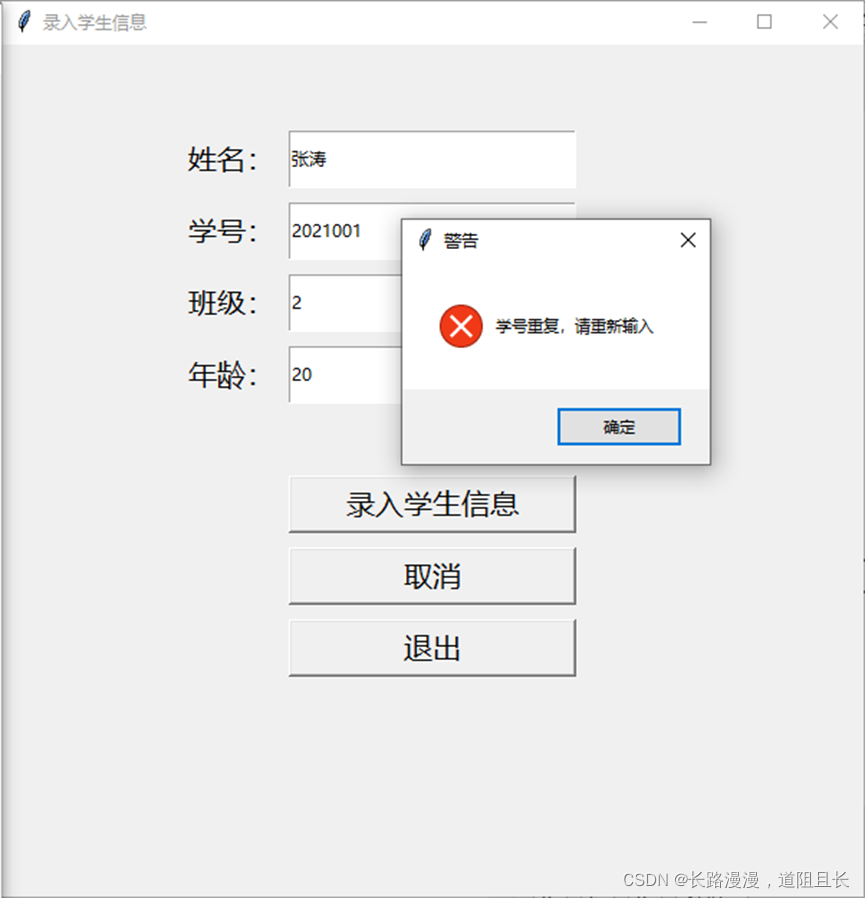
??在“录入学生信息”页面中输入要录入数据库学生的姓名、学号、班级和年龄。假设要录入学生的学号为数据库中已有的,则被提示“学号重复,请重新输入”,录入学生信息页面如下图所示。
??由于插入之前首先要查询数据库是否存在相同学号的学生,此时服务器得到的结果是查询成功。服务器响应信息如下图所示。

??接下来输入数据库中不存在学号的学生信息,则显示录入成功。此时录入学生信息页面如下图所示。

??服务器显示接收到录入学生信息的请求,响应信息如下图所示。

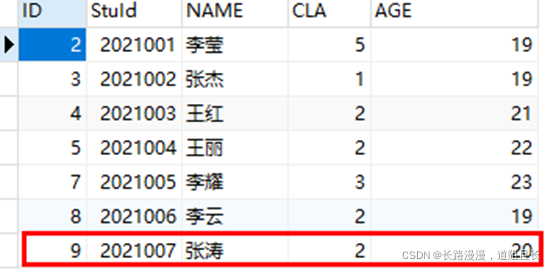
??刷新数据库则可以看到刚刚录入的学生信息已成功插入到student表中,如下图所示。
2.3 删除学生信息模块
2.3.1客户端的删除学生信息模块
??在SIMS.py中添加删除学生信息模块,页面效果如下图所示

??在SIMS.py中新增删除学生信息函数,用于实现删除学生信息页面的展示以及向服务器端发送“删除学生信息的请求”。代码如下
# 实现删除学生信息
def delete_stu():
    root2=Tk()
    root2.title("删除学生信息")
    root2.config(width=600)
    root2.config(height=600)

    #创建标签
    label=Label(root2,text="学号:",font=("微软雅黑 -20"))
    label.place(x=120,y=100,height=40,width=80)

    entryId=Entry(root2)
    entryId.place(x=200,y=100,height=40,width=200)

    def delete():
        stu_id = eval(entryId.get())#学号输入
        # 请求头
        header = {
            "Content-Type": "application/json"
        }
        # json 类型的参数
        delJson = {
            "StuId": stu_id
        }
        response = requests.post(url="http://127.0.0.1:5000/deleteStudent", json=delJson, headers=header)
        print(response.content)
        if response.content == b'success':
            messagebox.showinfo(title='恭喜', message='删除成功!')
        elif response.content == b'notExist':
            messagebox.showinfo(title='警告', message='该学生不存在!')
        else:
            messagebox.showinfo(title='警告', message='删除失败!')

        root2.destroy()

    #删除键
    buttondelete=Button(root2,text="删除",font=("微软雅黑 -20"),command=delete)
    buttondelete.place(x=200,y=200,height=40,width=200)

    #退出键
    buttondel=Button(root2,text="退出",font=("微软雅黑 -20"),command=root2.destroy)
    buttondel.place(x=200,y=250,height=40,width=200)

    root2.mainloop()
2.3.2 服务器端的删除学生信息模块
??在SIMS_Server.py中新增一个请求方法,用于接收删除学生信息的请求。该功能的流程图如下图所示

??代码如下:
#删除学生信息
@app.route('/deleteStudent', methods=['POST'])
def deleteStudent():
    # 连接数据库
    db, cur = linkDB()
    # request 获取原始提交的json内容
    #学生信息的json格式为 { ”StuId":int }
    stuInfo = request.json
    varStuId = stuInfo['StuId']
    num = cur.execute("SELECT * from student where StuId =  " + str(varStuId) + ' ;')
    if num == 0:
        # 该学生不存在
        return 'notExist'
    else:
        try:
            # 删除成功
            db.begin()
            cur.execute("DELETE from student where StuId = '%s';" % varStuId)
            db.commit()
            return 'success'
        except:
            # 删除失败
            return 'fail'
2.3.3 删除学生信息RPC测试
??在“删除学生信息”页面中输入要删除学生的学号。如果不存在要删除学生的学号,则被提示“该学生不存在!”,删除学生信息页面如下图所示。

??服务器接收到上述删除请求后也给出了相关的响应信息,如下图所示。

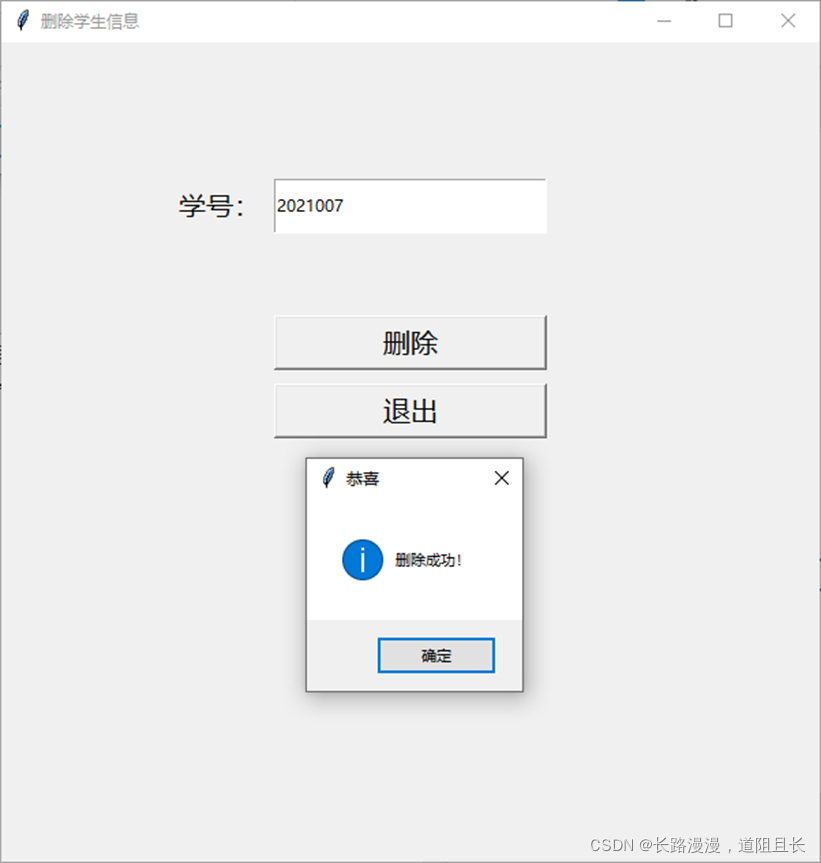
??接着输入要删除学生的学号为“2021007”,点击“删除”按钮,则显示删除成功。删除成功的页面如下图所示。
??服务器显示成功接收到删除学生信息的请求,响应信息页面如下图所示。

??刷新数据库后学号为“2021007”的学生信息已成功被删除,如下图所示。

2.4 查询学生信息模块
2.4.1 客户端的查询学生信息模块
??在SIMS.py中添加查询学生信息模块,页面效果如下图所示

??在SIMS.py中新增查询学生信息函数,用于实现查询学生信息页面的展示以及向服务器端发送“查询学生信息的请求”。代码如下
# 查询学生信息
def sel_stu():
    root3=Tk()
    root3.title("查询学生信息")
    root3.config(width=600)
    root3.config(height=600)

    #创建关联变量
    sId=StringVar(root3,value='')

    #创建文本组件框\标签组件
    label=Label(root3,text="学号",font=("微软雅黑 -20"))
    label.place(x=120,y=10,height=40,width=80)

    selId=Entry((root3),textvariable=sId)
    selId.place(x=200,y=10,height=40,width=200)

    def select():
        #创建关联字符变量
        varName=StringVar(root3,value='')
        varId=StringVar(root3,value='')
        varClass=StringVar(root3,value='')
        varAge=StringVar(root3,value='')

        # 创建标签组件
        label = Label(root3, text="姓名:", font=("微软雅黑 -20"))
        label.place(x=120, y=160, height=40, width=80)

        label = Label(root3, text="学号:", font=("微软雅黑 -20"))
        label.place(x=120, y=210, height=40, width=80)

        label = Label(root3, text="班级:", font=("微软雅黑 -20"))
        label.place(x=120, y=260, height=40, width=80)

        label = Label(root3, text="年龄:", font=("微软雅黑 -20"))
        label.place(x=120, y=310, height=40, width=80)

        # 创建文本框组件,同时设置关联的变量
        #    姓名entryName
        #    学号entryId
        #    班级entryClass
        #    年龄entryAge

        entryName = Entry((root3), textvariable=varName)
        entryName.place(x=200, y=160, height=40, width=200)

        entryId = Entry((root3), textvariable=varId)
        entryId.place(x=200, y=210, height=40, width=200)

        entryClass = Entry((root3), textvariable=varClass)
        entryClass.place(x=200, y=260, height=40, width=200)

        entryAge = Entry((root3), textvariable=varAge)
        entryAge.place(x=200, y=310, height=40, width=200)

        stu_id = eval(selId.get())#学号输入
        selResponse = requests.get(url="http://127.0.0.1:5000/selectStudent", params={"StuId":stu_id})
        num = 0
        if selResponse.content != b'fail':
            num = 1
        if num > 0:
            stuInfo =json.loads(selResponse.content.decode('utf-8'))
            print(stuInfo["StuId"])
            print(type(stuInfo["StuId"]))
            print(type(stu_id))
            if stu_id == int(stuInfo["StuId"]):
                stu_name = stuInfo['NAME']
                stu_class = stuInfo['CLA']
                stu_age = stuInfo['AGE']
            varName.set(stu_name)
            varId.set(stu_id)
            varClass.set(stu_class)
            varAge.set(stu_age)
        else:
            messagebox.showinfo(title='警告', message='无当前学生信息')

    #查询键
    buttonselect=Button(root3,text="查询",font=("微软雅黑 -20"),command=select)
    buttonselect.place(x=250,y=60,height=40,width=100)

    #取消键
    def cancel():
        sId.set('')

    buttoncancel=Button(root3,text="取消",font="微软雅黑 -20",command=cancel)
    buttoncancel.place(x=100,y=60,height=40,width=100)

    #退出键
    buttondel=Button(root3,text="退出",font="微软雅黑 -20",command=root3.destroy)
    buttondel.place(x=400,y=60,height=40,width=100)
    root3.mainloop()
2.4.2 服务器端的查询学生信息模块
??在SIMS_Server.py中新增一个请求方法,用于接收查询学生信息的请求。该功能的流程图如下图所示

??代码如下:
#查询学生信息
@app.route('/selectStudent', methods=['GET'])
def selectStudent():
    # 连接数据库
    db, cur = linkDB()
    # request 获取原始提交的json内容
    varStuId = request.args.get('StuId')
    db.begin()
    num = cur.execute("SELECT * from student where StuId = '%d';" % int(varStuId))
    db.commit()
    if num > 0:
        cursor = cur.fetchall()
        for row in cursor:
            if int(varStuId) == row['StuId']:
                varName = row['NAME']
                varClass = row['CLA']
                varAge = row['AGE']
        stu = {'StuId':varStuId, 'NAME':varName, 'CLA':varClass, 'AGE':varAge}
        return stu
    else:
        return 'fail'
2.4.3 查询学生信息RPC测试
??在“查询学生信息”页面中输入要查询学生的学号。如果不存在要查询学生的学号,则被提示“无当前学生信息”。例如,输入数据库不存在的学号“2021000”后,查询学生信息页面如下图所示。
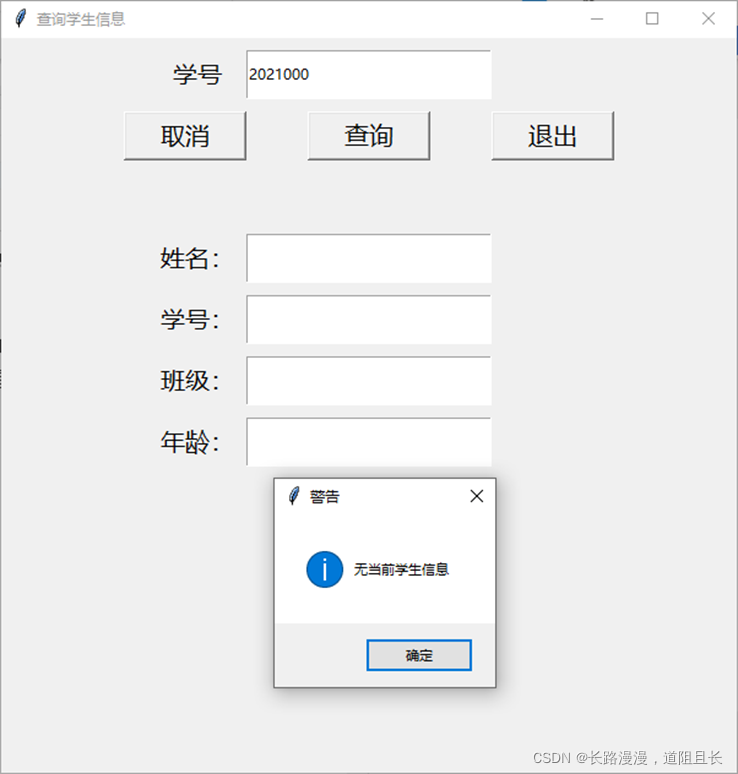
??服务器接收到查询学号为“2021000”学生信息的请求后,给出的响应信息如下图所示。

??接着输入数据库存在学生的学号,例如“2021001”,点击“查询”按钮,则会在页面显示学生的姓名、学号、班级和年龄。如下图所示。

??服务器接收到查询学号为“2021001”学生信息的请求后,给出的响应信息如下图所示。

2.5 修改学生信息模块
2.5.1 客户端的修改学生信息模块
??在SIMS.py中添加修改学生信息模块,页面效果如下图所示

??在SIMS.py中新增修改学生信息函数,用于实现修改学生信息页面的展示以及向服务器端发送“修改学生信息的请求”。代码如下
def change_stu():
    root4=Tk()
    root4.title("修改学生信息")
    root4.config(width=600)
    root4.config(height=600)

    #创建关联变量
    sId=StringVar(root4,value='')

    #创建文本组件框\标签组件
    label=Label(root4,text="学号",font=("微软雅黑 -20"))
    label.place(x=120,y=10,height=40,width=80)

    selId=Entry((root4),textvariable=sId)
    selId.place(x=200,y=10,height=40,width=200)

    #创建关联字符变量
    varName=StringVar(root4,value='')
    varId=StringVar(root4,value='')
    varClass=StringVar(root4,value='')
    varAge=StringVar(root4,value='')

    #创建标签组件
    label=Label(root4,text="姓名:",font=("微软雅黑 -20"))
    label.place(x=80,y=160,height=40,width=80)

    label=Label(root4,text="学号:",font=("微软雅黑 -20"))
    label.place(x=80,y=210,height=40,width=80)

    label=Label(root4,text="班级:",font=("微软雅黑 -20"))
    label.place(x=80,y=260,height=40,width=80)


    label=Label(root4,text="年龄:",font=("微软雅黑 -20"))
    label.place(x=80,y=310,height=40,width=80)

        #创建文本框组件,同时设置关联的变量
        #    姓名entryName
        #    学号entryId
        #    班级entryClass
        #    年龄entryAge
    entryName=Entry((root4),textvariable=varName)
    entryName.place(x=200,y=160,height=40,width=200)

    entryId=Entry((root4),textvariable=varId)
    entryId.place(x=200,y=210,height=40,width=200)

    entryClass=Entry((root4),textvariable=varClass)
    entryClass.place(x=200,y=260,height=40,width=200)

    entryAge=Entry((root4),textvariable=varAge)
    entryAge.place(x=200,y=310,height=40,width=200)


    def select():
        stu_id = eval(selId.get())  # 学号输入
        selResponse = requests.get(url="http://127.0.0.1:5000/selectStudent", params={"StuId": stu_id})
        num = 0
        if selResponse.content != b'fail':
            num = 1
        if  num > 0:
            i = 1
        else:
            i = 0

        if num > 0:
            stuInfo = json.loads(selResponse.content.decode('utf-8'))
            if stu_id == int(stuInfo["StuId"]):
                stu_name = stuInfo['NAME']
                stu_class = stuInfo['CLA']
                stu_age = stuInfo['AGE']
            varName.set(stu_name)
            varId.set(stu_id)
            varClass.set(stu_class)
            varAge.set(stu_age)
        else:
            messagebox.showinfo(title='警告', message='无当前学生信息')

    header = {
        "Content-Type":"application/json"
    }

    def saveName():
        name=entryName.get()
        # json类型的参数
        changeNameJson = {
            "StuId": eval(selId.get()),
            "NAME": name
        }
        changeNameResponse = requests.post(url="http://127.0.0.1:5000/updateStudentName",json=changeNameJson,headers=header)
        if changeNameResponse.content == b'success':
            messagebox.showinfo(title='恭喜',message='保存成功!')
        else:
            messagebox.showinfo(title='警告', message='保存失败!')

    def saveCla():
        cla=eval(entryClass.get())
        # json类型的参数
        changeClaJson = {
            "StuId": eval(selId.get()),
            "CLA": cla
        }
        changeClaResponse = requests.post(url="http://127.0.0.1:5000/updateStudentClass", json=changeClaJson,
                                           headers=header)
        if changeClaResponse.content == b'success':
            messagebox.showinfo(title='恭喜', message='保存成功!')
        else:
            messagebox.showinfo(title='警告', message='保存失败!')

    def saveAge():
        age=eval(entryAge.get())# json类型的参数
        changeAgeJson = {
            "StuId": eval(selId.get()),
            "AGE": age
        }
        changeAgeResponse = requests.post(url="http://127.0.0.1:5000/updateStudentAge", json=changeAgeJson,
                                           headers=header)
        if changeAgeResponse.content == b'success':
            messagebox.showinfo(title='恭喜', message='保存成功!')
        else:
            messagebox.showinfo(title='警告', message='保存失败!')


    #保存键
    buttonname=Button(root4,text="保存",font=("微软雅黑 -20"),command=saveName)
    buttonname.place(x=450,y=160,height=40,width=60)

    buttoncla=Button(root4,text="保存",font=("微软雅黑 -20"),command=saveCla)
    buttoncla.place(x=450,y=260,height=40,width=60)

    buttonage=Button(root4,text="保存",font=("微软雅黑 -20"),command=saveAge)
    buttonage.place(x=450,y=310,height=40,width=60)

    def cancel():
        sId.set('')

    #取消键
    buttoncancel=Button(root4,text="取消",font=("微软雅黑 -20"),command=cancel)
    buttoncancel.place(x=105,y=70,height=40,width=60)

    #查询键
    buttonselect=Button(root4,text="查询",font=("微软雅黑 -20"),command=select)
    buttonselect.place(x=250,y=70,height=40,width=60)

    #退出键
    buttondel=Button(root4,text="退出",font="微软雅黑 -20",command=root4.destroy)
    buttondel.place(x=395,y=70,height=40,width=60)

    root4.mainloop()
2.5.2 服务器端的修改学生信息模块
??在SIMS_Server.py中新增一个请求方法,用于接收修改学生信息的请求。该功能的流程图如下图所示

??代码如下:
#修改学生姓名
@app.route('/updateStudentName', methods=['POST'])
def updateStudentName():
    # 连接数据库
    db, cur = linkDB()
    # request 获取原始提交的json内容
    #学生信息的json格式为 { ”StuId":int, "NAME":text }
    stuInfo = request.json
    varStuId = stuInfo['StuId']
    varName = stuInfo['NAME']
    # 当前学生存在
    db.begin()
    num = cur.execute("SELECT * from student where StuId = %d;" % varStuId)
    if num > 0:
        cur.execute("UPDATE student SET NAME='%s' WHERE StuId=%d;"%(varName,varStuId))
        db.commit()
        return 'success'
    else:
        return 'fail'

#修改学生班级
@app.route('/updateStudentClass', methods=['POST'])
def updateStudentClass():
    # 连接数据库
    db, cur = linkDB()
    # request 获取原始提交的json内容
    #学生信息的json格式为 { ”StuId":int, "CLA":int }
    stuInfo = request.json
    varStuId = stuInfo['StuId']
    varCLA = stuInfo['CLA']
    # 当前学生存在
    db.begin()
    num = cur.execute("SELECT * from student where StuId = %d;" % varStuId)
    if num > 0:
        cur.execute("UPDATE student SET CLA='%d' WHERE StuId=%d;"%(varCLA,varStuId))
        db.commit()
        return 'success'
    else:
        return 'fail'

#修改学生年龄
@app.route('/updateStudentAge', methods=['POST'])
def updateStudentAge():
    # 连接数据库
    db, cur = linkDB()
    # request 获取原始提交的json内容
    #学生信息的json格式为 { ”StuId":int, "AGE":int }
    stuInfo = request.json
    varStuId = stuInfo['StuId']
    varAGE = stuInfo['AGE']
    # 当前学生存在
    db.begin()
    num = cur.execute("SELECT * from student where StuId = %d;" % varStuId)
    if num > 0:
        cur.execute("UPDATE student SET AGE='%d' WHERE StuId=%d;"%(varAGE,varStuId))
        db.commit()
        return 'success'
    else:
        return 'fail'
2.5.3 修改学生信息RPC测试
??在“修改学生信息”页面中输入要修改学生的学号。如果不存在要修改学生的学号,则被提示“无当前学生信息”。例如,输入数据库不存在的学号“2021000”后,修改学生信息页面如图下图所示。

??将待修改信息的学生的各项数据显示处理的过程,服务器接收到查询指定学号学生信息的请求,并给出了相关的响应信息。如下图所示。

??接着输入数据库存在学生的学号,例如“2021001”,点击“查询”按钮,则会在页面显示学生的姓名、学号、班级和年龄。如下图所示。

??该过程中服务器接收到查询学号为“2021001”学生信息的请求,相关的响应信息如下图所示。

??这里以修改学生姓名为例,在姓名输入框中输入修改后的学生姓名“李莹莹”,点击右侧的“保存”按钮,则会显示“保存成功”提示窗口。如下图所示。

??上述修改学生姓名的过程服务器接收到修改学号为“2021001”学生姓名的请求,响应信息如下图所示。

??刷新数据库后,学号为2021001的学生的姓名由“李莹”被修改为“李莹莹”。如下图所示。

2.6 完整代码
2.6.1 客户端完整代码
# -*- coding: utf-8 -*-
#Author: WXW
#@Time: 2021/12/7  9:58

from tkinter import *
from tkinter import messagebox
from PIL import Image,ImageTk
import tkinter
import requests
import json

root = Tk()
# 禁止最大化按钮(只显示最小化按钮和关闭按钮)
root.resizable(False,False)
root.minsize(600,600) # 最小尺寸
root.maxsize(600,600) # 最大尺寸
root.title("学生信息管理系统")
root.config(width=600)
root.config(height=600)
# 添加窗口背景图片
canvas = tkinter.Canvas(root,
                        width = 600,  # 指定Canvas组件的宽度
                        height = 600,  # 指定Canvas组件的高度
                        bg = 'white'  # 指定Canvas组件的背景色
                        )
#记得在运行时修改文件所在位置
image = Image.open('F:\\1.jpg')

im = ImageTk.PhotoImage(image) #用photoImage打开图片
canvas.create_image(200, 170, image=im)  # 使用creat_image将图片添加到Canvas
canvas.pack()

#增加学生信息
def insert_stu():  #录入学生信息
    root1=Tk()
    root1.title("录入学生信息")
    root1.config(width=600)
    root1.config(height=600)

    #创建关联字符变量
    varName=StringVar(root1,value='')
    varId=StringVar(root1,value='')
    varClass=StringVar(root1,value='')
    varAge=StringVar(root1,value='')

    #创建标签组件
    label=Label(root1,text="姓名:",font=("微软雅黑 -20"))
    label.place(x=120,y=60,height=40,width=80)

    label=Label(root1,text="学号:",font=("微软雅黑 -20"))
    label.place(x=120,y=110,height=40,width=80)


    label=Label(root1,text="班级:",font=("微软雅黑 -20"))
    label.place(x=120,y=160,height=40,width=80)


    label=Label(root1,text="年龄:",font=("微软雅黑 -20"))
    label.place(x=120,y=210,height=40,width=80)

    #创建文本框组件,同时设置关联的变量
    #    姓名entryName
    #    学号entryId
    #    班级entryClass
    #    年龄entryAge

    entryName=Entry((root1),textvariable=varName)
    entryName.place(x=200,y=60,height=40,width=200)

    entryId=Entry((root1),textvariable=varId)
    entryId.place(x=200,y=110,height=40,width=200)

    entryClass=Entry((root1),textvariable=varClass)
    entryClass.place(x=200,y=160,height=40,width=200)

    entryAge=Entry((root1),textvariable=varAge)
    entryAge.place(x=200,y=210,height=40,width=200)

    def buttonOK():
        i=0

        stu_id = eval(entryId.get())#学号输入
        stu_name =str(entryName.get())#姓名录入
        stu_class =eval(entryClass.get())#班级录入
        stu_age=eval(entryAge.get())#年龄录入

        print(stu_id)
        print(type(stu_id))

        # 查找完成若有重复的学号,则警告。否则录入数据库
        response = requests.get(url='http://127.0.0.1:5000/selectStudent',params={"StuId":stu_id})
        if response.content == b'fail':
            i = 0
        else:
            i = 1

        if i==1:
            messagebox.showerror('警告',message='学号重复,请重新输入')
        else:
            try:
                # 请求头
                header = {
                    "Content-Type": "application/json"
                }
                # json 类型的参数
                addJson = {
                    "StuId": stu_id,
                    "NAME": stu_name,
                    "CLA": stu_class,
                    "AGE": stu_age
                }
                responseAdd = requests.post(url='http://127.0.0.1:5000/addStudent', json=addJson, headers=header)
                print(responseAdd.content.decode('utf-8'))
                messagebox.showinfo(title='恭喜',message='录入成功!')
                root1.destroy()
            except:
                messagebox.showerror('警告',message='未录入成功')


    buttonbuttonOK=Button(root1,text="录入学生信息",font=("微软雅黑 -20"),command=buttonOK)
    buttonbuttonOK.place(x=200,y=300,height=40,width=200)
    def cancel():
        varName.set('')
        varId.set('')
        varClass.set('')
        varAge.set('')


    #取消键
    buttonCancel=Button(root1,text="取消",font=("微软雅黑 -20"),command=cancel)
    buttonCancel.place(x=200,y=350,height=40,width=200)

    #退出键
    buttondel=Button(root1,text="退出",font=("微软雅黑 -20"),command=root1.destroy)
    buttondel.place(x=200,y=400,height=40,width=200)
    root1.mainloop()

# 实现删除学生信息
def delete_stu():
    root2=Tk()
    root2.title("删除学生信息")
    root2.config(width=600)
    root2.config(height=600)

    #创建标签
    label=Label(root2,text="学号:",font=("微软雅黑 -20"))
    label.place(x=120,y=100,height=40,width=80)

    entryId=Entry(root2)
    entryId.place(x=200,y=100,height=40,width=200)

    def delete():
        stu_id = eval(entryId.get())#学号输入
        # 请求头
        header = {
            "Content-Type": "application/json"
        }
        # json 类型的参数
        delJson = {
            "StuId": stu_id
        }
        response = requests.post(url="http://127.0.0.1:5000/deleteStudent", json=delJson, headers=header)
        print(response.content)
        if response.content == b'success':
            messagebox.showinfo(title='恭喜', message='删除成功!')
        elif response.content == b'notExist':
            messagebox.showinfo(title='警告', message='该学生不存在!')
        else:
            messagebox.showinfo(title='警告', message='删除失败!')

        root2.destroy()

    #删除键
    buttondelete=Button(root2,text="删除",font=("微软雅黑 -20"),command=delete)
    buttondelete.place(x=200,y=200,height=40,width=200)

    #退出键
    buttondel=Button(root2,text="退出",font=("微软雅黑 -20"),command=root2.destroy)
    buttondel.place(x=200,y=250,height=40,width=200)

    root2.mainloop()

# 查询学生信息
def sel_stu():
    root3=Tk()
    root3.title("查询学生信息")
    root3.config(width=600)
    root3.config(height=600)

    #创建关联变量
    sId=StringVar(root3,value='')

    #创建文本组件框\标签组件
    label=Label(root3,text="学号",font=("微软雅黑 -20"))
    label.place(x=120,y=10,height=40,width=80)

    selId=Entry((root3),textvariable=sId)
    selId.place(x=200,y=10,height=40,width=200)

    def select():
        #创建关联字符变量
        varName=StringVar(root3,value='')
        varId=StringVar(root3,value='')
        varClass=StringVar(root3,value='')
        varAge=StringVar(root3,value='')

        # 创建标签组件
        label = Label(root3, text="姓名:", font=("微软雅黑 -20"))
        label.place(x=120, y=160, height=40, width=80)

        label = Label(root3, text="学号:", font=("微软雅黑 -20"))
        label.place(x=120, y=210, height=40, width=80)

        label = Label(root3, text="班级:", font=("微软雅黑 -20"))
        label.place(x=120, y=260, height=40, width=80)

        label = Label(root3, text="年龄:", font=("微软雅黑 -20"))
        label.place(x=120, y=310, height=40, width=80)

        # 创建文本框组件,同时设置关联的变量
        #    姓名entryName
        #    学号entryId
        #    班级entryClass
        #    年龄entryAge

        entryName = Entry((root3), textvariable=varName)
        entryName.place(x=200, y=160, height=40, width=200)

        entryId = Entry((root3), textvariable=varId)
        entryId.place(x=200, y=210, height=40, width=200)

        entryClass = Entry((root3), textvariable=varClass)
        entryClass.place(x=200, y=260, height=40, width=200)

        entryAge = Entry((root3), textvariable=varAge)
        entryAge.place(x=200, y=310, height=40, width=200)

        stu_id = eval(selId.get())#学号输入
        selResponse = requests.get(url="http://127.0.0.1:5000/selectStudent", params={"StuId":stu_id})
        num = 0
        if selResponse.content != b'fail':
            num = 1
        if num > 0:
            stuInfo =json.loads(selResponse.content.decode('utf-8'))
            print(stuInfo["StuId"])
            print(type(stuInfo["StuId"]))
            print(type(stu_id))
            if stu_id == int(stuInfo["StuId"]):
                stu_name = stuInfo['NAME']
                stu_class = stuInfo['CLA']
                stu_age = stuInfo['AGE']
            varName.set(stu_name)
            varId.set(stu_id)
            varClass.set(stu_class)
            varAge.set(stu_age)
        else:
            messagebox.showinfo(title='警告', message='无当前学生信息')

    #查询键
    buttonselect=Button(root3,text="查询",font=("微软雅黑 -20"),command=select)
    buttonselect.place(x=250,y=60,height=40,width=100)

    #取消键
    def cancel():
        sId.set('')

    buttoncancel=Button(root3,text="取消",font="微软雅黑 -20",command=cancel)
    buttoncancel.place(x=100,y=60,height=40,width=100)

    #退出键
    buttondel=Button(root3,text="退出",font="微软雅黑 -20",command=root3.destroy)
    buttondel.place(x=400,y=60,height=40,width=100)
    root3.mainloop()

def change_stu():
    root4=Tk()
    root4.title("修改学生信息")
    root4.config(width=600)
    root4.config(height=600)

    #创建关联变量
    sId=StringVar(root4,value='')

    #创建文本组件框\标签组件
    label=Label(root4,text="学号",font=("微软雅黑 -20"))
    label.place(x=120,y=10,height=40,width=80)

    selId=Entry((root4),textvariable=sId)
    selId.place(x=200,y=10,height=40,width=200)

    #创建关联字符变量
    varName=StringVar(root4,value='')
    varId=StringVar(root4,value='')
    varClass=StringVar(root4,value='')
    varAge=StringVar(root4,value='')

    #创建标签组件
    label=Label(root4,text="姓名:",font=("微软雅黑 -20"))
    label.place(x=80,y=160,height=40,width=80)

    label=Label(root4,text="学号:",font=("微软雅黑 -20"))
    label.place(x=80,y=210,height=40,width=80)

    label=Label(root4,text="班级:",font=("微软雅黑 -20"))
    label.place(x=80,y=260,height=40,width=80)


    label=Label(root4,text="年龄:",font=("微软雅黑 -20"))
    label.place(x=80,y=310,height=40,width=80)

        #创建文本框组件,同时设置关联的变量
        #    姓名entryName
        #    学号entryId
        #    班级entryClass
        #    年龄entryAge
    entryName=Entry((root4),textvariable=varName)
    entryName.place(x=200,y=160,height=40,width=200)

    entryId=Entry((root4),textvariable=varId)
    entryId.place(x=200,y=210,height=40,width=200)

    entryClass=Entry((root4),textvariable=varClass)
    entryClass.place(x=200,y=260,height=40,width=200)

    entryAge=Entry((root4),textvariable=varAge)
    entryAge.place(x=200,y=310,height=40,width=200)


    def select():
        stu_id = eval(selId.get())  # 学号输入
        selResponse = requests.get(url="http://127.0.0.1:5000/selectStudent", params={"StuId": stu_id})
        num = 0
        if selResponse.content != b'fail':
            num = 1
        if  num > 0:
            i = 1
        else:
            i = 0

        if num > 0:
            stuInfo = json.loads(selResponse.content.decode('utf-8'))
            if stu_id == int(stuInfo["StuId"]):
                stu_name = stuInfo['NAME']
                stu_class = stuInfo['CLA']
                stu_age = stuInfo['AGE']
            varName.set(stu_name)
            varId.set(stu_id)
            varClass.set(stu_class)
            varAge.set(stu_age)
        else:
            messagebox.showinfo(title='警告', message='无当前学生信息')

    header = {
        "Content-Type":"application/json"
    }

    def saveName():
        name=entryName.get()
        # json类型的参数
        changeNameJson = {
            "StuId": eval(selId.get()),
            "NAME": name
        }
        changeNameResponse = requests.post(url="http://127.0.0.1:5000/updateStudentName",json=changeNameJson,headers=header)
        if changeNameResponse.content == b'success':
            messagebox.showinfo(title='恭喜',message='保存成功!')
        else:
            messagebox.showinfo(title='警告', message='保存失败!')

    def saveCla():
        cla=eval(entryClass.get())
        # json类型的参数
        changeClaJson = {
            "StuId": eval(selId.get()),
            "CLA": cla
        }
        changeClaResponse = requests.post(url="http://127.0.0.1:5000/updateStudentClass", json=changeClaJson,
                                           headers=header)
        if changeClaResponse.content == b'success':
            messagebox.showinfo(title='恭喜', message='保存成功!')
        else:
            messagebox.showinfo(title='警告', message='保存失败!')

    def saveAge():
        age=eval(entryAge.get())# json类型的参数
        changeAgeJson = {
            "StuId": eval(selId.get()),
            "AGE": age
        }
        changeAgeResponse = requests.post(url="http://127.0.0.1:5000/updateStudentAge", json=changeAgeJson,
                                           headers=header)
        if changeAgeResponse.content == b'success':
            messagebox.showinfo(title='恭喜', message='保存成功!')
        else:
            messagebox.showinfo(title='警告', message='保存失败!')


    #保存键
    buttonname=Button(root4,text="保存",font=("微软雅黑 -20"),command=saveName)
    buttonname.place(x=450,y=160,height=40,width=60)

    buttoncla=Button(root4,text="保存",font=("微软雅黑 -20"),command=saveCla)
    buttoncla.place(x=450,y=260,height=40,width=60)

    buttonage=Button(root4,text="保存",font=("微软雅黑 -20"),command=saveAge)
    buttonage.place(x=450,y=310,height=40,width=60)

    def cancel():
        sId.set('')

    #取消键
    buttoncancel=Button(root4,text="取消",font=("微软雅黑 -20"),command=cancel)
    buttoncancel.place(x=105,y=70,height=40,width=60)

    #查询键
    buttonselect=Button(root4,text="查询",font=("微软雅黑 -20"),command=select)
    buttonselect.place(x=250,y=70,height=40,width=60)

    #退出键
    buttondel=Button(root4,text="退出",font="微软雅黑 -20",command=root4.destroy)
    buttondel.place(x=395,y=70,height=40,width=60)

    root4.mainloop()

#创建顶级菜单及其下拉菜单
menubar=Menu(root)
filemenu=Menu(menubar,tearoff=False)
filemenu.add_command(label="增加",command=insert_stu)
filemenu.add_command(label="删除",command=delete_stu)#command接删除函数/下面接修改函数
filemenu.add_command(label="修改",command=change_stu)
filemenu.add_command(label="查询",command=sel_stu)

filemenu.add_separator()
filemenu.add_command(label="退出",command=root.destroy)
menubar.add_cascade(label="菜单",menu=filemenu)

#显示菜单
root.config(menu=menubar)

buttoninsert_stu=Button(root,text="录入学生信息",font=("微软雅黑 -20"),command=insert_stu)
buttoninsert_stu.place(x=200,y=150,height=40,width=200)

buttondelete_stu=Button(root,text="删除学生信息",font=("微软雅黑 -20"),command=delete_stu)
buttondelete_stu.place(x=200,y=250,height=40,width=200)

buttonchange_stu=Button(root,text="修改学生信息",font=("微软雅黑 -20"),command=change_stu)
buttonchange_stu.place(x=200,y=350,height=40,width=200)

buttonsel_stu=Button(root,text="查询学生信息",font=("微软雅黑 -20"),command=sel_stu)
buttonsel_stu.place(x=200,y=450,height=40,width=200)

root.mainloop()
2.6.2 服务器端完整代码
# -*- coding: utf-8 -*-
#Author: WXW
#@Time: 2021/12/6  14:42
# coding:utf-8

from __future__ import unicode_literals
from flask import Flask, request
import pymysql

# 创建应用程序对象
app = Flask(__name__)
app.config['JSON_AS_ASCII'] = False

'''连接数据库'''
def linkDB():
    # 打开数据库连接
    db = pymysql.connect(host='127.0.0.1',
                         port=3306,
                         user='root',
                         passwd='123456',
                         db='studentinfo')

    # 使用 cursor() 方法创建一个游标对象cur
    cur = db.cursor(cursor=pymysql.cursors.DictCursor)

    return db,cur

#添加学生信息
@app.route('/addStudent', methods=['POST'])
def addStudent():
    # 连接数据库
    db, cur = linkDB()
    # request 获取原始提交的json内容
    #学生信息的json格式为 { ”StuId":int, "NAME":text, "CLA":int, "AGE":int }
    stuInfo = request.json
    varStuId = stuInfo['StuId']
    varNAME = stuInfo['NAME']
    varCLA = stuInfo['CLA']
    varAGE = stuInfo['AGE']
    # 查找完成若有重复的学号,则警告。否则录入数据库
    num = cur.execute("SELECT * from student where StuId =  " + str(varStuId) + ' ;')
    if num > 0:
        # 学号重复,录入失败
        return 'fail'
    else:
        try:
            # 录入成功
            db.begin()
            sql1 = "INSERT INTO student(StuId,NAME,CLA,AGE)"
            sql1 += "VALUES(%d,'%s',%d,%d)" % (varStuId, varNAME, varCLA, varAGE)
            cur.execute(sql1)
            db.commit()
            return 'success'
        except:
            # 录入失败
            return 'fail'

#删除学生信息
@app.route('/deleteStudent', methods=['POST'])
def deleteStudent():
    # 连接数据库
    db, cur = linkDB()
    # request 获取原始提交的json内容
    #学生信息的json格式为 { ”StuId":int }
    stuInfo = request.json
    varStuId = stuInfo['StuId']
    num = cur.execute("SELECT * from student where StuId =  " + str(varStuId) + ' ;')
    if num == 0:
        # 该学生不存在
        return 'notExist'
    else:
        try:
            # 删除成功
            db.begin()
            cur.execute("DELETE from student where StuId = '%s';" % varStuId)
            db.commit()
            return 'success'
        except:
            # 删除失败
            return 'fail'


#查询学生信息
@app.route('/selectStudent', methods=['GET'])
def selectStudent():
    # 连接数据库
    db, cur = linkDB()
    # request 获取原始提交的json内容
    varStuId = request.args.get('StuId')
    db.begin()
    num = cur.execute("SELECT * from student where StuId = '%d';" % int(varStuId))
    db.commit()
    if num > 0:
        cursor = cur.fetchall()
        for row in cursor:
            if int(varStuId) == row['StuId']:
                varName = row['NAME']
                varClass = row['CLA']
                varAge = row['AGE']
        stu = {'StuId':varStuId, 'NAME':varName, 'CLA':varClass, 'AGE':varAge}
        return stu
    else:
        return 'fail'

#修改学生姓名
@app.route('/updateStudentName', methods=['POST'])
def updateStudentName():
    # 连接数据库
    db, cur = linkDB()
    # request 获取原始提交的json内容
    #学生信息的json格式为 { ”StuId":int, "NAME":text }
    stuInfo = request.json
    varStuId = stuInfo['StuId']
    varName = stuInfo['NAME']
    # 当前学生存在
    db.begin()
    num = cur.execute("SELECT * from student where StuId = %d;" % varStuId)
    if num > 0:
        cur.execute("UPDATE student SET NAME='%s' WHERE StuId=%d;"%(varName,varStuId))
        db.commit()
        return 'success'
    else:
        return 'fail'

#修改学生班级
@app.route('/updateStudentClass', methods=['POST'])
def updateStudentClass():
    # 连接数据库
    db, cur = linkDB()
    # request 获取原始提交的json内容
    #学生信息的json格式为 { ”StuId":int, "CLA":int }
    stuInfo = request.json
    varStuId = stuInfo['StuId']
    varCLA = stuInfo['CLA']
    # 当前学生存在
    db.begin()
    num = cur.execute("SELECT * from student where StuId = %d;" % varStuId)
    if num > 0:
        cur.execute("UPDATE student SET CLA='%d' WHERE StuId=%d;"%(varCLA,varStuId))
        db.commit()
        return 'success'
    else:
        return 'fail'

#修改学生年龄
@app.route('/updateStudentAge', methods=['POST'])
def updateStudentAge():
    # 连接数据库
    db, cur = linkDB()
    # request 获取原始提交的json内容
    #学生信息的json格式为 { ”StuId":int, "AGE":int }
    stuInfo = request.json
    varStuId = stuInfo['StuId']
    varAGE = stuInfo['AGE']
    # 当前学生存在
    db.begin()
    num = cur.execute("SELECT * from student where StuId = %d;" % varStuId)
    if num > 0:
        cur.execute("UPDATE student SET AGE='%d' WHERE StuId=%d;"%(varAGE,varStuId))
        db.commit()
        return 'success'
    else:
        return 'fail'

if __name__ == '__main__':
    app.run()