一 写在前面
最近在公司中进行开发,均是采用分布式微服务的开发方式,不同的微服务之间采用RPC框架进行通信与数据调用。通常在开发一个接口时,会需要调用其他微服务的接口,从而获取想要的数据,因为有了RPC框架,调用其他服务的接口非常方便,就像调用本地方法一样简单。于是我非常想学习RPC框架的原理并且自己实现一个RPC框架,为了记录这个过程,有了这个系列的文章。感兴趣的小伙伴们,记得一键三连~
二 RPC框架的基本原理
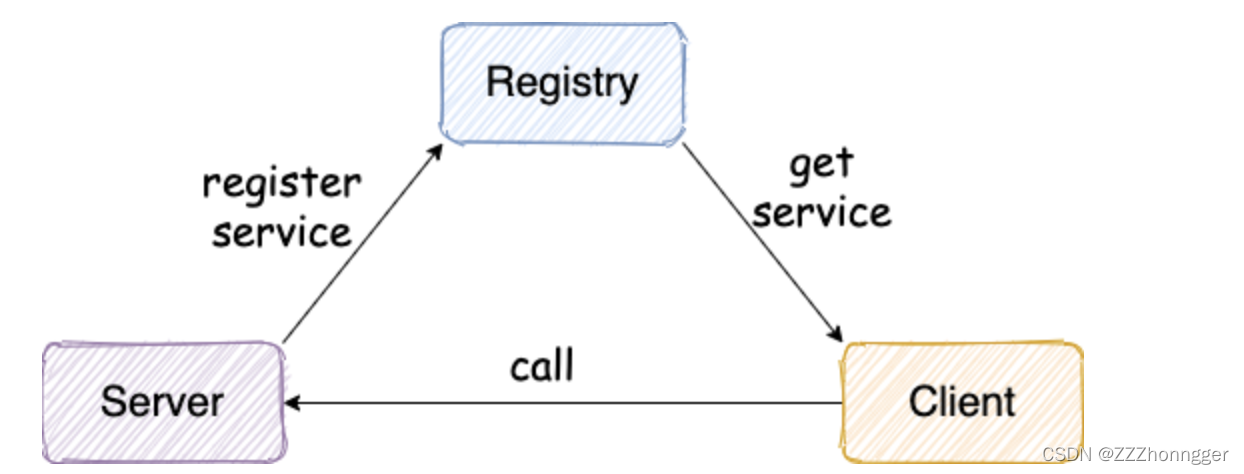
一个最简单的 RPC 框架使用示意图,如下图所示:

首先服务提供端 Server 向注册中心注册服务,把自己的IP地址、端口号、方法信息之类的元数据注册到注册中心里,服务消费者 Client 通过注册中心拿到服务相关信息,然后再通过网络请求服务提供端 Server。
再看下业界优秀的RPC框架:Dubbo的架构图,其实和上面的示意图大同小异:

了解了架构图后,我们再来看下设计一个RPC框架需要实现哪些组件?

- 注册中心: 首先是注册中心,服务提供者将自己的IP地址、端口号等信息写入到注册中心里,服务消费者才可以从注册中心里找到要请求服务所在的地址,才能发送请求到正确的地方。业界比较优秀的注册中心有:Zookeeper、Nacos、Consul、Eureka。
- 序列化: 服务消费者既然要向服务提供者发送网络请求,那么当然需要经过网络传输,我们知道网络传输的其实都是二进制流,那么服务器消费者发请求时必然得将请求体序列化成二进制流,才可以通过网络传输到服务提供者;同理,服务提供者也需要将响应结果序列化后发送回给服务消费者。
- 网络传输: 上面提到了网络传输,那么当然也需要网络传输相关的技术框架。
- 动态代理 : RPC 的主要目的就是让我们调用远程方法像调用本地方法一样简单,使用动态代理可以屏蔽远程方法调用的细节,例如网络传输。也就是说当我们调用远程方法的时候,实际会通过代理对象来传输网络请求。上图中的Client Stub、Server Stub其实就是个代理对象。
上述这四个组件在我看来是实现一个最简单的RPC框架所必需的,如果要把RPC框架做得更优秀,还应该要考虑负载均衡、容错、监控等等,大家有兴趣可以参考下Dubbo的实现。
三 写一个Spring Boot Starter
首先我的想法是,希望我写的RPC框架能够以Maven依赖的形式可以给其他项目使用,而Spring Boot项目在我们的微服务项目中是非常常用的,我们可以观察到Spring Boot项目中的Maven依赖有非常多的spring-boot-stater-xxx,因此,我也希望我的RPC框架能够很好地应用在Spring Boot项目中。于是,我决定将RPC框架,写成一个Spring Boot Starter。 怎么命名呢?参照Spring Boot的官网得出结论:
- 官方的 starter 的命名格式为:spring-boot-starter-{xxxx} 比如spring-boot-starter-activemq
- 第三方的命名格式为 {xxxx}-spring-boot-starter。比如mybatis-spring-boot-starter。如果我们忽略这种约定,是不是会显得我们写的东西不够“专业“。
于是,我给我的RPC框架起了一个简单的名字:zhongger-rpc-spring-boot-starter
1.首先在IDEA中创建一个Maven工程,引入相关的Maven依赖:
 	<dependencies>
        <dependency>
            <groupId>org.springframework.boot</groupId>
            <artifactId>spring-boot-configuration-processor</artifactId>
            <version>${spring-boot.version}</version>
        </dependency>
        <dependency>
            <groupId>org.springframework.boot</groupId>
            <artifactId>spring-boot-autoconfigure</artifactId>
            <version>${spring-boot.version}</version>
        </dependency>
    </dependencies>
2.编写AutoConfiguration配置类,使用@Configuration注解表明这是一个配置类,使用@Bean注解表明StarterDemoService类是一个需要注册到Spring容器中的类
package com.zhongger.rpc.config;

import com.zhongger.rpc.service.StarterDemoService;
import com.zhongger.rpc.service.StarterDemoServiceImpl;
import org.springframework.context.annotation.Bean;
import org.springframework.context.annotation.Configuration;

/**
 * @author zhongmingyi
 * @date 2021/12/7 6:40 下午
 */
@Configuration
public class AutoConfiguration {
    @Bean
    public StarterDemoService getStarterDemoService() {
        return new StarterDemoServiceImpl();
    }
}
3.resource目录下新建META-INF,并在META-INF目录下新建spring.factories文件,该文件中配置的类会在Spring Boot项目启动时被加载。
org.springframework.boot.autoconfigure.EnableAutoConfiguration=com.zhongger.rpc.config.AutoConfiguration
4.mvn install 打包到本地仓库。IDEA下很简单,直接点击这个按钮就行了。

打包成功的话,控制台显示:

5.在其他项目中引用zhongger-rpc-spring-boot-starter。步骤也很简单,直接在pom.xml中引入如下依赖就可以了
 		<dependency>
            <groupId>com.zhongger</groupId>
            <artifactId>zhongger-rpc-spring-boot-starter</artifactId>
            <version>1.0-SNAPSHOT</version>
        </dependency>
然后编写一个测试,直接使用@Autowired注解注入zhongger-rpc-spring-boot-starter中的StarterDemoService即可调用它里面的方法了
import com.zhongger.rpc.service.StarterDemoService;
import org.springframework.beans.factory.annotation.Autowired;
import org.springframework.web.bind.annotation.GetMapping;
import org.springframework.web.bind.annotation.RestController;

/**
 * @author zhongmingyi
 * @date 2021/12/7 7:52 下午
 */
@RestController
public class StarterDemoController {
    @Autowired
    private StarterDemoService starterDemoService;

    @GetMapping("/test")
    public String test() {
        starterDemoService.hello();
        return "success";
    }
}
输入localhost:8080/test,发现控制台打印出了zhongger-rpc-spring-boot-starter中的StarterDemoService的hello方法里输出的内容!

综上,这个Spring Boot Starter就这样写完了!为啥这样子就可以生成一个Spring Boot Starter,我们接下来就来了解下Spring Boot自动配置的原理!
四 Spring Boot自动配置的原理
首先我们知道,每个Spring Boot项目都有一个启动类,该类有一个注解 @SpringBootApplication ,围绕着这个注解,我们一起来揭秘Spring Boot自动配置的原理吧!
package com.zhongger.rpc.consumer;

import org.springframework.boot.SpringApplication;
import org.springframework.boot.autoconfigure.SpringBootApplication;

@SpringBootApplication
public class ZhonggerRpcConsumerApplication {

    public static void main(String[] args) {
        SpringApplication.run(ZhonggerRpcConsumerApplication.class, args);
    }

}
@SpringBootApplication由以下三个核心注解组成:
- @SpringBootConfiguration(实际上是@Configuration的封装)
- @EnableAutoConfiguration
- @ComponentScan
@SpringBootConfiguration
@EnableAutoConfiguration
@ComponentScan(
    excludeFilters = {@Filter(
    type = FilterType.CUSTOM,
    classes = {TypeExcludeFilter.class}
), @Filter(
    type = FilterType.CUSTOM,
    classes = {AutoConfigurationExcludeFilter.class}
)}
)
public @interface SpringBootApplication {

}
根据Spring Boot官网的介绍
- @Configuration:运行在Spring容器中注册额外的bean或导入其他配置类
- @EnableAutoConfiguration:允许启用SpringBoot的自动配置机制
- @ComponentScan:扫描被@Component (@Service,@Controller)注解的bean,注解默认会扫描启动类所在的包下所有的类 ,可以自定义不扫描某些 bean。
@EnableAutoConfiguration 是实现自动装配的重要注解:
@Target({ElementType.TYPE})
@Retention(RetentionPolicy.RUNTIME)
@Documented
@Inherited
@AutoConfigurationPackage
@Import({AutoConfigurationImportSelector.class})
public @interface EnableAutoConfiguration {
    String ENABLED_OVERRIDE_PROPERTY = "spring.boot.enableautoconfiguration";

    Class<?>[] exclude() default {};

    String[] excludeName() default {};
}
- @AutoConfigurationPackage:将main包下的所有组件注册到容器中
- @Import({AutoConfigurationImportSelector.class}): 用于加载自动装配类:xxxAutoConfiguration
AutoConfigurationImportSelector类负责加载自动装配类
通过阅读源码发现,AutoConfigurationImportSelector 类实现了 ImportSelector接口,也就实现了这个接口中的 selectImports方法,该方法主要用于获取所有符合条件的类的全限定类名,这些类需要被加载到 IoC 容器中。selectImports方法中的getAutoConfigurationEntry方法有三步:
- 1 判断自动装配开关是否打开。默认spring.boot.enableautoconfiguration=true,可在 application.properties 或 application.yml 中设置
- 2 用于获取EnableAutoConfiguration注解中的 exclude 和 excludeName
- 3 获取需要自动装配的所有配置类,读取META-INF/spring.factories,所有Starter下的spring.factories文件中的配置类都会扫描,但不一定都会被加载到容器中,其中会经过各种@ConditionalOnXXX的筛选,该类才会被加载到容器中。
小结
好了,这一节就先写到这里,下一篇文章我会开始正式编写这个RPC框架,后续我也会把源码放到Github上,大家可以多多关注!