SpringBoot中的WebSocket的理解及使用
使用场景
因为业务需要一个类似客服的功能,这就要求双方能够主动的互相发送信息和接受消息,常用的http请求则在实时性和服务端主动推送这块没法做到实时性,所以综合考虑采用websocket,它是一种全双工的网络技术(具体百度好了,主要以websocket内容使用为主,不干扰大家的重点),能让我们在浏览器和服务端之间通过一次握手形成一条快速通道,直接进行数据的传输
前端+后端 一个demo案例感受下具体的socket运作流程
SpringBoot使用
依赖添加
<dependency>
    <groupId>org.springframework.boot</groupId>
    <artifactId>spring-boot-starter-websocket</artifactId>
</dependency>
配置
SpringBoot 环境得先写个能扫描 @ServerEndpoint 的配置, 不然在客户端连接的时候会一直连不上,ps:不是 SpringBoot 下开发的可跳过
/**
 * @Author Gary
 * @Date 2022年3月27日 14:35
 * @Description: 配置类,让客户端能连接上 springboot下需要
 */
@Configuration
public class SocketConfig {

    @Bean
    public ServerEndpointExporter serverEndpointExporter() {
        return new ServerEndpointExporter();
    }
}
websocket类
package com.mhsb.access.socket;

import com.alibaba.fastjson.JSONObject;
import org.apache.commons.lang.StringUtils;
import org.slf4j.Logger;
import org.slf4j.LoggerFactory;
import org.springframework.stereotype.Component;

import javax.websocket.*;
import javax.websocket.server.PathParam;
import javax.websocket.server.ServerEndpoint;
import java.io.IOException;
import java.util.Map;
import java.util.concurrent.ConcurrentHashMap;

/**
 * @Author: ***
 * @Date: 2022/03/23/10:13
 * @Description:  定义具体的客户端连接地址,提供socket连接
 */
@Component
@ServerEndpoint(value = "/ws/{userId}")
public class WebSocket {

    /**
     * 日志记录
     */
    private static Logger logger = LoggerFactory.getLogger(WebSocket.class);

    /**
     * 静态变量,记录当前连接数---线程安全
     */
    private static int onlineCount = 0;

    /**
     * session来对用户发送数据, 获取连接特征userId
     */
    private Session session;
    private String userId;
    /**
     * 存放客户端websocket对象
     */
    private static ConcurrentHashMap<String, WebSocket> webSocketMap = new ConcurrentHashMap<>();

    @OnOpen
    public void open(@PathParam("userId") String userId, Session session) {
        try {
            this.userId = userId;
            this.session = session;
            addCount();
            if (webSocketMap.containsKey(userId)) {
                logger.info("当前用户id:{}已有其他终端登录", userId);
            } else {
                webSocketMap.put(userId, this);
            }
            logger.info("新连接用户:{},当前在线用户数:" + getOnlineCount(), userId);
        } catch (Exception e) {
            e.printStackTrace();
            throw new RuntimeException("web socket 异常!");
        }
    }

    @OnMessage
    public void onMessage(String message, Session session) throws IOException {
        logger.info("收到来自用户id为:{}的消息:{}", this.userId, message);
        Map map = JSONObject.parseObject(message, Map.class);
        String toUserId = (String) map.get("toUserId");
        String toMessage = (String) map.get("toMessage");
        map.put("gender", "male");
        map.put("age", 23);
        for (WebSocket server : webSocketMap.values()) {
            try {
                if (server.userId.equals(userId) || server.userId.equals(toUserId)) {
                    server.sendMessage(JSONObject.toJSONString(map));
                }
            } catch (IOException e) {
                e.printStackTrace();
                continue;
            }
        }
        //做了方法抽离,其实主要还是依靠session
        //session.getBasicRemote().sendText("收到" + this.userId + "的消息:" + message);
    }

    public void sendMessage(String message) throws IOException {
        this.session.getBasicRemote().sendText(message);
    }

    @OnClose
    public void close() {
        if (webSocketMap.get(this.userId) != null) {
            webSocketMap.remove(this.userId);
            remove();
            logger.info("用户{}已下线,当前用户数:{}", this.userId, getOnlineCount());
        }
    }

    @OnError
    public void onError(Throwable error) {
        logger.error("error:" + this.userId + ",reason:" + error.getMessage());
        error.printStackTrace();
    }

    //没什么作用,感觉当时有那个大病,onmessage中都能处理,结果自己单独又写了方法,就当记录下开发中的无用工作
    public static void sendInfo(String message, @PathParam("userId") String userId) {
        logger.info("推送消息到窗口" + userId + ",推送内容:" + message);
        if (StringUtils.isNotBlank(message)) {
            for (WebSocket server : webSocketMap.values()) {
                try {
                    // sid为null时群发,不为null则只发一个
                    if (userId == null) {
                        server.sendMessage(message);
                    } else if (server.userId.equals(userId)) {
                        server.sendMessage(message);
                    }
                } catch (IOException e) {
                    e.printStackTrace();
                    continue;
                }
            }
        }
    }

    public static synchronized void addCount() {
        onlineCount++;
    }

    public static synchronized void remove() {
        onlineCount--;
    }

    public static synchronized int getOnlineCount() {
        return onlineCount;
    }
}
前端页面
<!DOCTYPE html>
<html>
<head>
    <meta charset="utf-8">
    <title>websocket通讯</title>
</head>
<script src="https://cdn.bootcss.com/jquery/3.3.1/jquery.js"></script>
<script>
    var socket;
    function openSocket() {
        if(typeof(WebSocket) == "undefined") {
            console.log("您的浏览器不支持WebSocket");
        }else{
            console.log("您的浏览器支持WebSocket");
            //实现化WebSocket对象,指定要连接的服务器地址与端口  建立连接
            //ps:具体的socketUrl根据你自己定义的内容去修改好了,不要无脑cv啊!!!
            var socketUrl="http://127.0.0.1:9999/saToken/ws/"+$("#userId").val();
            socketUrl=socketUrl.replace("https","ws").replace("http","ws");
            console.log(socketUrl)
            socket = new WebSocket(socketUrl);
            //打开事件
            socket.onopen = function() {
                console.log("websocket已打开");
                //socket.send("这是来自客户端的消息" + location.href + new Date());
            };
            //获得消息事件
            socket.onmessage = function(msg) {
                console.log(msg.data);
                $('#receive').append(msg.data)
                //发现消息进入    开始处理前端触发逻辑
            };
            //关闭事件
            socket.onclose = function() {
                console.log("websocket已关闭");
            };
            //发生了错误事件
            socket.onerror = function() {
                console.log("websocket发生了错误");
            }
        }
    }
    function sendMessage() {
        if(typeof(WebSocket) == "undefined") {
            console.log("您的浏览器不支持WebSocket");
        }else {
            console.log("您的浏览器支持WebSocket");
            // console.log('{"toUserId":"'+$("#toUserId").val()+'","contentText":"'+$("#toMessage").val()+'"}');
            socket.send('{"toUserId":"'+$("#toUserId").val()+'","contentText":"'+$("#toMessage").val()+'"}');
        }
    }
</script>
<body>
<p>【userId】:<div><input id="userId" name="userId" type="text" value="11"/></div>
<p>【toUserId】:<div><input id="toUserId" name="toUserId" type="text" value="22"/></div>
<p>【toUserId内容】:<div><input id="toMessage" name="toMessage" type="text" value="abc"/></div>
<p>【操作】:<div><input type="button" onclick="openSocket()"/>开启socket</div>
<p>【操作】:<div><input type="button" onclick="sendMessage()"/>发送消息</div>

<div id="receive"> </div>
</body>
</html>
流程
-
开启后端服务,保证正常启动,服务运行中
-
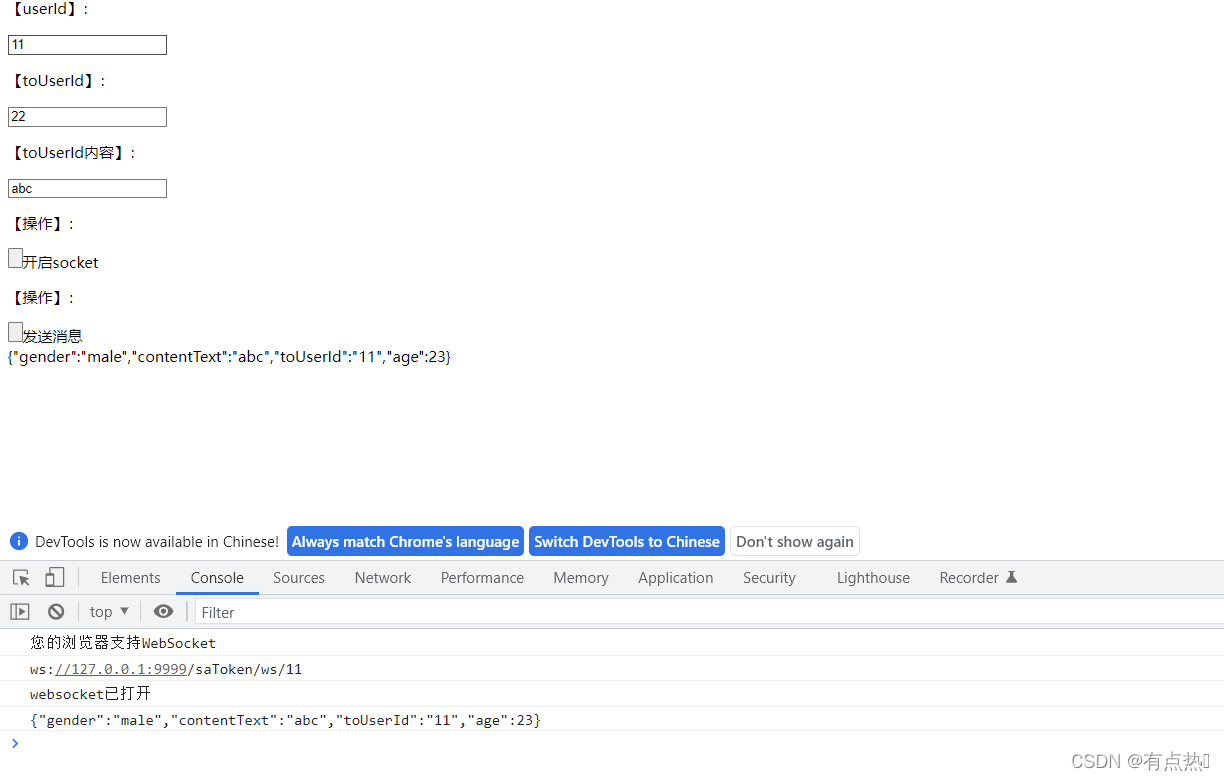
开启两个页面,检测websocket服务是否正常启动F12调试console页面,查看打印信息

-
websocket开启连接后,后台会检测是否连接,打印连接数,证明连接成功
-
前端指定发送方,填写信息后,socket.send()方法,发送具体的信息
-
后端中onmessage接受消息,其中能对消息进行处理和选择发送(这里也可以单独配置拦截器类去做,implement WebSocketHandler)
-
前端中通过onMessage接受消息,拿到后处理前端触发逻辑

示意图

结束!!!

等等!!!
在捕获信息后,业务场景中,message信息需要和数据库相关联,这就涉及到bean对象的注入,按照原来的@autowired注入方式无法成功,所以采用配置类加静态变量的方法
@Configuration
public class WebSocketConfig {

    @Bean
    public ServerEndpointExporter serverEndpointExporter() {
        return new ServerEndpointExporter();
    }

    @Resource
    public void setAppMessage(AppServiceMessageMapper appServiceMessageMapper) {
        WebSocket.appServiceMessageMapper = appServiceMessageMapper;
    }
}
WebSocket类中添加变量即可,项目启动都就能使用注入的对象了
public static AppServiceMessageMapper appServiceMessageMapper;