文章目录
1.Websocket是什么?
????了解网络编程的朋友如果是第一次听说Websocket,但是我相信你对于socket一定不陌生。socket的中文名叫做套接字,如果两个应用程序想要进行全双工通信(每个客户端可以同时收发数据)就需要使用到socket。socket本质上就是对TCP/IP的应用进行了一层封装,可以理解为处于应用层和传输层中间。为了使应用程序可以直接调用socket API进行通信, 举个例子:服务端会首先创建一个socket,接着调用Bind()绑定本地的地址,最后调用Listen()开启监听。这个时候客户端就可以创建一个socket并且使用Connect()函数建立连接,当建立连接成功之后,服务端或者客户端就可以使用send()/recv()来收发数据,一旦建立了连接就没有客户端和服务器之分,这样就可以实现双向通信了。
????Websocket是html5规范的一个部分,它借鉴了socket的思想,为web应用程序客户端和服务端之间提供了一种全双工通信机制。
2.Websocket诞生的原因
????在Websocket出现之前,浏览器和服务器之间的通信往往采用的是HTTP协议,交互流程是浏览器发出一个请求,然后服务端接收请求后进行处理并返回结果给浏览器,最后浏览器将数据进行渲染呈现到网页上。但是HTTP有一个缺陷就是只能由客户端发起,服务端不具备推送能力。为了获取服务端最新的状态,客户端只能采取“轮询”的方式,每隔一段时间发起一个请求,但是这会导致 1.服务端被迫维持来自各个客户端的大量的不同的连接。2.大量的轮询请求会造成高开销,比如会带上多余的Header,造成无用的数据传输为了解决这些问题,Websocket由此诞生。
3.Websocket与HTTP的相同点与不同点
相同点
- 都是基于TCP协议
- 都是可靠的传输协议
- 都是应用层协议
- 默认端口也是80和443
不同点
- Websocket是双向通信协议,HTTP是单向的
- Websocket需要浏览器和服务器握手进行连接建立,而HTTP是浏览器发起向服务器的连接
- 虽然HTTP/2也具备服务器推送功能,但是HTTP/2只能推送静态资源,无法推送动态内容
4.Websocket实现原理
????在讲Websocket的原理之前,首先得先了解一下HTTP短连接和长连接
- 短链接,在HTTP1.0 客户端每次发送请求都需要重新建立TCP连接。即在一个生命周期内只有一个Request和一个Response.
- 长连接,在HTTP1.1中默认使用长连接,在一定期限内保持TCP连接。即在一个生命周期内可以发送多个Request和接收多个Response.
????前面说了HTTP和Websocket都是基于TCP协议的,所以Websocket首先会借助于HTTP1.1协议建立通道,然后在此基础上使用Websocket进行通信。
????我们来看RFC6455文档中给出的一个WebSocket握手的例子,浏览器会发送
Get /chat HTTP/1.1
Host: server.example.com
Upgrade: websocket
Connection: Upgrade
Sec-Websocket-key: x3JJHMbDL1EzLkh9GBhXDw==
Sec-WebSocket-Protocol: chat, superchat
Sec-WebSocket-Version: 13
Origin: http://example.com
????这里的Upgrade: websocket 和 Cnnection:Upgrade 是websocket的核心。
????upgrade: 是HTTP1.1中用于定义转换协议的header域。这里表示,如果服务器支持的话,客户端希望使用现有的建立好的连接,升级到websocket协议。
????Connection: HTTP1.1中规定Upgrade只能应用在“直接连接”中,所以带有Upgrade头的HTTP1.1消息必须含有Connection头,Connection的意义是任何接收到此消息的人都要在转发消息之前处理掉Connection中指定的域,不转发Upgrade域。
????Sec-Websocket-key: 是一个Base64 encode的值,是浏览器随机生成的,用来发送给服务器,服务器会使用此字段组成另一个key放在首部Sec-WebSocket-Accept 返回给客户端,用于提供基本的防护,如恶意连接。
???? Sec-WebSocket-Protocol: 标识了客户端可支持的子协议(基于Websocket的应用程序协议)的列表。这里的chat,superchat只是占位符,并不存在这样的协议,子协议可以从IANA WebSocket 子协议名称注册表中选择,也可以是客户端和服务器共同理解的自定义名称。
????Sec-WebSocket-Version:标识了客户端支持的Websocket协议的版本。
????Origin: 用来指明请求的来源,Origin头部主要用于保护Websocket服务器免受非授权的跨域脚本调用Websocket API的请求。也就是不想没被授权的跨域访问与服务器建立连接,服务器可以通过这个字段来判断来源的域并有选择的拒绝。
服务端如果决定升级协议,则会向客户端返回如下响应,至此客户端和服务器连接握手成功,后续就可以进行TCP通信了。
HTTP/1.1 101 Switching Protocols
Upgrade: websocket
Connection: Upgrade
Sec-WebSocket-Accept: K7DJLdLooIwIG/MOpvWFB3y3FE8=
服务器也可以出于任何原因选择忽略该请求,在这种情况下,它只是响应,忽略Upgrade标头(例如,使用200 OK)
5.Websocket代码示例
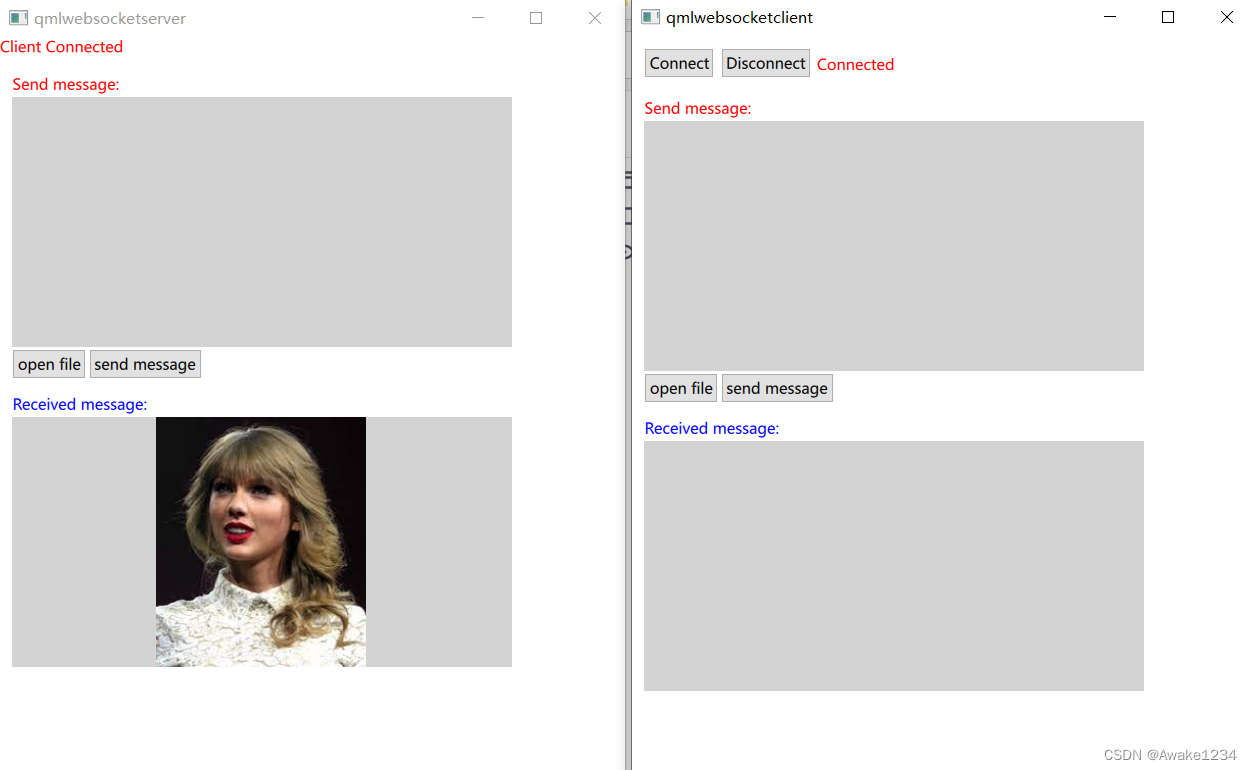
????一直想要了解一下QML,然后就借这次机会熟悉了一下QML的语法,基于Qt-6.3.1官方的示例qmlwebsocketclient和qmlwebsocketserver两个Demo开发了两个支持websocket连接,断开连接,发送文字,发送图片功能的客户端和服务器。
效果图
- 连接和断开连接,客户端和服务器会实时更新状态


- 客户端和服务器互发文字消息

- 发送图片消息

图5.4 客户端选择图片

核心代码
辅助类:文件读写类
//fileoperate.h
#ifndef FILEOPERATE_H
#define FILEOPERATE_H

#include <QObject>

class FileOperate : public QObject
{
    Q_OBJECT
    Q_PROPERTY(QString source READ source WRITE setSource NOTIFY sourceChanged)
public:
    explicit FileOperate(QObject *parent = nullptr);

    Q_INVOKABLE QByteArray read();
    Q_INVOKABLE bool write(const QByteArray& data);

    void setSource(const QString& source);
    QString source(){return m_source;}
signals:
    void sourceChanged(const QString& source);

private:
    QString m_source;
};

#endif // FILEOPERATE_H
//fileoperate.cpp
#include "fileoperate.h"
#include <QFile>


FileOperate::FileOperate(QObject *parent)
    : QObject{parent}
{

}

QByteArray FileOperate::read()
{
   QByteArray content;
   QFile file(m_source);
   if(file.open(QIODevice::ReadOnly)){
       content = file.readAll();
       file.close();
   }
   return content;
}

bool FileOperate::write(const QByteArray &data)
{
   QFile file(m_source);
   if(file.open(QFile::WriteOnly | QFile::Truncate)){
       file.write(data);
       file.close();
       return true;
   }else{
       return false;
   }
}

void FileOperate::setSource(const QString &source)
{
    if(source!= m_source){
        m_source = source;
        emit sourceChanged(source);
    }
}
qmlwebsocketclient相关文件
//main.cpp
#include <QtGui/QGuiApplication>
#include <QQuickView>
#include "fileoperate.h"

int main(int argc, char *argv[])
{
    QGuiApplication app(argc, argv);
    qmlRegisterType<FileOperate>("FileOperate",1,0,"FileOperate");

    QQuickView view;
    view.setSource(QUrl(QStringLiteral("qrc:/qml/qmlwebsocketclient/main.qml")));
    view.show();

    return app.exec();
}
//main.qml
import QtQuick 2.15
import QtWebSockets 1.0
import QtQuick.Controls 2.5
import Qt.labs.platform 1.1
import FileOperate 1.0

Rectangle {
    width: 500
    height: 600
    property var content: null
    WebSocket {
        id: socket
        url: "ws://127.0.0.1:80"
        onTextMessageReceived: {
            recvTextArea.append(message)
        }
        onStatusChanged: if(socket.status === WebSocket.Open){
                             messageBox.text = "Connected"
                         }else if(socket.status === WebSocket.Error) {
                             messageBox.text = "Error: " + socket.errorString
                         } else if (socket.status === WebSocket.Closed) {
                             messageBox.text = qsTr("Disconnected")
                         }
        active: false
    }

    Text {
        id: messageBox
        anchors.left: disconnectBtn.right
        anchors.top: disconnectBtn.top
        anchors.leftMargin: 5
        topPadding: 5
        color: "red"
        text: socket.status == WebSocket.Open ? qsTr("Connected") : qsTr("Welcome!")
    }

    Button{
        id: connectBtn
        x: 10
        y: 10
        text:"Connect"
        onClicked: {
            socket.active = true;
        }
    }

    Button{
        id: disconnectBtn
        anchors.left: connectBtn.right
        anchors.top: connectBtn.top
        anchors.leftMargin: 5
        text: "Disconnect"
        onClicked:{
            socket.active = false;
        }
    }


    Column{
        x: 10
        y: 50
        spacing: 2

        Text{
            id: sendLab
            color: "red"
            text: qsTr("Send message:")
        }

        TextArea{
            background: Rectangle{
                color: "lightgray"
            }
            id: sendTextArea
            width: 400
            height: 200
            Image {
                id: img
                width: 400
                height: 200
                fillMode: Image.PreserveAspectFit
            }
        }

        Row{
            spacing: 2
            Button{
                id: fileBtn
                text: "open file"
                onClicked: fileDialog.open()
            }

            Button{
                id: sendBtn
                text: "send message"
                onClicked: {
                    if (socket.status == WebSocket.Open) {
                        if(content){
                            socket.sendBinaryMessage(content);
                            img.source = "";
                            content = null;
                        }else{
                            socket.sendTextMessage(sendTextArea.text);
                            sendTextArea.clear();
                        }
                    }else{
                        messageBox.text = "Error: "+ socket.errorString;
                    }
                }
            }
        }

        Text{
            id: recvLab
            color: "blue"
            topPadding: 10
            text: qsTr("Received message:")
        }

        TextArea{
            background: Rectangle{
                color: "lightgray"
            }
            id: recvTextArea
            width: 400
            height: 200
        }

    }

    FileDialog {
        id: fileDialog
        nameFilters: ["Image Files (*.jpg *.png *.gif *.bmp *.ico)", "*.*"]
        onAccepted: {
            img.source = file
            fileOperate.source = new URL(file).pathname.substring(1);
        }
    }

    FileOperate{
        id: fileOperate
        onSourceChanged: function(source){
            console.log(source);   // D:/wallpicture/taylor.jpg
            content = read();
        }
    }
}
qmlwebsocketserver相关文件
//main.cpp
#include <QtGui/QGuiApplication>
#include <QQuickView>
#include "../qmlwebsocketclient/fileoperate.h"

int main(int argc, char *argv[])
{
    QGuiApplication app(argc, argv);
    qmlRegisterType<FileOperate>("FileOperate",1,0,"FileOperate");
    QQuickView view;
    view.setSource(QUrl(QStringLiteral("qrc:/qml/qmlwebsocketserver/main.qml")));
    view.show();

    return app.exec();
}
//
import QtQuick 2.15
import QtWebSockets 1.0
import QtQuick.Controls 2.5
import Qt.labs.platform 1.1
import FileOperate 1.0

Rectangle {
    width: 500
    height: 600
    property var filePath: "file:///D:/wallpicture/temp/taylor.jpg"
    property var socketIns: null
    function appendMessage(message) {
        recvTextArea.append(message)
    }

    WebSocketServer {
        id: server
        listen: true
        host: "127.0.0.1"
        port: 80
        onClientConnected:function(webSocket) {
            socketIns = webSocket
            messageBox.text = qsTr("Client Connected");
            webSocket.onTextMessageReceived.connect(function(message) {
                appendMessage(message);
            });

            webSocket.onBinaryMessageReceived.connect(function(message) {
                fileOperate.source = new URL(filePath).pathname.substring(1);
                if(fileOperate.write(message)){
                    img.source = filePath;
                }
            });

            webSocket.onStatusChanged.connect(function(status){
                if(status === WebSocket.Open){
                    webSocket.sendTextMessage(qsTr("Hello Client!"));
                }else if(status === WebSocket.Error) {
                    messagebox.text = "Error: " + webSocket.errorString
                } else if (status === WebSocket.Closed) {
                    messageBox.text = qsTr("Disconnected")
                }
            });
        }
        onErrorStringChanged: {
            messageBox.text = qsTr("Server error: %1").arg(errorString);
        }

    }

    Text {
        id: messageBox
        text: qsTr("Listening.....")
        color: "red"
        anchors.fill: parent
    }

    Column{
        x: 10
        y: 30
        spacing: 2

        Text{
            id: sendLab
            color: "red"
            text: qsTr("Send message:")
        }

        TextArea{
            background: Rectangle{
                color: "lightgray"
            }
            id: sendTextArea
            width: 400
            height: 200
        }

        Row{
            spacing: 2
            Button{
                id: fileBtn
                text: "open file"
                onClicked: fileDialog.open()
            }

            Button{
                id: sendBtn
                text: "send message"
                onClicked: {
                    socketIns.sendTextMessage(sendTextArea.text)
                    sendTextArea.clear();
                }
            }
        }

        Text{
            id: recvLab
            color: "blue"
            topPadding: 10
            text: qsTr("Received message:")
        }

        TextArea{
            background: Rectangle{
                color: "lightgray"
            }
            id: recvTextArea
            width: 400
            height: 200
            Image {
                id: img
                width: 400
                height: 200
                fillMode: Image.PreserveAspectFit
            }
        }
        FileOperate{
            id: fileOperate
        }
    }
}
6.Wireshark抓包分析
Websocket 协议
      0                   1                   2                   3
      0 1 2 3 4 5 6 7 8 9 0 1 2 3 4 5 6 7 8 9 0 1 2 3 4 5 6 7 8 9 0 1
     +-+-+-+-+-------+-+-------------+-------------------------------+
     |F|R|R|R| opcode|M| Payload len |    Extended payload length    |
     |I|S|S|S|  (4)  |A|     (7)     |             (16/64)           |
     |N|V|V|V|       |S|             |   (if payload len==126/127)   |
     | |1|2|3|       |K|             |                               |
     +-+-+-+-+-------+-+-------------+ - - - - - - - - - - - - - - - +
     |     Extended payload length continued, if payload len == 127  |
     + - - - - - - - - - - - - - - - +-------------------------------+
     |                               |Masking-key, if MASK set to 1  |
     +-------------------------------+-------------------------------+
     | Masking-key (continued)       |          Payload Data         |
     +-------------------------------- - - - - - - - - - - - - - - - +
     :                     Payload Data continued ...                :
     + - - - - - - - - - - - - - - - - - - - - - - - - - - - - - - - +
     |                     Payload Data continued ...                |
     +---------------------------------------------------------------+
抓包分析

- TCP建立连接三次握手就不多说了
- 发送HTTP请求升级协议

- Server响应

这里稍微提下http响应中Acess-Control-Allow-XX 字段表示了服务器对于客户端请求的方法,请求标头等字段的限制,具体含义可查 MDN标头
- 客户端发送文本

- 客户端发送图片
