公众号【离心计划】,掌握一手文章,一起离开地球表面
【RPC系列合集】
前言
? ? 前一章番外篇中我们讲解了几种IO模型和线程模型的区别,这一节主要我们动手实现一下从BIO到NIO的过程,实际感受一下。
BIO
单线程BIO
public static void main(String[] args) {
    byte[] buffer = new byte[1024];
    try {
        ServerSocket serverSocket = new ServerSocket();
        System.out.println("绑定端口:8080");
        serverSocket.bind(new InetSocketAddress(8080));
        System.out.println("等待连接");
        while (true) {
            //阻塞点1:建立连接
            Socket accept = serverSocket.accept();
            System.out.println("-------------------------");
            System.out.println("建立连接成功,读取数据");
            //阻塞点2:等待数据
            accept.getInputStream().read(buffer);
            String data = new String(buffer);
            System.out.println("接收到数据:" + data);
            System.out.println("发送数据...");
            accept.getOutputStream().write("我收到数据啦".getBytes(StandardCharsets.UTF_8));
            System.out.println("发送完成");
            System.out.println("-------------------------");
        }
    } catch (Exception e) {
        e.printStackTrace();
    }
}
? ? 这是单线程阻塞IO的实现的Server,上面有两个阻塞点:accept和read。这也是我们在番外篇中理解的阻塞IO,由于没有连接的到来或者没有IO事件的到来就会阻塞在这里,然后我们关注一点ServerSocket的包路径:package java.net,并不是在NIO包下。
? ? 这种单线程阻塞模型的问题很明显,只能连接一个客户端,其他的连接都会被阻塞。
多线程BIO
? ? 基于上面的问题,由于单线程导致的并发连接阻塞问题,那么我们给每个连接分配一个线程去处理不就行了?按照这个思路,代码就是这样
public static void main(String[] args) {
  byte[] buffer = new byte[1024];
  try {
      ServerSocket serverSocket = new ServerSocket();
      System.out.println("绑定端口:8080");
      serverSocket.bind(new InetSocketAddress(8080));
      System.out.println("等待连接");
      while (true) {
          Socket accept = serverSocket.accept();
          //连接到了后分配一个线程处理这个连接后续的io操作
          Thread thread = new Thread(new Runnable() {
              @Override
              public void run()
              {
                  long threadId = Thread.currentThread().getId();
                  System.out.println("-------------------------");
                  System.out.printf("[%s] 建立连接成功\n", threadId);
                  while (true){
                      try {
                          int read = accept.getInputStream().read(buffer);
                          if(read>0){
                              String data = new String(buffer);
                              System.out.println(String.format("[%s] 接收到数据:", threadId) + data);
                              System.out.println("发送数据...");
                              accept.getOutputStream().write(String.format("Hello!I have received your message:%s",data).getBytes(StandardCharsets.UTF_8));
                          }else{
                              accept.close();
                              break;
                          }
                      } catch (IOException e) {
                          e.printStackTrace();
                          break;
                      }
                      System.out.println("发送完成");
                      System.out.println("-------------------------");
                  }
              }
          });
            thread.start();
        }
    } catch (Exception e) {
        e.printStackTrace();
    }
}
? ? 这样的做法在大量连接出现的情况下就会导致C10K问题,也就是服务器创建线程数量的上限引起的瓶颈,通常为了不浪费资源会使用线程池来做线程公用,但是存在两个基本问题:
-
线程模型问题。线程池中线程数量够还好,不够还是得阻塞。
-
IO模型问题,accept这一步的阻塞,一定会导致并发连接出现等待的问题(再短也是等待)。read这一步的阻塞,依旧会导致大量线程的切换。
NIO
? ? NIO与BIO的区别在于,accept与read不再阻塞。从阻塞的定义来看:调用方不等待被调用方的真实返回,所以是成立的。
public static void main(String[] args) {
    ByteBuffer buffer = ByteBuffer.allocate(1024);
    try {
        ServerSocketChannel serverSocketChannel = ServerSocketChannel.open();
        System.out.println("绑定端口:8080");
        serverSocketChannel.bind(new InetSocketAddress(8080));
        serverSocketChannel.configureBlocking(false);
        System.out.println("等待连接");
        while (true) {
            SocketChannel socketChannel = serverSocketChannel.accept();
            if (socketChannel != null) {
                socketChannel.configureBlocking(false);
                System.out.println("-------------------------");
                System.out.println("建立连接成功,读取数据");
                int hasData = socketChannel.read(buffer);
                if (hasData != 0) {
                    String data = new String(buffer.array());
                    System.out.println("接收到数据:" + data);
                    System.out.println("发送数据...");
                    //重置buffer
                    buffer.flip();
                    buffer.put("我拿到数据啦".getBytes(StandardCharsets.UTF_8));
                    socketChannel.write(buffer);
                    System.out.println("发送完成");
                    System.out.println("-------------------------");
                } else {
                    System.out.println("还没数据啊");
                }
            } else {
                System.out.println("还没有客户端连接,但是不阻塞");
                Thread.sleep(2000);
            }
        }
    } catch (Exception e) {
        e.printStackTrace();
    }
}
? ? 我们看ServerSocketChannel的包路径在java.nio下面,说明这是nio的socket实现。当我们调用了accept时无论有无连接都会直接返回,这就是nio与bio的区别所在,没有连接就会返回null。
? ? 这个是单线程的NIO模式,问题其实可以想象到,客户端A建立了连接后,客户端B也马上建立了连接,虽然他们之间不会阻塞了,但是Server还没等AB发送数据就已经下一次循环了,Server根本没记住A和B的连接。
NIO
? ? 要记住每个连接,必然要把连接存储下来,每个连接建立后,放到一个socketList里面,然后有连接进来就放到这个list中,每次判断后都隐形list的循环,看看其中的每个socket是否都有数据进来
publicstatic void main(String[] args) throws InterruptedException {
     ByteBuffer byteBuffer = ByteBuffer.allocate(1024);
     List<SocketChannel> socketList = newArrayList<SocketChannel>();
     try{
         //Java为非阻塞设置的类
         ServerSocketChannel serverSocketChannel = ServerSocketChannel.open();
         serverSocketChannel.bind(newInetSocketAddress(8080));
         //设置为非阻塞
         serverSocketChannel.configureBlocking(false);
         while(true) {
             SocketChannel socketChannel = serverSocketChannel.accept();
             if(socketChannel==null) {
                 //表示没人连接
                 System.out.println("还没连接");
                 Thread.sleep(5000);
             }else{
                 System.out.println("建立连接成功");
                 socketList.add(socketChannel);
             }
             for(SocketChannel socket:socketList) {
                 socket.configureBlocking(false);
                 int effective = socket.read(byteBuffer);
                 if(effective!=0) {
                         byteBuffer.flip();//切换模式  写-->读
                         String content = Charset.forName("UTF-8").decode(byteBuffer).toString();
                         System.out.println("接收到消息:"+content);
                         byteBuffer.clear();
                 }else{
                         System.out.println("没收到消息呢");
                 }
             }
         }
       } catch(IOException e) {
             e.printStackTrace();
     }
}
? ? 其实这种“将连接暂存起来”的做法,就是IO多路复用的做法,上面我们看起来很挫的代码体现的也是复用的思想,即一个对外的socket可以同时保持多个连接,并且还能通过轮询的方式监听每个连接有没有数据。说到轮询,问题又来了,这边的for循环其实是同步的,也就意味着如果队列第一个接收的数据特别大,那么就会导致第二个连接的数据读取延迟,越往后延迟越严重,这倒是有点http队头阻塞的感觉,解决这个问题的办法其实在于使用正确的线程模型,也就是在上一篇番外篇中提到的Reactor模型,让处理连接和处理IO事件的线程分离,所以IO复用+Reactor正是最后的大招。
? ? 在引出代码之前我们还需要回想一个问题:IO复用+Reactor的模式可以使用BIO么?BIO是阻塞的,accept和read都阻塞,那么拿accept来说,我们根本不可能有下面这段代码,因为阻塞被唤醒后必然已经是有连接进来了,read操作亦是如此,所以显然这个问题的答案是不能。
if(socketChannel==null) {
   //表示没人连接
   System.out.println("还没连接");
   Thread.sleep(5000);
}else{
   System.out.println("建立连接成功");
   socketList.add(socketChannel);
}
IO复用+Reactor
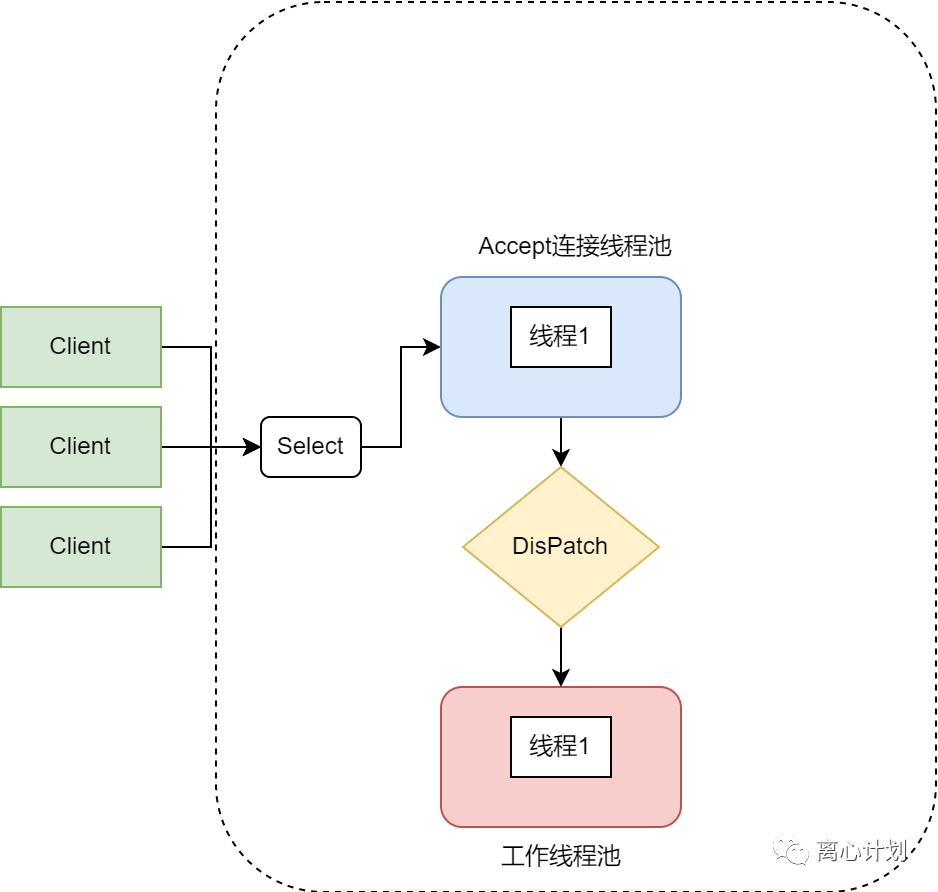
? ? 这一块我们主要复现前一篇番外篇(再贴一下【专栏】RPC系列(番外)-IO模型与线程模型)中所说的三种Reactor线程模型,直观地感受一下,首先是单线程地Reactor
单Reactor单线程
-
创建监听的channel
-
创建selector,并注册channel的连接事件到selector上
-
调用selector.select()阻塞等待连接
-
分流连接channel的连接、可读、可写事件分别处理
public class Server {
    private Selector selector;
    private ByteBuffer readBuffer = ByteBuffer.allocate(1024);
    private ByteBuffer sendBuffer = ByteBuffer.allocate(1024);

    String str;
    public void start() throws IOException {
        // 创建channel
        ServerSocketChannel ssc = ServerSocketChannel.open();
        // 服务器配置为非阻塞
        ssc.configureBlocking(false);
        ssc.bind(new InetSocketAddress("localhost", 8001));
        // 创建selector
        selector = Selector.open();
        // 将channel注册到selector并监听连接事件
        ssc.register(selector, SelectionKey.OP_ACCEPT);

        while (!Thread.currentThread().isInterrupted()) {
            //这一步是阻塞的
            selector.select();
            Set<SelectionKey> keys = selector.selectedKeys();
            Iterator<SelectionKey> keyIterator = keys.iterator();
            while (keyIterator.hasNext()) {
                SelectionKey key = keyIterator.next();
                if (!key.isValid()) {
                    continue;
                }
                if (key.isAcceptable()) {
                    accept(key);
                } else if (key.isReadable()) {
                    read(key);
                } else if (key.isWritable()) {
                    write(key);
                }
                keyIterator.remove();
            }
        }
    }

    private void write(SelectionKey key) throws IOException, ClosedChannelException {
        SocketChannel channel = (SocketChannel) key.channel();
        System.out.println("write:"+str);

        sendBuffer.clear();
        sendBuffer.put(str.getBytes());
        //转成读模式,重置position
        sendBuffer.flip();
        channel.write(sendBuffer);
        channel.register(selector, SelectionKey.OP_READ);
    }

    private void read(SelectionKey key) throws IOException {
        SocketChannel socketChannel = (SocketChannel) key.channel();
        this.readBuffer.clear();
        int numRead;
        try {
            numRead = socketChannel.read(this.readBuffer);
        } catch (IOException e) {
            key.cancel();
            socketChannel.close();
            return;
        }
        str = new String(readBuffer.array(), 0, numRead);
        System.out.println(str);
        socketChannel.register(selector, SelectionKey.OP_WRITE);
    }

    private void accept(SelectionKey key) throws IOException {
        ServerSocketChannel ssc = (ServerSocketChannel) key.channel();
        SocketChannel clientChannel = ssc.accept();
        clientChannel.configureBlocking(false);
        //将这个连接channel注册到selector上
        clientChannel.register(selector, SelectionKey.OP_READ);
        System.out.println("[New Client Connected]"+clientChannel.getRemoteAddress());
    }

    public static void main(String[] args) throws IOException {
        System.out.println("Server started...");
        new Server().start();
    }
}
? ? 这里代码我们没有用复杂的Reactor模型,可以看到处理读写事件与select阻塞是一个线程,要想变成多线程Reactor模型,其实只要创建一个多线程worker线程池,在select后把处理IO事件的逻辑交给线程池处理就行了。
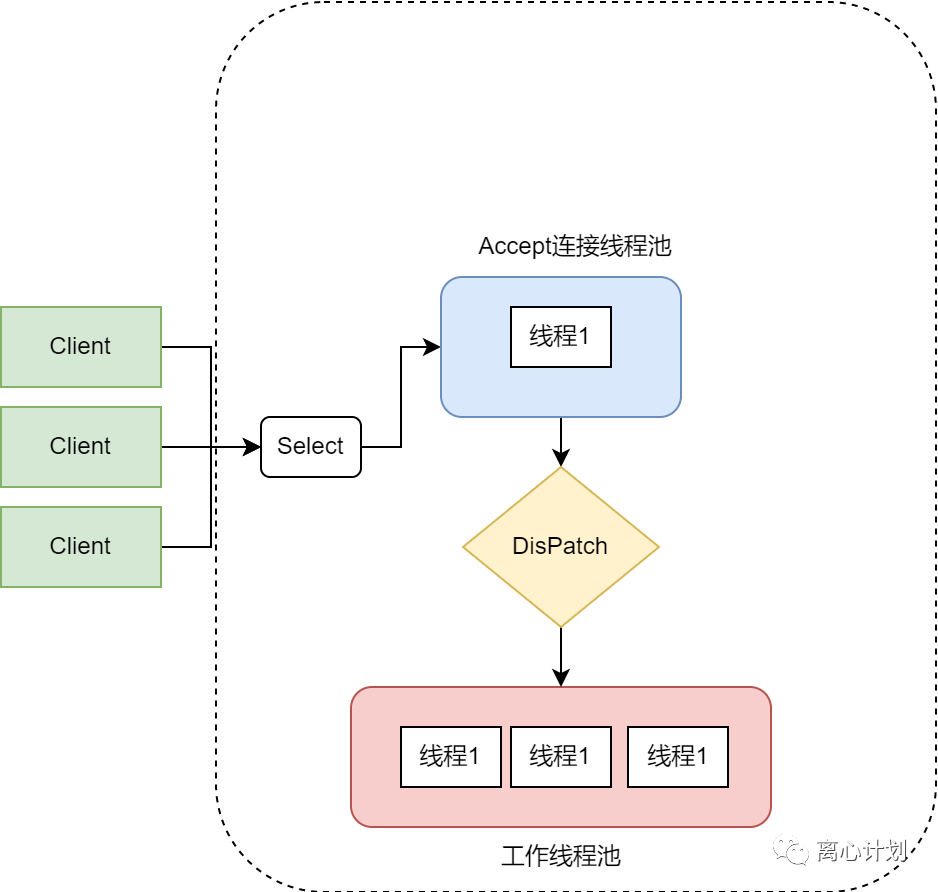
单Reactor多线程Reactor
? ? 为了不浪费篇幅,省去了部分去上面重复地代码。我们创建了一个线程池(按照规范不建议这样创建,这里为了方便)并接收IO任务、
public class ServerMulti {
    private Selector selector;
    private ByteBuffer readBuffer = ByteBuffer.allocate(1024);
    private ByteBuffer sendBuffer = ByteBuffer.allocate(1024);
    private ExecutorService executorService = Executors.newFixedThreadPool(50);
    String str;

    public void start() throws IOException {
        // 创建channel
        ServerSocketChannel ssc = ServerSocketChannel.open();
        // 服务器配置为非阻塞
        ssc.configureBlocking(false);
        ssc.bind(new InetSocketAddress("localhost", 8001));

        // 通过open()方法找到Selector
        selector = Selector.open();
        // 注册连接事件到selector
        ssc.register(selector, SelectionKey.OP_ACCEPT);

        while (!Thread.currentThread().isInterrupted()) {
            //这一步是阻塞的
            selector.select();
            Set<SelectionKey> keys = selector.selectedKeys();
            Iterator<SelectionKey> keyIterator = keys.iterator();
            while (keyIterator.hasNext()) {
                SelectionKey key = keyIterator.next();
                if (!key.isValid()) {
                    continue;
                }
                if (key.isAcceptable()) {
                    accept(key);
                } else if (key.isReadable()) {
                    executorService.submit(() -> {
                        try {
                            read(key);
                            write(key);
                        } catch (IOException e) {
                            e.printStackTrace();
                        }
                    });
                }
                keyIterator.remove();
            }
        }
    }

    private void write(SelectionKey key) throws IOException {
        SocketChannel channel = (SocketChannel) key.channel();
        String data = "Hello Client";
        System.out.println("write:" + data);

        sendBuffer.clear();
        sendBuffer.put(data.getBytes());
        //转成读模式,重置position
        sendBuffer.flip();
        channel.write(sendBuffer);
        channel.register(selector, SelectionKey.OP_READ);
    }
}
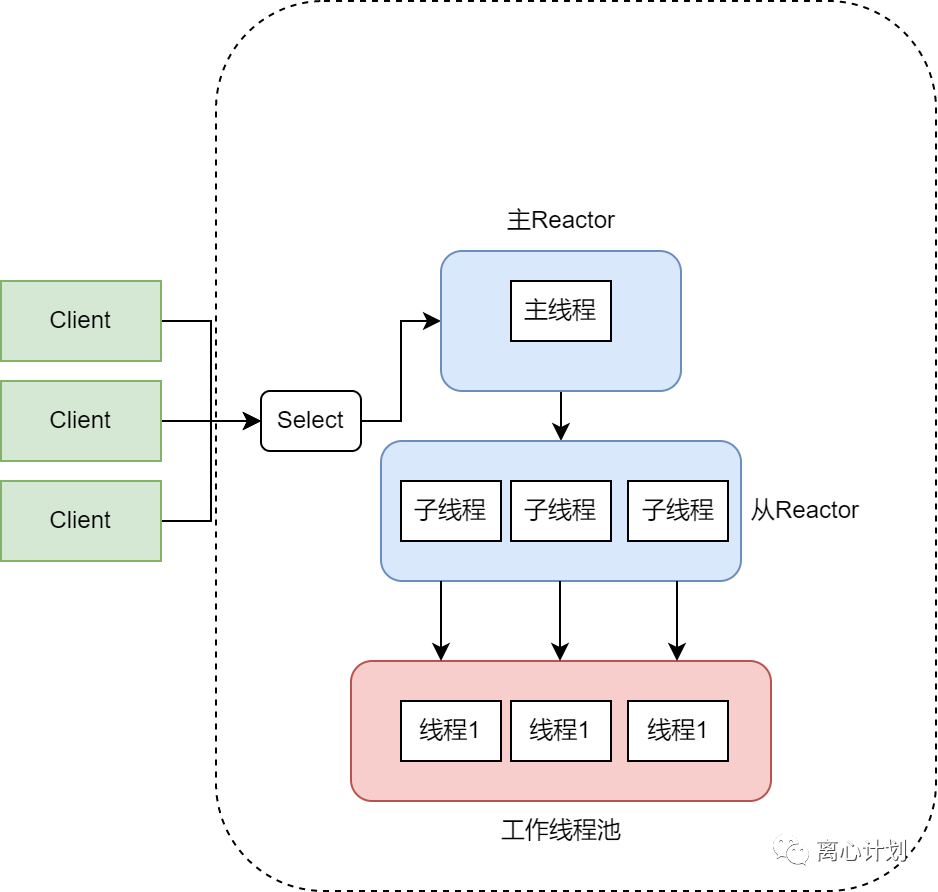
主从Reactor多线程Reactor
? ? 主从Reactor其实是将Reactor拆分,主Reactor只负责获取连接,从Reactor负责监听连接事件的IO事件并分配给工作线程处理对应的IO事件,为了节省篇幅去除了与上面重复的方法。
public class MasterSlaveServer {
    static ExecutorService followerExecutor = Executors.newFixedThreadPool(10);
    static ExecutorService workerExecutor = Executors.newFixedThreadPool(10);

    static class MasterReactor {
        private Selector selector;
        int slaveNum = 4;
        private List<SlaveReactor> slaveReactors = new ArrayList<>(slaveNum);

        public void start() throws IOException {
            Selector selector = Selector.open();
            ServerSocketChannel serverSocketChannel = ServerSocketChannel.open();
            serverSocketChannel.configureBlocking(false);
            serverSocketChannel.socket().bind(new InetSocketAddress(8001));
            serverSocketChannel.register(selector, SelectionKey.OP_ACCEPT);
            //初始化slaveReactor
            for (int i = 0; i < slaveNum; i++) {
                SlaveReactor reactor = new SlaveReactor();
                slaveReactors.add(reactor);
                reactor.run();
            }
            int index = 0;
            while (!Thread.currentThread().isInterrupted()) {
                selector.select();
                Set<SelectionKey> keys = selector.selectedKeys();
                Iterator<SelectionKey> keyIterator = keys.iterator();
                while (keyIterator.hasNext()) {
                    SelectionKey key = keyIterator.next();
                    if (key.isValid() && key.isAcceptable()) {
                        //为新连接创建channel并分配给slaveReactor
                        ServerSocketChannel ssc = (ServerSocketChannel) key.channel();
                        SocketChannel clientChannel = ssc.accept();
                        clientChannel.configureBlocking(false);
                        SlaveReactor slaveReactor = slaveReactors.get(index++ % slaveNum);
                        slaveReactor.registerChannel(clientChannel);
                    }
                    keyIterator.remove();
                }
            }
        }
    }

    static class SlaveReactor {
        private Selector selector;

        public SlaveReactor() throws IOException {
            selector = Selector.open();
            run();
        }

        //注册连接channel到当前SlaveReactor
        public void registerChannel(SocketChannel socketChannel) throws ClosedChannelException {
            socketChannel.register(selector, SelectionKey.OP_READ);
        }

        public void run() {
            followerExecutor.submit(() -> {
                while (!Thread.currentThread().isInterrupted()) {
                    try {
                        //这一步是阻塞的
                        selector.select(500);
                    } catch (IOException e) {
                        e.printStackTrace();
                    }
                    Set<SelectionKey> keys = selector.selectedKeys();
                    Iterator<SelectionKey> keyIterator = keys.iterator();
                    while (keyIterator.hasNext()) {
                        SelectionKey key = keyIterator.next();
                        if (!key.isValid()) {
                            continue;
                        }
                        if (key.isReadable()) {
                            workerExecutor.submit(() -> {
                                try {
                                    read(key);
                                    write(key);
                                } catch (IOException e) {
                                    e.printStackTrace();
                                }
                            });
                        }
                        keyIterator.remove();
                    }
                }
            });
        }
    }
    public static void main(String[] args) throws IOException {
        MasterReactor masterReactor = new MasterReactor();
        masterReactor.start();
    }
}
小结
? ?今天我们对照上一篇番外篇文章实现了各种IO模型与线程模型,相信大家对IO方面有了更深的认识,这是为更容易上手Netty,Netty也是基于java nio,做了很多抽象与管理工作,因此也产出了很多组件,ok周末快乐~
