文章目录
自动化运维工具ansible使用
1.什么是ansible?
? Ansible是一款自动化运维工具,它是基于python开发,集合了众多运维工具(puppet、cfengine、chef、func、fabric)的优点,实现了批量系统配置、批量程序部署、批量运行命令等功能。
? Ansible是基于模块工作的,本身没有批量部署的能力。真正具有批量部署的是Ansible所运行的模块,Ansible只是提供一种框架。
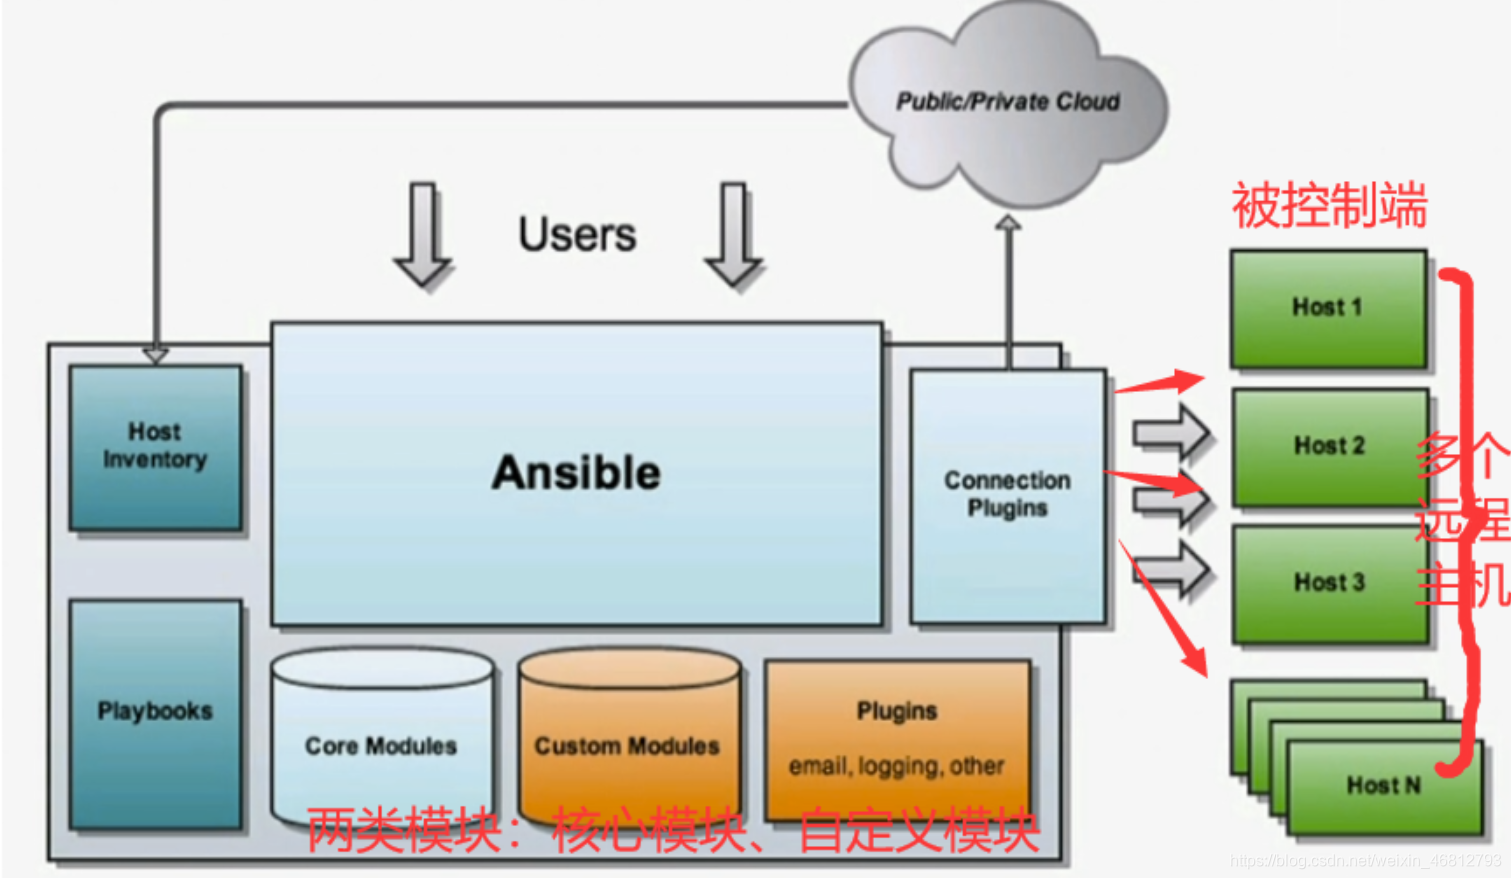
主要包括: (1) 连接插件connection plugins:负责和被监控端实现通信;
(2) host inventory:指定操作的主机,是一个配置文件里面定义监控的主机;
(3) 各种模块核心模块、command模块、自定义模块;
(4) 借助于插件完成记录日志邮件等功能;
(5) playbook:剧本执行多个任务时,非必需可以让节点一次性运行多个任务。

由于图中写不下,所以我们在下面进行解释:
Host lnventory:对指定组内得主机进行事件处理定义的文件
Playbooks:批量的命令文件
Ansible:每次批量只控制5个(要改变值,需要设定)/Ansible使用插件来连接每一个被控制端。
Connection Plugine:通过模块连接各远程主机发送要执行的命令
Users:是我们用户请求
Plugins:通过插件来记录日志
2.Ansible无需代理
? Ansible 围绕无代理架构构建。通常而言,Ansible 通过 OpenSSH 或 WinRM 连接它所管理的主机并且运行任务,方法通常是将称为 Ansible 模块的小程序推送至这些主机。这些程序用于将系统置于需要的特定状态。在 Ansible 运行完其任务后,推送的所有模块都会被删除。
? Ansible 不需要批准使用任何特殊代理,然后再部署到受管主机上。由于没有代理,也不需要额外的自定义安全基础架构,
Ansible 具有多个重要的优点:
- 跨平台支持:Ansible 提供Linux、Windows、UNIX和网络设备的无代理支持,适用于物理、虚拟、云和容器环境。
- 人类可读的自动化:Ansible Playbook采用YAML文本文件编写,易于阅读,有助于确保所有人都能理解它们的用途。
- 完美描述应用:可以通过 Ansible Playbook进行每种更改,并描述和记录应用环境的每一个方面。
- 轻松管理版本控制:Ansible Playbook和项目是纯文本。它们可以视作源代码,放在现有版本控制系统中。
- 支持动态清单:可以从外部来源动态更新 Ansible 管理的计算机列表,随时获取所有受管服务器的当前正确列表,不受基础架构或位置的影响。
- 编排可与其他系统轻松集成:能够利用环境中现有的 HP SA、Puppet、Jenkins、红帽卫星和其他系统,并且集成到 Ansible 工作流中。
3.Ansible方式
? Ansible 的设计宗旨是工具易用,自动化易写易读。所以在创建自动化时我们应追求简单化。
? Ansible 自动化语言围绕简单易读的声明性文本文件来构建。正确编写的 Ansible Playbook可以清楚地记录你的工作自动化。
? Ansible 是一种要求状态引擎。它通过表达你所希望系统处于何种状态来解决如何自动化IT部署的问题。Ansible 的目标是通过仅执行必要的更改,使系统处于所需的状态。试图将 Ansible 视为脚本语言并非正确的做法。
4.Ansible的安装流程及管理
? Ansible 易于安装。 Ansible 软件只需要安装到要运行它的一个(或多个)控制节点上。由 Ansible管理的主机不需要安装 Ansible。
对控制节点安装的要求:
- 控制节点应是Linux或UNIX系统。不支持将Windows用作控制节点,但Windows系统可以是受管主机。
- 控制节点需要安装Python3(版本3.5或以上)或Python2(版本2.7或以上)。
注:如果操作系统是红帽8.0,Ansible 2.9可以自动使用 platform-python 软件包,该软件包支持使用Python的系统实用程序。你不需要从 AppStream安装python37或python27软件包。
安装platform-python软件包:
[root@centos8-1 ~]# yum list installed platform-python
已安装的软件包
platform-python.x86_64                                   3.6.8-33.el8                                    @anaconda
[root@centos8-1 ~]#
安装ansible
[root@centos8-1 ~]# yum -y install epel-release
CentOS Stream 8 - BaseOS                                                          835 kB/s | 8.1 MB     00:09
CentOS Stream 8 - Extras                                                           14 kB/s |  14 kB     00:00
上次元数据过期检查:0:00:01 前,执行于 2021年07月13日 星期二 02时33分11秒。
依赖关系解决。
==================================================================================================================
 软件包                            架构                   版本                       仓库                    大小
==================================================================================================================
安装:
 epel-release                      noarch                 8-11.el8                   extras                  24 k
安装弱的依赖:
 epel-next-release                 noarch                 8-11.el8                   extras                  11 k

事务概要
[root@centos8-1 ~]# yum makecache    //测试是否能用
CentOS Stream 8 - AppStream                                                       6.4 kB/s | 4.4 kB     00:00
CentOS Stream 8 - BaseOS                                                          4.9 kB/s | 3.9 kB     00:00
CentOS Stream 8 - Extras                                                          4.2 kB/s | 3.0 kB     00:00
Extra Packages for Enterprise Linux Modular 8 - x86_64                            517 kB/s | 663 kB     00:01
Extra Packages for Enterprise Linux 8 - Next - x86_64                             578 kB/s | 1.1 MB     00:01
Extra Packages for Enterprise Linux 8 - x86_64                                    2.5 MB/s |  10 MB     00:04
元数据缓存已建立。
[root@centos8-1 ~]#
[root@centos8-1 ~]# yum -y install ansible    //安装ansible
上次元数据过期检查:0:00:39 前,执行于 2021年07月13日 星期二 02时33分58秒。
依赖关系解决。
==================================================================================================================
 软件包                       架构           版本                                         仓库               大小
==================================================================================================================
安装:
 ansible                      noarch         2.9.23-1.el8                                 epel               17 M
升级:
[root@centos8-1 ~]# ansible --version
ansible 2.9.23
  config file = /etc/ansible/ansible.cfg
  configured module search path = ['/root/.ansible/plugins/modules', '/usr/share/ansible/plugins/modules']
  ansible python module location = /usr/lib/python3.6/site-packages/ansible
  executable location = /usr/bin/ansible
  python version = 3.6.8 (default, Dec  3 2020, 18:11:24) [GCC 8.4.1 20200928 (Red Hat 8.4.1-1)]
[root@centos8-1 ~]#
通过使用setup模块验证localhost上的ansible_python_version
[root@centos8-1 ~]# ansible -m setup localhost|grep ansible_python_version
        "ansible_python_version": "3.6.8",
[root@centos8-1 ~]#
受管主机:
? Ansible的一大优点是受管主机不需要安装特殊代理。Ansible控制节点使用标准的网络协议连接受管主机,从而确保系统处于指定的状态
? 受管主机可能要满足一些要求,具体取决于控制节点连接它们的方式以及它们要运行的模块。
? Linux和UNIX受管主机需要安装有Python2(版本2.6或以上)或Python3(版本3.5或以上),这样才能运行大部分的模块,对于红帽8,可以启用并安装python36应用流(或python27应用流)。
注:如果受管主机上启用了SELinux,还需要确保安装python3-libselinux软件包,然后才能使用与任何复制、文件或模板功能相关的模块。所以在工作的时候,应当把SELinux功能关闭。
基于windows的受管主机
? 大部分专门为Windows受管主机设计的模块需要在受管主机上安装PowerShell 3.0或更高版本,而不是安装Python。此外,受管主机也需要配置PowerShell远程连接。Ansible还要求至少将.NET Framework 4.0或更高版本安装在Windows受管主机上。
受管网络设备
? Ansible还可以配置受管网络设备,例如路由器和交换机。Ansible包含大量专门为此目的而设计的模块。其中包括对Cisco IOS、IOS XR和NX-OS的支持;Juniper Junos;Arsta EOS;以及基于VyOS的网络设备等。
? 我们可以使用为服务器编写playbook时使用的相同基本技术为网络设备编写Ansible Playbook。由于大多数网络设备无法运行Python,因此Ansible在控制节点上运行网络模块,而不是在受管主机上运行。特殊连接方法也用于与网络设备通信,通常使用SSH上的CLI、SSH上的XML或HTTP(S)上的API。
5.构建Ansible清单
定义清单
? 清单定义Ansible将要管理的一批主机。这些主机也可以分配到组中,以进行集中管理。组可以包含子组,主机也可以是多个组的成员。清单还可以设置应用到它所定义的主机和组的变量。
? 可以通过两种方式定义主机清单。静态主机清单可以通过文本文件定义。动态主机清单可以根据需要使用外部信息提供程序通过脚本或其他程序来生成
使用静态清单指定受管主机
? 静态清单文件是指定Ansible目标受管主机的文本文件。可以使用多种不同的格式编写此文件,包括INI样式或YAML。
? 在最简单的形式中。INI样式的静态清单文件是受管主机的主机名或IP地址的列表,每行一个:
在操作之前我们可以查看一下/etc/ansible
[root@centos8-1 ~]# cd /etc/ansible   //进入/etc/ansible
[root@centos8-1 ansible]# ls
ansible.cfg  hosts  roles
[root@centos8-1 ansible]# cat hosts    //查看hosts
# This is the default ansible 'hosts' file.
#
# It should live in /etc/ansible/hosts
#
#   - Comments begin with the '#' character
#   - Blank lines are ignored
#   - Groups of hosts are delimited by [header] elements
#   - You can enter hostnames or ip addresses
#   - A hostname/ip can be a member of multiple groups

# Ex 1: Ungrouped hosts, specify before any group headers.

## green.example.com
## blue.example.com
## 192.168.100.1
## 192.168.100.10
? 但通常而言,可以将受管主机组织为主机组。通过主机组,可以更加有效的对一系列系统运行Ansible。这时,每一部分的开头为以中括号括起来的主机组名称。其后为该组中每一受管主机的主机名或IP地址,每行一个。
写入清单:
[root@centos8-1 ansible]# vim ansible.cfg
[root@centos8-1 ansible]# cat ansible.cfg
# config file for ansible -- https://ansible.com/
# ===============================================

# nearly all parameters can be overridden in ansible-playbook
# or with command line flags. ansible will read ANSIBLE_CONFIG,
# ansible.cfg in the current working directory, .ansible.cfg in
# the home directory or /etc/ansible/ansible.cfg, whichever it
# finds first

[defaults]

# some basic default values...

#inventory      = /etc/ansible/hosts
inventory      = /etc/ansible/shen    //在这里我们另起一行,我们不用hosts清单,我们需改名字, 自己创建一个清单
#library        = /usr/share/my_modules/
[root@centos8-1 ansible]# touch shen    //退出来之后我, 再创建一个清单名字shen
[root@centos8-1 ansible]# ls
ansible.cfg  hosts  roles  shen
[root@centos8-1 ansible]#
[root@centos8-1 ansible]# vim shen
[root@centos8-1 ansible]# cat shen   //随后我们进入创建得清单里面,写入另一台主机得IP地址
[webservers]
192.168.100.147
[root@centos8-1 ansible]#
6.验证清单
[root@centos8-1 ansible]# ansible 192.168.100.147 --list-hosts  //ip地址也能验证
  hosts (1):
    192.168.100.147
[root@centos8-1 ansible]# ansible webservers --list-hosts   //利用域名也能验证
  hosts (1):
    192.168.100.147
[root@centos8-1 ansible]#
注:如果清单中含有名称相同的主机和主机组,ansible 命令将显示警告并以主机作为其目标。主机组则被忽略。
[root@centos8-1 ansible]# vim shen
[root@centos8-1 ansible]# cat shen
192.168.100.147

[webservers]
192.168.100.147
[root@centos8-1 ansible]# ansible 192.168.100.147 --list-hosts
  hosts (1):
    192.168.100.147    //这里查看我们查看到得是上面得100.147,下面得并没有查看到
[root@centos8-1 ansible]# ansible webservers --list-hosts
  hosts (1):
    192.168.100.147    //这里是我们域名里面得100.147地址,不是上面100.147地址
[root@centos8-1 ansible]#
应对这种情况的方法有多种,其中最简单的是确保主机组不使用与清单中主机相同的名称。
7.覆盖清单得位置
? /etc/ansible/hosts文件被视为系统的默认静态清单文件。不过,通常的做法是不使用该文件,而是在Ansible配置文件中为清单文件定义一个不同的位置。
8.构建Ansible清单
很多内容上面操作过, 我们这里在进行一边。
使用以下命令列出默认清单文件中的所有受管主机:
[root@centos8-1 ansible]# ansible all --list-hosts
  hosts (1):
    192.168.100.147
[root@centos8-1 ansible]#
使用以下命令列出不属于任何组的受管主机:
[root@centos8-1 ansible]# vim shen     //列出之前我们得写一个不属于受管主机得ip
[root@centos8-1 ansible]# cat shen
192.168.100.160


[webservers]
192.168.100.147
[root@centos8-1 ansible]# ansible ungrouped --list-hosts
  hosts (1):
    192.168.100.160
[root@centos8-1 ansible]#
使用以下命令列出属于某组的受管主机:
[root@centos8-1 ansible]# ansible webservers --list-hosts
  hosts (2):
    192.168.100.147
    192.168.100.160
[root@centos8-1 ansible]#
9.自定义清单
在/etc/ansible/目录中,创建一个名为shen的自定义静态清单文件。
[root@localhost ansible]# vim shen
[root@localhost ansible]# cat shen
[webservers]
192.168.100.147  ansible_user=root ansible_password=1   //在ping之前我们要写入用户和密码
[root@localhost ansible]# ansible all -m ping
192.168.100.147 | SUCCESS => {
    "ansible_facts": {
        "discovered_interpreter_python": "/usr/libexec/platform-python"
    },
    "changed": false,
    "ping": "pong"
}
[root@localhost ansible]#
执行以下命令列出所有受管主机:
[root@localhost ansible]# ansible all -i /etc/ansible/shen --list-hosts
  hosts (1):
    192.168.100.147
[root@localhost ansible]#
执行以下命令列出webservers组中的所有受管主机:
[root@localhost ansible]# ansible webservers -i /etc/ansible/shen --list-hosts
  hosts (1):
    192.168.100.147
[root@localhost ansible]#
10.生成密钥以及传输密钥
[root@localhost ~]# ssh-keygen -t rsa   //首先我们先生成密钥
Generating public/private rsa key pair.
Enter file in which to save the key (/root/.ssh/id_rsa):
Created directory '/root/.ssh'.
Enter passphrase (empty for no passphrase):
Enter same passphrase again:
Your identification has been saved in /root/.ssh/id_rsa.
Your public key has been saved in /root/.ssh/id_rsa.pub.
The key fingerprint is:
SHA256:Vs0TB7871HTCH7Q+Lqt5Qk1N/xywhxap29NkkxJHqPI root@centos8-1
The key's randomart image is:
+---[RSA 3072]----+
|            o.=o |
|           o @.o.|
|          . * &o=|
|         o o B.#+|
|        S o * O+*|
|       .   E =.o+|
|          .  .+. |
|           ...o. |
|           o+.   |
+----[SHA256]-----+
[root@localhost ~]# ssh-copy-id root@192.168.100.147   //然后我们将密钥传过去
/usr/bin/ssh-copy-id: INFO: Source of key(s) to be installed: "/root/.ssh/id_rsa.pub"
/usr/bin/ssh-copy-id: INFO: attempting to log in with the new key(s), to filter out any that are already installed
/usr/bin/ssh-copy-id: INFO: 1 key(s) remain to be installed -- if you are prompted now it is to install the new keys
root@192.168.100.147's password:

Number of key(s) added: 1

Now try logging into the machine, with:   "ssh 'root@192.168.100.147'"
and check to make sure that only the key(s) you wanted were added.

[root@localhost ~]#