目录
一、nginx作为缓存服务的配置语法
二、lz虚拟机说明
| ip | 说明 |
|---|---|
| 192.168.3.10(已安装nginx) | 此虚拟机作为负载均衡缓存服务器 |
| 192.168.3.11(已安装nginx) | 此虚拟机通过nginx配置三个端口访问三个不同的页面(模拟三台虚拟机应用) |
三、nginx缓存服务器的演示示例
1、配置192.168.3.11虚拟机(即模拟三台虚拟机应用服务器)
(1)分别在/opt/app/code1、code2、code3目录下创建index.html页面(模拟三台服务器分别对应的index页面)
-
/opt/app/code1/目录下创建index.html页面,内容如下:
<html lang="en"> <head> <meta charset="utf-8"> <title>server1</title> </head> <body> <h1>server1</h1> </body> </html> -
/opt/app/code2/目录下创建index.html页面,内容如下:
<html lang="en"> <head> <meta charset="utf-8"> <title>server2</title> </head> <body> <h1>server2</h1> </body> </html> -
/opt/app/code3/目录下创建index.html页面,内容如下:
<html lang="en">
	<head>
		<meta charset="utf-8">
		<title>server3</title>
	</head>

	<body>
		<h1>server3</h1>
	</body>
</html>
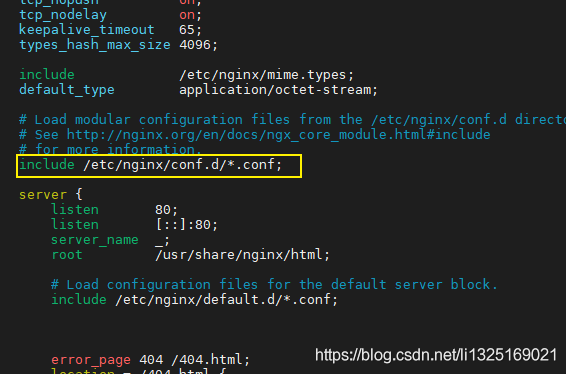
(2)、编辑 nginx.conf 配置文件可以看到在/etc/nginx/conf.d/目录下可以创建子配置文件,如下图:

(3)在/etc/nginx/conf.d/目录下分别创建server1.conf、server2.conf和server3.conf三个配置文件(模拟三台服务器通过不同的端口访问对应目录下的index页面,即模拟三台服务三个不同的应用)
-
server1.conf配置文件内容如下:
server { listen 8001; #8001端口 server_name localhost; #ip地址 location / { root /opt/app/code1;#指定code1目录下的文件 index index.html index.htm; } error_page 404 /404.html; location = /404.html { } error_page 500 502 503 504 /50x.html; location = /50x.html { } } -
server2.conf配置文件内容如下:
server { listen 8002; #8002端口 server_name localhost; #ip地址 location / { root /opt/app/code2;#指定code2目录下的文件 index index.html index.htm; } error_page 404 /404.html; location = /404.html { } error_page 500 502 503 504 /50x.html; location = /50x.html { } } -
server3.conf配置文件内容如下:
server {
        listen       8003; #8003端口
        server_name  localhost; #ip地址

	location / {
	root /opt/app/code3;#指定code3目录下的文件
	index index.html index.htm;
	}


	error_page 404 /404.html;
	location = /404.html {
	}

	error_page 500 502 503 504 /50x.html;
	location = /50x.html {
	}
}
(4)、启动nginx服务并从新加载配置文件
-
启动nginx服务
[root@localhost conf.d]# systemctl start nginx.service -
检查配置修改的配置文件是否正确,返回successful表示配置文件修改无错
[root@localhost nginx]# nginx -t -c /etc/nginx/nginx.conf
-
重新加载nginx配置文件,并查看
[root@localhost conf.d]# nginx -s reload -c /etc/nginx/nginx.conf -
查看本机启用nginx的端口
[root@localhost conf.d]# netstat -luntp|grep nginx
(5)、浏览器分别输入地址,访问模拟的三台服务器分别对应的index页面(即模拟三台服务三个不同的应用)
-
http://192.168.3.11:8001

-
http://192.168.3.11:8002

- http://192.168.3.11:8003

2、配置192.168.3.10虚拟机(即负载均衡缓存服务器)
(1)、编辑 nginx.conf 配置文件可以看到在/etc/nginx/conf.d/目录下可以创建子配置文件,如下图:

(2)、在/etc/nginx/conf.d/目录下创建cache_test.conf配置文件,内容如下:
upstream blance {
   server 192.168.3.11:8001;
   server 192.168.3.11:8002;
   server 192.168.3.11:8003;
}

#/opt/app/cache表示缓存文件路径;levels表示目录的分级;
#keys_zone表示开辟的缓存空间的名字和大小;max_size表示缓存文件目录的最大大小。
#inactive表示不活跃的,超过多长时间缓存文件没有被访问过,就会清理该缓存文件;
#use_temp_path表示用于存放临时文件的路径;
proxy_cache_path /opt/app/cache levels=1:2 keys_zone=blance_cache:10m max_size=10g inactive=60m use_temp_path=off;

server {
	listen       80; #80端口
	server_name  localhost; #ip地址

	location / {
		proxy_pass http://blance;
		proxy_cache blance_cache; #上面配置的keys_zone的名字
		proxy_cache_valid 200 300 12h; #表示200状态码、300状态码缓存的有效期,12小时后过期
		proxy_cache_valid any 10m; #表示除了200和300状态码,其他的10分钟以后过期
		proxy_cache_key $host$uri$is_args$args; #定义缓存的key格式
		add_header Nginx-Cache "$upstream_cache_status"; #添加头信息给客户端,f12时可以看缓存是否被命中

		#配置的upstream服务器如果发生错误、超时或者返回500、502、503、504时跳过此台服务器访问下一台服务器
		proxy_next_upstream error timeout invalid_header http_500 http_502 http_503 http_504;
	}


	error_page 404 /404.html;
		location = /404.html {
	}

	error_page 500 502 503 504 /50x.html;
		location = /50x.html {
	}
}

(3)、启动nginx服务并从新加载配置文件
-
启动nginx服务
[root@localhost conf.d]# systemctl start nginx.service -
检查配置修改的配置文件是否正确,返回successful表示配置文件修改无错
[root@localhost nginx]# nginx -t -c /etc/nginx/nginx.conf
-
重新加载nginx配置文件,并查看
[root@localhost conf.d]# nginx -s reload -c /etc/nginx/nginx.conf -
查看本机启用nginx的端口
[root@localhost conf.d]# netstat -luntp|grep nginx
(4)、浏览器输入代理服务的访问地址http://192.168.3.10/,因为负载均衡服务器的端口为80可以直接省略,依次刷新服务器,可以看到始终访问的是一个服务器页面,如下图:
-
为什么刷新浏览器始终访问的同一个服务器页面,因为配置的缓存已生效。

-
执行cd /opt/app/cache命令,可以查看到生成的缓存文件已存在该目录中;
[root@localhost cache]# pwd
/opt/app/cache
[root@localhost cache]# ls
6
[root@localhost cache]#

(5)、关闭缓存,查看页面是否可轮询访问。
-
在/etc/nginx/conf.d/目录下的cache_test.conf配置文件中,把proxy_cache blance_cache; 修改为proxy_cache off(即关闭缓存)

-
再重新加载配置文件
[root@localhost conf.d]# nginx -s reload -c /etc/nginx/nginx.conf -
刷新浏览器访问的http://192.168.3.10/路径,可以发现可以轮询访问页面。


