linux运维六
1、编写脚本实现登陆远程主机。(使用expect和shell脚本两种形式)。
- except脚本
yum install -y expect                     安装工具
ssh-keygen -f ~/.ssh/id_rsa  -P ''        在家目录生成秘钥文件
新建expect.sh 文件
#!/usr/bin/expect
set ip [lindex $argv 0]
set user root
set password 123456
set timeout 5
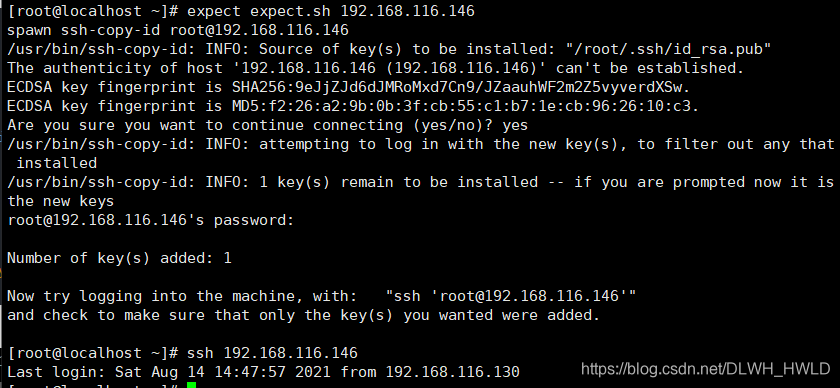
spawn ssh-copy-id $user@$ip

expect {
        "yes/no" { send "yes\r"; exp_continue }
        "password:" { send "$password\r" };
}
interact
expect expect.sh 192.168.116.146 需要手动在文件后面添加IP,执行脚本

- shell脚本
新建shell.sh文件
#!/bin/bash
#设置需要分发的IP列表
IPLIST="
192.168.116.146
192.168.116.147"
#安装工具
rpm -q sshpass &> /dev/null || yum -y install sshpass
#生成秘钥
[ -f /root/.ssh/id_rsa ] || ssh-keygen -f /root/.ssh/id_rsa  -P ''
#设置密码
export SSHPASS=123456
#遍历IP,分发秘钥
for IP in $IPLIST;do
sshpass -e ssh-copy-id -o StrictHostKeyChecking=no $IP
done
bash shell.sh 执行脚本

3. expect和shell结合
新建ssh.sh 文件
#!/bin/bash
#密码
password=123456

#判断本机有没有安装expect,没有就安装
rpm -q expect &>/dev/null
if [ $? -ne 0 ]
   then
       yum -y install expect
fi

#判断有没有公钥文件,没有就新建
if [ ! -f ~/.ssh/id_rsa ]
   then
      ssh-keygen -P "" -f ~/.ssh/id_rsa
fi
#ping主机测试,然后把本机的公钥上传到对端服务器上
for i in {2..254}
do
     {
      ip=192.168.116.$i
      ping -c3 -W1 $ip &>/dev/null
      if [ $? -eq 0 ]
         then
                /usr/bin/expect <<-EOF
                set timout 5
                spawn ssh-copy-id $ip
                expect {
                        "yes/no" { send "yes\r"; exp_continue }
                        "password:" { send "$password\r" }
                }
                expect EOF
                EOF
      fi
      }&
done
wait
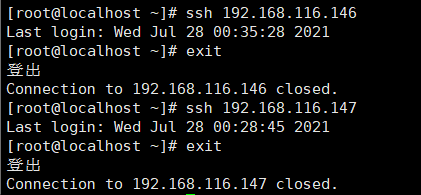
测试远程

2、生成10个随机数保存于数组中,并找出其最大值和最小值
新建number.sh文件
#!/bin/bash
declare -i min max
declare -a nums
for ((i=0;i<10;i++));do
        nums[$i]=$RANDOM
        echo "第$i取值:  ${nums[$i]}"
        echo
        if [ $i -eq 0 ];then
                min=${nums[0]}
                max=${nums[0]}
        elif [ ${nums[$i]} -gt $max ];then
                max=${nums[$i]}
        elif [ ${nums[$i]} -lt $min ];then
                min=${nums[$i]}
        else
                continue
        fi
done
echo "全部值: ${nums[*]}"
echo
echo "最大值: $max    最小值: $min"

3、输入若干个数值存入数组中,采用冒泡算法进行升序或降序排序
新建array.sh
#!/bin/bash
declare -i init
declare -a nums
for ((q=0;q<9;q++));do
        nums[$q]=$RANDOM
done
echo "生成的数组: ${nums[*]}"

len=${#nums[*]}
for ((j=0;j<$len;j++));do
for ((i=0;i<$len-1;i++));do
        if [ ${nums[$i]} -gt ${nums[$i+1]} ];then
                x=${nums[$i]}
                nums[$i]=${nums[$i+1]}
                nums[$i+1]=$x
        fi
done
done
echo "升序后的数组: ${nums[*]}"
bash array.sh 执行脚本

降序排序
#!/bin/bash
declare -i init
declare -a nums
for ((q=0;q<9;q++));do
        nums[$q]=$RANDOM
done
echo "生成的数组: ${nums[*]}"

len=${#nums[*]}
for ((j=0;j<$len;j++));do
for ((i=0;i<$len-1;i++));do
        if [ ${nums[$i]} -lt ${nums[$i+1]} ];then
                x=${nums[$i]}
                nums[$i]=${nums[$i+1]}
                nums[$i+1]=$x
        fi
done
done
echo "降序后的数组: ${nums[*]}"
bash array.sh 执行脚本

4、总结查看系统负载的几种命令,总结top命令的指标大概什么含义
- uptime 一次性输出当前系统负载情况
18:25:14                          当前时间
up  2:30                          系统开机到现在的时间
2 users                           当前远程到系统的账户数量
load average: 0.06, 0.04, 0.05    每1、5、15分钟的平均负载

- mpstat 根据参数返回系统负载情况
yum install -y sysstat           安装工具
mpstat                           只显示一次系统负载情况
mpstat 1 3                       每秒显示一次负载,总共输出3次负载

- top 动态显示系统负载情况
系统负载情况
top - 18:31:16                        当前时间
up  2:36,                             系统开机到现在活动时间
2 users,                              当前远程用户数量
load average: 0.00, 0.01, 0.05        每1、5、15分钟的平均负载

进程情况
Tasks:  98 total,                     系统中进程总数
1 running,                            正在运行的进程数量
97 sleeping,                          睡眠中的进程数量
0 stopped,                            停止的进程数量
0 zombie                              僵死进程数量

CPU使用情况
%Cpu(s):  0.3 us,                     用户模式占用cpu的使用率
0.3 sy,                               系统模式占用cpu的使用率
0.0 ni,                               优先级发生改变的用户进程的占用cpu使用率
99.3 id,                              cpu空闲率
0.0 wa,                               等待输入/输出的进程的占用cpu的使用率
0.0 hi,                               强制中断请求占用cpu的使用率
0.0 si,                               软中断请求占用cpu的使用率
0.0 st                                虚拟机占用cpu的使用率

内存使用情况
KiB Mem :   995684 total,             物理内存的总值
487624 free,                          空闲的内存值
140848 used,                          已经使用的内存值
367212 buff/cache                     缓冲区的内存值

SWAP分区的使用情况
KiB Swap:  2097148 total,             SWAP分区的总值
2097148 free,                         SWAP分区的空闲值
0 used.                               SWAP分区的使用值
706156 avail Mem                      SWAP分区理论上使用值

在top界面可以按的参数
按h 可以看到帮助信息

按P可以安装cpu使用率排序,默认就是这个

按M 可以按内存使用率排序

按N 以PID进程倒序排序

按q退出界面

top -b -n 1 指定输出1次系统负载情况

5、编写脚本,使用for和while分别实现192.168.116.0/24网段内,地址是否能够ping通,若ping通则输出"success!",若ping不通则输出"fail!"
- for 循环
新建ping.sh文件
#!/bin/bash
a=192.168.116
for i in {1..254};do
        ping -c3 -W1 $a.$i &>/dev/null
        ip="$a.$i"
        if [ $? -eq 0 ];then
                echo "$ip sucess"
        else
                echo "$ip fail"
        fi
done
bash ping.sh 执行脚本

- while循环
新建ping.sh文件
#!/bin/bash
a=192.168.116
i=1
while [ $i -le 254 ]
do
        ip=$a.$i
        ping -c3 -W1 $ip &>/dev/null
        if [ $? -eq 0 ];then
                echo "$ip sucess"
        else
                echo "$ip fail"
        fi
                let i++
done
bash ping.sh 执行脚本

6、每周的工作日1:30,将/etc备份至/backup目录中,保存的文件名称格式 为“etcbak-yyyy-mm-dd-HH.tar.xz”,其中日期是前一天的时间
mkdir /backup                                                       创建文件夹
tar -cpJcf /backup/etcbak-`date -s '-1 day' +\%F-\%H`.tar.xz /etc   测试压缩命令
ll /etc/* |wc -l                                                    确认/etc的数量
tar xf /backup/etcbak-2021-08-06-20.tar.xz -C /root/                解压压缩包
ll /root/etc/* |wc -l                                               测试解压后etc的数量

开启定时任务
crontab -e                   输入任务内容

30 1 * * 1-5 /usr/bin/tar -cpJcf /backup/etcbak-`date -s '-1 day' +\%F-\%H`.tar.xz /etc &>/dev/null

crontab -l                         查看任务列表
date -s "2021/08/09 01:29"         修改时间
ll /backup/                        确认备份成功
