ELK收集Nginx访问日志应用架构

Nginx的日志格式与日志变量
Nginx跟Apache一样,都支持自定义输出日志格式,在进行Nginx日志格式定义前,有必要先了解一下关于多层代理获取用户真实IP的几个概念。
- remote_addr:表示客户端地址,但有个条件,如果没有使用代理,这个地址就是客户端的真实IP,如果使用了代理,这个地址就是上层代理的IP。相当于apache日志变量%a
- X-Forwarded-For:简称XFF,这是一个HTTP扩展头,格式为 X-Forwarded-For: client, proxy1, proxy2,如果一个HTTP请求到达服务器之前,经过了三个代理 Proxy1、Proxy2、Proxy3,IP 分别为 IP1、IP2、IP3,用户真实IP为 IP0,那么按照 XFF标准,服务端最终会收到以下信息:X-Forwarded-For: IP0, IP1, IP2
由此可知,IP3这个地址X-Forwarded-For并没有获取到,而remote_addr刚好获取的就是IP3的地址。
还要几个容易混淆的变量,这里也列出来做下说明:
- $remote_addr :此变量如果走代理访问,那么将获取上层代理的IP,如果不走代理,那么就是客户端真实IP地址。相当于apache日志中的%a
- $http_x_forwarded_for:此变量获取的就是X-Forwarded-For的值。
- $proxy_add_x_forwarded_for:此变量是$http_x_forwarded_for和$remote_addr两个变量之和。
 系统默认定义和引用的日志格式为main:
[root@filebeatserver nginx]# grep -A 4 'log_format' /etc/nginx/nginx.conf
    log_format  main  '$remote_addr - $remote_user [$time_local] "$request" '
                      '$status $body_bytes_sent "$http_referer" '
                      '"$http_user_agent" "$http_x_forwarded_for"';

    access_log  /var/log/nginx/access.log  main;
自定义Nginx日志格式
在掌握了Nginx日志变量的含义后,接着开始对它输出的日志格式进行改造,这里我们仍将Nginx日志输出设置为json格式,下面仅列出Nginx配置文件nginx.conf中日志格式和日志文件定义部分,定义好的日志格式与日志文件如下:
    map $http_x_forwarded_for $clientRealIp {	# 定义日志变量clientRealIp
        "" $remote_addr;						# 当$http_x_forwarded_for变量为空时,将$remote_addr变量的值赋值给$clientRealIp变量
        ~^(?P<firstAddr>[0-9\.]+),?.*$ $firstAddr;	# 当$http_x_forwarded_for变量非空时,使用正则表达式取出$http_x_forwarded_for变量中的第一个IP值并赋值给$firstAddr变量,最后$firstAddr变量的值再赋值给$clientRealIp变量
    }		# 所以map指令整段配置就是要获取到真正的客户端IP地址并将其赋值给$clientRealIp变量,$clientRealIp变量会在下面定义日志格式时引用

# 以下为自定义nginx日志格式
[root@filebeatserver ~]# vim /etc/nginx/nginx.conf
    log_format nginx_log_json '{"accessip_list":"$proxy_add_x_forwarded_for","client_ip":"$clientRealIp","http_host":"$host","@timestamp":"$time_iso8601","method":"$request_method","url":"$request_uri","status":"$status","http_referer":"$http_referer","body_bytes_sent":"$body_bytes_sent","request_time":"$request_time","http_user_agent":"$http_user_agent","total_bytes_sent":"$bytes_sent","server_ip":"$server_addr"}';

    access_log  /var/log/nginx/access.log  nginx_log_json;
验证日志输出
[root@filebeatserver ~]# nginx -t
nginx: the configuration file /etc/nginx/nginx.conf syntax is ok
nginx: configuration file /etc/nginx/nginx.conf test is successful
[root@filebeatserver ~]# systemctl restart nginx
[root@filebeatserver ~]# ifconfig ens32 | awk 'NR==2 {print $2}'
192.168.126.90
浏览器访问 http://192.168.126.90

查看nginx日志
[root@filebeatserver ~]# tailf /var/log/nginx/access.log
{"accessip_list":"192.168.126.1","client_ip":"192.168.126.1","http_host":"192.168.126.90","@timestamp":"2021-08-14T22:54:46+08:00","method":"GET","url":"/","status":"200","http_referer":"-","body_bytes_sent":"612","request_time":"0.000","http_user_agent":"Mozilla/5.0 (Windows NT 6.1; Win64; x64; rv:78.0) Gecko/20100101 Firefox/78.0","total_bytes_sent":"850","server_ip":"192.168.126.90"}
{"accessip_list":"192.168.126.1","client_ip":"192.168.126.1","http_host":"192.168.126.90","@timestamp":"2021-08-14T22:54:46+08:00","method":"GET","url":"/favicon.ico","status":"404","http_referer":"-","body_bytes_sent":"153","request_time":"0.000","http_user_agent":"Mozilla/5.0 (Windows NT 6.1; Win64; x64; rv:78.0) Gecko/20100101 Firefox/78.0","total_bytes_sent":"308","server_ip":"192.168.126.90"}
为nginx服务器设置一层反向代理
[root@kafkazk1 ~]# ifconfig ens32 | awk 'NR==2 {print $2}'
192.168.126.91
[root@kafkazk1 ~]# vim /etc/httpd/conf/httpd.conf
ProxyPass / http://192.168.126.90
ProxyPassReverse / http://192.168.126.90/
[root@kafkazk1 ~]# systemctl restart httpd
浏览器访问 http://192.168.126.91
 查看nginx日志
[root@filebeatserver ~]# tailf /var/log/nginx/access.log
{"accessip_list":"192.168.126.1, 192.168.126.91","client_ip":"192.168.126.1","http_host":"192.168.126.90","@timestamp":"2021-08-14T23:02:48+08:00","method":"GET","url":"/","status":"200","http_referer":"-","body_bytes_sent":"612","request_time":"0.000","http_user_agent":"Mozilla/5.0 (Windows NT 6.1; Win64; x64; rv:78.0) Gecko/20100101 Firefox/78.0","total_bytes_sent":"850","server_ip":"192.168.126.90"}
# 可以看到此时"accessip_list"字段是两个IP,第一个是客户端真实IP,第二个是代理IP;"client_ip"字段为真实客户端IP
在一层的基础上设置二层反向代理
[root@kafkazk2 ~]# ifconfig ens32 | awk 'NR==2 {print $2}'
192.168.126.92
[root@kafkazk2 ~]# vim /etc/httpd/conf/httpd.conf
ProxyPass / http://192.168.126.91
ProxyPassReverse / http://192.168.126.91/
[root@kafkazk2 ~]# systemctl restart httpd
浏览器访问 http://192.168.126.92

查看nginx日志
[root@filebeatserver ~]# tailf /var/log/nginx/access.log
{"accessip_list":"192.168.126.1, 192.168.126.92, 192.168.126.91","client_ip":"192.168.126.1","http_host":"192.168.126.90","@timestamp":"2021-08-14T23:08:11+08:00","method":"GET","url":"/","status":"200","http_referer":"-","body_bytes_sent":"612","request_time":"0.000","http_user_agent":"Mozilla/5.0 (Windows NT 6.1; Win64; x64; rv:78.0) Gecko/20100101 Firefox/78.0","total_bytes_sent":"850","server_ip":"192.168.126.90"}
# 可以看到此时"accessip_list"字段是三个IP,第一个是客户端真实IP,第一个IP是第一层代理IP,第二个IP是第二层代理IP;"client_ip"字段为真实客户端IP
在这个输出中,可以看到,client_ip和accessip_list输出的异同,client_ip字段输出的就是真实的客户端IP地址,而accessip_list输出是代理叠加而成的IP列表,第一条日志,是直接访问http://192.168.126.90不经过任何代理得到的输出日志,第二条日志,是经过一层代理访问http://192.168.126.91 而输出的日志,第三条日志,是经过二层代理访问http://192.168.126.92得到的日志输出。
Nginx中获取客户端真实IP的方法很简单,无需做特殊处理,这也给后面编写logstash的事件配置文件减少了很多工作量。
配置filebeat
filebeat是安装在Nginx服务器上的,这里给出配置好的filebeat.yml文件的内容:
[root@filebeatserver filebeat]# vim /usr/local/filebeat/filebeat.yml
filebeat.inputs:
- type: log
  enabled: true
  paths:
    - /var/log/nginx/access.log
  fields:
    log_topic: nginxlogs
name: "192.168.126.90"
output.kafka:
  enabled: true
  hosts: ["192.168.126.91:9092", "192.168.126.92:9092", "192.168.126.93:9092"]
  version: "0.10"
  topic: '%{[fields][log_topic]}'
  partition.round_robin:
    reachable_only: true
  worker: 2
  required_acks: 1
  compression: gzip
  max_message_bytes: 10000000
logging.level: debug

# 启动
[root@filebeatserver filebeat]# nohup /usr/local/filebeat/filebeat -e -c /usr/local/filebeat/filebeat.yml &
[1] 1056
 nohup: ignoring input and appending output to ‘nohup.out’
启动kafka+zookeeper集群
/usr/local/zookeeper/bin/zkServer.sh start
nohup /usr/local/kafka/bin/kafka-server-start.sh /usr/local/kafka/config/server.properties &
浏览器访问nginx

查看nginx访问日志
[root@filebeatserver filebeat]# tailf /var/log/nginx/access.log
{"accessip_list":"192.168.126.1","client_ip":"192.168.126.1","http_host":"192.168.126.90","@timestamp":"2021-08-15T15:10:23+08:00","method":"GET","url":"/","status":"304","http_referer":"-","body_bytes_sent":"0","request_time":"0.000","http_user_agent":"Mozilla/5.0 (Windows NT 6.1; Win64; x64; rv:78.0) Gecko/20100101 Firefox/78.0","total_bytes_sent":"180","server_ip":"192.168.126.90"}
同时验证filebeat采集日志数据
2021-08-15T15:10:32.294+0800	DEBUG	[publish]	pipeline/processor.go:308	Publish event: {
  "@timestamp": "2021-08-15T07:10:32.292Z",
  "@metadata": {
    "beat": "filebeat",
    "type": "doc",
    "version": "6.5.4"
  },
  "offset": 2007,
  "message": "{\"accessip_list\":\"192.168.126.1\",\"client_ip\":\"192.168.126.1\",\"http_host\":\"192.168.126.90\",\"@timestamp\":\"2021-08-15T15:10:23+08:00\",\"method\":\"GET\",\"url\":\"/\",\"status\":\"304\",\"http_referer\":\"-\",\"body_bytes_sent\":\"0\",\"request_time\":\"0.000\",\"http_user_agent\":\"Mozilla/5.0 (Windows NT 6.1; Win64; x64; rv:78.0) Gecko/20100101 Firefox/78.0\",\"total_bytes_sent\":\"180\",\"server_ip\":\"192.168.126.90\"}",
  "fields": {
    "log_topic": "nginxlogs"
  },
  "prospector": {
    "type": "log"
  },
  "input": {
    "type": "log"
  },
  "beat": {
    "name": "192.168.126.90",
    "hostname": "filebeatserver",
    "version": "6.5.4"
  },
  "host": {
    "name": "192.168.126.90"
  },
  "source": "/var/log/nginx/access.log"
}
验证kafka集群是否能消费到
[root@kafkazk1 ~]# /usr/local/kafka/bin/kafka-console-consumer.sh --zookeeper 192.168.126.91:2181,192.168.126.92:2181,192.168.126.93:2181 --topic nginxlogs
{"@timestamp":"2021-08-15T07:10:32.292Z","@metadata":{"beat":"filebeat","type":"doc","version":"6.5.4","topic":"nginxlogs"},"prospector":{"type":"log"},"input":{"type":"log"},"beat":{"name":"192.168.126.90","hostname":"filebeatserver","version":"6.5.4"},"host":{"name":"192.168.126.90"},"source":"/var/log/nginx/access.log","offset":2007,"message":"{\"accessip_list\":\"192.168.126.1\",\"client_ip\":\"192.168.126.1\",\"http_host\":\"192.168.126.90\",\"@timestamp\":\"2021-08-15T15:10:23+08:00\",\"method\":\"GET\",\"url\":\"/\",\"status\":\"304\",\"http_referer\":\"-\",\"body_bytes_sent\":\"0\",\"request_time\":\"0.000\",\"http_user_agent\":\"Mozilla/5.0 (Windows NT 6.1; Win64; x64; rv:78.0) Gecko/20100101 Firefox/78.0\",\"total_bytes_sent\":\"180\",\"server_ip\":\"192.168.126.90\"}","fields":{"log_topic":"nginxlogs"}}
均能正确收集到日志信息
配置logstash
由于在Nginx输出日志中已经定义好了日志格式,因此在logstash中就不需要对日志进行过滤和分析操作了,下面直接给出logstash事件配置文件kafka_nginx_into_es.conf的内容:
[root@logstashserver ~]# vim /usr/local/logstash/config/kafka_nginx_into_es.conf
input {
    kafka {
        bootstrap_servers => "192.168.126.91:9092,192.168.126.92:9092,192.168.126.93:9092"
        topics => "nginxlogs"		#指定输入源中需要从哪个topic中读取数据,这里会自动新建一个名为nginxlogs的topic
        group_id => "logstash"
        codec => json {
           charset => "UTF-8"
        }
        add_field => { "[@metadata][myid]" => "nginxaccess-log" }   #增加一个字段,用于标识和判断,在output输出中会用到。
    }
}

filter {
    if [@metadata][myid] == "nginxaccess-log" {
      mutate {
        gsub => ["message","\\x","\\\x"]  # 这里的message就是message字段,也就是日志的内容。这个插件的作用是将message字段内容中UTF-8单字节编码做替换处理,这是为了应对URL有中文出现的情况。
      }
      if ('method":"HEAD' in [message]) {    # 如果message字段中有HEAD请求,就删除此条信息。
           drop{}
      }
      json {
            source => "message"
            remove_field => "prospector"
            remove_field => "beat"
            remove_field => "source"
            remove_field => "input"
            remove_field => "offset"
            remove_field => "fields"
            remove_field => "host"
            remove_field => "@version"
            remove_field => "message"
     }
  }
}

output {
    if [@metadata][myid] == "nginxaccess-log" {
        elasticsearch {
            hosts => ["192.168.126.95:9200","192.168.126.96:9200","192.168.126.97:9200"]
            index => "logstash_nginxlogs-%{+YYYY.MM.dd}"   #指定Nginx日志在elasticsearch中索引的名称,这个名称会在Kibana中用到。索引的名称推荐以logstash开头,后面跟上索引标识和时间。
        }
    }
}
这个logstash事件配置文件非常简单,没对日志格式或逻辑做任何特殊处理,由于整个配置文件跟elk收集apache日志的配置文件基本相同。所有配置完成后,就可以启动logstash了,执行如下命令:
[root@logstashserver ~]# nohup /usr/local/logstash/bin/logstash -f /usr/local/logstash/config/kafka_nginx_into_es.conf &
[1] 1084
nohup: ignoring input and appending output to ‘nohup.out’
启动es集群
su - elasticsearch
/usr/local/elasticsearch/bin/elasticsearch -d
访问nginx使其产生日志,并查看es集群是否生成对应的索引(生成索引需要一定的时间)

配置Kibana
Filebeat从nginx上收集数据到kafka,然后logstash从kafka拉取数据,如果数据能够正确发送到elasticsearch,我们就可以在Kibana中配置索引了。
[root@es2 ~]# ifconfig | awk 'NR==2 {print $2}'
192.168.126.96
# 启动
[root@es2 ~]# nohup /usr/local/kibana/bin/kibana &
[1] 1495
nohup: ignoring input and appending output to ‘nohup.out’
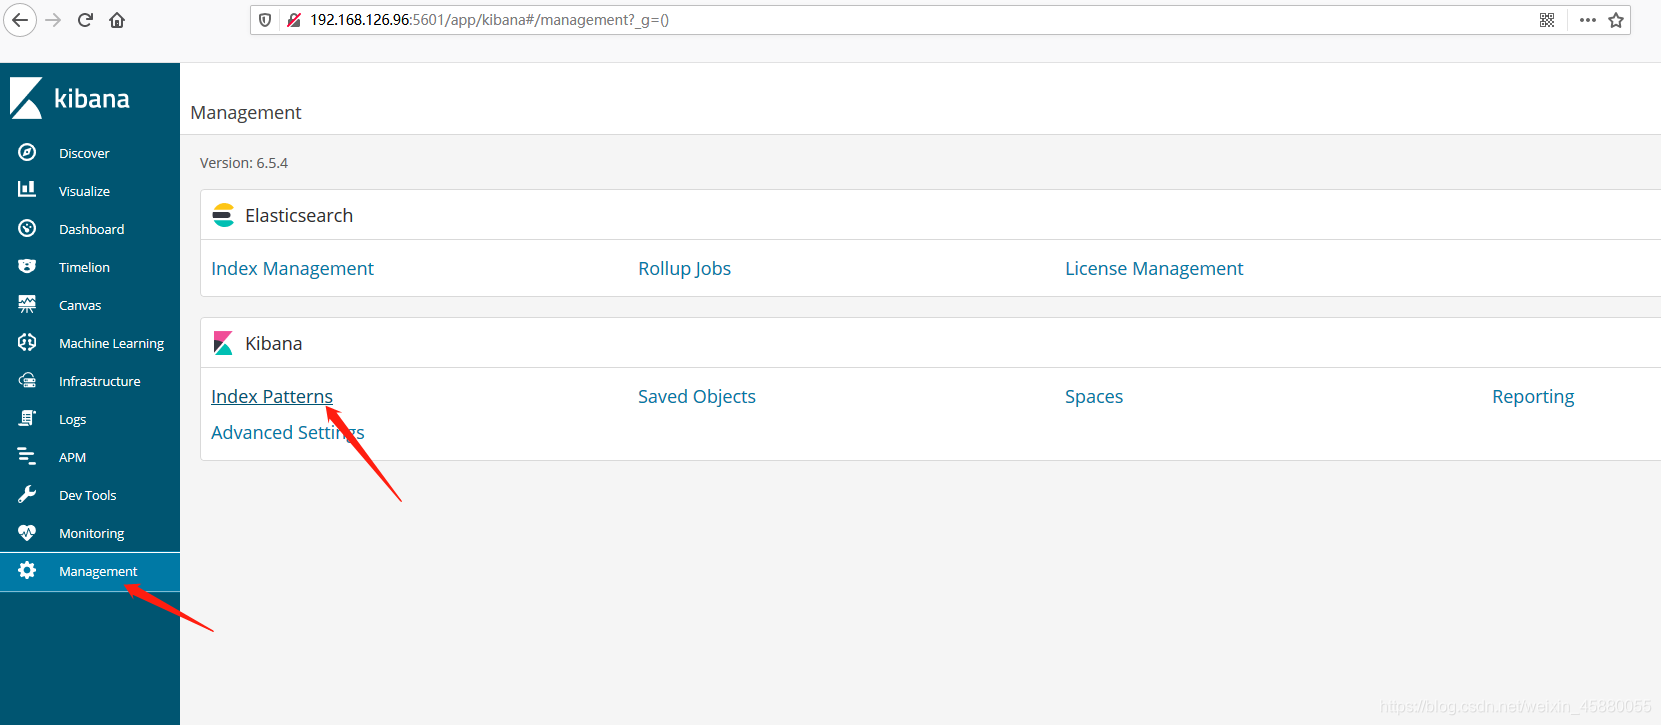
浏览器访问 http://192.168.126.96:5601 登录Kibana,首先配置一个index_pattern,点击kibana左侧导航中的Management菜单,然后选择右侧的Index Patterns按钮,最后点击左上角的Create index pattern。


