dubbo集群搭建、负载均衡、zookeeper集群搭建、nginx服务器搭建(快速搭建)一文就够了
一、准备工作
搭建一个基础的提供者、消费者环境(没有可以看后面的这个文章,从安装虚拟机、JDK开始,真正实现从零开始)
虚拟机的搭建、zookeeper搭建、dubbo-admin使用等(精简)
二、本文大体概述
- 回顾上边文章实现的内容

- 发送请求

在上述实现基础的单zookeeper、单dubbo之后,实现zookeeper集群、dubbo集群、实现dubbo负载均衡!!!
主要ip和端口声明:
- zookeeper集群配置
zookeeper配置在linux虚拟机上(因为不想开太多个linux虚拟机,所以配置在 一台linux虚拟机上了,差别只在于修改ip地址)
| 包名称 | ip地址 | 端口号 |
|---|---|---|
| zookeeper-2181 | 172.16.248.201 | 2181 |
| zookeeper-2182 | 172.16.248.201 | 2182 |
| zookeeper-2183 | 172.16.248.201 | 2183 |
- dubbo集群配置
- 消费者集群
配置在我的windows系统上了
- 消费者集群
| 应用名 | ip地址 | 端口号 |
|---|---|---|
| dubbodemo-consumer_1 | localhost | 2011 |
| dubbodemo-consumer_1 | localhost | 2012 |
| dubbodemo-consumer_1 | localhost | 2013 |
| dubbodemo-consumer_1 | localhost | 2014 |
- 服务者集群
配置在我的windows系统上了
| 应用名 | ip地址 | 端口号 |
|---|---|---|
| dubbodemo_provider_1 | localhost | 8081 |
| dubbodemo_provider_1 | localhost | 8082 |
三、搭建nginx服务器
- 简介(来自百度百科)
Nginx是一款轻量级的Web 服务器/反向代理服务器及电子邮件(IMAP/POP3)代理服务器,在BSD-like 协议下发行。其特点是占有内存少,并发能力强,事实上nginx的并发能力在同类型的网页服务器中表现较好,中国大陆使用nginx网站用户有:百度、京东、新浪、网易、腾讯、淘宝等。
修改本地DNS配置
因为我们想要实现本地输入域名(www.xxx.com)来实现请求业务,所以首先先需要配置hosts文件!

- 打开C:\Windows\System32\drivers\etc路径

打开修改为,保存

下载nginx并解压
- 官网下载或者百度等等都行
- 然后解压(注意一定不要带中文路径(同时希望所有的路径都不带中文,很麻烦!!))
- 如下图

- 打开配置文件,简单看看

因为是80端口,所以我们在输入ip地址(localhost、127.0.0.1、刚才DNS配置的网址)不需要在添加:80便可以直接访问!!!
运行nginx
- 开启服务
start nginx
- 重启服务
nginx -s reload
- 停止服务
nginx -s stop

注意是根目录!!!(然后会有一个窗口一闪而过)
然后输入localhost、127.0.0.1、刚才DNS配置的网址,查看

这便是搭建完成了,如果是搭建失败的话,可以到

查看错误日志,然后百度
关于我遇到的端口被占用问题
我的好像是因特尔的图像中心占用了端口而且不能关闭,大家可以看下这两篇文章(可以解决,当然也可以更换80端口为其他端口!!!)
简单的可以通过以下命令解决
- 查找端口被哪个进程占用
netstart -ano | findstr “端口号”
- 然后去任务管理器找到关闭它
四、消费者集群配置
现在我们开始配置消费者集群!
我们只需要在准备工作完成之后的项目中,进行修改即可!!!
- 此时我们是可以拷贝多个消费者项目至多台电脑,我这里采用改变端口的方式,实现本机集群!(拷贝至多条电脑也只需要修改一下文件即可!)
修改tomcat插件的工作端口
(如果你是拷贝至多个文件至多条电脑的话,可以不修改)

修改controller(便于区分)

重新启动服务
此时我们已经有了消费者集群了,可以进行测试了!!!
- 但是我们首先要重新配置一下nginx,反向代理我们的消费者集群
- 那么为什么要配置nginx呢???
打个比方,百度有很多台服务器,你访问百度时,需要输入不同的百度的ip(www.baidu1.com、wwwbaidu2.com)地址吗?nginx在这里的作用就是分配一下四个ip地址访问,根据内部策略,实现访问一个域名,请求不同的服务

文件代码如下:
#user  nobody;
worker_processes  1;

#error_log  logs/error.log;
#error_log  logs/error.log  notice;
#error_log  logs/error.log  info;

#pid        logs/nginx.pid;


events {
    worker_connections  1024;
}


http {

	upstream ebuyaddress{
			server 127.0.0.1:2011;
			server 127.0.0.1:2012;
			server 127.0.0.1:2013;
			server 127.0.0.1:2014;
	}


    include       mime.types;
    default_type  application/octet-stream;

    #log_format  main  '$remote_addr - $remote_user [$time_local] "$request" '
    #                  '$status $body_bytes_sent "$http_referer" '
    #                  '"$http_user_agent" "$http_x_forwarded_for"';

    #access_log  logs/access.log  main;

    sendfile        on;
    #tcp_nopush     on;

    #keepalive_timeout  0;
    keepalive_timeout  65;

    #gzip  on;

    server {
        listen       80;
        server_name  localhost;

        #charset koi8-r;

        #access_log  logs/host.access.log  main;

       # location / {
       #     root   html;
       #     index  index.html index.htm;
       # }

		location / {
				root  html;
				index  index.jsp index.html;
				proxy_pass http://ebuyaddress;
		}


        #error_page  404              /404.html;

        # redirect server error pages to the static page /50x.html
        #
        error_page   500 502 503 504  /50x.html;
        location = /50x.html {
            root   html;
        }

        # proxy the PHP scripts to Apache listening on 127.0.0.1:80
        #
        #location ~ \.php$ {
        #    proxy_pass   http://127.0.0.1;
        #}

        # pass the PHP scripts to FastCGI server listening on 127.0.0.1:9000
        #
        #location ~ \.php$ {
        #    root           html;
        #    fastcgi_pass   127.0.0.1:9000;
        #    fastcgi_index  index.php;
        #    fastcgi_param  SCRIPT_FILENAME  /scripts$fastcgi_script_name;
        #    include        fastcgi_params;
        #}

        # deny access to .htaccess files, if Apache's document root
        # concurs with nginx's one
        #
        #location ~ /\.ht {
        #    deny  all;
        #}
    }


    # another virtual host using mix of IP-, name-, and port-based configuration
    #
    #server {
    #    listen       8000;
    #    listen       somename:8080;
    #    server_name  somename  alias  another.alias;

    #    location / {
    #        root   html;
    #        index  index.html index.htm;
    #    }
    #}


    # HTTPS server
    #
    #server {
    #    listen       443 ssl;
    #    server_name  localhost;

    #    ssl_certificate      cert.pem;
    #    ssl_certificate_key  cert.key;

    #    ssl_session_cache    shared:SSL:1m;
    #    ssl_session_timeout  5m;

    #    ssl_ciphers  HIGH:!aNULL:!MD5;
    #    ssl_prefer_server_ciphers  on;

    #    location / {
    #        root   html;
    #        index  index.html index.htm;
    #    }
    #}

}
- 然后重启服务
D:\dubbo\nginx\nginx-1.20.1_clear>nginx -s reload
-
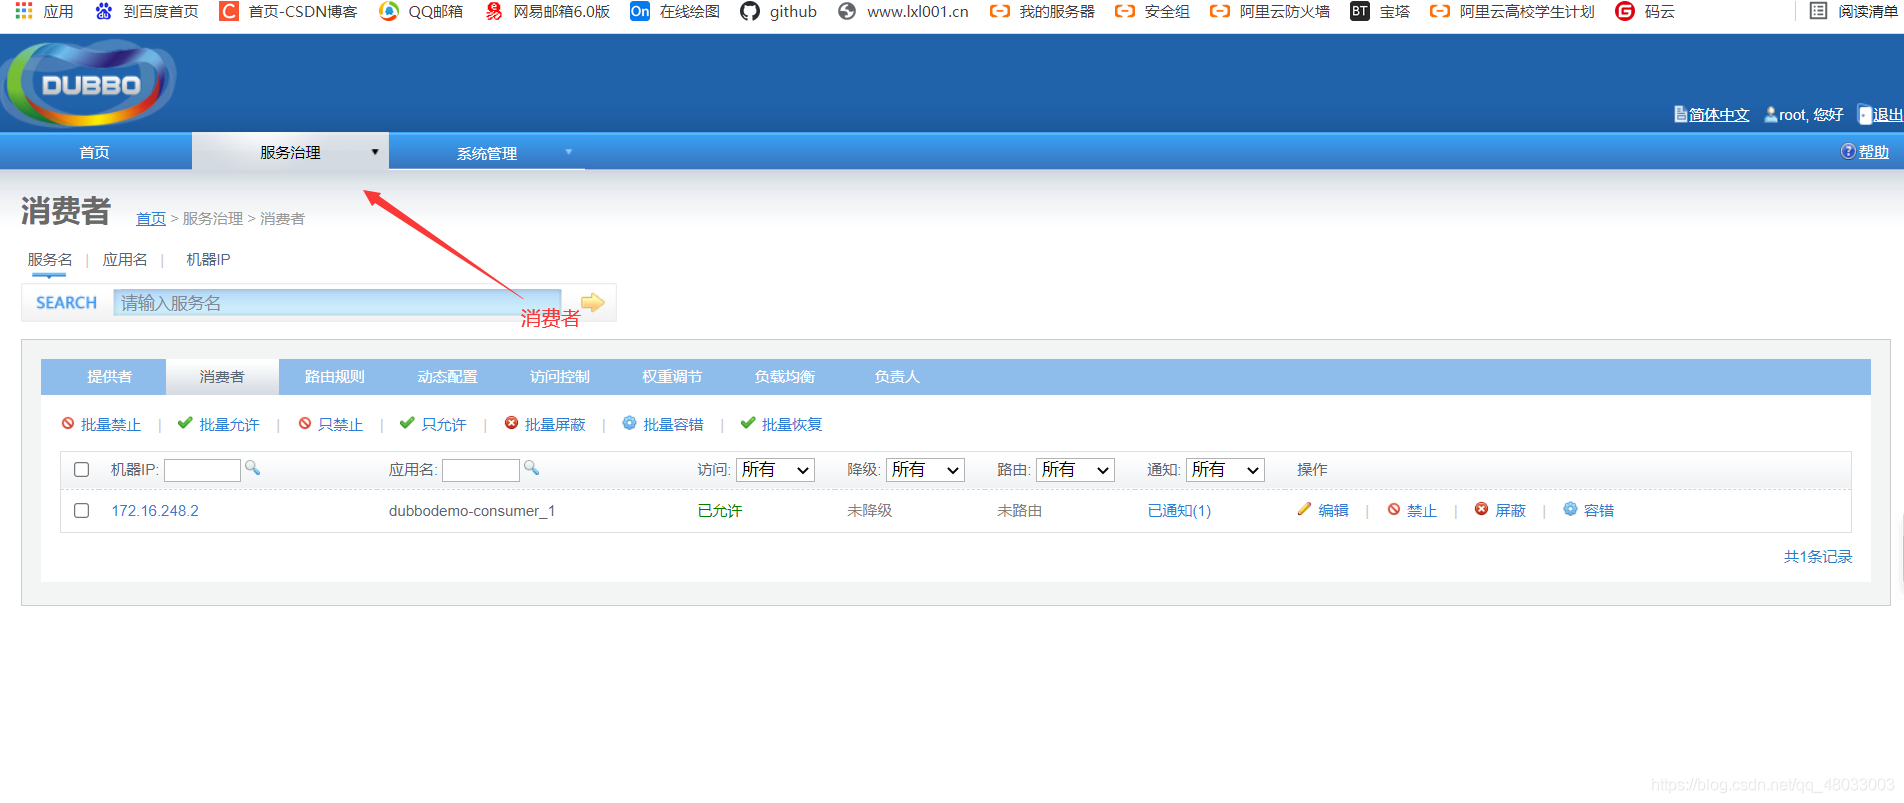
然后我们可以在dubbo-admin可视化界面中看到如下

-
访问我们的请求

此时nginx服务器会挨个选择,所以会切换2011->2014

这样消费者集群便是搭建完成了!!!
五、提供者集群配置
接下来搭建提供者集群
关于消费者和提供者集群之间的看法:
消费者就好比餐厅的服务员,提供者就好比餐厅的厨师,消费者集群搭建好了,相当于餐厅的服务员足够了,但是如果没有足够的厨师的话,出餐肯定还是慢,用户体验不好
修改tomcat端口
与消费者集群极其相似,同样可以部署到不同的电脑上的不同端口上!!!

修改注册端口

修改service(便于区分)

运行项目
将上面修改后的多个提供者项目运行,可以在dubbo-admin可视化界面中看到如下:

- 此时再次访问我们的请求,会发现请求8081(2011->2014)然后变为8082(2011->2014),这样我们的dubbo算是配置成功了
六、zookeeper集群搭建
接下来开始搭建zookeeper集群,我是在linux下配置的,windows和linux是完全一样的,注意是完全一样!!!只有启动时,一个是命令,一个是双击exe文件罢了
创建文件夹并解压
- 首先创建一个集群的文件夹
- 解压压缩包(解压三个分别命名2181、2182、2183)

创建data目录
- 进入目录分别创建data目录(每个zookeeper文件夹都创建)

修改配置文件
- 进入复制zoo_sample.cfg文件为zoo.cfg

复制一份就行,然后修改分发至2182、2183的conf文件夹下!!!
我们主要修改三个东西
- 1.修改data文件路径为…/data/(都一样)
- 2.该zookeeper服务的占用端口(都不一样 2181->2183)
- 3.集群之间的配置(都一样)

文件源码(记得修改本机端口号)
# The number of milliseconds of each tick
tickTime=2000
# The number of ticks that the initial
# synchronization phase can take
initLimit=10
# The number of ticks that can pass between
# sending a request and getting an acknowledgement
syncLimit=5
# the directory where the snapshot is stored.
# do not use /tmp for storage, /tmp here is just
# example sakes.
dataDir=../data/
# the port at which the clients will connect
clientPort=2181
server.1=127.0.0.1:2801:3801
server.2=127.0.0.1:2802:3802
server.3=127.0.0.1:2803:3803
# the maximum number of client connections.
# increase this if you need to handle more clients
#maxClientCnxns=60
#
# Be sure to read the maintenance section of the
# administrator guide before turning on autopurge.
#
# http://zookeeper.apache.org/doc/current/zookeeperAdmin.html#sc_maintenance
#
# The number of snapshots to retain in dataDir
#autopurge.snapRetainCount=3
# Purge task interval in hours
# Set to "0" to disable auto purge feature
#autopurge.purgeInterval=1
data文件夹下新建myid文件

- 注意没有后缀myid
内容如下(三个zookeeper分别是1、 2 、3)

分别对应刚才配置文件中的
server.1=127.0.0.1:2801:3801
server.2=127.0.0.1:2802:3802
server.3=127.0.0.1:2803:3803
启动zookeeper集群
关闭之前的单机zookeeper
首先关闭之前的单机zookeeper,防止端口冲突
切换至bin目录,执行关闭
./zkServer.sh stop
启动集群
- 分别切换到zookeeper-端口号的bin目录下执行
- 如果你是windows配置的,只需要双击bin目录下的zkServer.exe就行
- 启动命令
./zkServer.sh start
停止服务命令
./zkServer.sh stop
查看服务状态:
./zkServer.sh status

看到这里,大致便是配置完成了!!!
七、修改提供者和消费者的配置文件
图解
- 修改application的配置文件(提供者和消费者)

配置文件源码
- 提供者
<?xml version="1.0" encoding="UTF-8"?>
<beans xmlns="http://www.springframework.org/schema/beans"
       xmlns:xsi="http://www.w3.org/2001/XMLSchema-instance"
       xmlns:p="http://www.springframework.org/schema/p"
       xmlns:context="http://www.springframework.org/schema/context"
       xmlns:dubbo="http://code.alibabatech.com/schema/dubbo"
       xmlns:mvc="http://www.springframework.org/schema/mvc"
       xsi:schemaLocation="http://www.springframework.org/schema/beans
		http://www.springframework.org/schema/beans/spring-beans.xsd
         http://www.springframework.org/schema/mvc
         http://www.springframework.org/schema/mvc/spring-mvc.xsd
         http://code.alibabatech.com/schema/dubbo
         http://code.alibabatech.com/schema/dubbo/dubbo.xsd
         http://www.springframework.org/schema/context
         http://www.springframework.org/schema/context/spring-context.xsd">
    <!-- 当前应用名称,用于注册中心计算应用间依赖关系,注意:消费者和提供者应用名不要一样 -->
    <dubbo:application name="dubbodemo_provider_1"></dubbo:application>

    <!--指定注册中心地址 单机-->
<!--    <dubbo:registry address="zookeeper://172.16.248.201:2181"></dubbo:registry>-->
    <!--集群-->
    <dubbo:registry address="172.16.248.201:2181,172.16.248.201:2182,172.16.248.201:2183" protocol="zookeeper"></dubbo:registry>

    <!-- 注册 协议和port端口默认是20880 -->
    <dubbo:protocol name="dubbo" port="20881"></dubbo:protocol>

    <dubbo:annotation package="cn.ebuy.service.impl"></dubbo:annotation>

</beans>
- 消费者
<?xml version="1.0" encoding="UTF-8"?>
<beans xmlns="http://www.springframework.org/schema/beans"
       xmlns:xsi="http://www.w3.org/2001/XMLSchema-instance"
       xmlns:p="http://www.springframework.org/schema/p"
       xmlns:context="http://www.springframework.org/schema/context"
       xmlns:dubbo="http://code.alibabatech.com/schema/dubbo"
       xmlns:mvc="http://www.springframework.org/schema/mvc"
       xsi:schemaLocation="http://www.springframework.org/schema/beans
			http://www.springframework.org/schema/beans/spring-beans.xsd
			http://www.springframework.org/schema/mvc
			http://www.springframework.org/schema/mvc/spring-mvc.xsd
			http://code.alibabatech.com/schema/dubbo
			http://code.alibabatech.com/schema/dubbo/dubbo.xsd
			http://www.springframework.org/schema/context
			http://www.springframework.org/schema/context/spring-context.xsd">

    <!-- 当前应用名称,用于注册中心计算应用间依赖关系,注意:消费者和提供者应用名不要一样 -->
    <dubbo:application name="dubbodemo-consumer_1" />
    <!-- 连接服务注册中心zookeeper ip为zookeeper所在服务器的ip地址 单机-->
<!--    <dubbo:registry address="zookeeper://172.16.248.201:2181"/>-->
<!--集群-->
    <!---->
    <dubbo:registry address="172.16.248.201:2181,172.16.248.201:2182,172.16.248.201:2183" protocol="zookeeper"></dubbo:registry>

    <!-- 扫描的方式暴露接口  -->
    <dubbo:annotation package="cn.ebuy.controller" />
</beans>
最后
重启消费者和服务者的tomcat,并测试!!!
本文结束,感谢观看!!!