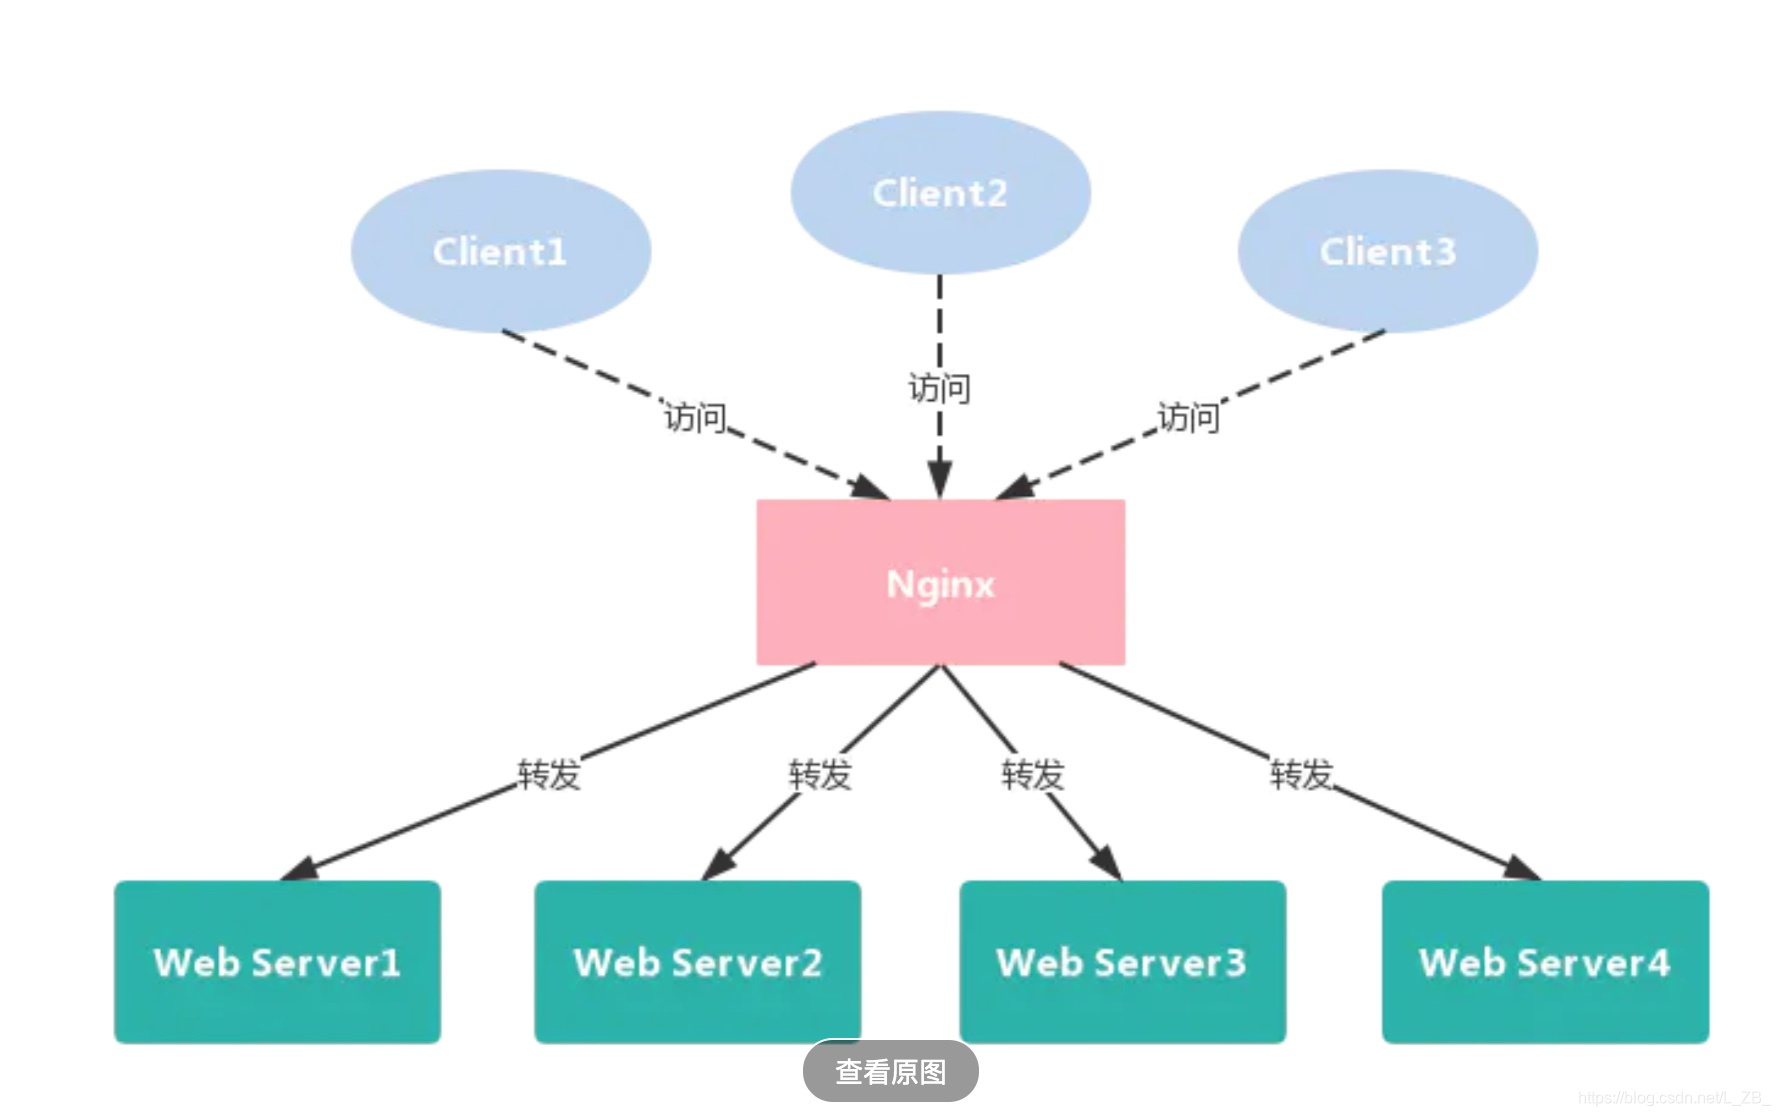
动态负载均衡有哪些实现方案?
何谓动态: (增加节点 调整权重 修改配置文件)
属于架构的知识: 传统的配置都放在项目中, 这样的化就有弊端(如果生产环境中发现配置文件配置有误), 重新修改项目配置文件, 重新打包
分布式领域: 分布式配置中心(配置统一管理) 扩展性及高
动态化: 可变化 灵活 Dubbo
2. 动态负载均衡 大型互联网公司中(动态配置), 如果需要频繁的发布版本, 提高扩展性 传统方式的Nginx配置负载均衡upstream扩展新的节点 要重启nginx服务器才能获取到最新的配置, 所以存不存在这样的一种方式, 在不重启nginx的前提下, 修改了upstream配置, 能实现动态获取nginx_upstream配置
upstream wwwbackend {
server 10.15.200.101:80 weight=1;
server 10.15.200.102:80 weight=1;
server 10.15.200.103:80 weight=1 backup;
}
server {
server_name www.example.cn;
access_log /dev/shm/www.example.cn.access.log main;
error_log /dev/shm/www.example.cn.error.log;
location / {
proxy_pass http://wwwbackend;
}
}
- 一台服务器专门的存放动态upstream配置服务器
- 可配置化: 灵活的扩展( 不要写死 ) 分布化配置中心 设置jdbc懒加载
一般常见如下三种方式:
1. Consul+Consl-template: 需要reload
2. Consul+OpenResty: 无需reload
3. Consul+UpSync: 无需reload
Nginx+Consul+UpSync: 实现动态负载均衡
实验思路:
每个知识点 哪个环节 及 其作用
Nginx: 反向代理和负载均衡
Consul: 实现分布式服务注册与发现功能(go)
UpSync:
微服务:
1)服务注册与发现应用场景: 微服务rpc远程调用(对服务实现服务治理(注册中心))
会员项目: 10.15.200.101
IP地址+端口号 (http://10.15.200.102:8081)
订单项目: 10.15.200.102:8081
注册中心: 专门存和IP地址和端口号

会员项目: vip.example.cn
    IP地址+端口号 (http://order.example.cn)
订单项目: order.example.cn
SpringCloud: 支持zookeeper Eureka Consul etcd(k8s注册中心)
服务注册:
服务发现:
故障检测:
K/V存储:
多数据中心:
Raft算法:
传统的负载均衡

自动负载均衡

服务调用

注册中心

[root@node01 ~]# tar -zxf nginx_consul.tgz
[root@node01 ~]# cd nginx_consul
[root@node01 nginx_consul]# unzip consul_1.6.3_linux_amd64.zip
[root@node01 nginx_consul]# sudo cp consul /usr/local/sbin/
consul-6ecc 服务的名字 下面nginx中的配置 与 服务的名字绑定 表明归属 (注册绑定信息)**
[root@node01 ~]# consul agent -dev -ui -node=consul-6ecc -client=10.15.200.101
浏览器进行访问: (出现一个web页面 这就是consul的web管理页面)
http://10.15.200.101:8500
HTTP_API接口: 1) curl 2) python 3) Postman
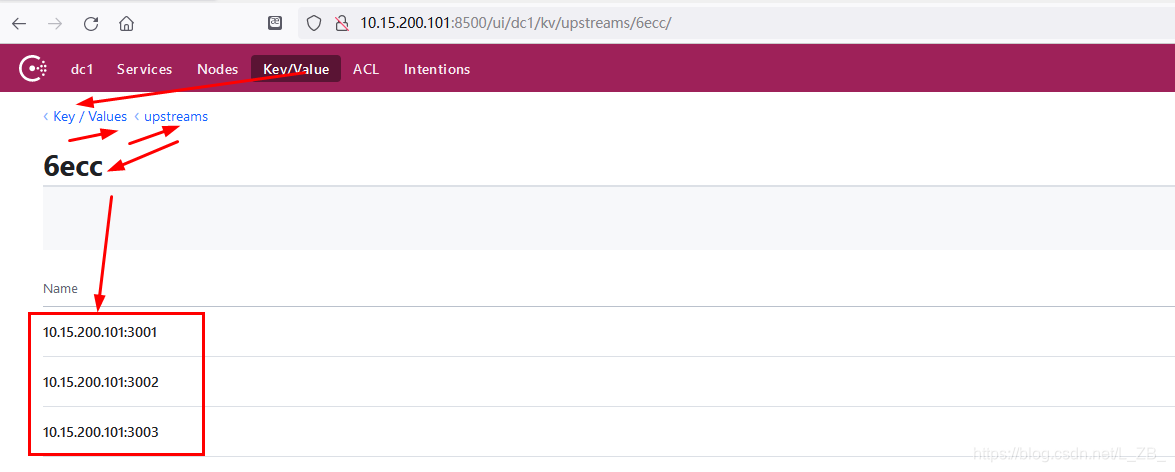
通过API方式 添加对应的upstream及服务节点: (添加3个后端节点 3001 3002 3003)
效果见: 05_consul管理页面.jpg
[root@node01 ~]# curl -X PUT -d ‘{“weight”:1,“max_fails”:2,“fail_timeout”:10}’ http://10.15.200.101:8500/v1/kv/upstreams/6ecc/10.15.200.101:3001
true
[root@node01 ~]# curl -X PUT -d ‘{“weight”:1,“max_fails”:2,“fail_timeout”:10}’ http://10.15.200.101:8500/v1/kv/upstreams/6ecc/10.15.200.101:3002
true
[root@node01 ~]# curl -X PUT -d ‘{“weight”:1,“max_fails”:2,“fail_timeout”:10}’ http://10.15.200.101:8500/v1/kv/upstreams/6ecc/10.15.200.101:3003
true
在 node01 创建 5个 测试目录 3001-3005 (3004 3005后面的测试要用到 提前创建好)
mkdir -p /data/web/6ecc/{3001,3002,3003,3004,3005}
for p in 3001 3002 3003 3004 3005
do
echo "welcome to 6ecc port
p
"
>
/
d
a
t
a
/
w
e
b
/
6
e
c
c
/
p" > /data/web/6ecc/
p">/data/web/6ecc/p/index.html
done
前提 6ecc.example.cn这个域名 解析到 10.15.200.101
目的: 浏览器 或 CentOS 进行访问 多次刷新 出现 3001 3002 3003 的页面
http://6ecc.example.cn/
下面对Nginx进行相关安装和配置:
[root@node01 ~]# cd /root/nginx_consul/
[root@node01 nginx_consul]# sh install.sh
[root@node01 nginx_consul]# nginx -t
nginx: the configuration file /usr/local/webserver/nginx/conf/nginx.conf syntax is ok
nginx: configuration file /usr/local/webserver/nginx/conf/nginx.conf test is successful
[root@node01 nginx_consul]# systemctl start nginx
[root@node01 nginx_consul]# cat /usr/local/webserver/nginx/conf/vhosts_consul/6ecc.conf
server 10.15.200.101:3003 weight=1 max_fails=2 fail_timeout=10s;
server 10.15.200.101:3002 weight=1 max_fails=2 fail_timeout=10s;
server 10.15.200.101:3001 weight=1 max_fails=2 fail_timeout=10s;
配置文件本地持久化: (这是自动生成的 根据前面 绑定到 key:6ecc的value(多条数据): curl -X PUT -d)
[root@node01 ~]# cat /usr/local/webserver/nginx/conf/vhosts_consul/6ecc.conf
server 10.15.200.101:3003 weight=1 max_fails=2 fail_timeout=10s;
server 10.15.200.101:3002 weight=1 max_fails=2 fail_timeout=10s;
server 10.15.200.101:3001 weight=1 max_fails=2 fail_timeout=10s;
用浏览器进行测试:
http://6ecc.example.cn/ (如下结果 轮询出现)
welcome to 6ecc port 3001
welcome to 6ecc port 3002
welcome to 6ecc port 3003

在node01上 再加两个节点 进行测试: 效果图见: 06_添加两个节点.jpg
curl -X PUT -d ‘{“weight”:1,“max_fails”:2,“fail_timeout”:10}’ http://10.15.200.101:8500/v1/kv/upstreams/6ecc/10.15.200.101:3004
curl -X PUT -d ‘{“weight”:1,“max_fails”:2,“fail_timeout”:10}’ http://10.15.200.101:8500/v1/kv/upstreams/6ecc/10.15.200.101:3005
上面两条命令 的返回结果 一定是true 标明 命令返回成功
http://10.15.200.101:8500/ui/dc1/kv/upstreams/6ecc/ 效果图见: 06_添加两个节点.jpg
重复上面的过程中 进行测试:
http://6ecc.example.cn/ (如下结果 轮询出现)

welcome to 6ecc port 3001
welcome to 6ecc port 3002
welcome to 6ecc port 3003
welcome to 6ecc port 3004
welcome to 6ecc port 3005
发现 新增加的节点 直接持久化到本地
[root@node01 nginx_consul]# cat /usr/local/webserver/nginx/conf/vhosts_consul/6ecc.conf
server 10.15.200.101:3005 weight=1 max_fails=2 fail_timeout=10s;
server 10.15.200.101:3004 weight=1 max_fails=2 fail_timeout=10s;
server 10.15.200.101:3003 weight=1 max_fails=2 fail_timeout=10s;
server 10.15.200.101:3002 weight=1 max_fails=2 fail_timeout=10s;
server 10.15.200.101:3001 weight=1 max_fails=2 fail_timeout=10s;
添加或删除节点 不需要再次手动加载reload 或 重启nginx