学习记录
目录
- 学习记录
- 1.`vmtools`的安装
- 2.设置共享文件夹
- 3.目录结构
- 4.Linux下查看IP地址
- 5.命令行下`vim`的使用
- 6. 关机 & 重启 命令
- 7. 登录 & 注销命令
- 8.用户管理指令
- 9. 用户组指令
- 10. 运行级别指令
- 11. 找回root密码
- 12. 帮助指令
- 13. 文件目录类指令
- 14. 时间日期类指令
- 15. 搜索查找类指令
- 16. 压缩解压类指令
- 17. 文件所有者/所在组
- 18. 用户对文件的权限
- 19. 通过 `crond ` 进行定时任务调度
- 20. 通过 at 进行定时任务调度
- 21. 磁盘相关
- 22. 网络相关
- 23. 进程管理相关
- 24. 服务管理相关
- 25.`rpm` 软件管理
- 26. `yum` 软件管理
- 27.搭建JavaEE环境
- 28.`Shell`编程入门
1.vmtools的安装

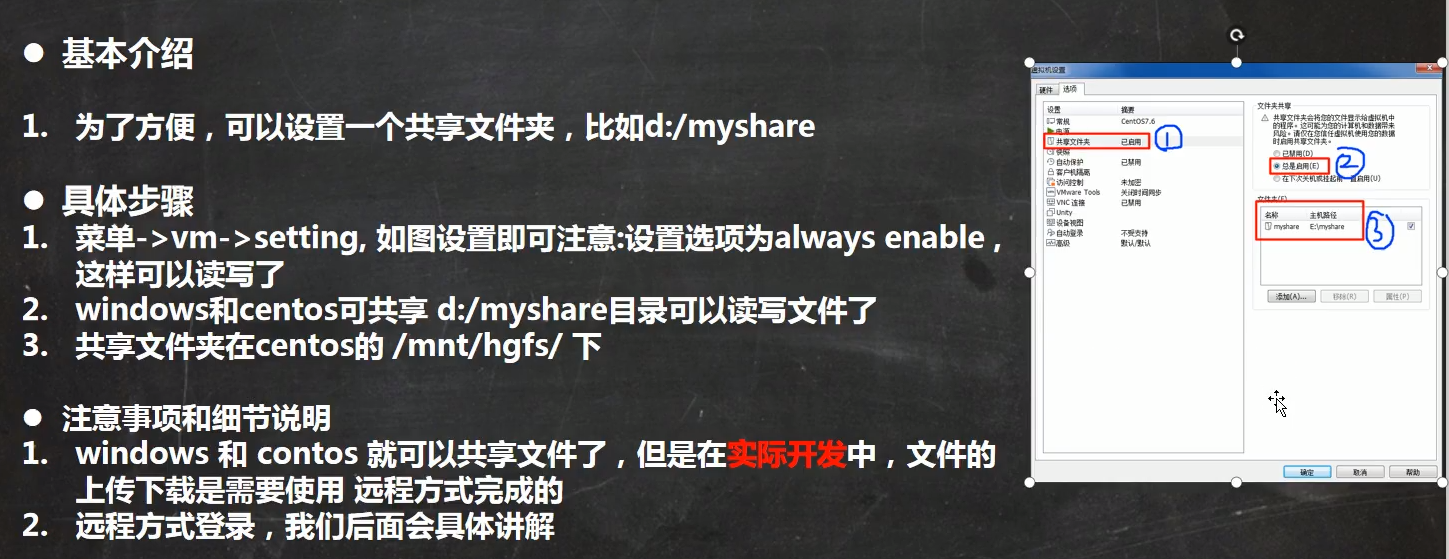
2.设置共享文件夹
3.目录结构
熟知的目录结构, 方便在命令行环境下工作

4.Linux下查看IP地址
终端中输入 ifconfig -a

5.命令行下vim的使用
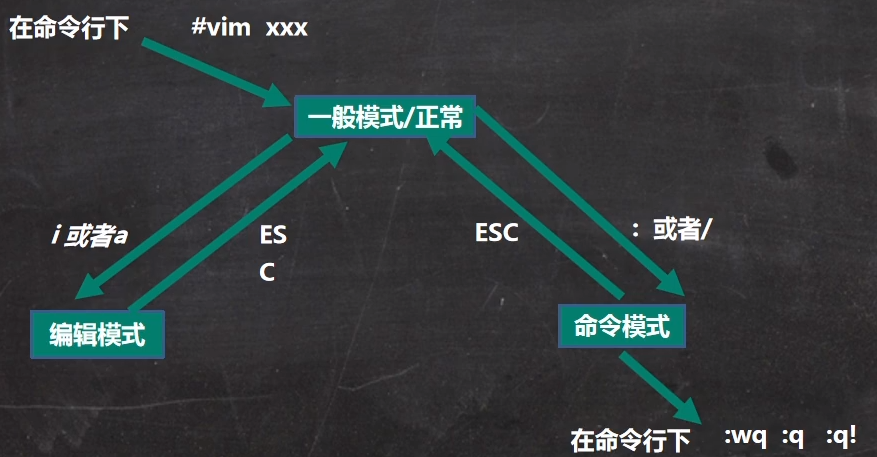
1).vim的三种模式
从键盘上按下esc,而不是输入
2) vim常用快捷键
?
| 复制从光标起5行 | 5yy |
|---|---|
| 粘贴 | p(paste) |
| 查找word | /word,回车查找,n查找下一个 |
| 撤销 | u |
| 定位到第一行/最后一行 | gg/G |
| (不)显示行号 | :set (no)nu |
| 光标定位到20行 | 输入20, shift+g |
| 保存并退出 | :wq |
| 强制退出 | :q! |
3).vim的快捷键一览

6. 关机 & 重启 命令

-h 指 halt 关机
7. 登录 & 注销命令

运行级别3指的是命令行窗口
使用
su - 用户名更换用户, 输入密码只是不显示, 而不是卡死
用户名设置成
小写, 否则无法用Xshell远程登录
8.用户管理指令
1) useradd 添加用户

[root@yes ~]# useradd milan // 添加用户milan
[root@yes ~]# cd /home // cd 路径 进入某路径
[root@yes home]# ls // 即list 列出当前目录
hkbelong2chn  milan  tom
[root@yes home]# useradd -d /home/test jack // 添加用户jack, 指定家目录: /home/test
[root@yes home]# ls
hkbelong2chn  milan  test  tom
2)passwd 更改用户密码

[root@yes home]# passwd // 不指定用户名默认修改当前登录的用户的密码
更改用户 root 的密码 。
[root@yes home]# passwd jack
更改用户 jack 的密码 。
新的 密码: // 密码输入是不可见的
无效的密码: 密码少于 8 个字符 // 只是不建议设置简单密码, 但仍可以成功
重新输入新的 密码:
passwd:所有的身份验证令牌已经成功更新。
3)userdel 删除用户

[root@yes home]# ls
hkbelong2chn  milan  test  tom
[root@yes home]# userdel milan
[root@yes home]# ls
hkbelong2chn  milan  test  tom
[root@yes home]# userdel -r milan
userdel:用户“milan”不存在 // 说明 成功删除 "milan" 但其家目录依然存在
[root@yes home]# userdel -r tom // 删除 "tom", 及其家目录
[root@yes home]# ls
hkbelong2chn  milan  test
一般来说, 删除用户时, 推荐保留其家目录
4) id 查询用户信息

[root@yes home]# id root
uid=0(root) gid=0(root) 组=0(root)
5)su - 用户名切换用户
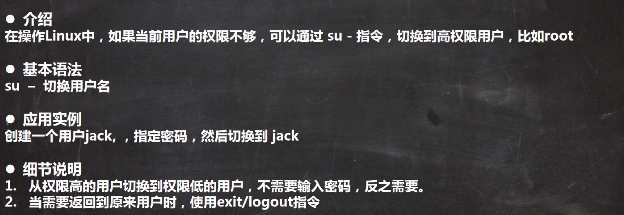
[root@yes home]# su - jack // 切换至低权限用户
上一次登录:日 2月 21 13:06:01 CST 2021pts/4 上
[jack@yes ~]$ su - root // 切换至高权限用户, 需要输入密码
密码:
上一次登录:日 2月 21 13:15:34 CST 2021:1 上
[root@yes ~]# logout // 登出后, 返回jack, 而不是退出, 因为root是从jack切换过来的
[jack@yes ~]$ logout // 登出后, 返回root, 因为jack是从root切换过来的
[root@yes home]#
6)who am i查看当前用户

[root@yes ~]# who am i
root     pts/4        2021-02-21 12:22 (192.168.31.20)
9. 用户组指令
同一组中的用户有相同的权限

1) groupadd 新增组 / 删除组

[root@yes ~]# groupadd lakers
[root@yes ~]# groupdel lakers
[root@yes ~]# groupdel lakers
groupdel:“lakers”组不存在
2) useradd -g 新增用户并指定组

[root@yes ~]# useradd -g lakers james
[root@yes ~]# id james
uid=1006(james) gid=1006(lakers) 组=1006(lakers)
3) usermod 修改用户的组

[root@yes ~]# groupadd cavs
[root@yes ~]# usermod -g cavs james
[root@yes ~]# id james
uid=1006(james) gid=1007(cavs) 组=1007(cavs)
4) id 查看用户所在的组
id 用户名

5) 用户组相关文件

-
/etc/passwd

root:x:0:0:root:/root:/bin/bash jack:x:1003:1003::/home/test:/bin/bash davis:x:1005:1005::/home/davis:/bin/bash james:x:1006:1007::/home/james:/bin/bash -
/etc/shadow

jack:$6$W.eAmTCD$yjjFF.xVTBVhkPiMlEdwXfk4DOAy0.EOyzDuDXr169bPY80cFhn/iJwEs10n61I6VDBVjpHN6puyJlmz0VCkc1:18679:0:99999:7::: davis:!!:18679:0:99999:7::: james:!!:18679:0:99999:7::: -
/etc/group

lakers:x:1006:
10. 运行级别指令

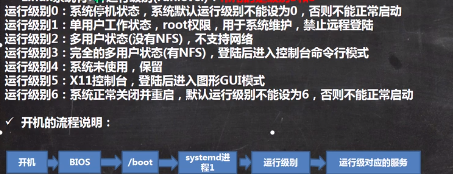
1) init 切换运行级别
init [0123456]
2) systemctl 查看/设置默认运行级别
Centos7简化了运行级别, 以下是 /etc/inittab 原文
# systemd uses 'targets' instead of runlevels. By default, there are two main targets:
#
# multi-user.target: analogous to runlevel 3
# graphical.target: analogous to runlevel 5
#
# To view current default target, run:
# systemctl get-default  // 查看默认targets
#
# To set a default target, run:
# systemctl set-default TARGET.target // 设置默认targets
演示:
[root@yes ~]# systemctl get-default
graphical.target
[root@yes ~]# systemctl set-default multi-user.target
Removed symlink /etc/systemd/system/default.target.
Created symlink from /etc/systemd/system/default.target to /usr/lib/systemd/system/multi-user.target.
[root@yes ~]# systemctl get-default
multi-user.target
11. 找回root密码
-
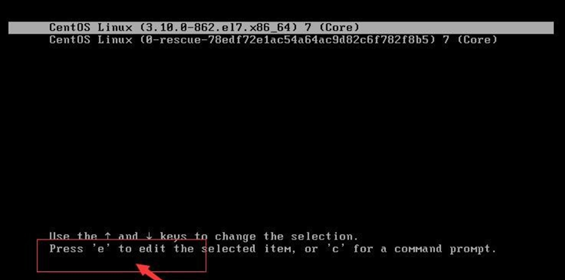
启动系统,进入开机界面,在界面中按“e”进入编辑界面
-
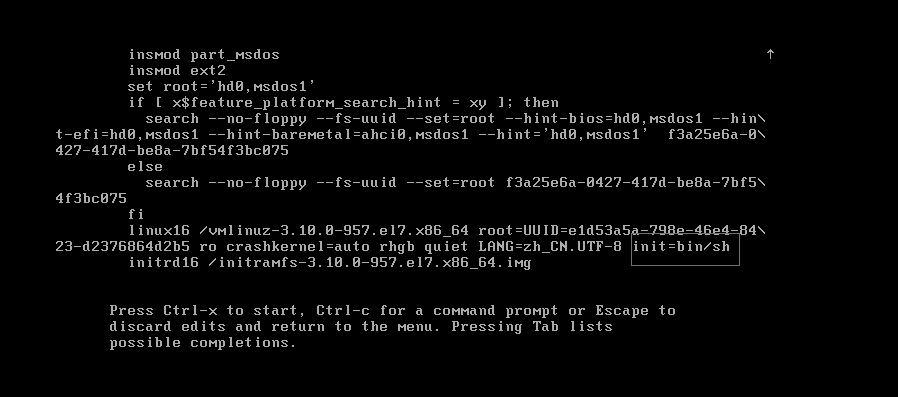
找到以“
linux16”开头内容所在的行数,在行的最后面输入:init=/bin/sh, 输入完成后,直接按快捷键:Ctrl+x进入单用户模式
-
输入:
mount -o remount,rw /(注意:各个单词间有空格),完成后按键盘的回车键
-
在新的一行输入:
passwd, 完成后按键盘的回车键。输入密码,然后再次确认密码即可 密码修改成功后,会显示passwd…的样式,说明密码修改成功[外链图片转存失败,源站可能有防盗链机制,建议将图片保存下来直接上传(img-SGptmjo5-1631107810268)(D:%5CTypora%20Img%5Cimage-20210308173316897.png)]
-
接着,在鼠标闪烁的位置中(最后一行中)输入:
touch /.autorelabel,完成后按键盘的回车键. 继续在光标闪烁的位置中输入:exec /sbin/init,完成后按键盘的回车键 ,等待系统自动修改密码,完成后系统会自动重启, 新的密码便生效(过程可能有点长,耐心等待,不是死机)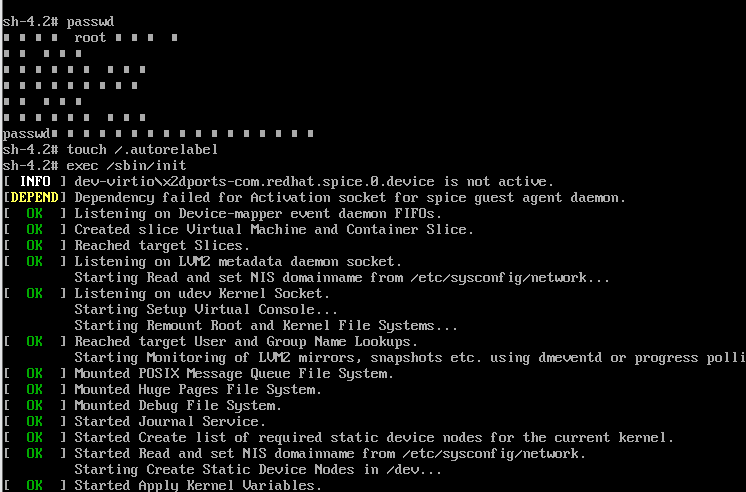
12. 帮助指令
1) man
[root@yes ~]# man ls
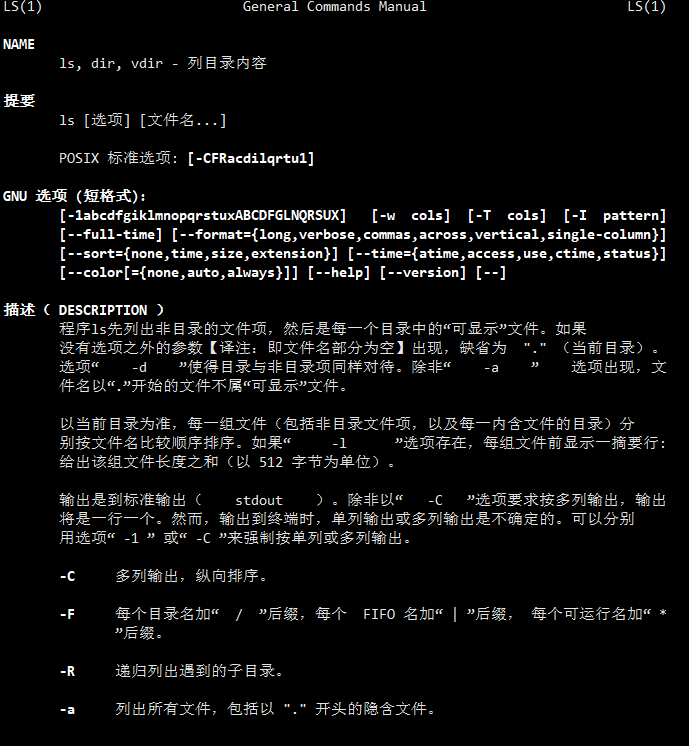
浏览时按空格滚动, 按q退出
[root@yes ~]# man /etc/passwd // 还可以浏览配置文件

2) help
[root@yes ~]# help cd
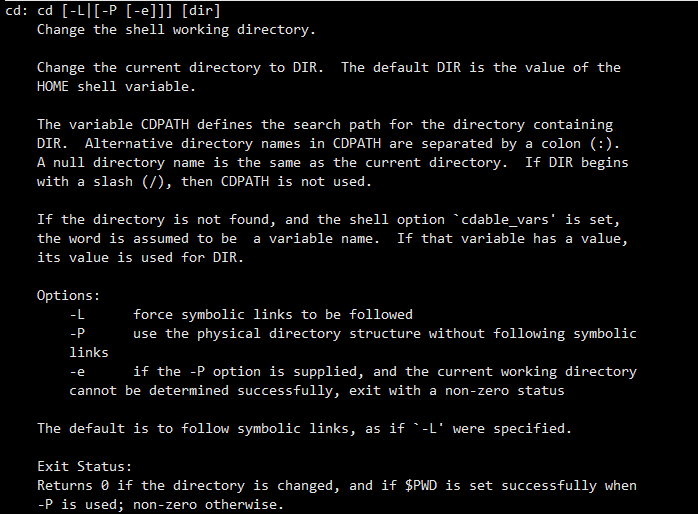
注意, help只能查看shell内置命令的帮助信息

13. 文件目录类指令
1) pwd

2) ls

选项可以组合使用(顺序无所谓), 如
ls -al
3) cd
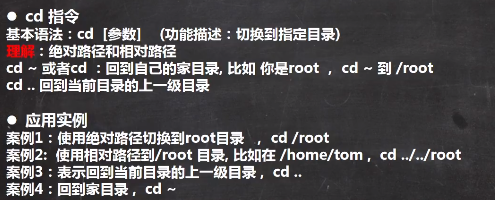
4) mkdir

-
创建一级目录
[root@yes /]# mkdir /home/harden [root@yes /]# ls home davis harden hkbelong2chn james milan test -
创建多级目录
[root@yes /]# mkdir /home/nba/jokic
mkdir: 无法创建目录"/home/nba/jokic": 没有那个文件或目录 // 因为 /home下没有nba这个文件
[root@yes /]# mkdir -p /home/nba/jokic
[root@yes /]# ls home/nba
jokic
注意路径. 若在
/home下输入mkdir /harden,实际上会在/下创建目录/harden,而不是在/home下
5) rmdir

[root@yes /]# rmdir /home/cba
[root@yes /]# ls home
davis  harden  hkbelong2chn  james  milan  test
6) rm 删除文件/目录

rm -rf用于删除非空目录.rm指remove,r指recurrence(递归)f指force(强制), 删除时要谨慎
[root@yes home]# rmdir nba
rmdir: 删除 "nba" 失败: 目录非空
[root@yes home]# ls
davis  harden  hkbelong2chn  james  milan  nba  test
[root@yes home]# ls nba
jokic
[root@yes home]# rm -rf nba
[root@yes home]# ls
davis  harden  hkbelong2chn  james  milan  test
7) touch

[root@yes home]# ls
davis  harden  hkbelong2chn  james  milan  test
[root@yes home]# touch hello.txt // 在当前目录下创建
[root@yes home]# ls
davis  harden  hello.txt  hkbelong2chn  james  milan  test
[root@yes /]# touch /home/world.txt // 可以指定路径
[root@yes /]# ls home
davis  harden  hello.txt  hkbelong2chn  james  milan  test  world.txt
8) cp
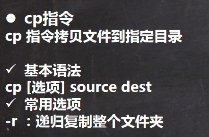
[root@yes home]# cp hello.txt james
[root@yes home]# ls james
hello.txt
[root@yes home]# cp james milan
cp: 略过目录"james" // cp 不加选项只能复制单一文件或者空文件夹
[root@yes home]# ls milan
[root@yes home]# cp -r james milan
[root@yes home]# ls milan
james
9) mv

[root@yes home]# mv hello.txt world.txt // 重命名
/* 移动文件 */
[root@yes home]# mv world.txt test
[root@yes home]# ls test
world.txt
/* 移动并重命名 */
[root@yes home]# mv test/world.txt /home/hello.txt
[root@yes home]# ls
davis  harden  hello.txt  hkbelong2chn  james  test
10) cat

cat指令只能查看文件, 不能修改. 更安全
/* 浏览文件 */
[root@yes home]# cat -n /etc/profile
 1	# /etc/profile
 2	...
11) more

[root@yes home]# cat -n /etc/profile | more
|是管道命令, 类似于JAVA中的stream, 就是将上一次操作的结果,接着让下一个命令处理
12) less
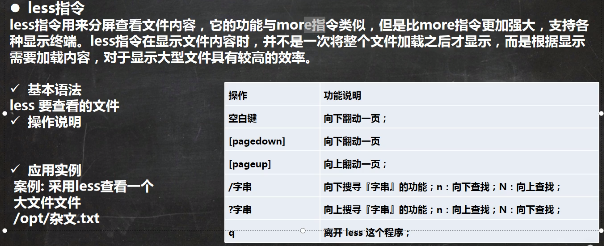
less浏览文件是动态加载内容(看多少.加载多少),浏览大型文件效率高
13) echo

/* 输出主机名和环境变量 */
[root@yes opt]# echo $HOSTNAME
yes
[root@yes opt]# echo $PATH
/usr/local/sbin:/usr/local/bin:/usr/sbin:/usr/bin:/root/bin
/* 输出任意内容 */
[root@yes opt]# echo hello,world!
hello,world!
14) head & tail


tail -f 文件名可以实时监控文件的变化并显示, 退出监控键入Ctrl+D
15) > & >>
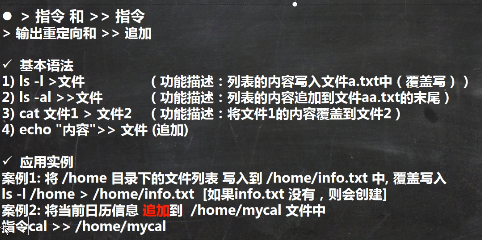
/* 将/home的内容按行写入info.txt(info.txt不存在则自动创建) */
[root@yes home]# ls -l /home > info.txt
/* 将日历内容追加至mycal.txt */
[root@yes home]# cal >> mycal.txt
cal(calendar)会显示当前日历
16) ln 创建软链接
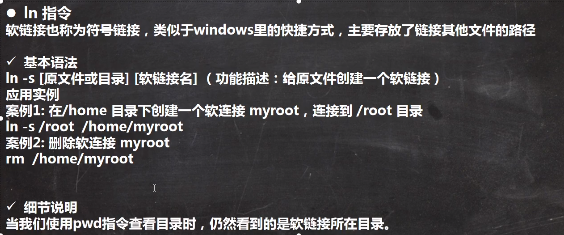
/*在/home下创建/root的软链接myroot*/
[root@yes home]# ln -s /root myroot
符号链接类似于windows下的快捷方式
17) history

18) !
用法: ! 历史编号x: 执行历史编号为x的指令
!! // 执行上一条指令
!m // 执行最近一个以指定字符串开头的命令
通过键盘上下键可以快速找到最近使用过的命令
19) 可执行文件
可执行文件是绿色的:
如何执行 ?
/*输入可执行文件的路径, 即可执行*/
[root@yes home]# /home/test.sh
20) source 使刚修改的文件生效
source filename
14. 时间日期类指令
1) date

[root@yes myroot]# date +%Y-%m-%d // -是分隔符, 可以任意设置
2021-02-23
同步网络时间参考: https://www.cnblogs.com/suiyueshentou/p/7798340.html
设置完时间后, 最好
hwclock -w保存一下设置
2) cal

15. 搜索查找类指令
1) find
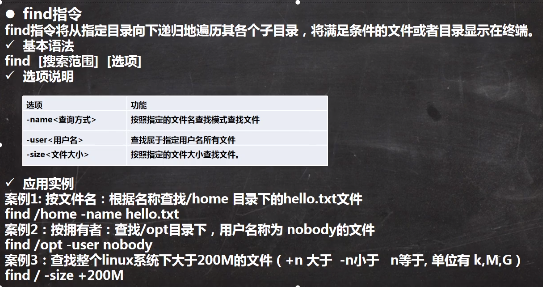
2) locate

使用
locate检索之前, 先使用updatedb更新数据库, 再进行检索
/* 定位文件 */
[root@yes ~]# updatedb
[root@yes ~]# locate hello.txt
/home/hello.txt
3) which
用于查看指令所在目录
/* 查找指令所在目录 */
[root@yes ~]# which ls
alias ls='ls --color=auto'
	/usr/bin/ls
4) grep
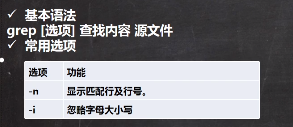
/* 查找文件中的内容  查看有没有 */
[root@yes home]# grep -ni hello /home/hello.txt
2:hello,
16. 压缩解压类指令
1) gzip / gunzip

只能解压缩文件, 不能解压缩目录(文件夹)
/* 解压缩文件 */
[root@yes home]# ls
hello.txt
[root@yes home]# gzip hello.txt
[root@yes home]# ls
hello.txt.gz
[root@yes home]# gunzip hello.txt.gz
[root@yes home]# ls
hello.txt
2) zip / unzip
既可以压缩文件, 又可以压缩文件夹
zip用法:
zip [选项] xxx.zip(压缩后的文件名) 文件所在位置
如: zip -r hello.zip hello.txt
-r: 递归处理,将指定目录下的所有文件和子目录一并处理;
这是不加 -r的效果:

这是加 -r的效果:

-
unzip用法unzip [选项] 要解压的文件 如: unzip -d /opt/tmp /opt/myhome.zip -d: 可以指定解压的位置
3) tar
可以打包/解压缩文件/目录, 通过选项决定打包/解压/压缩
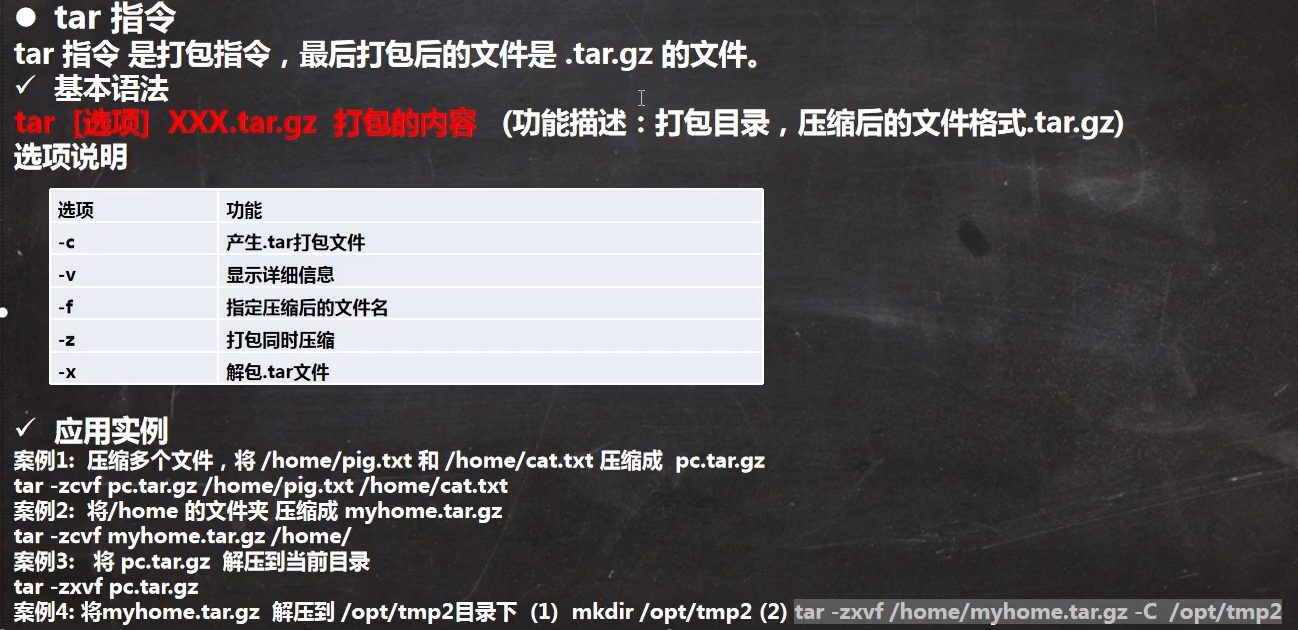
关于后缀名
tar.gz与tar的区别
tar -zxvf xxx.tar.gz
tar -xvf xxx.tar
17. 文件所有者/所在组
中每个用户都属于一个组
每个文件都有一个
所有者(创建该文件的用户), 一个所在组(该文件的所有者所在的组), 一个其他组(该文件所有者不在的组)
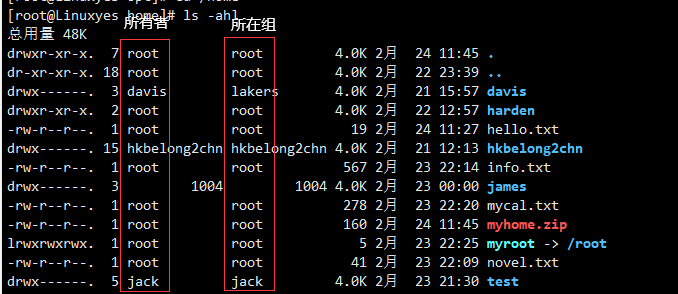
1) 查看文件(目录)所有者/所在组
ls -ahl
/* -a 显示隐藏的文件 -h 文件大小便于查看(G,M,K) -l 以列表形式显示详细信息
2) chown 修改文件(目录)所有者

// chown 即 change the ownership
[root@yes home]# chown -R root:root fox
3) chgrp 修改文件(目录)所在组

chgrp [选项,如-R(递归)] 新组 文件
[root@yes home]# chgrp [-R] root fox
18. 用户对文件的权限
依次是
所有者 所在组 其他组的权限
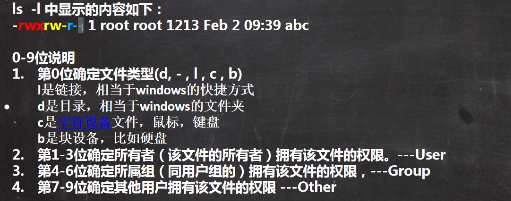
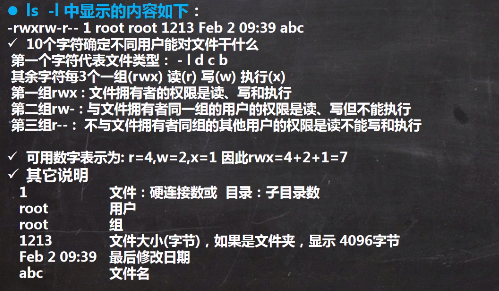
1) rwx权限

如果想要对目录内的文件进行操作, 除了对该文件有相应权限外, 首先需要对该目录有相应权限
2) chmod 修改权限

[root@yes fox]# chmod u=rwx,g=rx,o=rx fox.txt
相当于
[root@yes fox]# chmod 755 fox.txt

19. 通过 crond 进行定时任务调度
1) crontab详细用法
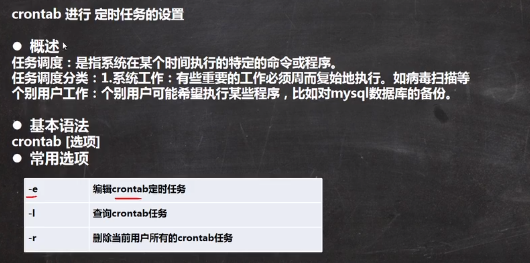
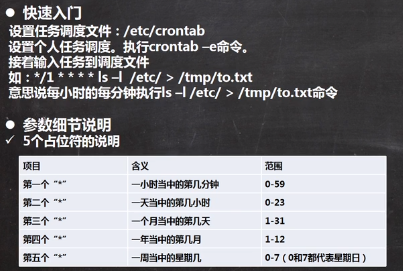

- 案例:
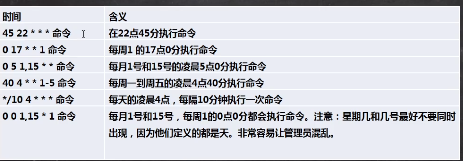
2) 通过 crontab 定时执行命令
/* 通过crontab设置定时任务 */
[root@yes home]# crontab -e // 通过vim编辑,:wq保存退出
crontab: installing new crontab
[root@yes home]# crontab -l
*/1 * * * * ls -l /etc > /tmp/to.txt
3) 通过crontab定时执行shell

/*1. 编写shell脚本 test.sh */
date >> /home/mycal
cal >> /home/mycal

/*2. 给用户添加test.sh的执行权限*/
[root@yes home]# chmod u+x test.sh

/*3. 通过crontab定时执行shell脚本*/
[root@yes home]# crontab -e
*/1 * * * * /home/my.sh/
4) 重启定时任务
sevice crond restart
20. 通过 at 进行定时任务调度

/* 检测atd进程是否正在运行 */
[root@yes ~]# ps -ef | grep atd // ps -ef 是列出所有进程
root       7706      1  0 05:02 ?        00:00:00 /usr/sbin/atd -f
root      21652  21127  0 10:26 pts/0    00:00:00 grep --color=auto atd
at与crontab不同, 定时任务加入队列后,只会执行一次(出队)
用法:
at [选项] [时间]
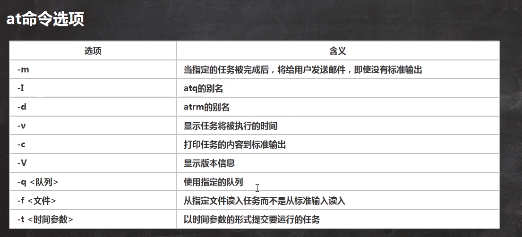
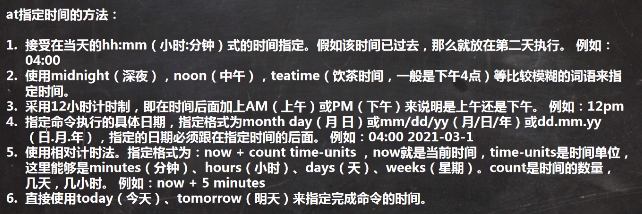
案例:
/* 定时任务加入队列 */
[root@yes ~]# at 5pm + 2days
at> ls /home // Ctrl+D结束输入
job 1 at Sat Feb 27 17:00:00 2021
/* 显示系统中待执行的任务列表 */
[root@yes ~]# atq
1	Sat Feb 27 17:00:00 2021 a root
/* 删除队列中的任务  atrm 任务编号 */
[root@yes ~]# atq
3	Fri Feb 26 17:00:00 2021 a root
2	Fri Feb 26 17:00:00 2021 a root
1	Sat Feb 27 17:00:00 2021 a root
[root@yes ~]# atrm 1
[root@yes ~]# atq
3	Fri Feb 26 17:00:00 2021 a root
2	Fri Feb 26 17:00:00 2021 a root
21. 磁盘相关
1) 磁盘分区

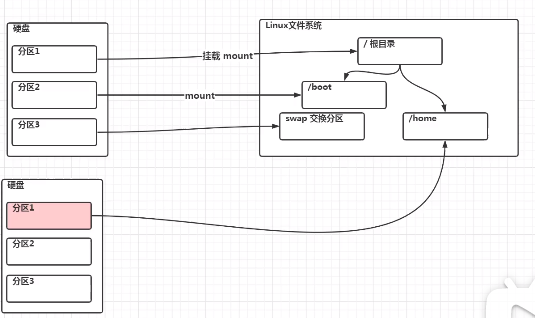
2) lsblk 查看设备挂挂载情况
lsblk // list block
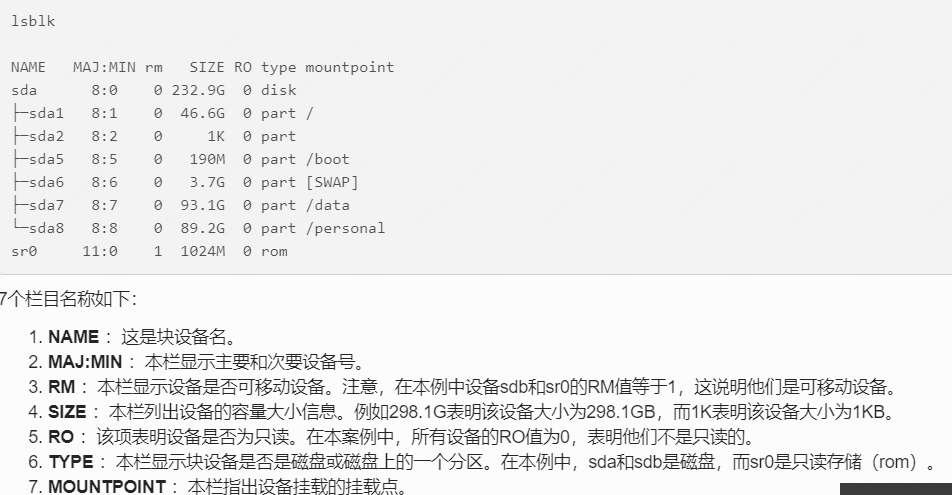
lsblk -f // 显示文件系统信息。

3) 操作: 新增一块硬盘并挂载
① 虚拟机添加一块硬盘
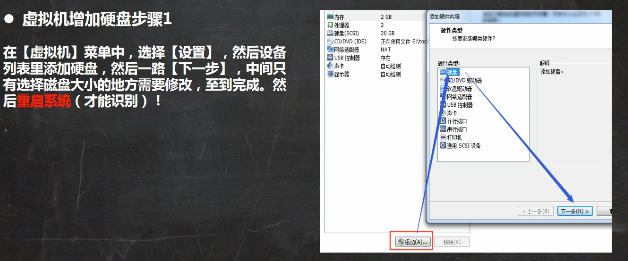
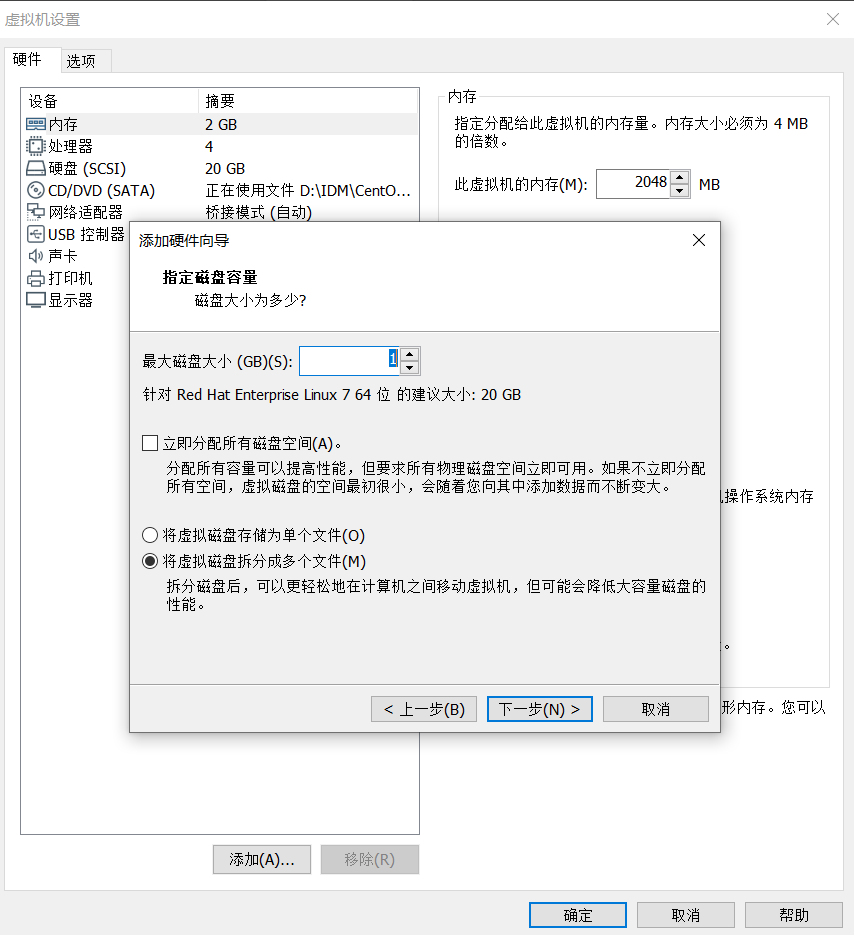
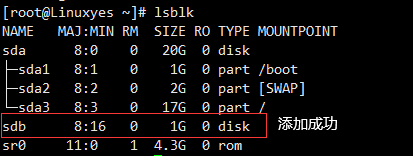
目录为
/dev/sdb
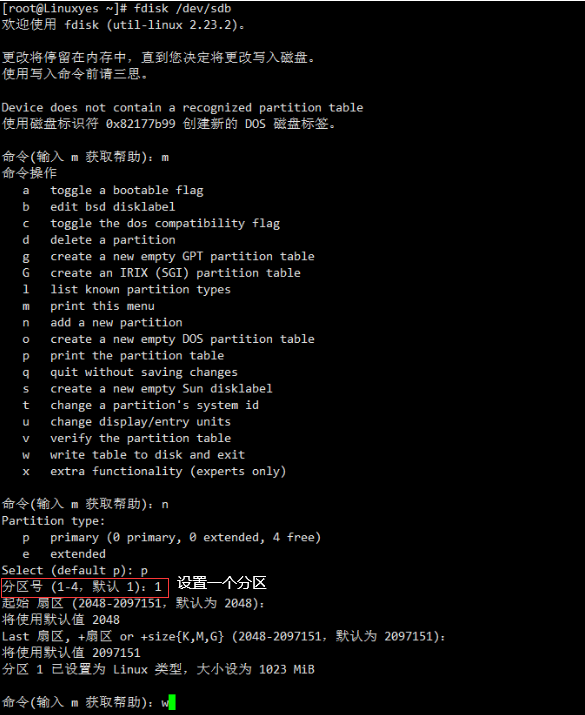
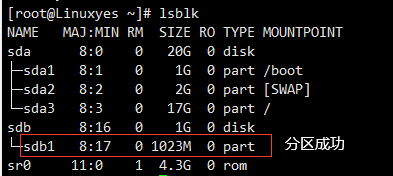
② 分区 fdisk
fdisk 磁盘目录
③ 格式化分区 mkfs

mkfs -t ext4 /dev/sdb1

④ 临时挂载 mount
mount 分区目录 挂载点
/* 将/dev/sdb1挂载至/root/newdisk下 */
[root@yes ~]# mount /dev/sdb1 /root/newdisk/

使用
mount是临时挂载, 重启后会自动卸载
⑤ 永久挂载
修改/etc/fstb

执行mount -a即可
-a:将/etc/fstab中定义的所有档案系统挂上。
⑥ 卸载 umount
umount 分区目录(或挂载点)
[root@yes ~]# umount /dev/sdb1
或
[root@yes ~]# umount /root/newdisk
4) df 显示磁盘使用情况
[root@yes ~]# df -h
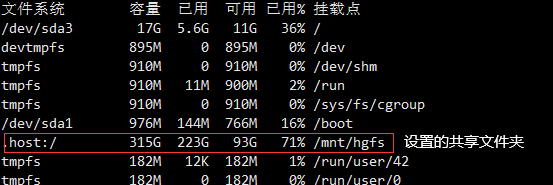
5) du显示指定目录(文件)所占空间


22. 网络相关
1). 查看IP地址
-
[root@yes ~]# ifconfig
-
WIN10
C:\Users\12859>ipconfig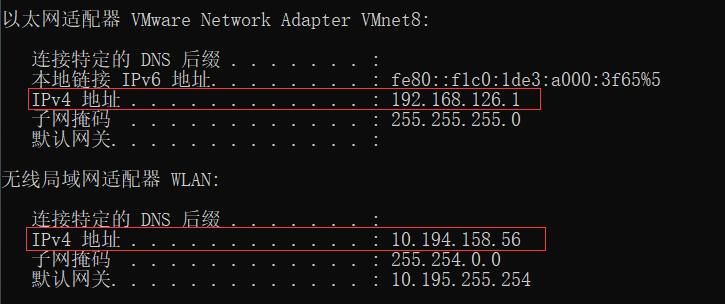
2). NAT模式示意图
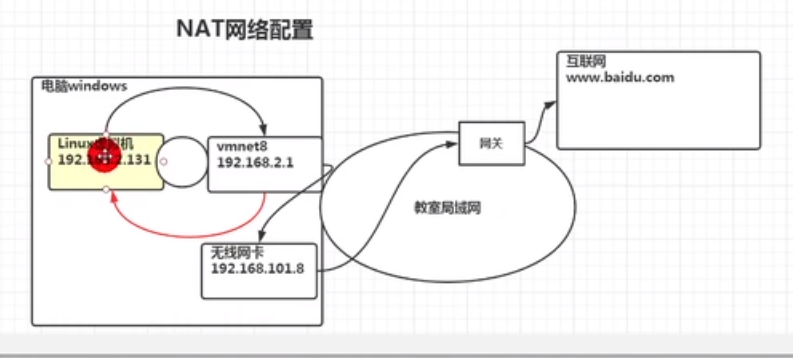
3).ping 测试主机间网络连通性

4). 自动分配IP
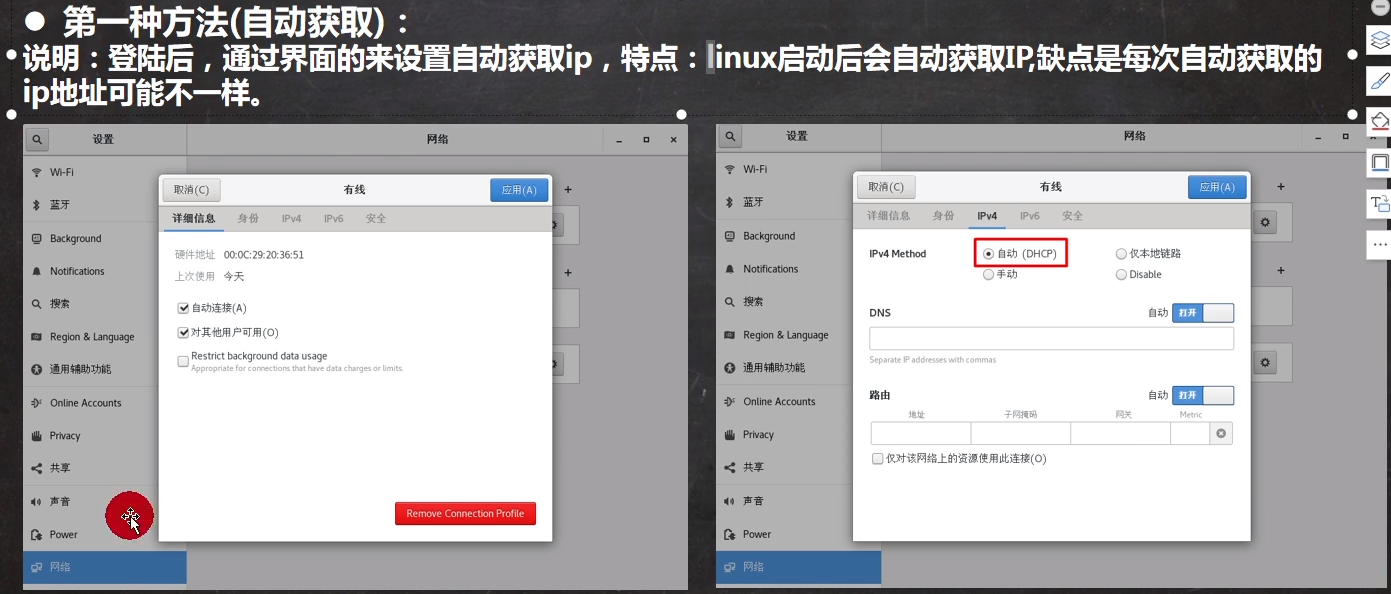
该模式下如果
IP冲突, 会自动分配一个新IP, 但这也意味着,每次登陆后的IP地址不同, 不适合作为服务器使用
5) 手动指定IP (我没修改成功)
-
编辑
/etc/sysconfig/network-scripts/ifcfg-ens33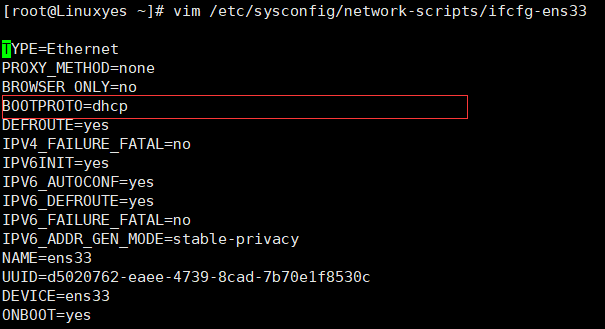
BOOTPROTO = dhcp指 动态IPBOOTPROTO = static指 静态IP -
修改上述文件
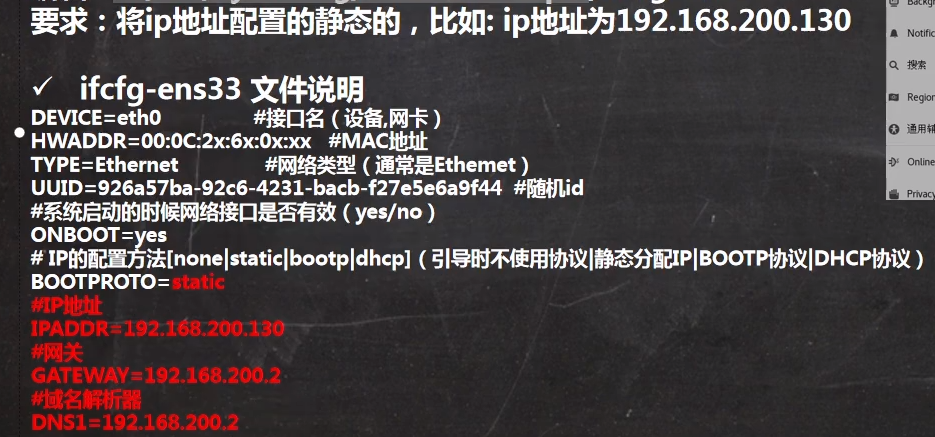
-
编辑虚拟机网络配置, 应用后即成功

6). 重启网络服务
service network restart
7). 设置主机名

8). 设置hosts映射


-
Windows下
修改
hosts文件添加映射(主机最好是静态IP)
-
Linux下
在
/etc/hosts下添加映射
-
?
windows下查看主机名: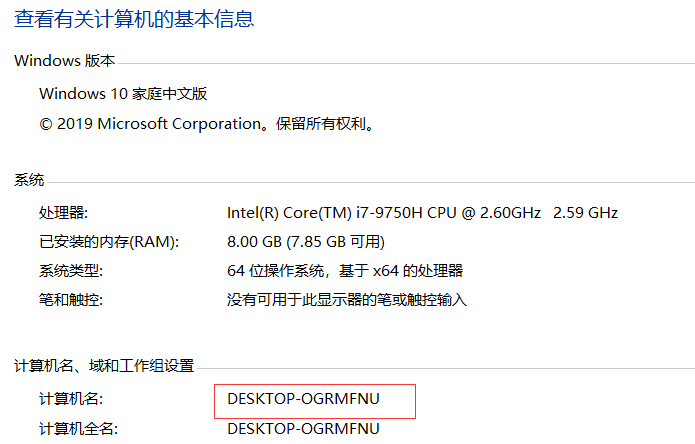
9) 域名解析过程
检查顺序: 浏览器缓存->本地hosts文件->DNS服务器->域名不存在
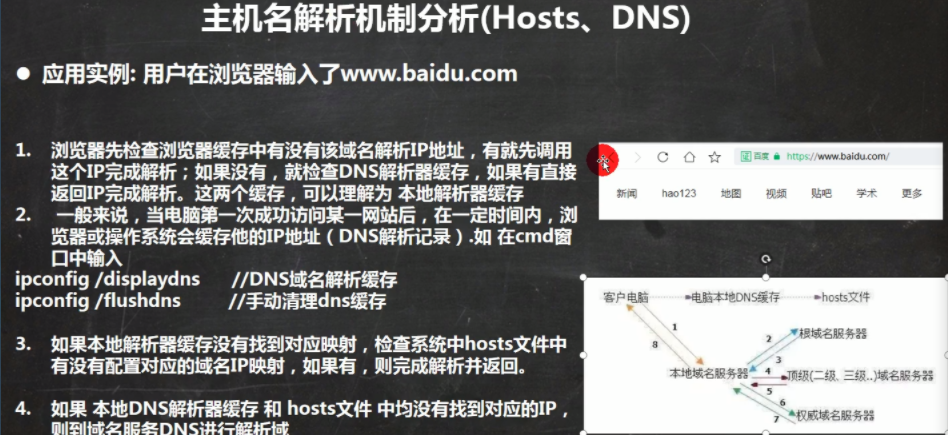
10) netstat 监控网络状态


23. 进程管理相关
1) 关于进程

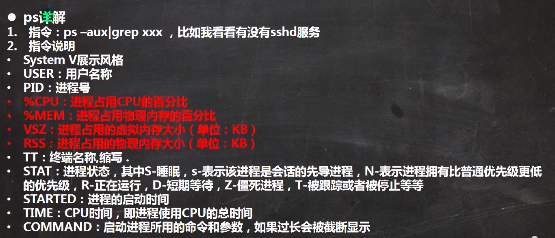
2) ps查看当前的进程
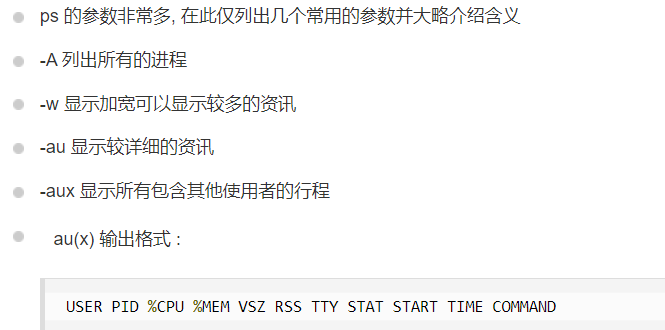
? 如ps -aux`:

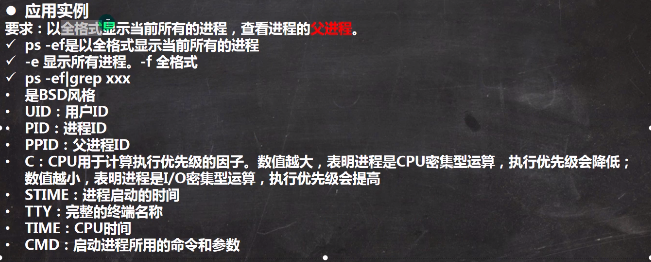
3) 查看XXX的父进程
ps -ef | grep XXX


4) kill | killall 终止进程

kill [-9: 强制终止]  11117
killall sshd // 会将sshd的子进程一并杀掉
通过
/bin/systemctl start sshd.service可以重启sshd(远程登录)进程
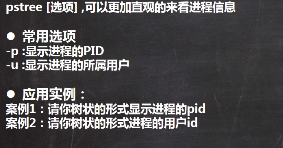
5) pstree 查看进程树
6) top 动态监控进程
类似于windows下的任务管理器

注意要区分大小写

-
监控特定用户

-
终止指定进程

输入PID后, 要输入
9表示强制终止进程[外链图片转存失败,源站可能有防盗链机制,建议将图片保存下来直接上传(img-ddqsrwDj-1631107810342)(C:%5CUsers%5C12859%5CAppData%5CRoaming%5CTypora%5Ctypora-user-images%5Cimage-20210303174712281.png)]
-
指定动态监控间隔时间

7) & 后台运行进程
# 用法 使该命令以后台方式运行
运行命令 &

24. 服务管理相关

1) service服务管理命令

? 以下服务可用service管理
service network restart

2) setup查看所有的服务
[root@Yes! ~]# setup
[*] 表示自动启动的服务
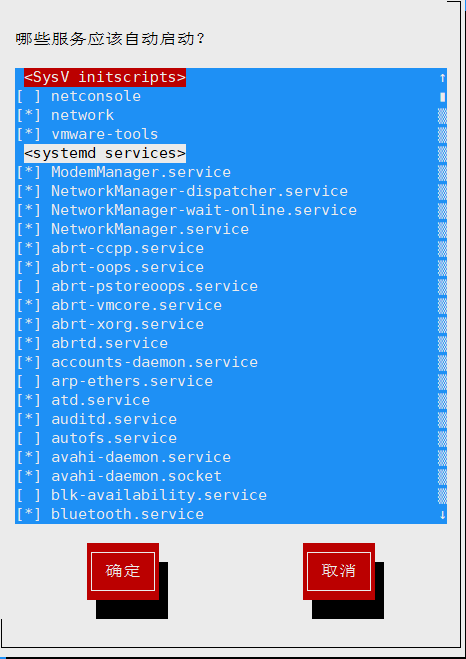
3) checkconfig 设置各运行级别下服务的状态
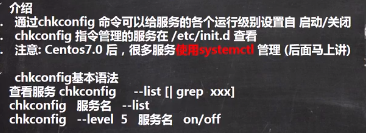
-
查看各运行级别下的状态
[root@Yes! ~]# chkconfig --list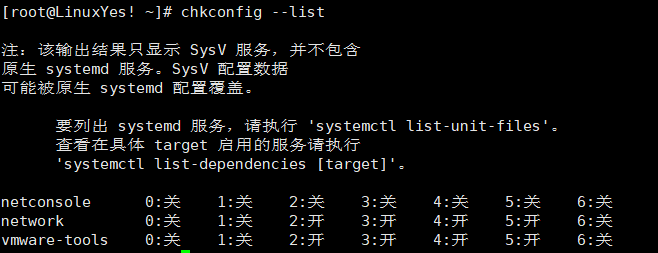
-
设置某运行级别下某服务的状态
chkconfig --level [0-6] 服务 on/off
4) systemctl服务管理命令
-
查看
systemctl管理的指令
这种方式只是临时生效, 想要永久生效需要设置自启动状态
-
设置服务状态

-
查看/设置服务的自启动状态

5) firewall 打开关闭指定端口
打开指定端口主要适用于开启防火墙的情况下, 打开指定端口, 使外部与之通信

[root@Yes! ~]# firewall-cmd --permanent --query-port=23/tcp
no
-
? 查看端口的协议类型
[root@Yes! ~]# netstat -anp | more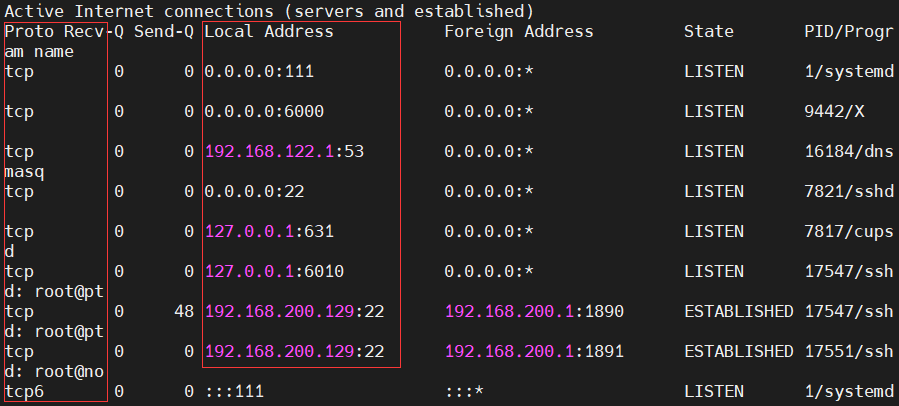
25.rpm 软件管理
1) 什么是rpm

2) rpm包的格式
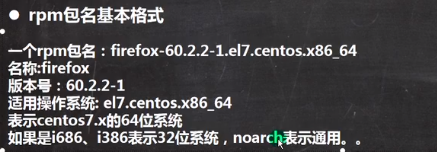
3) 查询是否有相关软件的rpm包
rpm -qa | grep 软件
4) rpm的其他查询指令
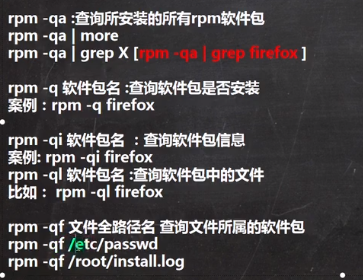
5) 通过rpm包卸载相应软件
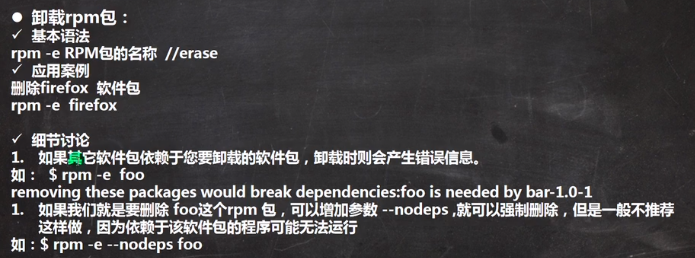
只会卸载软件, 相应的
rpm包并不会被删除
6) 通过rpm包安装相应软件
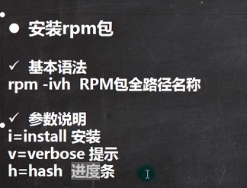

该方法安装软件, 首先要保证系统中有相应软件的rpm包
CentOs7中有许多自带的安装包,在下图位置, 但是这个目录是无法访问的, 可以从中选择需要的软件复制到其他位置(一般是
/opt)下进行安装, 安装位置系统自动选择, 一般在/usr
26. yum 软件管理
1) 什么是 yum

可以自动处理软件的依赖关系, 需要网络
2) 查询yum中是否有相应的软件

3) 通过yum安装相应软件

27.搭建JavaEE环境
1) 安装JDK
-
下载解压jdk8, 并将解压后的jdk8目录移动到
/usr/local/java下
-
配置环境变量, 修改
/etc/profile在文件中添加
export JAVA_HOME= jdk所在目录[/usr/local/java] // 设置jdk目录的映射
export PATH=$JAVA_HOME/bin:$PATH // 添加环境变量, java和javac在JAVA_HOME/bin下
// :$PATH是在原有PATH上添加环境变量
删除XXX的环境变量
unset XXX_PATH -
刷新环境变量
source /etc/profile环境变量添加成功!

查看系统中的环境变量
echo $PATH -
hello,world测试一下

javac xx.java编译生成class文件
java xx运行java程序
2) 安装配置Tomcat

? 成功 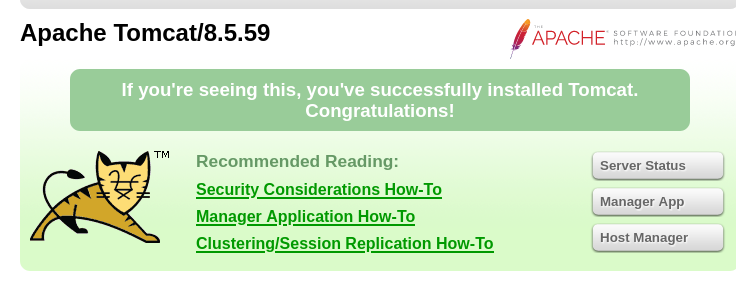
3) 安装配置IDEA
-
下载相应软件并解压至
/opt/idea -
运行
idea/bin下的idea.sh进行安装后,即可使用
不要在虚拟机上运行
idea.sh -
启动
idea, 即运行idea/bin下的idea.sh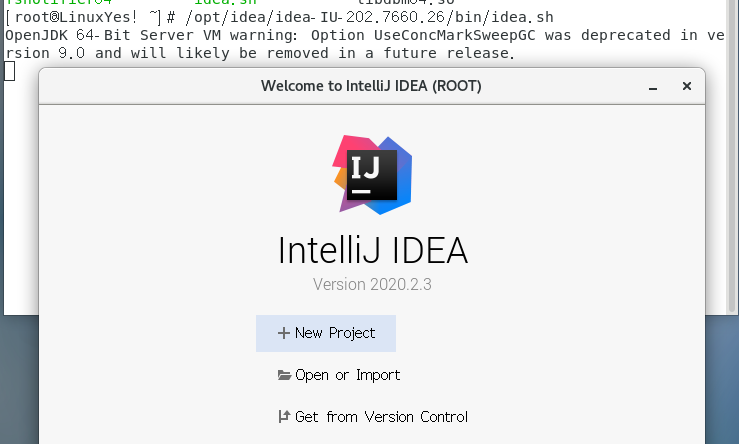
4) 安装配置mysql 5.7
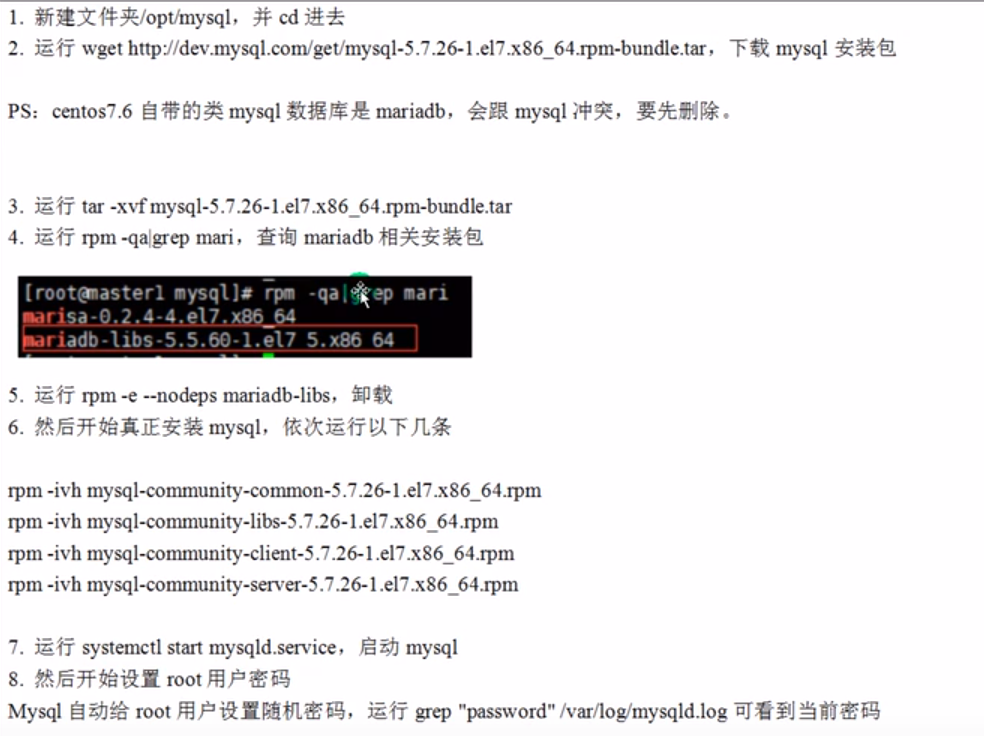
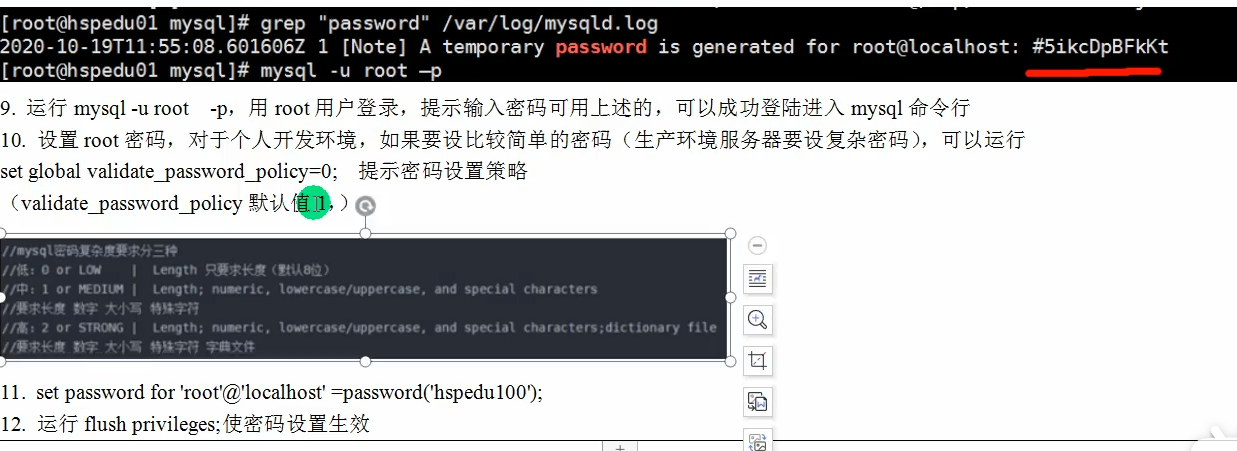
28.Shell编程入门
1) 什么是Shell
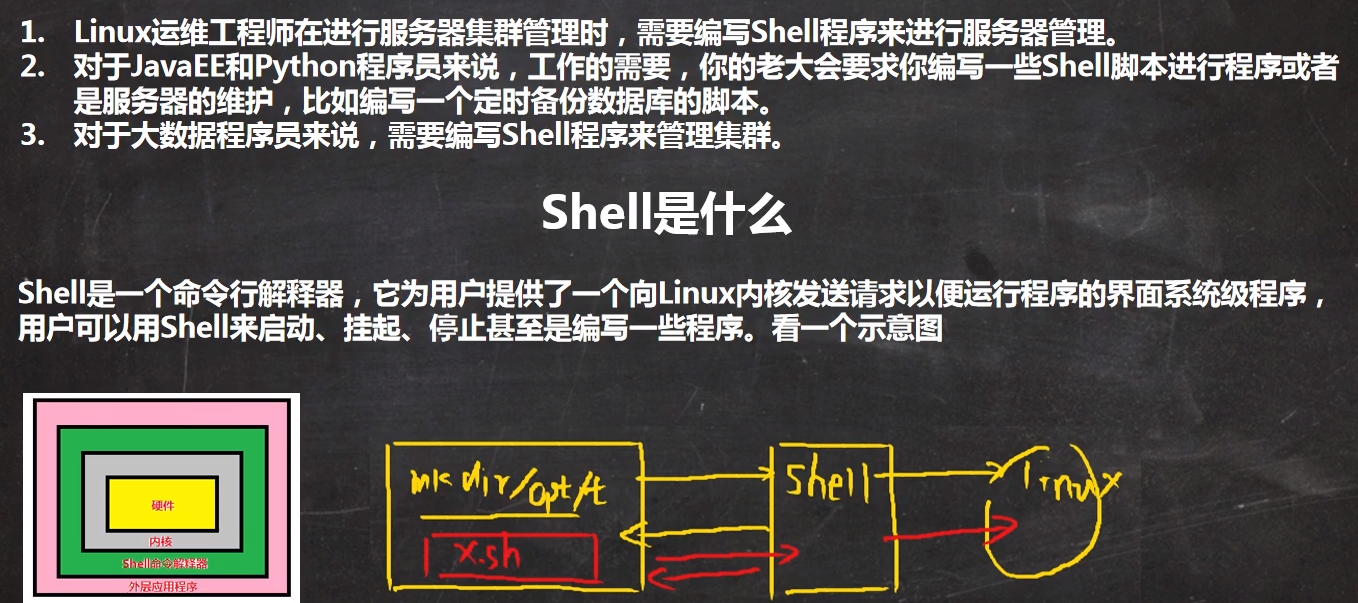
2) 通过Shell输出hello world
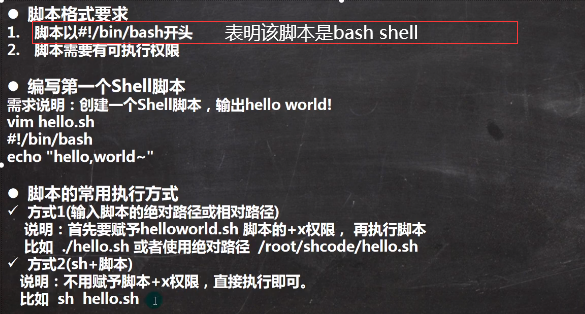
3) Shell变量入门
-
Shell变量的分类
-
定义变量的规则


-
将指令返回的结果赋值给变量

#将命令作为返回值赋给变量 C=`date` echo C=$C D=$(date) echo D=$D #结果: C=2021年 03月 06日 星期六 14:30:30 CST D=2021年 03月 06日 星期六 14:30:30 CST -
设置环境变量
修改
/etc/profile,在该文件中添加所需环境变量
如:

所谓环境变量, 就是可以在
Linux的任何位置使用,包括可以在shell脚本中使用
4) Shell注释
-
单行注释
#内容
-
多行注释
:<<! 内容 !或:' 内容 '
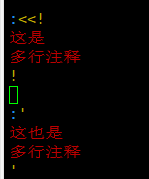
5) Shell位置参数变量
-
基本用法

注意
$*与$@的区别 -
演示:


6) Shell预定义变量
-
基本用法

-
演示:


7) Shell运算操作
-
$((运算式))或$[运算式]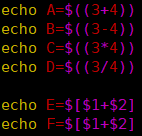
-
expr命令expr即expression, 表达式使用此命令, 运算式各个数之间要有
空格,且进行乘法运算时要使用转义字符\*
8) if 条件判断
-
语法
if [ condition1 ] # 注意空格 then command1 command2 elif [ condition2 ] then command2 else commandN fi # 条件判断结尾不要忘记添加 fi -
常用判断条件
[  ] // 要有空格 为假
[ 任意内容 ] // 为真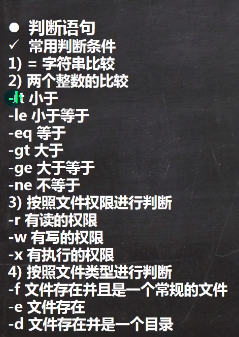
-
演示:
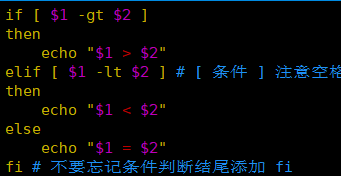
?

?

9) case...esac 条件判断
-
语法
case 值 in 模式1) command1 ;; # 类似于break, 不可少 模式2) command1 command2 ;; *) # 没有匹配的, 类似于default command1 esac -
演示
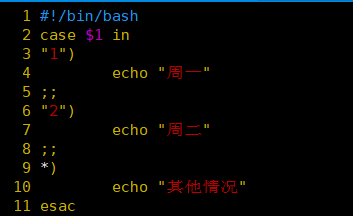
10) for循环
-
语法1
for var in item1 item2 ... itemN # 循环N次 do command1 command2 ... commandN done -
演示1
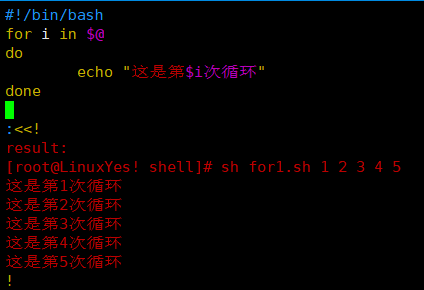
-
语法2
更符合使用
for循环的习惯for((assignment;condition:next)) do command_1 command_2 done -
演示2
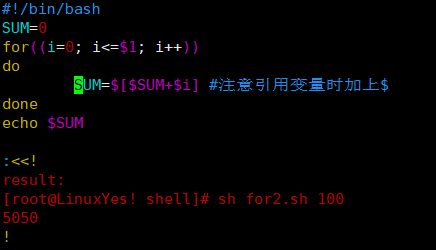
11) while循环
-
语法
while [condition] do command1 .... done -
演示
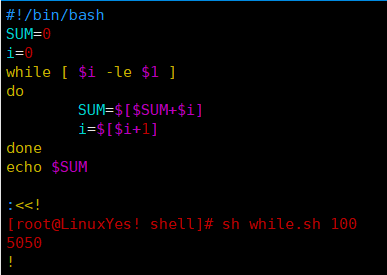
12) read读取控制台输入
-
语法

-
演示
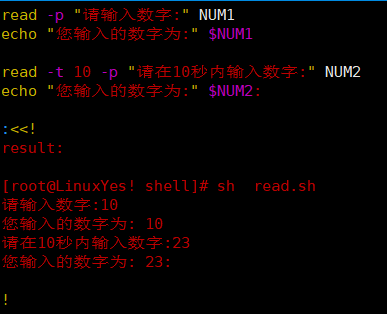
13) 系统函数
简单介绍两个内置的系统函数
-
basename获取文件名称# 从文件路径过去文件名称(如a.txt) # 如果指定了后缀会在原有基础上删除后缀 basename 文件路径 [后缀]
-
dirname获取文件绝对路径中除文件名的部分dirname 文件绝对路径


