Anycloud37E基于Ubuntu21.04编译环境搭建
0. 下载安装 Ubuntu 21.04
-
官网下载ubuntu21.04镜像(ubuntu-21.04-desktop-amd64.iso)
-
基于Virtualbox安装系统
-
进入系统后,打开命令行终端(ALT+CTRL+T), 更新系统的相关环境:
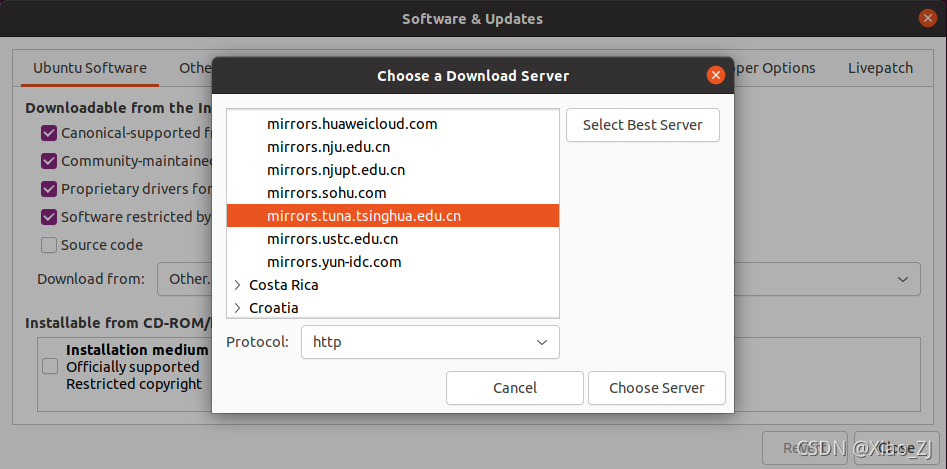
选择一个国内的更新源,运行:
sudo update-manager

选择更新源后,然后手动进行更新:
sudo apt-get update
sudo apt-get upgrade
Note:
? 由于新版本系统默认不带ifconfig命令,建议先运行安装
sudo apt-get install net-tools
1. 下载安装相关依赖库、工具
下载SDK需要依赖的库:
sudo apt-get install gcc-multilib
sudo apt-get install libstdc++6
sudo apt-get install make cmake
sudo apt-get install zlib1g-dev lib32z1-dev
sudo apt-get install liblzo2-dev liblzo2-2 liblzo2-dev:i386
sudo apt-get install u-boot-tools
sudo apt-get install lib32ncurses6 libncurses5-dev
sudo apt-get install libmpfr-dev libmpfr6 libmpfr6:i386
sudo apt-get install mtd-utils
sudo apt-get install libtool
sudo apt-get install cpp g++
sudo apt-get install gawk
sudo apt-get install gcc perl
下载开发过程需要的工具:
sudo apt-get install net-tools
sudo apt-get install python
sudo apt-get install autoconf
sudo apt-get install vim exuberant-ctags cscope
sudo apt-get install git gitk
sudo apt-get install ssh
sudo apt-get install samba
sudo apt-get install unrar
sudo apt-get install p7zip-full
sudo apt-get install meld
sudo apt-get install ffmpeg
sudo apt-get install tree
sudo apt-get install scons
sudo apt-get install bison
sudo apt-get install flex
sudo apt-get install dos2unix
2. 配置交叉工具鏈
-
将tool目录下面的工具链拷贝到 /opt 目录下,然后解压:
tar xzf AK37E_SDK_V1.02.tar.gz -
配置系统环境变量PATH, 打开~/.bashrc ,添加配置:
export PATH="${PATH}:/opt/arm-anykav500-linux-uclibcgnueabi/bin"打开新的终端界面,确认PATH已经添加工具链路径,运行命令:
anyka@anyka-VirtualBox:~/project/AK37E_SDK_V1.02$ arm-anykav500-linux-uclibcgnueabi-gcc -v
Using built-in specs.
COLLECT_GCC=/opt/arm-anykav500-linux-uclibcgnueabi/bin/arm-anykav500-linux-uclibcgnueabi-gcc.br_real
COLLECT_LTO_WRAPPER=/opt/arm-anykav500-linux-uclibcgnueabi/bin/../libexec/gcc/arm-anykav500-linux-uclibcgnueabi/4.9.4/lto-wrapper
Target: arm-anykav500-linux-uclibcgnueabi
Configured with: ./configure --prefix=/home/chehongfeng/toolchain_release --sysconfdir=/home/chehongfeng/toolchain_release/etc --enable-static --target=arm-anykav500-linux-uclibcgnueabi --with-sysroot=/home/chehongfeng/toolchain_release/arm-anykav500-linux-uclibcgnueabi/sysroot --disable-__cxa_atexit --with-gnu-ld --disable-multilib --with-gmp=/home/chehongfeng/toolchain_release --with-mpc=/home/chehongfeng/toolchain_release --with-mpfr=/home/chehongfeng/toolchain_release --with-pkgversion='Buildroot 2018.02.7_V1.0.03-g9ff3371' --with-bugurl=http://bugs.buildroot.net/ --disable-libquadmath --disable-libsanitizer --enable-tls --disable-libmudflap --enable-threads --without-isl --without-cloog --with-float=soft --disable-decimal-float --with-abi=aapcs-linux --with-cpu=arm926ej-s --with-float=soft --with-mode=arm --enable-languages=c,c++ --with-build-time-tools=/home/chehongfeng/toolchain_release/arm-anykav500-linux-uclibcgnueabi/bin --enable-shared --disable-libgomp --enable-libssp
Thread model: posix
gcc version 4.9.4 (Buildroot 2018.02.7_V1.0.03-g9ff3371)
能够正常运行
arm-anykav500-linux-uclibcgnueabi-gcc -v即可.
3. 解决编译Kernel错译问题
在编译内核时,会出现以下错误:
-
libmpfr链接异常
anyka@anyka-VirtualBox:~/project/AK37E_SDK_V1.02/os$ ./build_kernel.sh
CROSS_COMPILE : arm-anykav500-linux-uclibcgnueabi-
make[1]: Entering directory '/home/anyka/project/AK37E_SDK_V1.02/os/bd'
  GEN     ./Makefile
#
# configuration written to .config
#
make[1]: Leaving directory '/home/anyka/project/AK37E_SDK_V1.02/os/bd'
make[1]: Entering directory '/home/anyka/project/AK37E_SDK_V1.02/os/bd'
  GEN     ./Makefile
scripts/kconfig/conf  --silentoldconfig Kconfig
  CHK     include/config/kernel.release
  Using /home/anyka/project/AK37E_SDK_V1.02/os/kernel as source for kernel
  GEN     ./Makefile
  CHK     include/generated/uapi/linux/version.h
  CHK     include/generated/utsrelease.h
make[2]: 'include/generated/mach-types.h' is up to date.
  CC      kernel/bounds.s
/opt/arm-anykav500-linux-uclibcgnueabi/bin/../libexec/gcc/arm-anykav500-linux-uclibcgnueabi/4.9.4/cc1: error while loading shared libraries: libmpfr.so.4: cannot open shared object file: No such file or directory
make[2]: *** [/home/anyka/project/AK37E_SDK_V1.02/os/kernel/./Kbuild:20: kernel/bounds.s] Error 1
make[1]: *** [/home/anyka/project/AK37E_SDK_V1.02/os/kernel/Makefile:1040: prepare0] Error 2
make[1]: Leaving directory '/home/anyka/project/AK37E_SDK_V1.02/os/bd'
make: *** [Makefile:152: sub-make] Error 2
解决方法:
sudo ln -s /usr/lib/x86_64-linux-gnu/libmpfr.so.6 /usr/lib/x86_64-linux-gnu/libmpfr.so.4 -
yylloc符号错误
  CALL    /home/anyka/project/AK37E_SDK_V1.02/os/kernel/scripts/checksyscalls.sh
  HOSTCC  scripts/dtc/dtc.o
  HOSTCC  scripts/dtc/flattree.o
  HOSTCC  scripts/dtc/fstree.o
  HOSTCC  scripts/dtc/data.o
  HOSTCC  scripts/dtc/livetree.o
  HOSTCC  scripts/dtc/treesource.o
  HOSTCC  scripts/dtc/srcpos.o
  HOSTCC  scripts/dtc/checks.o
  HOSTCC  scripts/dtc/util.o
  SHIPPED scripts/dtc/dtc-lexer.lex.c
  SHIPPED scripts/dtc/dtc-parser.tab.h
  HOSTCC  scripts/dtc/dtc-lexer.lex.o
  SHIPPED scripts/dtc/dtc-parser.tab.c
  HOSTCC  scripts/dtc/dtc-parser.tab.o
  HOSTLD  scripts/dtc/dtc
/usr/bin/ld: scripts/dtc/dtc-parser.tab.o:(.bss+0x10): multiple definition of `yylloc'; scripts/dtc/dtc-lexer.lex.o:(.bss+0x0): first defined here
collect2: error: ld returned 1 exit status
make[3]: *** [scripts/Makefile.host:100: scripts/dtc/dtc] Error 1
make[2]: *** [/home/anyka/project/AK37E_SDK_V1.02/os/kernel/scripts/Makefile.build:484: scripts/dtc] Error 2
make[1]: *** [/home/anyka/project/AK37E_SDK_V1.02/os/kernel/Makefile:558: scripts] Error 2
make[1]: Leaving directory '/home/anyka/project/AK37E_SDK_V1.02/os/bd'
make: *** [Makefile:152: sub-make] Error 2
解决方法:
......
186
187 extern YYSTYPE yylval;
188 //extern YYLTYPE yylloc;
189 int yyparse (void);
......
1193 /* The lookahead symbol.  */
1194 int yychar;
1195
1196 /* The semantic value of the lookahead symbol.  */
1197 YYSTYPE yylval;
1198 /* Location data for the lookahead symbol.  */
1199 static YYLTYPE yylloc
1200 # if defined YYLTYPE_IS_TRIVIAL && YYLTYPE_IS_TRIVIAL
1201   = { 1, 1, 1, 1 }
1202 # endif
1203 ;
1204 /* Number of syntax errors so far.  */
1205 int yynerrs;
1206
......
调整
yylloc为局部符号.
4. 编译SDK
4.1 编译整个SDK
在顶层目录运行:./auto_build.sh
此脚本默认只支持第一次拿到SDK编译,因为默认会重新解压Kernel、uboot代码.
所以,第一次编译完后,可以修改脚本:
  6 # 检查是否有残留的kernel目录
  7 #if test -d kernel ; then
  8 #       rm -rf kernel
  9 #fi
 10
 11 # 解压缩内核,并进行编译
 12 #tar xvfz linux.tar.gz
 13 ./build_kernel.sh
 14 ./build_kernel.sh -i
 15
 16 # 检查是否存在编译错误
 17 if test $? -ne 0 ; then
 18         echo "Kernel build failed!"
 19     exit
 20 fi
 21
 22 # 检查是否有残留的uboot目录
 23 #if test -d uboot ; then
 24 #       rm -rf uboot
 25 #fi
 26
 27 # 解压缩uboot,并进行编译
 28 #tar xvfz uboot.tar.gz
 29 ./build_uboot.sh
 30 ./build_uboot.sh -i
去掉删除旧目录,重新解压的动作.
4.2 单独编译kernel
跳转到os目录,直接运行脚本:
./build_kernel.sh
./build_kernel.sh -i
4.3 单独编译U-boot
同样在os目录下,运行脚本:
./build_uboot.sh
./build_uboot.sh -i
4.4 编译sample、rootfs
在顶层目录下,运行默认脚本:./make_image.sh
以上步骤完成后,需要手动拷贝相关镜像到烧录目录:cp -rf image/* tools/burntool
5. 烧录固件
5.1 拷贝对应dtb配置到burntool目录
默认需要手动拷贝对应dtb到烧录工具目录下,如使用norflash的rgb核心板:
cp image/EVB_CBDR_AK3760E_V1.0.1.dtb tools/burntool/cloudOS.dtb
5.2 使用burntool烧录
打开tool/burntool下面的烧录工具,选择对应的nor、芯片类型,然后进行烧录.