自定义监控日志
监控日志步骤:
- 编写脚本,脚本放到统一的位置
- 修改/usr/local/etc/zabbix_agentd.conf文件
- UnsafeUserParameters=1
- UserParameter= < key > , < shell command >
- 重启zabbix_agent
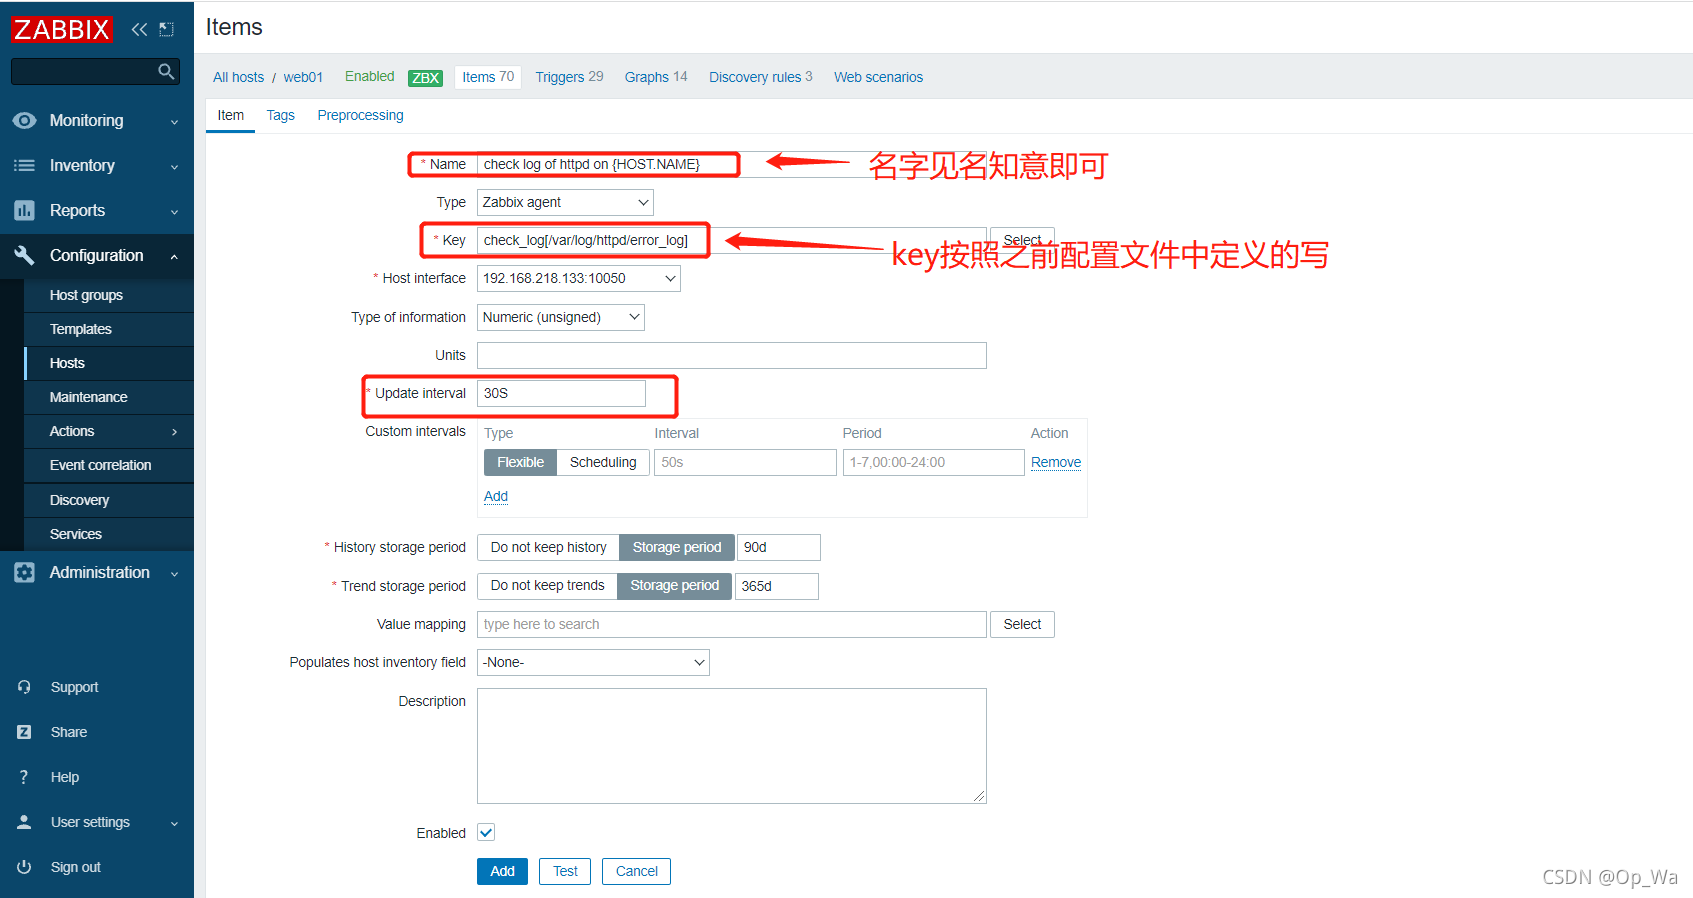
- 在web界面配置监控项和触发器
编写脚本
编写脚本前我们要确定一个防止脚本的位置,因为管理的客户端不止一台主机,如果每台主机上面的脚本放置脚本的位置不一样,在管理起来的时候只会更复杂。
我这里在根目录下创建一个目录scripts,在脚本放在这里
[root@localhost ~]# mkdir /scripts
把写好的脚本传到/scripts目录下
[root@localhost scripts]# ls
log.py
脚本下载地址 https://github.com/chendao2015/pyscripts
-
log.py脚本介绍
log.py
作用:检查日志文件中是否有指定的关键字
第一个参数为日志文件名(必须有,相对路径、绝对路径均可)
第二个参数为seek position文件的路径(可选项,若不设置则默认为/tmp/logseek文件。相对路径、绝对路径均可)
第三个参数为搜索关键字,默认为 Error -
安装python3
[root@localhost scripts]# yum -y install python3
- 测试脚本
[root@localhost scripts]# ./log.py /var/log/httpd/error_log
0      //0代表没有Error关键字
//在/var/log/httpd/error_log中追加关键字Error测试
[root@localhost scripts]# echo 'Error' >> /var/log/httpd/error_log
[root@localhost scripts]# ./log.py /var/log/httpd/error_log
1   //1代表有Error关键字
修改zabbix_agentd.conf文件
[root@localhost ~]# cd /usr/local/etc/
[root@localhost etc]# vim zabbix_agentd.conf
//搜索UnsafeUserParameters,把UnsafeUserParameters=0改为取消注释并且UnsafeUserParameters=1

//在文章结尾添加UserParameter=<key>,<command>
UserParameter=check_log[*],/scripts/log.py $1 $2 $3
//check_log是key ,key 是由/scripts/log.py这个脚本执行所获得
重启服务
[root@localhost ~]# pkill zabbix
[root@localhost ~]# zabbix_agentd
[root@localhost ~]# ss -antl
State      Recv-Q      Send-Q           Local Address:Port            Peer Address:Port     Process
LISTEN     0           128                    0.0.0.0:10050                0.0.0.0:*
LISTEN     0           128                    0.0.0.0:22                   0.0.0.0:*
LISTEN     0           128                          *:80                         *:*
LISTEN     0           128                       [::]:22                      [::]:*
我们在配置文件中写了key,可以在服务端测试一下,使用zabbix_get (服务端使用)命令,在使用zabbix_get之前需要改一下/var/log/httpd的权限,否则无法使用
[root@localhost ~]# chmod 755 /var/log/httpd

//使用zabbix_get测试
[root@localhost ~]# zabbix_get -s 192.168.218.133 -k check_log[/var/log/httpd/error_log]
1  //因为我们之前往里面写入了一个Error,所以测试1是正确的

//检查关键字failed
[root@localhost ~]# zabbix_get -s 192.168.218.133 -k check_log[/var/log/httpd/error_log,/tmp/logseek,failed]
0
//默认关键字是Error,如果监控failed,需要跟上第二个参数/tmp/logseek,然后传递第三个参数failed
web界面配置监控项


web界面配置触发器

手动测试监控
[root@localhost ~]# echo 'Error' >> /var/log/httpd/error_log

添加了关键字后监控就会报错,配置成功,之前配置过用户媒介(email),右下角也是第一时间收到了报警的邮件