Centos7.6.1810��װMySQL8.0.27ͼ�����
�������»����µ���,֮ǰ��������������ɾ����,ͻȻ�뵽������Ŀ��ҪMySQL���ݿ�,�����������°�װһ��;�������ʹ���ֶ��Զ��尲װ,�������ļ�֮��,��װʱ�����������������ļ��Dz�����,��������װ;�����˺ܳ�ʱ��,������һ̨����װMySQLʱû��д�����ֲ�,������ι��̺ܼ���,ֱ���������ҵ�����ƪ���²ŵ��Խ��,�Ӱ�װ�ɹ���д�ĵ�ֻ����һ��������,�dz�����;�ش˽���װ���跢������:
���°�װ����ʡ�����������װLinuxϵͳ��MySQL�ļ��ϴ��������������;
��Ҫ�ο���CentOS7��װMySQL8.0ͼ�Ľ̳�; �ڴ˸�лԭ����;
1.ʹ������cat /etc/redhat-releaseȷ��Linuxϵͳ�汾,������ֻ���RedHat��Linuxϵͳ;

2.ʹ��uname -r��uname -aȷ��ϵͳ����32λ����64λ;

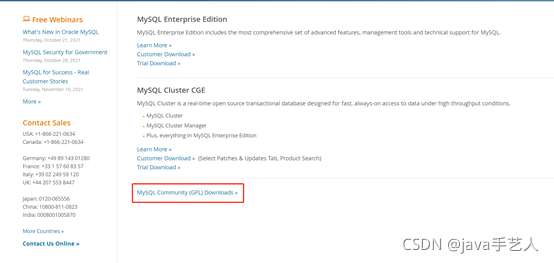
3.��¼MySQL����:https://www.mysql.com/;���DOWMLOADS;

4.ѡ�����·����ط���MySQL Community (GPL) Downloads ?��;
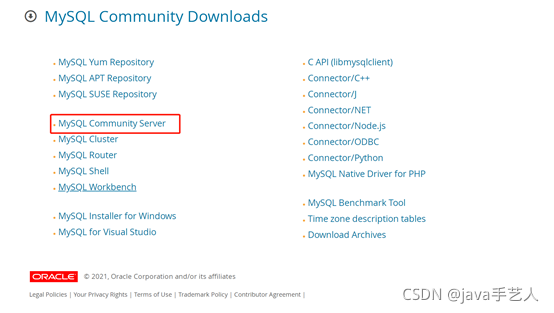
5.ѡ��MySQL Community Server��;
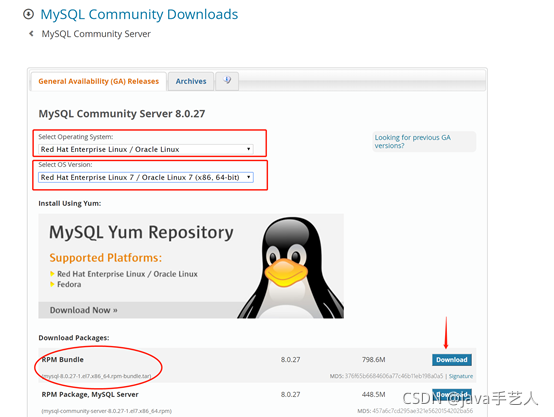
6.Ҫע�����Linuxϵͳ�汾��λ��ѡ���Ӧ��MySQL�汾;�ڡ�Download Packages:����ѡ���һ������;
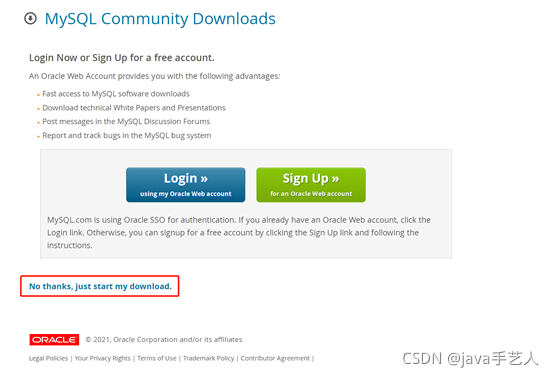
7.����·���No thanks, just start my download.�������¼ֱ������;
8.ʹ������rpm -qa | grep mariadb�鿴����ϵͳ���Ƿ����Դ���MySQL�ļ�;

9.ʹ������rpm -e mariadb-libs-5.5.60-1.el7_5.x86_64 �Cnodepsɾ���Դ���MySQL�ļ�;

10.ʹ������rpm -qa | grep mariadb�ټ��һ���Ƿ���,���Ϊ��,����ж�����;

11.ʹ������cd /usr/local�����ļ���;

12.ʹ������mkdir mysql�½�һ��mysql�ļ���;
ʹ������cd mysql����mysql�ļ���;

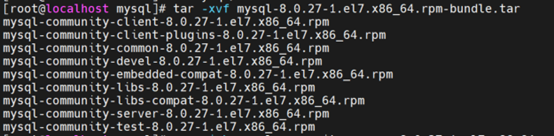
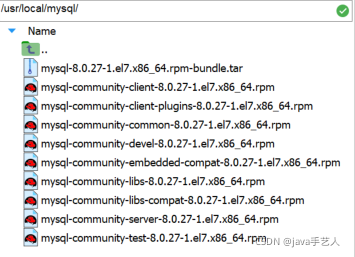
13.ʹ������tar -xvf mysql-8.0.27-1.el7.x86_64.rpm-bundle.tar��ѹ���ص�mysql��װ�ļ�;
14.ʹ�������ѹ��Ϊ����rpm�ļ�;
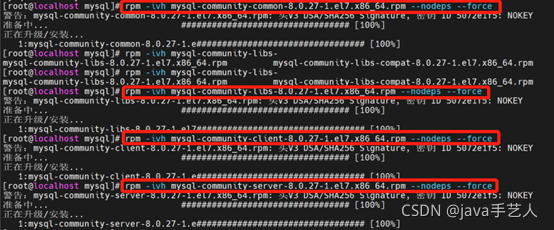
15.ʹ����������:
��rpm -ivh mysql-community-common-8.0.27-1.el7.x86_64.rpm --nodeps �Cforce
�� rpm -ivh mysql-community-libs-8.0.27-1.el7.x86_64.rpm --nodeps --force
�� rpm -ivh mysql-community-client-8.0.27-1.el7.x86_64.rpm --nodeps --force
�� rpm -ivh mysql-community-server-8.0.27-1.el7.x86_64.rpm --nodeps �Cforce
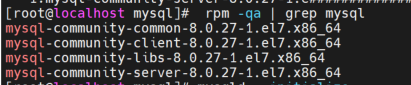
16.ʹ������rpm -qa | grep mysql���mysql�Ƿ�װ�ɹ�;
17.ʹ������mysqld �Cinitialize��ʼ��;

18.ʹ������chown mysql:mysql /var/lib/mysql -R����Ȩ��;ע��:һ��Ҫ��**/var/lib/mysql**�ļ���;

19. ʹ������systemctl start mysqld.service��������;
20.ʹ������systemctl enable mysqld���ÿ�������;

21.ʹ������cat /var/log/mysqld.log | grep password�鿴���ɵ�����;

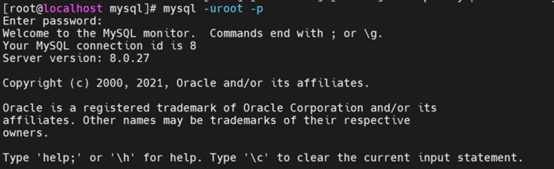
22.ʹ������mysql -uroot -p��¼mysql����;
23.ʹ������ALTER USER ��root��@��localhost�� IDENTIFIED WITH mysql_native_password BY ��mysql@8027�� ��������;��mysql@8027�����������õ�����;ʹ������exit�˳�;

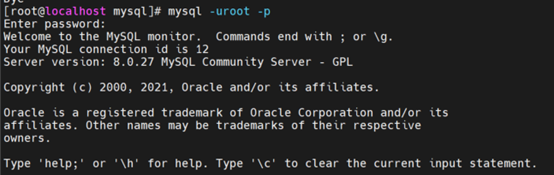
24.ʹ������mysql -uroot -p���µ�¼����,ʹ��������;
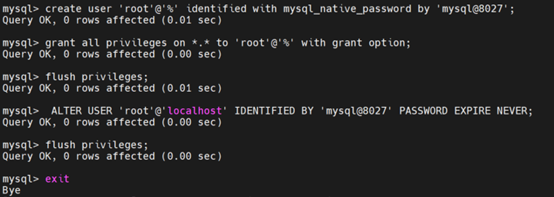
25.ʹ����������,����Զ�̷�����Ȩ:
�� create user 'root'@'%' identified with mysql_native_password by 'mysql@8027'
�� grant all privileges on *.* to 'root'@'%' with grant option
��flush privileges
ִ����Ϻ�,�˳�mysql;
26.ʹ������رշ���ǽ:
�� systemctl stop firewalld.service
�� systemctl disable firewalld.service
�� systemctl mask firewalld.service

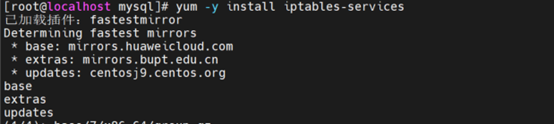
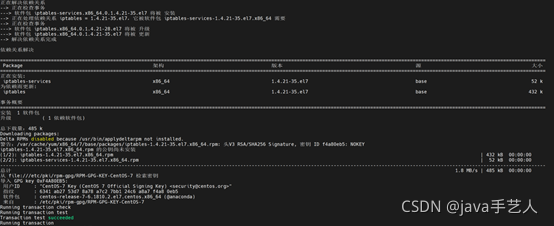
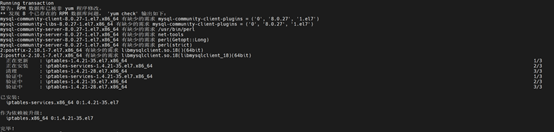
27.ʹ������yum -y install iptables-services��װ iptables ����ǽ;
ע:
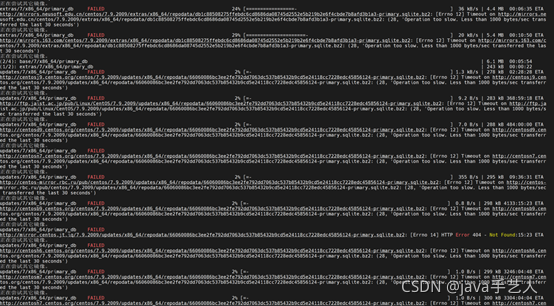
���ھ����ַ������������,�ᵼ�¶������ʧ��,�����ֶ���Ԥ,���һ����ͻ��Զ���װ���;
28.ʹ������systemctl enable iptables���ÿ�����������ǽ;

29.ʹ������systemctl start iptables������������ǽ;

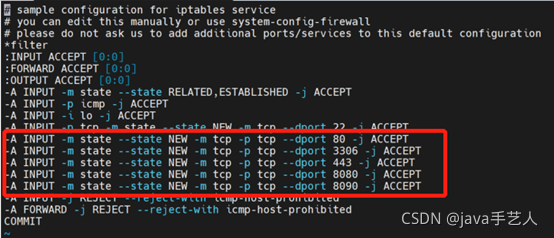
30.ʹ������vi /etc/sysconfig/iptables���÷���ǽ�����ļ�;

�� -A INPUT -m state --state NEW -m tcp -p tcp --dport 80 -j ACCEPT
�� -A INPUT -m state --state NEW -m tcp -p tcp --dport 3306 -j ACCEPT
�� -A INPUT -m state --state NEW -m tcp -p tcp --dport 443 -j ACCEPT
�� -A INPUT -m state --state NEW -m tcp -p tcp --dport 8080 -j ACCEPT
�� -A INPUT -m state --state NEW -m tcp -p tcp --dport 8090 -j ACCEPT
31.ʹ������systemctl restart iptables.service��������ǽ����;
32.ʹ������systemctl enable iptables.service���÷���ǽ��������;

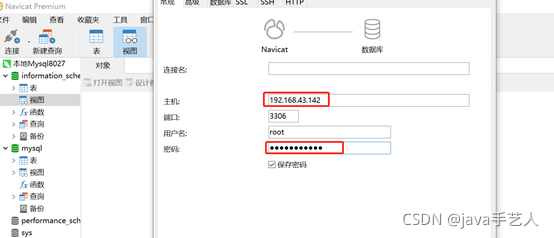
33.ʹ��Navicat��������;
���ϲ�����ǰ�װMySQL������һ�ַ���,�൱���Զ���װ,���������Զ���Ĭ�ϵ�,Ӧ�û���һ���Զ��������ļ��İ�װ����(��Ҫ�������ļ�������),ϣ�����������Ѳ��ߴͽ�,����ѧϰ!!!