1. 开启wsl2
-
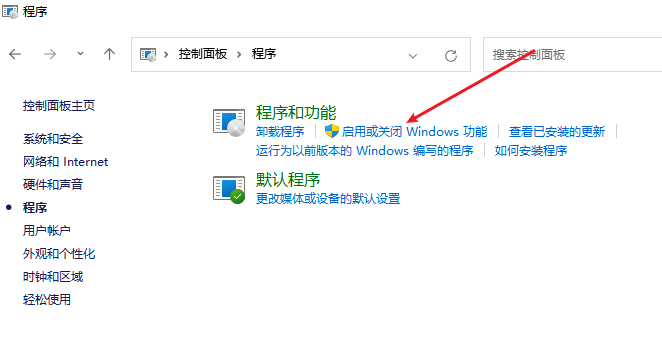
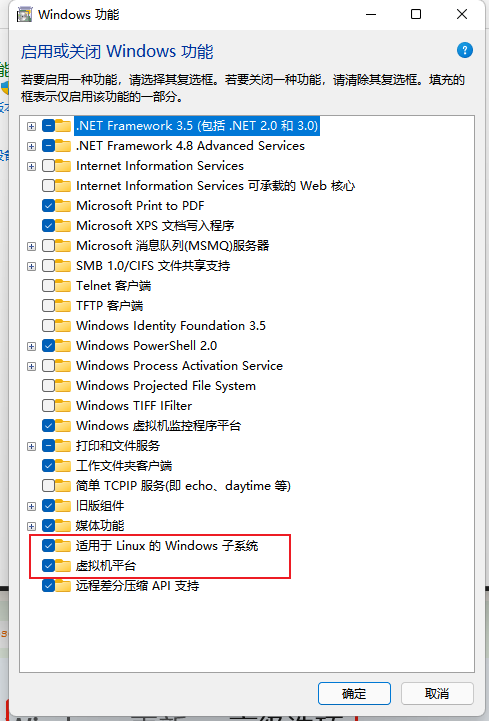
打开控制面板,选择程序 —— 启用或关闭Windows功能,勾选 适用于Linux的Windows子系统还有虚拟机平台选项


-
设置wsl版本为wsl2
使用管理员身份,打开cmd(命令提示符),输入以下命令
wsl --set-default-version 2
更新wsl
wsl --update
2. 安装Ubuntu 20.04
-
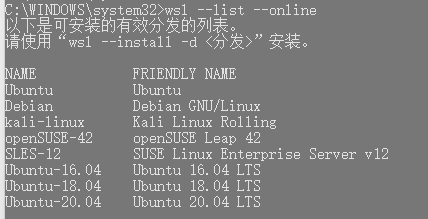
查看可安装的Linux版本
wsl --list --online
这里选择安装Ubuntu 20.04
wsl --install -d Ubuntu-20.04
在弹出的页面中输入用户名及密码


至此wsl2及对应的Ubuntu 20.04就安装完毕了
3. 解决wsl2 ip地址每次变更问题
每一次重启电脑,或者重启 wsl 服务后,子系统ip地址都会变更,使用起来比较麻烦,后来看到网上有人发布的解决思路比较优雅
地址为:https://github.com/microsoft/WSL/issues/4210#issuecomment-648570493
I give you a new idea: Instead of changing the IP, add a designated IP.
In Windows 10, run CMD or Powershell with administrator privilege, and then execute the following two commands:
:: Add an IP address in Ubuntu, 192.168.50.16, named eth0:1
wsl -d Ubuntu -u root ip addr add 192.168.50.16/24 broadcast 192.168.50.255 dev eth0 label eth0:1:: Add an IP address in Win10, 192.168.50.88
netsh interface ip add address "vEthernet (WSL)" 192.168.50.88 255.255.255.0In the future, you will use 192.168.50.16 when you access Ubuntu, and 192.168.50.88 when you access Win10.
You can save the above two lines of commands as a .bat file, and then put it into the boot area, and let it execute automatically every time.
翻译如下:
我给你一个新的想法: 与其改变 IP,不如增加一个指定的 IP。
在 Windows 10中,使用管理员权限运行 CMD 或 Powershell,然后执行以下两个命令:
在 Ubuntu 中添加一个 IP 地址,192.168.50.16,命名为 eth0:1
wsl -d Ubuntu -u root ip addr add 192.168.50.16/24 broadcast 192.168.50.255 dev eth0 label eth0:1在 Win10中添加 IP 地址,192.168.50.88
netsh interface ip add address "vEthernet (WSL)" 192.168.50.88 255.255.255.0在未来,当你访问 Ubuntu 时,你将使用192.168.50.16,当你访问 Win10时,你将使用192.168.50.88。
可以将上面两行命令保存为。然后把它放到启动区域,让它每次都自动执行。
具体操作方式:
创建一个bat脚本文件
作用为在Windows中添加一个ip为 172.23.220.20 的地址,然后在Ubuntu中添加一个ip为 172.23.220.10 的地址
netsh interface ip add address "vEthernet (WSL)" 172.23.220.20 255.255.255.0
wsl -d Ubuntu-20.04 -u root ip addr add 172.23.220.10/24 broadcast 172.23.220.255 dev eth0 label eth0:1
然后开机后以管理员方式运行该脚本即可
同样,也可以使用该方式解决wsl2中子系统无法自启服务的问题,如想要启动mysql,只需要增加一行命令即可
wsl -d Ubuntu-20.04 -u root service mysql start