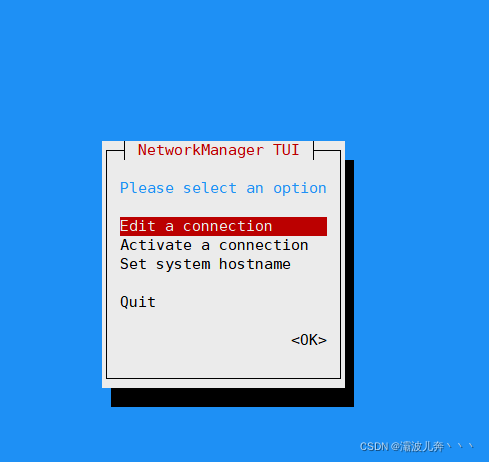
几个配置指令:
nmtui --- 图形化界面
nm-connection-editor --- 连接Xmanager
hostnamectl set-hostname XXX --- 设置主机名
rpm --- 文件安装
        //格式 rpm [选项] 文件包
          -i 安装软件包 / -v 安装文件详细显示 / -h 列出哈希标记
        //rpm -p  可以与下面的联用
          -a 查询已经安装的软件包  / -f 查询文件所属软件包 / -i 显示已安装rpm包
          -l 和 -p 显示未安装软件包的文件信息
rpm -Uvh [rpm包名]  --- 软件包升级
rpm -e [rpm包名] ---软件包卸载
        //如果文件有依赖,需要使用 rpm --nodeps 进行强制删除
————————————————————————————————————————————————————————————————————————————————————————
dnf/yum:
    yum install [-y] 包名 --- 安装包
    yum groupinstall 包组名 --- 安装包组
    yum install [-y] 包名 --- 安装指定的软件包,-y则在工作过程中需要使用者响应,这个选个参数可以直接回答yes
    yum update [-y] 包名 --- 升级指定的软件包或主机中所有已安装的软件包
    yum remove [-y] 包名 --- 卸载已经安装在系统中的指定的软件包
    yum provides 文件名 --- 查找指定的文件属于哪个包; rpm -qf
    yum info 包名 --- 查看指定软件包的详细信息 rpm -qpi
    yum repolist [all] --- 查看系统中yum资源库配置信息
    yum search 模糊包名 --- 查看模糊包名的软件包
    yum grouplist --- 查看仓库里而所有包组
    yum groupinfo 包组名 --- 查看指定包组里而的详细信息
    yum groupinstall 包组名 --- 安装指定包组里面的所有包
    yum list all --- 列出仓库里所有可安装的软件包
    yum list installed [包名] --- 列出己经安装的所有的或指定的rpm包(包名中可使用匹配符) rpm -qa
    yum clean packages all --- 清除下载到本机的指定的软件包或所有软件包的yum源缓存
    yum whatprovides /etc/fstab --- 查看这个文件是由那个包提供的
—————————————————————————————————————————————————————————————————————————————————————————
nmcli命令:
    建议使用man手册查看
    ***nmcli很重要
?几种网络配置方式:
//第一种方法:进入ens160地址交互编译器
[root@localhost ~]# nmcli connection edit ens160

===| nmcli interactive connection editor |===

Editing existing '802-3-ethernet' connection: 'ens160'

Type 'help' or '?' for available commands.
Type 'print' to show all the connection properties.
Type 'describe [<setting>.<prop>]' for detailed property description.

You may edit the following settings: connection, 802-3-ethernet (ethernet), 802-1x, dcb, sriov, ethtool, match, ipv4, ipv6, tc, proxy
nmcli> goto ipv4
You may edit the following properties: method, dns, dns-search, dns-options, dns-priority, addresses, gateway, routes, route-metric, route-table, routing-rules, ignore-auto-routes, ignore-auto-dns, dhcp-client-id, dhcp-iaid, dhcp-timeout, dhcp-send-hostname, dhcp-hostname, dhcp-fqdn, dhcp-hostname-flags, never-default, may-fail, dad-timeout
nmcli ipv4> set method
Allowed values for 'method' property: auto, link-local, manual, shared, disabled
Enter 'method' value: manual
nmcli ipv4> set addresses 192.168.220.126/24
nmcli ipv4> set dns 114.114.114.114
nmcli ipv4> set gateway 192.168.220.2
nmcli ipv4> save

//第二种方式(常用):nmcli配置ens160
[root@localhost ~]# nmcli connection  modify ens160 ipv4.addresses 192.168.220.126/24 ipv4.gateway 192.168.220.2 ipv4.dns 144.144.144.144 connection.autoconnect yes

//connection.autoconnect yes  设置为开机激活

//第三种方式 : 新增一个静态端口来
[root@localhost ~]# nmcli connection add type ethernet con-name home ifname ens160
[root@localhost ~]# nmcli connection modify home ipv4.method manual ipv4.addresses
192.168.220.126/24 ipv4.gateway 192.168.220.2 ipv4.dns 114.114.114.114 connection.autoconnect yes
root@localhost ~]# nmcli connection modify home +ipv4.addresses 192.168.220.127/24
[root@localhost ~]# nmcli connection up home      //打开接口home

第四种方式 :nmtui 进入图形化界面

第五种方式 :nm-connection-editor 使用Xmanger

第六种方式 :直接配置ens160这个接口的属性
[root@localhost ~]# vim /etc/sysconfig/network-scripts/ifcfg-ens160
    BOOTPROTO=none          //静态地址
    ONBOOT=yes              //激活接口
    IPADDR=192.168.220.128  //ip地址
    PREFIX=24               //子网掩码
    GATEWAY=192.168.220.2   //网关
    DNS1=114.114.114.114    //DNS地址
    BOOTPROTO=dhcp          //动态获取地址     ***这个时候是从上往下优先读取***
? mutui会进入这个页面: 此时可以图像交互式配置地址

***nmcli命令:
//设置连接状态查看
[root@localhost ~]# nmcli device status
DEVICE      TYPE      STATE         CONNECTION
ens160      ethernet  connected     ens160
virbr0-nic  tun       disconnected  --
virbr0      bridge    unmanaged     --
lo          loopback  unmanaged     --
//硬件设置查看
[root@localhost ~]# nmcli device show
//启动ens160接口
[root@localhost ~]# nmcli connection up ens160
//停止ens160接口
[root@localhost ~]# nmcli connection down ens160
//删除ens160接口
nmcli connection delete eth160
//查看connection列表
nmcli connection show
NAME    UUID                                  TYPE      DEVICE
ens160  499a9128-a963-4440-a480-3b41dd0a4c92  ethernet  ens160
ens160  ca7119a8-91c9-4c3b-b731-f86ebe0b7142  ethernet  --


//重载所有ifcfg或route到connection(不会立即生效)
nmcli c reload
//重载指定ifcfg或route到connection(不会立即生效)
nmcli c load /etc/sysconfig/network-scripts/ifcfg-ethX
nmcli c load /etc/sysconfig/network-scripts/route-ethX
主机名设置:
//查看主机名
[root@localhost ~]# hostname
localhost.localdomain
//修改主机名
[root@localhost ~]# hostname lxb
[root@localhost ~]# hostnamectl set-hostname lxb
rpm命令:
rpm -ivh --- 软件包名 安装
rpm -evh --- 软件名 卸载
rpm -qa  --- 查看系统所有已安装的软件包
rpm -qf  --- 文件绝对路径 查看某个文件是哪一个包释放
rpm -ql  --- 软件名 查看软件释放的文件列表
rpm -qpi --- 包名 包的详细信息显示
rpm -Uvh --- 软件名 软件升级

//在挂载的光盘下cd到/run/media/root/RHEL-8-2-0-BaseOS-x86_64/AppStream/Packages
//下进行rpm下载
***yum命令:
//yum在虚拟机的/usr/bin/yum上
//使用yum下载时需要配置本地库,库的位置在 /etc/yum.repos.d/r
//配置yum库
[root@localhost yum.repos.d]# vim base.repo
[BaseOS]           //仓库标识
name=BaseOS        //仓库名称
baseurl=file:///sr0/BaseOS    //资源定位符(本地)
gpgcheck=0        //不设置秘钥检测

[Appstream]
name=Appstream
baseurl=https://mirrors.aliyun.com/centos/$releasever/BaseOS/$basearch/os/
        http://mirrors.aliyuncs.com/centos/$releasever/BaseOS/$basearch/os/
        http://mirrors.cloud.aliyuncs.com/centos/$releasever/BaseOS/$basearch/os/
    //资源定位符号(网络)
gpgcheck=0

//此时去yum下载httpd
[root@localhost /]# yum install httpd -y
Updating Subscription Management repositories.
Unable to read consumer identity
This system is not registered to Red Hat Subscription Management. You can use subscription-manager to register.
CentOS-8 - Base - mirrors.aliyun.com                                 2.1 MB/s | 3.5 MB     00:01
CentOS-8 - Extras - mirrors.aliyun.com                                12 kB/s |  10 kB     00:00
CentOS-8 - AppStream - mirrors.aliyun.com                            881 kB/s | 8.1 MB     00:09
Dependencies resolved.
=====================================================================================================
 Package                Arch       Version                                       Repository     Size
=====================================================================================================
Installing:
 httpd                  x86_64     2.4.37-43.module_el8.5.0+1022+b541f3b1        AppStream     1.4 M
Installing dependencies:
 apr                    x86_64     1.6.3-12.el8                                  AppStream     129 k
 apr-util               x86_64     1.6.1-6.el8                                   AppStream     105 k
 centos-logos-httpd     noarch     85.8-2.el8                                    base           75 k
 httpd-filesystem       noarch     2.4.37-43.module_el8.5.0+1022+b541f3b1        AppStream      39 k
 httpd-tools            x86_64     2.4.37-43.module_el8.5.0+1022+b541f3b1        AppStream     107 k
 mod_http2              x86_64     1.15.7-3.module_el8.4.0+778+c970deab          AppStream     154 k
Installing weak dependencies:
 apr-util-bdb           x86_64     1.6.1-6.el8                                   AppStream      25 k
 apr-util-openssl       x86_64     1.6.1-6.el8                                   AppStream      27 k
Enabling module streams:
 httpd                             2.4

Transaction Summary
=====================================================================================================
Install  9 Packages

Total download size: 2.1 M
Installed size: 5.6 M
Downloading Packages:
(1/9): apr-util-1.6.1-6.el8.x86_64.rpm                               150 kB/s | 105 kB     00:00
(2/9): apr-1.6.3-12.el8.x86_64.rpm                                   180 kB/s | 129 kB     00:00
(3/9): apr-util-bdb-1.6.1-6.el8.x86_64.rpm                           197 kB/s |  25 kB     00:00
(4/9): apr-util-openssl-1.6.1-6.el8.x86_64.rpm                       241 kB/s |  27 kB     00:00
(5/9): httpd-filesystem-2.4.37-43.module_el8.5.0+1022+b541f3b1.noarc 193 kB/s |  39 kB     00:00
(6/9): httpd-2.4.37-43.module_el8.5.0+1022+b541f3b1.x86_64.rpm       3.2 MB/s | 1.4 MB     00:00
(7/9): httpd-tools-2.4.37-43.module_el8.5.0+1022+b541f3b1.x86_64.rpm 425 kB/s | 107 kB     00:00
(8/9): mod_http2-1.15.7-3.module_el8.4.0+778+c970deab.x86_64.rpm     655 kB/s | 154 kB     00:00
(9/9): centos-logos-httpd-85.8-2.el8.noarch.rpm                       29 kB/s |  75 kB     00:02
-----------------------------------------------------------------------------------------------------
Total                                                                813 kB/s | 2.1 MB     00:02
warning: /var/cache/dnf/base-43708d1174dbbac2/packages/centos-logos-httpd-85.8-2.el8.noarch.rpm: Header V3 RSA/SHA256 Signature, key ID 8483c65d: NOKEY
CentOS-8 - Base - mirrors.aliyun.com                                 6.3 kB/s | 1.6 kB     00:00
Importing GPG key 0x8483C65D:
 Userid     : "CentOS (CentOS Official Signing Key) <security@centos.org>"
 Fingerprint: 99DB 70FA E1D7 CE22 7FB6 4882 05B5 55B3 8483 C65D
 From       : https://mirrors.aliyun.com/centos/RPM-GPG-KEY-CentOS-Official
Key imported successfully
Running transaction check
Transaction check succeeded.
Running transaction test
Transaction test succeeded.
Running transaction
  Preparing        :                                                                             1/1
  Installing       : apr-1.6.3-12.el8.x86_64                                                     1/9
  Running scriptlet: apr-1.6.3-12.el8.x86_64                                                     1/9
  Installing       : apr-util-bdb-1.6.1-6.el8.x86_64                                             2/9
  Installing       : apr-util-openssl-1.6.1-6.el8.x86_64                                         3/9
  Installing       : apr-util-1.6.1-6.el8.x86_64                                                 4/9
  Running scriptlet: apr-util-1.6.1-6.el8.x86_64                                                 4/9
  Installing       : httpd-tools-2.4.37-43.module_el8.5.0+1022+b541f3b1.x86_64                   5/9
  Running scriptlet: httpd-filesystem-2.4.37-43.module_el8.5.0+1022+b541f3b1.noarch              6/9
  Installing       : httpd-filesystem-2.4.37-43.module_el8.5.0+1022+b541f3b1.noarch              6/9
  Installing       : centos-logos-httpd-85.8-2.el8.noarch                                        7/9
  Installing       : mod_http2-1.15.7-3.module_el8.4.0+778+c970deab.x86_64                       8/9
  Installing       : httpd-2.4.37-43.module_el8.5.0+1022+b541f3b1.x86_64                         9/9
  Running scriptlet: httpd-2.4.37-43.module_el8.5.0+1022+b541f3b1.x86_64                         9/9
  Verifying        : centos-logos-httpd-85.8-2.el8.noarch                                        1/9
  Verifying        : apr-1.6.3-12.el8.x86_64                                                     2/9
  Verifying        : apr-util-1.6.1-6.el8.x86_64                                                 3/9
  Verifying        : apr-util-bdb-1.6.1-6.el8.x86_64                                             4/9
  Verifying        : apr-util-openssl-1.6.1-6.el8.x86_64                                         5/9
  Verifying        : httpd-2.4.37-43.module_el8.5.0+1022+b541f3b1.x86_64                         6/9
  Verifying        : httpd-filesystem-2.4.37-43.module_el8.5.0+1022+b541f3b1.noarch              7/9
  Verifying        : httpd-tools-2.4.37-43.module_el8.5.0+1022+b541f3b1.x86_64                   8/9
  Verifying        : mod_http2-1.15.7-3.module_el8.4.0+778+c970deab.x86_64                       9/9
Installed products updated.

Installed:
  apr-1.6.3-12.el8.x86_64
  apr-util-1.6.1-6.el8.x86_64
  apr-util-bdb-1.6.1-6.el8.x86_64
  apr-util-openssl-1.6.1-6.el8.x86_64
  centos-logos-httpd-85.8-2.el8.noarch
  httpd-2.4.37-43.module_el8.5.0+1022+b541f3b1.x86_64
  httpd-filesystem-2.4.37-43.module_el8.5.0+1022+b541f3b1.noarch
  httpd-tools-2.4.37-43.module_el8.5.0+1022+b541f3b1.x86_64
  mod_http2-1.15.7-3.module_el8.4.0+778+c970deab.x86_64

Complete!