shell的执行流控制
一、for语句
- 作用:为循环执行动作
- for语句结构
for  定义变量
do   使用变量,执行动作
done 结束标志
1、for语句的基本格式
格式一:全部列出,依次循环
for HOST in 1 2 3 4 5 6 7 8 9 10
do
  echo $HOST
done
格式二:连续数字,依次循环
for HOST in {1..10}
do
  echo $HOST
done
格式三:连续数字,用seq方式指定间隔,依次循环
seq 1 2 10 = 1,3,5,7,9
for HOST in $(seq 1 2 10)
do
  echo $HOST
done
格式四:for循环语句
for ((HOST=0;HOST<10;HOST++))
do
  echo $HOST
done
2、示例
编写check_host.sh,用此脚本检测 10 台主机与当前主机是否网络通畅,如果网络通畅请显示主机的 ip 列表
vim check_host.sh

for HOST in $(seq 1 10)
do
  ping -c1 -w1 172.25.36.$HOST &> /dev/null && {
    echo 172.25.36.$HOST is up
  }
done
二、条件语句
1、while…do语句
作用:条件为真时执行动作
语句结构:
while true
do
done
2、until…do语句
作用:条件为假时执行动作
语句结构:
until false
do
done
3、if …then语句
作用:多次判定条件执行动作
语句结构:
if
then
elif
then
...
else
fi
4、示例
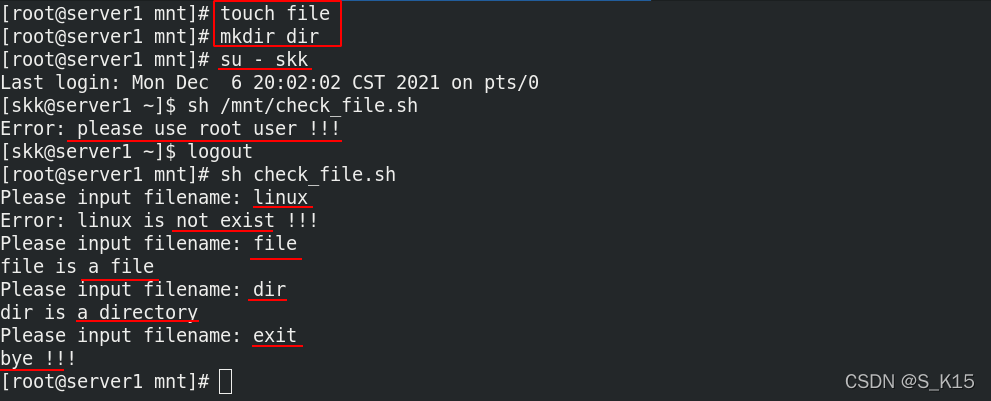
编写check_file.sh,需要提示用户输入文件名,用来判断文件类型,文件不存在时报错,直到输入exit时退出脚本,执行脚本的用户必须是root用户
vim check_file.sh

while [ "$USER" = "root" ]
do
  read -p "Please input filename: " FILE
  if [ $FILE = "exit" ]
  then
    echo "bye !!!"
    exit
  elif [ ! -e "$FILE" ]
  then
    echo "Error: $FILE is not exist !!!"
  elif [ -f "$FILE" ]
  then
    echo "$FILE is a file"
  elif [ -d "$FILE" ]
  then
    echo "$FILE is a directory"
  fi
done
echo "Error: please use root user !!!"

三、case语句
作用:符合哪个条件时执行相应的动作,对于同级别的条件,执行效率更高,点名机制;而if语句判定时为从上到下判定,更适合不同级别的条件。
语句结构:
case $1 in
	word1|WORD1)
	action1
	;;
	word2|WORD2)
	action2
	;;
	*)
	action3
esac
示例: 编写grade.sh判定成绩的等级
vim grade.sh

until false
do
  read -p "Please input your score: " ABC
  case $ABC in
    [8-9][0-9] | 100)
    echo "Your score is A"
    ;;
    [6-7][0-9])
    echo "Your score is B"
    ;;
    [1-5][0-9] | [0-9])
    echo "Your score is C"
    ;;
    exit)
    echo "Thanks for your inquiry"
    exit
    ;;
    *)
    echo "Please input your real score !!"
  esac
done

四、expect应答语句
作用:针对一些需要根据问题输入答案的命令,如ssh远程连接时,需要输入密码,第一次连接还需要输入yes等,问题不同,答案也不同。
- 为模拟此类问题,设定一个问题脚本,并给予执行权限
问题脚本:
vim ask.sh

#!/bin/bash
read -p "What is your name? " NAME
read -p "How old are you? " AGE
read -p "Which subject do you study? " SUBJECT
read -p "How do you feel for study it? " FEEL
echo $NAME is $AGE\'s old, he study $SUBJECT and he feel $FEEL
执行问题脚本时,需要一个一个输入答案,也可以选择多行输入EOF,提前把答案写入,但如果问题发生变化,就会回答错误,此时就需要使用expect来根据问题进行回答。
 应答脚本:
应答脚本:
注意:系统默认没有expect,需要安装,expect有自己的独立环境,创建应答脚本answer.exp时要监控问题脚本
1、固定答案
\r:换行,exp_continue:没有遇到问题的关键字时,继续按expect执行
yum install expect -y
vim answer.exp

#!/usr/bin/expect  ##指定expect环境
spawn /mnt/ask.sh  ##监控问题脚本
expect {
  "name" { send "skk\r";exp_continue }
  "old" { send "21\r";exp_continue }
  "subject" { send "linux\r";exp_continue }
  "feel" { send "fine\r" }
}
expect eof  ##退出expect环境

2、手动赋予答案
set:定义内置变量和变量,timeout 3:expect超时时间为3s,默认为10s
lindex $argv 0:脚本后跟的第一个参数,lindex $argv 1:脚本后跟的第二个参数
vim answer.exp

#!/usr/bin/expect
spawn /mnt/ask.sh
set timeout 3  ##设定超时时间为3s
set NAME [ lindex $argv 0 ]  ##将脚本后的第一个参数赋予NAME
set AGE [ lindex $argv 1 ]
set SUBJECT [ lindex $argv 2 ]  ##将脚本后的第二个参数赋予SUBJECT
set FEEL [ lindex $argv 3 ]
expect {
  "name" { send "$NAME\r";exp_continue }
  "old" { send "$AGE\r";exp_continue }
  "subject" { send "$SUBJECT\r";exp_continue }
  "feel" { send "$FEEL\r" }
}
expect eof

3、将expect与bash环境结合
vim answer.sh

#!/bin/bash
/usr/bin/expect <<EOF
spawn /mnt/ask.sh
expect {
  "name" { send "$1\r";exp_continue }
  "old" { send "$2\r";exp_continue }
  "subject" { send "$3\r";exp_continue }
  "feel" { send "$4\r" }
}
expect eof
EOF

4、示例
编写host_list.sh,检测172.25.36.1~172.25.36.10 网络是否开启,如果网络正常请生成解析列表 hosts_list,由ip + hostname组成,每台主机密码均为skklinux
vim host_list.sh

SSH_hostname()
{
/usr/bin/expect <<EOF  ##使用expect远程连接获取hostname
spawn ssh -l root $1 hostname
expect {
  "yes/no" { send "yes\r";exp_continue }
  "password" { send "westos\r" }
}
expect eof
EOF
}
for IP in 172.25.36.{1..10}
do
  ping -c1 -w1 $IP &> /dev/null && {
    echo -e "$IP\t`SSH_hostname $IP | sed -n '$p'`" >> /mnt/hosts_list
  }
done

五、终止语句
continue | 终止当前循环提前进入下个循环 |
break | 终?当前所在语句所有动作进?语句外的其他动作 |
exit | 退出脚本 |
示例: 区别三者
1、完整输出
vim skk.sh

#!/bin/bash
for NUM in {1..5}
do
  if [ "$NUM" = "3" ]
  then
    echo "Luck number !!"
  fi
  echo "$NUM"
done
echo "hello linux"
 2、添加continue,跳过输出3
vim skk.sh

#!/bin/bash
for NUM in {1..5}
do
  if [ "$NUM" = "3" ]
  then
    echo "Luck number !!"
    continue
  fi
  echo "$NUM"
done
echo "hello linux"
 3、添加break,跳过剩下的循环
vim skk.sh

#!/bin/bash
for NUM in {1..5}
do
  if [ "$NUM" = "3" ]
  then
    echo "Luck number !!"
    break
  fi
  echo "$NUM"
done
echo "hello linux"
 4、添加exit,直接退出脚本
vim skk.sh

#!/bin/bash
for NUM in {1..5}
do
  if [ "$NUM" = "3" ]
  then
    echo "Luck number !!"
    exit
  fi
  echo "$NUM"
done
echo "hello linux"
