目录
隐藏nginx版本号
查看版本号
方法一:curl命令
可以在 CentOS 中使用命令 curl -I http://192.168.80.130 显示响应报文首部信息。
curl -I http://192.168.80.130

方法二:在网页中查看
1. #切换至html目录,拖一个图片进去
cd /usr/local/nginx/html
?
2. #在网页中查看
http://192.168.59.118/game.png

隐藏版本信息
方法一:修改配置文件
1.#修改配置文件
vim /usr/local/nginx/conf/nginx.conf

    ```handlebars
http {
    include       mime.types;
    default_type  application/octet-stream;
    server_tokens off;                        #添加,关闭版本号
    ......
}

2.#重启nginx
systemctl restart nginx

3.#查看版本是否被隐藏
curl -I http://192.168.80.130
?
方法二: 修改源码文件,重新编译安装
可以自定义版本号,可以让人迷惑
1. #切换至nginx安装包所在目录
cd /opt/
2. #停止nginx服务
systemctl stop nginx.service
3. #切换至安装目录
cd nginx-1.12.0/
4. #切换至内核目录
cd src/core/
5. #进入配置文件
vim nginx.h
?
#define NGINX_VERSION      "老铁"
#define NGINX_VER          "666/" NGINX_VERSION
?
6. #切换至文件目录
cd ../../
?
7. #编译
./configure \
--prefix=/usr/local/nginx \
--user=nginx \
--group=nginx \
--with-http_stub_status_module
?
8. #安装
make && make install -j4
?
9. #将配置文件下的之前关闭版本信息开启
vim /usr/local/nginx/conf/nginx.conf
server_tokens on;
?
10. #重启nginx
systemctl restart nginx
?
11. #查看版本信息
curl -I http://192.168.59.118
?
修改用户与组
1. #修改配置文件
vim /usr/local/nginx/conf/nginx.conf
?
user  dayu dayu; #取消注释,修改用户为 dayu ,组为 dayu
?
2. #创建非登录用户
useradd -s /sbin/nologin dayu
?
3. #重启服务
systemctl restart nginx
?
4. #查看是否修改成功
ps aux | grep nginx


缓存时间
当nginx将网页数据返回给客户端后,可设置缓存时间,以方便在日后进行相同内容的请求时直接返回,避免重复请求,加快了访问速度一般针对静态网页设置,对动态网页不设置缓存时间。
1. #修改配置文件
vim /usr/local/nginx/conf/nginx.conf
        #添加以下内容
        location ~ \.(jpg|png|bmp|gif)$ {
            root   html;
            expires 1d;
        }
?
?
2. #查看是否有语法错误
nginx -t
?
3. #重启服务
systemctl restart nginx.service
?
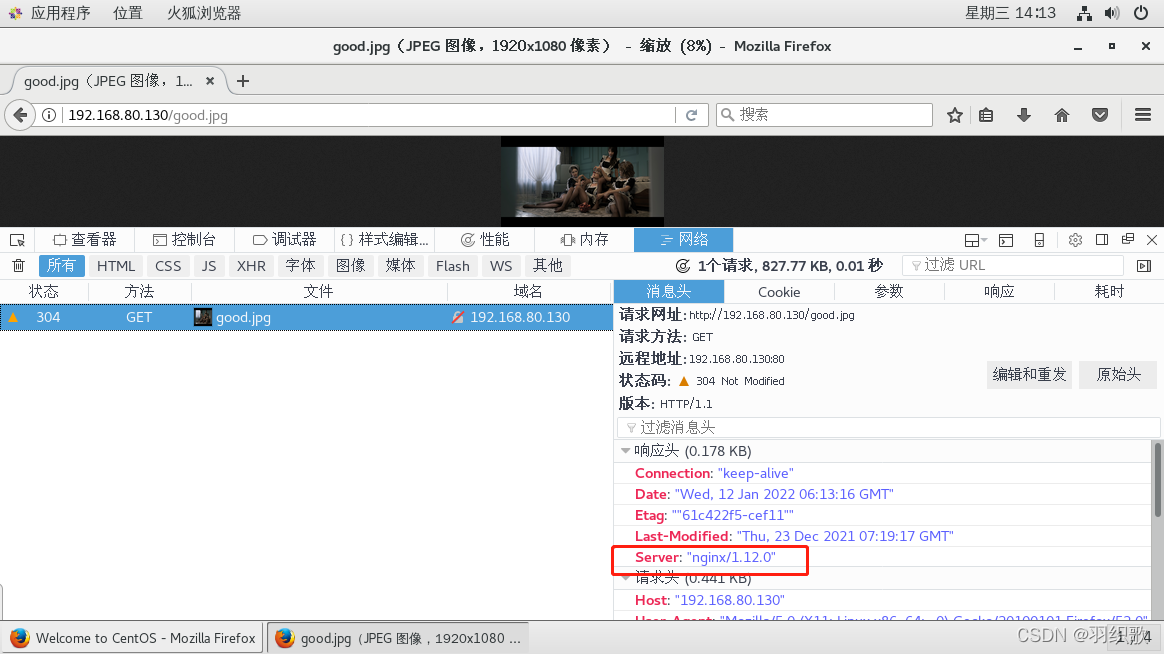
4.#在网页中查看服务
http://192.168.80.130/good.jpg
?
 Cahce-Control:max-age=86400 表示缓存时间是 86400 秒。
也就是缓存一天的时间,一天之内浏览器访问这个页面,都是用缓存中的数据,
而不需要向 Nginx 服务器重新发出请求,减少了服务器的使用带宽。

日志分割
随着Nginx运行时间的增加,产生的日志也会逐渐增加,为了方便掌握Nginx的运行状态,需要时刻关注Nginx日志文件。太大的日志文件对监控是一个大灾难,不便于分析排查,需要定期的进行日志文件的切割。
1. #写脚本
vim /usr/local/nginx/nginx_log.sh
?
#!/bin/bash
#this is for divide nginx log
d=$(date +%F -d -1day)                                       #显示前一天的时间
path="/var/log/nginx"
pid="/usr/local/nginx/logs/nginx.pid"
?
[ -d $path ] ||mkdir -p $path                                #创建日志文件目录
mv /usr/local/nginx/logs/access.log ${path}/www.yxp.com-$d   #移动并重命名日志文件
kill -USR1 $(cat $pid)                                       #重建新日志文件
find $path -mtime +30 -delete                                #删除30天之前的日志文件
?
2. #赋予权限
chmod +x /usr/local/nginx/nginx_log.sh
?
3. #计划任务
[root@localhost nginx]#crontab -e
?
30 1 * * * /usr/local/nginx/nginx_log.sh


配置Nginx实现连接超时
HTTP有一个KeepAlive模式,它告诉web服务器在处理完一个请求后保持这个TCP连接的打开状态。若接收到来自同一客户 端的其它请求,服务端会利用这个未被关闭的连接,而不需要再建立一个连接。
KeepAlive在一段时间内 保持打开状态,它们会在这段时间内占用资源。占用过多就会影响性能。
vim /usr/ local/nginx/conf/nginx. conf
http {
......
keepalive_ timeout 65 180;
client header timeout 80;
client_ body_ timeout 80;
......
}
systemctl restart nginx
keepalive_ timeout
- 指定KeepAlive的超时时间(timeout) 。指定每个TCP连接最多可以保持多长时间,服务器将会在这个时间后关闭连接。
- Nginx的默认值是65秒,有些浏览器最多只保持60秒,所以可以设定为60秒。若将它设置为0,就禁止了keepalive 连接。
- 第二个参数(可选的)指定了在响应头Keep-Alive: timeout=t ime中的time值。这个头能够让一 些浏览器主动关闭连接,这样服务器就不必去关闭连接了。没有这个参数,Nginx 不会发送Keep- Alive 响应头。
client_ header_ timeout
客户端向服务端发送-一个完整的request header 的超时时间。如果客户端在指定时间内没有发送一个完整的request header, Nginx返回HTTP 408 (Request Timed Out) 。
client_ body_ timeout
指定客户端与服务端建立连接后发送requestbody的超时时间。如果客户端在指定时间内没有发送任何内容,Nginx返回HTTP?408 (Request Timed Out )。


更改Nginx运行进程数
在高并发场景,需要启动更多的Nginx进程以保证快速响应,以处理用户的请求,避免造成阻塞
更改进程数的配置方法
修改配置文件,修改进程配置参数
修改配置文件的worker_processes参数
- 一般设为CPU的个数或者核数
- 在高并发的情况下可设置为CPU个数或者核数的2倍
增加进程数,可减少系统的开销,提升服务速度
使用ps aux查看运行进程数的变化情况
[root@www conf]# cat /proc/cpuinfo | grep -c "physical"
4
[root@www conf]# vi nginx.conf
worker_ processes 4;
[root@www conf]# systemctl restart nginx
[root@www conf]# ps aux | grep nginx
默认情况,Nginx的多个进程可能跑在一 个CPU上,可以分配不同的进程给不同的CPU处理,充分利用硬件多核多CPU。
在一台4核物理服务器,进行配置,将进程进行分配。
[root@www conf]# vi nginx.conf
worker_ processes 4;
worker_ cpu_ affinity 0001 0010 0100 1000;

1代表CPU的位置
??
??


配置Nginx实现网页优化压缩功能
- Nginx的ngx_http_ gzip_module压缩模块提供对文件内容压缩的功能
- 允许Nginx服务器将输出内容在发送客户端之前进行压缩,以节约网站带宽,提升用户的访问体验,默认已经安装
- 可在配置文件中加入相应的压缩功能参数对压缩性能进行优化
压缩功能参数
1. #修改配置文件
   gzip on;                          #取消注释,开启gzip压缩功能
   gzip_min_length 1k;              #最小压缩文件大小
   gzip_buffers 4 16k;              #压缩缓冲区,大小为4个16k缓冲区
   gzip_http_version 1.1;           #压缩版本(默认1.1,前端如果是squid2.5请使用1.0)
   gzip_comp_level 6;               #压缩比率
   gzip_vary on;                    #支持前端缓存服务器存储压缩页面
   gzip_types text/plain text/javascript application/x-javascript text/css text/xml application/xml application/xml+rss image/jpg image/jpeg image/png image/gif application/x-httpd-php application/javascript application/json;       #压缩类型,表示哪些网页文档启用压缩功能
?
2. #重启服务
systemctl restart nginx.service
?
?
3. #网页查看
http://192.168.59.118/game.png


配置防盗链
-
在企业网站服务中,一般都要配置防盗链功能,以避免网站内容被非法盗用,造成经济损失,也避免了不必要的带宽浪费。
-
Nginx 的防盗链功能也非常强大,在默认情况下,只需要进行很简单的配置,即可实现防盗链处理。
vim /usr/ local/nginx/conf/nginx. conf
http {
......
   server {
     ......

    location ~* \. (jpglgiflswf)$ {

      valid_ referers none blocked * . kgc. com kgc . com;

        if ( $invalid referer ) {

        rewrite ^/ http: I /www. kgc. com/error。pngi

           #return 403;

         }

      }

  ......

   }
}
~* \. (jpgIgifIswf)$ :这段正则表达式表示匹配不区分大小写,以.jpg或.gif 或.swf结尾的文件:
?
valid_ referers :设置信任的网站,可以正常使用图片:
?
none:允许没有http_refer的请求访问资源(根据Referer的定义,它的作用是指示一个请求是从哪里链接过来的,如果直接在浏览器的地址栏中输入一个资源的URL地址,那么这种请求是不会包含Referer 字段的),如http:/ /www.dayu.com/ game.jpg
?
我们使用http://www. dayu.com访问显示的图片,可以理解成http://www. dayu.com/game.jpg这个请求是从http://www. dayu.com这个链接过来的。
?
blocked: 允许不是http://开头的, 不带协议的请求访问资源;
?
*.?dayu. com: 只允许来自指定域名的请求访问资源,如http://www. dayu.com
?
if语句:如果链接的来源域名不在valid_ referers所列出的列表中,$invalid_ referer为true, 则执行后面的操作,即进行重写或返回403 页面。
?
第二台机器配置内容:

 ??
??

?
 ?现在还是可以正常显示的

现在防盗图出现
补充:面试题:用过哪些nginx的模块和做过哪些优化?
gzip ? ? ? ### 网站数据压缩
rewrite ? ? ? ### 地址重写
stub_ status ? ? ### ?统计nginx服务状态
ssl 支持https, ? ? ?### 得先用openss1或者TLS工具生成相关证书和私钥文件。再在ssl模块配置中调用证书和私钥
upstream ? ? ?### 使用nginx做反向代理web群集,定义群集服务器池
stream ? ? ? ### 用于定义4层反向代理的
auth_ basic ? ? ### 用户认证
fastcgi ? ? ? ?### 转发请求给php
--with-模块名 ? ? ? ### 开启模块
--without-模块名 ? ? ### 禁用模块
?
隐藏版本号 、压缩、缓存、防盗链、连续保持、优化工作进程和进程连接数、日志分割、反向代理?
