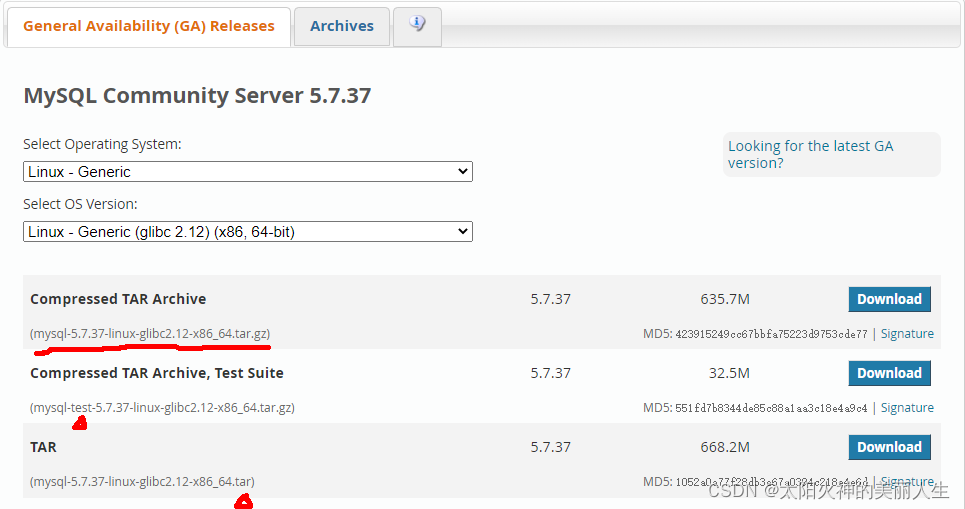
MySQL 5.7?解压版下载链接获取:

上图中默认是 8.x.x?版本,点右侧的先前版本链接,进入下面的页面,选择无测试套件的压缩包版本:?

下载并创建必要的目录:
# cd /usr/local/src
# wget https://dev.mysql.com/get/Downloads/MySQL-5.7/mysql-5.7.37-linux-glibc2.12-x86_64.tar.gz
# tar -zxvf mysql-5.7.37-linux-glibc2.12-x86_64.tar.gz
# mv mysql-5.7.37-linux-glibc2.12-x86_64 /usr/local/
# cd /usr/local
# ln -s mysql-5.7.37-linux-glibc2.12-x86_64 mysql
# mkdir -p /data/mysql/data
已安装 MySQL?版本或 Mariadb?查看并卸载:
//检查系统中有无安装过mysql
rpm -qa|grep mysql

//查询所有mysql 对应的文件夹,全部删除
whereis mysql
find / -name mysql

# 查看系统自带的Mariadb
rpm -qa|grep mariadb
mariadb-libs-5.5.44-2.el7.centos.x86_64

# 卸载系统自带的Mariadb
rpm -e --nodeps mariadb-libs-5.5.44-2.el7.centos.x86_64
yum remove mariadb-libs.x86_64 -y

# 删除etc目录下的my.cnf ,一定要删掉,等下再重新建,之前我将就用这个文件,后面改配置各种不生效
rm /etc/my.cnf
创建 mysql?用户组和用户,用于?mysql?服务配置启动:
# 检查mysql 用户组是否存在
cat /etc/group | grep mysql
cat /etc/passwd |grep mysql

# 创建mysql 用户组和用户
groupadd mysql
useradd -r -g mysql mysql

# 第二种:创建mysql用户组和用户
useradd -s /sbin/nologin mysql
id mysql

# 给 mysql 用户赋予程序和数据目录的所有者权限
chown -R mysql.mysql /usr/local/mysql/*
chown -R mysql.mysql /data/mysql/data
初始化 mysql?数据目录,此处可挂载数据盘以指定数据目录:
./bin/mysqld --initialize --user=mysql --basedir=/usr/local/mysql --datadir=/data/mysql/data

2022-02-01T12:05:41.595896Z 0 [Warning] TIMESTAMP with implicit DEFAULT value is deprecated. Please use --explicit_defaults_for_timestamp server option (see documentation for more details).
2022-02-01T12:05:42.235260Z 0 [Warning] InnoDB: New log files created, LSN=45790
2022-02-01T12:05:42.329112Z 0 [Warning] InnoDB: Creating foreign key constraint system tables.
2022-02-01T12:05:42.430463Z 0 [Warning] No existing UUID has been found, so we assume that this is the first time that this server has been started. Generating a new UUID: 475cdd4f-8357-11ec-b016-000c2921133a.
2022-02-01T12:05:42.432091Z 0 [Warning] Gtid table is not ready to be used. Table 'mysql.gtid_executed' cannot be opened.
2022-02-01T12:05:43.317709Z 0 [Warning] A deprecated TLS version TLSv1 is enabled. Please use TLSv1.2 or higher.
2022-02-01T12:05:43.317721Z 0 [Warning] A deprecated TLS version TLSv1.1 is enabled. Please use TLSv1.2 or higher.
2022-02-01T12:05:43.318284Z 0 [Warning] CA certificate ca.pem is self signed.
2022-02-01T12:05:43.568210Z 1 [Note] A temporary password is generated for root@localhost: Bhwhh.qy2wwe

临时密码在上面输出中:Bhwhh.qy2wwe ,需要使用它登录并修改。
创建启动配置文件 /etc/my.cnf:
cat /etc/my.cnf
[mysqld]
user=mysql
basedir=/usr/local/mysql
datadir=/data/mysql/data
socket=/tmp/mysql.sock
server_id=6
port=3306

[mysql]
socket=/tmp/mysql.sock
创建 systemctl?服务 mysqld.service:
cat /etc/systemd/system/mysqld.service
[Unit]
Description=MySQL Server
Documentation=mysqld.service
After=network.target
After=syslog.target

[Install]
WantedBy=multi-user.target

[Service]
User=mysql
Group=mysql
ExecStart=/usr/local/mysql/bin/mysqld --defaults-file=/etc/my.cnf
LimitNOFILE = 5000
关闭或配置防火墙,以开放 3306 端口,配置启动 mysqld?服务:
systemctl enable mysqld
systemctl start mysqld
systemctl status mysqld
systemctl stop mysqld
systemctl restart mysqld

systemctl disable firewalld
systemctl stop firewalld
登录并修改 root?密码,允许 root?远程连接:
# 使用临时密码登录,修改密码
./bin/mysql -u root -p
Bhwhh.qy2wwe

alter user root@'localhost' identified by '123456';
quite

# 使用新密码登录验证,并设置允许远程连接
./bin/mysql -u root -p
123456

update user set Host='%' where Host='localhost' and User='root';

quite


# 重启 mysqld 服务使生效
systemctl restart mysqld

# 远程连接
/usr/local/mysql/bin/mysql -uroot -p123456 -h 192.168.42.102 -P 3306
查看?mysqld?服务进程,以及管理服务:
# ps -ef | grep mysql

# kill -9 xxxx

# systemctl status mysqld

# systemctl enable mysqld

# systemctl start mysqld

# systemctl stop mysqld

# systemctl restart mysqld