文章目录
1、Docker容器技术简述
是一个开源的应用容器引擎,让开发者可以打包他们的应用以及依赖包到一个可以移植的镜像中,然后发布到任意系统中,实现虚拟化;常用技术为 Docker;
一个完整的Docker由四个部分组成:
- Client客户端
- Daemon守护进程
- Image镜像
- Container容器
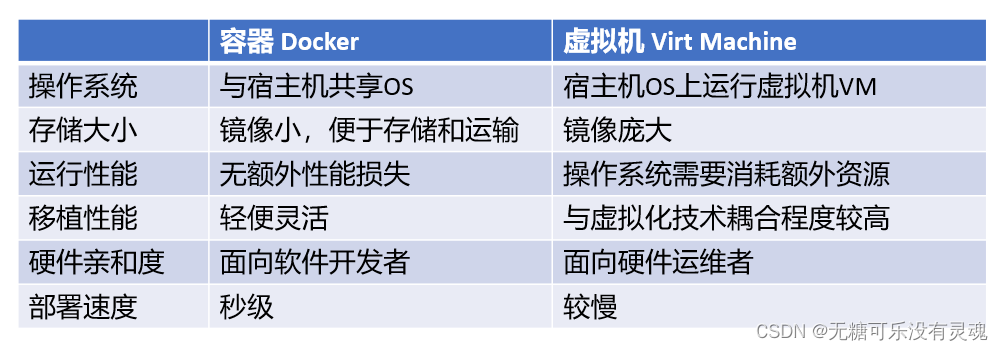
Docker有着比虚拟机更少的抽象层,由于Docker不需要Hypervisor实现硬件资源虚拟化,运行在Docker容器上的程序直接使用宿主机的硬件资源,因此在资源的占用上Docker有明显的优势;

Docker利用的是宿主机的内核,不需要虚拟机系统,因此当创建一个容器时,Docker不需要和虚拟机一样重新加载一个操作系统内核,因此创建一个Docker容器的操作是秒级;

Docker部署前准备操作,宿主机需要访问网络,从网络中下载对应的Docker包(也可以通过本地Yum源安装,此处不做赘述);
[root@localhost ~]# yum clean all			#清理Yum仓库
[root@localhost ~]# yum makecache 		    #建立Yum缓存,将服务器包信息下载到本地
[root@localhost ~]# yum update -y			#更新Yum仓库(更新时间较长)
2、CentOS 6安装Docker
此处不再赘述Yum源的配置与使用,参考以上内容;
[root@localhost ~]# yum install -y epel-release		    #安装依赖
[root@localhost ~]# yum install -y docker-io			#安装Docker
[root@localhost ~]# cat /etc/sysconfig/docker			#查看配置文件
~
other_args=								                #填写阿里云镜像加速器链接;
~
[root@localhost ~]# service docker start				#重启服务
[root@localhost ~]# docker version					    #查看版本信息
3、CentOS 7/8安装Docker
此处不再赘述Yum源的配置与使用,参考以上内容;
3.1 卸载旧版本Docker与其依赖关系
如果没有安装过Docker则无需卸载就版本与其依赖包
[root@localhost ~]# sudo yum remove docker \
                  docker-client \
                  docker-client-latest \
                  docker-common \
                  docker-latest \
                  docker-latest-logrotate \
                  docker-logrotate \
                  docker-engine
3.2 安装Docker服务
设置Docker仓库
[root@localhost ~]# sudo yum install yum-utils -y
设置稳定Docker仓库
[root@localhost ~]# sudo yum-config-manager --add-repo https://download.docker.com/linux/centos/docker-ce.repo	                    #官方源仓库
Adding repo from: https://download.docker.com/linux/centos/docker-ce.repo
#部分仓库内容默认被禁用,可以使用下面的命令进行启用,如果不需要可以忽略此步骤
[root@localhost ~]# sudo yum-config-manager --enable docker-ce-nightly		#开启夜间存储库
[root@localhost ~]# sudo yum-config-manager --enable docker-ce-test			#开启测试通道
[root@localhost ~]# sudo yum-config-manager --disable docker-ce-nightly		#关闭夜间存储库
3.2.1 安装最新版本Docker引擎和容器
[root@localhost ~]# sudo yum install -y docker-ce docker-ce-cli containerd.io
3.2.2 安装特定版本的Docker引擎和容器
列出并排序可用的Docker版本,返回的列表取决于启用了哪些存储库,并且特定于系统版本;
[root@localhost ~]# yum list docker-ce --showduplicates | sort -r
Last metadata expiration check: 0:00:45 ago on Wed 03 Mar 2021 01:02:22 AM PST.
Installed Packages
docker-ce.x86_64               3:20.10.5-3.el8                 docker-ce-stable
docker-ce.x86_64               3:20.10.5-3.el8                 @docker-ce-stable
docker-ce.x86_64               3:20.10.4-3.el8                 docker-ce-stable
docker-ce.x86_64               3:20.10.3-3.el8                 docker-ce-stable
docker-ce.x86_64               3:20.10.2-3.el8                 docker-ce-stable
docker-ce.x86_64               3:20.10.1-3.el8                 docker-ce-stable
docker-ce.x86_64               3:20.10.0-3.el8                 docker-ce-stable
docker-ce.x86_64               3:19.03.15-3.el8                docker-ce-stable
docker-ce.x86_64               3:19.03.14-3.el8                docker-ce-stable
docker-ce.x86_64               3:19.03.13-3.el8                docker-ce-stable
Available Packages
通过完全合格的包名安装一个特定的版本
[root@localhost ~]# sudo yum install docker-ce-<VERSION_STRING> docker-ce-cli-<VERSION_STRING> containerd.io
[root@localhost ~]# sudo yum install docker-ce-20.10.2 docker-ce-cli-20.10.2 containerd.io
启动Docker
[root@localhost ~]# sudo start dockersystemctl
3.2.3 查看Docker版本信息
[root@localhost ~]# docker version
Client: Docker Engine - Community
 Version:           20.10.5
 API version:       1.41
 Go version:        go1.13.15
 Git commit:        55c4c88
 Built:             Tue Mar  2 20:17:04 2021
 OS/Arch:           linux/amd64
 Context:           default
 Experimental:      true

Server: Docker Engine - Community
 Engine:
  Version:          20.10.5
  API version:      1.41 (minimum version 1.12)
  Go version:       go1.13.15
  Git commit:       363e9a8
  Built:            Tue Mar  2 20:15:27 2021
  OS/Arch:          linux/amd64
  Experimental:     false
 containerd:
  Version:          1.4.3
  GitCommit:        269548fa27e0089a8b8278fc4fc781d7f65a939b
 runc:
  Version:          1.0.0-rc92
  GitCommit:        ff819c7e9184c13b7c2607fe6c30ae19403a7aff
 docker-init:
  Version:          0.19.0
  GitCommit:        de40ad0
3.2.4 验证Dokcer是否成功安装
[root@localhost ~]# docker run hello-world
Unable to find image 'hello-world:latest' locally
latest: Pulling from library/hello-world
2db29710123e: Pull complete
Digest: sha256:cc15c5b292d8525effc0f89cb299f1804f3a725c8d05e158653a563f15e4f685
Status: Downloaded newer image for hello-world:latest

Hello from Docker!
This message shows that your installation appears to be working correctly.

To generate this message, Docker took the following steps:
 1. The Docker client contacted the Docker daemon.
 2. The Docker daemon pulled the "hello-world" image from the Docker Hub.
    (amd64)
 3. The Docker daemon created a new container from that image which runs the
    executable that produces the output you are currently reading.
 4. The Docker daemon streamed that output to the Docker client, which sent it
    to your terminal.

To try something more ambitious, you can run an Ubuntu container with:
 $ docker run -it ubuntu bash

Share images, automate workflows, and more with a free Docker ID:
 https://hub.docker.com/

For more examples and ideas, visit:
 https://docs.docker.com/get-started/


 [root@localhost ~]# docker ps -a
CONTAINER ID   IMAGE         COMMAND    CREATED          STATUS                      PORTS     NAMES
528787d4228a   hello-world   "/hello"   11 seconds ago   Exited (0) 11 seconds ago             dreamy_margulis
4、升级Docker
安装最新版本即可完成升级
5、配置Docker镜像加速器
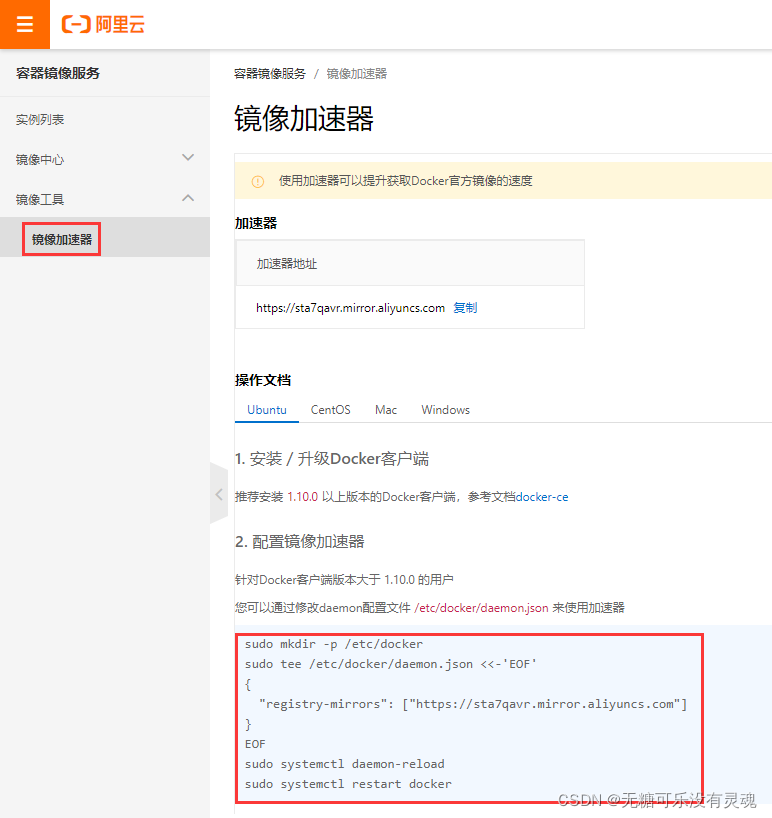
默认Docker仓库使用国外的服务器,鉴于后续下载内容的网速,推荐使用国内的源进行下载,此处更新为阿里云的镜像加速器,每一个镜像加速器都是不同的,需要自行去阿里云镜像服务官网获取,URL链接如下:
https://cr.console.aliyun.com/cn-qingdao/instances/mirrors
镜像加速器配置方式
[root@localhost ~]# mkdir -pv /etc/docker/
[root@localhost ~]# vim /etc/docker/daemon.json
{
	  "registry-mirrors": ["https://sta7qavr.mirror.aliyuncs.com"]
}
[root@localhost ~]# systemctl daemon-reload			#后台程序重新加载;
[root@localhost ~]# systemctl restart docker
#检测是否成功配置镜像加速器
[root@localhost ~]# docker info | grep aliyun
  https://sta7qavr.mirror.aliyuncs.com/
图示如下:

6、Docker配置文件
Docker安装后默认没有daemon.json这个配置文件,需要进行手动创建。配置文件的默认路径:/etc/docker/daemon.json;如果在daemon.json文件中进行配置,需要docker版本高于1.12.6(在这个版本上不生效,1.13.1以上是生效的)
[root@Redhat8 ~]# mkdir /etc/docker/ -pv
[root@localhost ~]# vim /etc/docker/daemon.json
{
 "api-cors-header":"",
 "authorization-plugins":[],
 "bip": "x.x.x.x/x",                  #设置docker0网卡网段,即容器部署完成后使用的IP地址范围
 "bridge":"",                         #定义桥接网卡,默认为docker0
 "cgroup-parent":"",
 "cluster-store":"",
 "cluster-store-opts":{},
 "cluster-advertise":"",
 "debug": true,                      #启用debug的模式,启用后,可以看到很多的启动信息。默认false
 "default-gateway":"",               #修改容器IPv4网关
 "default-gateway-v6":"",            #修改容器IPv6网关
 "default-runtime":"runc",
 "default-ulimits":{},
 "disable-legacy-registry":false,
 "dns": ["",""],                     #设定容器DNS的地址,在容器的 /etc/resolv.conf文件中可查看。
 "dns-opts": [],                     #容器 /etc/resolv.conf 文件,其他设置
 "dns-search": [],                   #设定容器的搜索域,当设定搜索域为 .example.com 时,在搜索一个名为 host 的 主机时,DNS不仅搜索host,还会搜索host.example.com 。 注意:如果不设置, Docker 会默认用主机上的 /etc/resolv.conf 来配置容器。

"exec-opts": [],
 "exec-root":"",
 "fixed-cidr":"",
 "fixed-cidr-v6":"",
 "graph":"/var/lib/docker",          #已废弃,使用data-root代替,主要看docker的版本
 "data-root":"/var/lib/docker",      #Docker运行时使用的根路径,根路径下的内容稍后介绍,默认/var/lib/docker
 "group": "",                        #Unix套接字的属组,仅指/var/run/docker.sock
 "hosts": [],                        #设置容器hosts
 "icc": false,
 "insecure-registries": [],          #配置Docker的私库地址
 "ip":"0.0.0.0",
 "iptables": false,
 "ipv6": false,
 "ip-forward": false,                #默认true, 启用net.ipv4.ip_forward,进入容器后使用sysctl -a | grep net.ipv4.ip_forward 查看

  "ip-masq":false,
 "labels":["nodeName=node-121"],     #Docker主机的标签,很实用的功能,例如定义:–label nodeName=host-121

 "live-restore": true,
 "log-driver":"",
 "log-level":"",
 "log-opts": {},
 "max-concurrent-downloads":3,
 "max-concurrent-uploads":5,
 "mtu": 1500,                        #设置数据包MTU值
 "oom-score-adjust":-500,
 "pidfile": "",                      #Docker守护进程的PID文件
 "raw-logs": false,
 "registry-mirrors":[""],            #镜像加速的地址,增加后在 docker info中可查看。
 "runtimes": {
 "runc": {
 "path": "runc"
 },
 "custom": {
 "path":"/usr/local/bin/my-runc-replacement",
 "runtimeArgs": [
 "--debug"
 ]
 }
 },
 "selinux-enabled": false,          #默认 false,启用selinux支持

 "storage-driver":"",
 "storage-opts": [],
 "swarm-default-advertise-addr":"",
 "tls": true,                       #默认 false, 启动TLS认证开关
 "tlscacert": "",                   #默认 ~/.docker/ca.pem,通过CA认证过的的certificate文件路径
 "tlscert": "",                     #默认 ~/.docker/cert.pem ,TLS的certificate文件路径
 "tlskey": "",                      #默认~/.docker/key.pem,TLS的key文件路径
 "tlsverify": true,                 #默认false,使用TLS并做后台进程与客户端通讯的验证
 "userland-proxy":false,
 "userns-remap":""
 }
修改案例:修改docker0下发容器使用网段与网关,并配置对应DNS;
[root@localhost ~]# cat /etc/docker/daemon.json
{
	"insecure-registries": ["10.81.20.166"],
	"registry-mirrors": ["https://sta7qavr.mirror.aliyuncs.com"],
	"bip": "10.1.1.0/16",
	"default-gateway": "10.1.1.1",
	"dns": ["8.8.8.8"]
}
[root@Redhat8 ~]# ifconfig docker0 | awk 'NR==2{print($2)}'
10.1.1.0
[root@cb4f1de96a62 /]# ip a s eth0 | awk 'NR==3{print($2)}'
10.1.0.1/16
[root@cb4f1de96a62 /]# cat /etc/resolv.conf
nameserver 8.8.8.8
[root@cb4f1de96a62 /]# exit
exit
7、离线安装Docker服务
很多情况下,内网服务器无法访问外网获取对应的服务安装包,因为Docker官网设计了离线安装方式,下面就做一个简单的介绍,离线安装包的获取地址如下(版本较多,自行下载所需版本):
https://download.docker.com/linux/static/stable/x86_64/docker-19.03.9.tgz
下载完成后,将离线包导入至Linux后台进行解压,命令如下:
[root@Redhat8 ~]# tar zxvf docker-19.03.9.tgz
将上述解压后文件(docker文件夹)全部移动至/usr/bin目录下(必须执行):
[root@Redhat8 ~]# cp -p docker/* /usr/bin/
将docker注册为service,命令如下:
[root@Redhat8 ~]# vim /usr/lib/systemd/system/docker.service
# 将下面文件内容直接负责到新创建的文件内即可
[Unit]
Description=Docker Application Container Engine
Documentation=http://docs.docker.com
After=network.target docker.socket

[Service]
Type=notify
EnvironmentFile=-/run/flannel/docker
WorkingDirectory=/usr/local/bin
ExecStart=/usr/bin/dockerd \
                -H tcp://0.0.0.0:4243 \
                -H unix:///var/run/docker.sock \
                --selinux-enabled=false \
                --log-opt max-size=1g
ExecReload=/bin/kill -s HUP $MAINPID
# Having non-zero Limit*s causes performance problems due to accounting overhead
# in the kernel. We recommend using cgroups to do container-local accounting.
LimitNOFILE=infinity
LimitNPROC=infinity
LimitCORE=infinity
# Uncomment TasksMax if your systemd version supports it.
# Only systemd 226 and above support this version.
#TasksMax=infinity
TimeoutStartSec=0
# set delegate yes so that systemd does not reset the cgroups of docker containers
Delegate=yes
# kill only the docker process, not all processes in the cgroup
KillMode=process
Restart=on-failure

[Install]
WantedBy=multi-user.target
配置完成后重新加载Docker的配置文件,命令如下:
[root@Redhat8 ~]# systemctl daemon-reload
启动Docker服务
[root@Redhat8 ~]# systemctl start docker
设置Docker服务开机启动
[root@Redhat8 ~]# systemctl enable docker
查看Docker服务是否安装成功
[root@Redhat8 ~]# docker version