逆向爬虫20 Scrapy-Splash入门
一. Splash
在学习Splash之前,先要明白为什么要学它,它能帮我们完成什么工作,什么情况下适合使用Splash?
splash是一个可以动态渲染js的工具. 有助于我们完成复杂的js内容加载工作. 你可以理解为另一个没有界面的selenium。
由于Selenium经常被用于爬虫,越来越多的网站开始针对Selenium做反爬技术,因此Splash算是Selenium的一个替代品,但它又不能完全替代Selenium,Splash无法处理登录验证,人机校验等反爬手段。
Splash的速度比Selenium还慢,它的访问过程有点类似与代理IP,如果还要加上代理IP的话,就更慢了。
那为什么还要学Splash呢,一是它可以作为Selenium的备用方案,二是Splash可以将浏览器抓包的全过程输出为字典,这是Selenium做不到的,拿到抓包全过程,可以方便我们后续优化爬虫性能。
1.1 splash安装
splash的安装过程十分复杂. 复杂到官方都不推荐你去手动安装它.
官方建议. 用docker去安装splash. 所以. 你需要先去安装docker. 但是docker这玩意在windows上支持非常不好. 各种各样的问题. 外加上后期我们要把爬虫部署到linux. 那干脆. 我们就安装一个linux. 在linux上搞docker是非常easy的.
有能力, 不怕苦的同学可以在windows上搞一个docker试试. 我这里就不带你们找坑踩了. 直接上Linux.
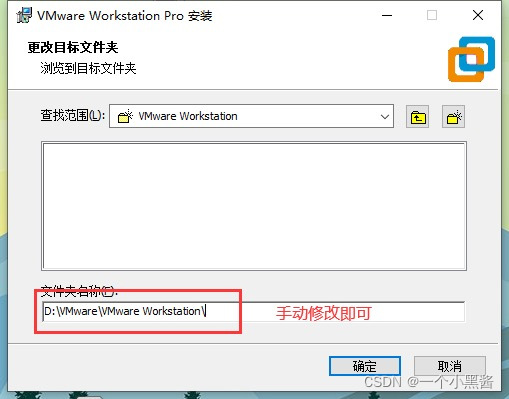
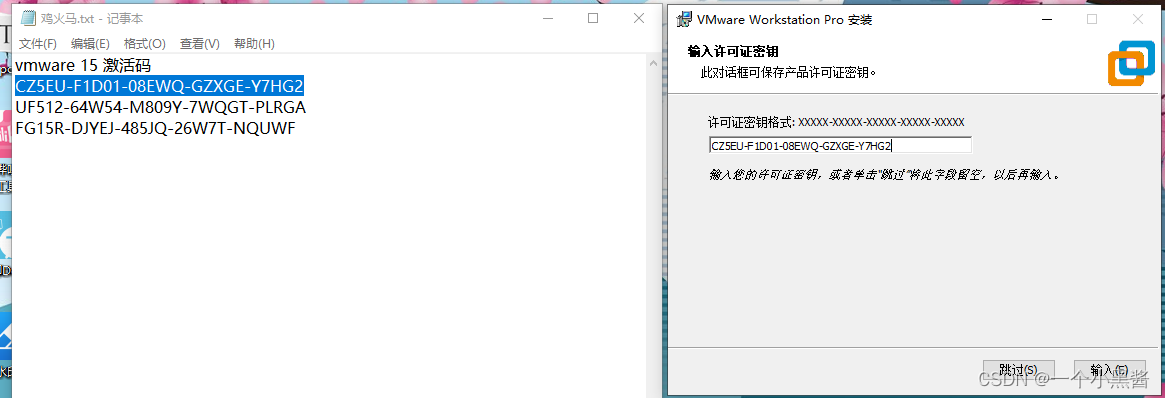
1.1.1安装VM


1.1.2 安装Linux


安装好的linux后,我们需要学会使用linux的一个工具. 叫yum, 我们需要用它来帮我们完成各种软件的安装. 十分的方便. 我们先用ifconfig来做一个测试.
yum search ifconfig   // 搜索出ifconfig的包
yum install net-tools.x86_64  // 安装该软件, 安装过程中会出现很多个询问. 直接y即可
发现了吧, 在linux这个破黑窗口里. 属实难受+憋屈. 所以, 我们这里选择用ssh远程连接linux.
mac版本: 打开终端. 输入
ssh root@服务器ip地址
输入密码
就可以顺利的链接到你的linux服务器. 接下来. 我们可以使用各种命令来操纵linux了.
Windows:


1.1.3 安装docker
? 安装docker就一条例命令就好了
[root@sylar-centos-2 ~]# yum install docker
? 配置docker的源,这里要使用国内的源,否则会慢死
[root@sylar-centos-2 ~]# vi /etc/docker/daemon.json
# 写入一下内容, 注意.先按'i', 更换为输入模式. 然后再填写内容
{
	"registry-mirrors": ["https://9cpn8tt6.mirror.aliyuncs.com"]
}
# 保存: 先按esc. 退出输入模式, 然后输入":wq" 表示写入, 退出. 就完事儿了
[root@sylar-centos-2 ~]# systemctl start docker # 启动docker
[root@sylar-centos-2 ~]# docker ps # 查看docker运行状态
如需关闭或者重新启动docker:
systemctl stop docker   # 停止docker服务
systemctl restart docker  # 重启docker服务
Vm -> cenos -> ssh -> docker -> splash
1.1.4 安装splash
-
拉取splash镜像
docker pull scrapinghub/splashsplash比较大. 大概2个G左右. 有点儿耐心等会儿就好了
-
运行splash
docker run -p 8050:8050 scrapinghub/splash -
打开浏览器访问splash
http://192.168.31.82:8050/

1.2 splash简单使用
? 我们可以在文本框内输入百度的网址. 然后点击render. 可以看到splash会对我们的网页进行动态的加载. 并返回截图. 运行状况. 以及页面代码(经过js渲染后的)


快速解释一下, script中的脚本. 这里面用的是lua的脚本语法. 所以看起来会有些难受.
function main(splash, args)  -- 主函数
  assert(splash:go(args.url))  -- 进入xxx页面
  assert(splash:wait(0.5))   -- 等待0.5秒
  return {  -- 返回
    html = splash:html(),  -- splash:html() 页面源代码
    png = splash:png(),   -- splash:png() 页面截图
    har = splash:har(),   -- splash:har() 页面加载过程
  }
end   -- 函数结束
有必要说明一下. 在lua中, .表示的是属性(变量), :表示的是方法(函数)的调用.
常见操作符都一样. 剩下的. 我们到案例里看.
1.3 splash的http-api接口
splash提供了对外的http-api接口. 我们可以像访问一个普通url一样访问splash. 并由splash帮助我们渲染好页面内容.
http://192.168.31.82:8050/render.html?url=http://www.baidu.com
虽然看不出任何差别. 但是你心里要清楚一个事情. 此时拿到的直接是经过js渲染后的html
我们换个url你就知道了
http://192.168.31.82:8050/render.html?url=https://www.endata.com.cn/BoxOffice/BO/Year/index.html&wait=5
endata这个网站. 它的数据是后期经过ajax请求二次加载进来的. 我们通过splash可以等待它后期加载完再拿html.
综上, splash的工作机制:

整个一个代理服务器的逻辑. ~~~~
二. python中使用splash
"""
    # splash提供的api接口
    渲染html的接口
    http://192.168.63.128:8050/render.html?url=你的url&wait=等待时间&time_out=超时时间

    截图的接口
    http://192.168.63.128:8050/render.png  参数和render.html基本一致, 可选width, height

    加载过程接口
    http://192.168.63.128:8050/render.har  参数和render.html基本一致

    json接口
    http://192.168.63.128:8050/render.json  参数和render.html基本一致

    执行lua脚本的接口
    http://192.168.31.184:8050/execute?lua_source=你要执行的lua脚本
"""
2.1 调用render接口
很简单,发送一个requests.get请求,把get的参数放进params中
import requests

resp = requests.get(
    url='http://192.168.63.128:8050/render.html',
    params={
        "url":'https://www.endata.com.cn/BoxOffice/BO/Year/index.html',
        "wait": 5
    }
)
with open("log.html", mode="w", encoding="utf-8") as f:
    f.write(resp.text)
2.2 调用execute接口
调用execute接口就可以执行相对比较复杂的浏览器操作了,这里用 https://news.163.com/ 来说明怎么模拟浏览器操作,利用splash来抓取ajax动态加载来的数据。
下图是网易新闻主页拉到最下面的样子,有一个 “加载更多” 按钮。

点击该按钮后,URL没有改变,但显示了更多的新闻,这就是ajax动态加载来的数据。

再点击一次 “加载更多” 按钮,拉到最下面发现展示完了。

要用execute接口实现这个功能,就必须编写Lua脚本和Javascript脚本,这里的代码本身的功能并不复杂,但是设计到多门语言混合编程,因此比较唬人。

import requests
from lxml import etree

lua_source = """
function main(splash, args)
  assert(splash:go("https://news.163.com/"))
  assert(splash:wait(2))
  -- 准备一个js函数. 预加载
  -- jsfunc是splash预留的专门为了js代码和lua代码结合准备的
  get_btn_display = splash:jsfunc([[
        function(){
            return document.getElementsByClassName('load_more_btn')[0].style.display;
        }
    ]])

  while(true)
  do
    splash:runjs("document.getElementsByClassName('load_more_btn')[0].scrollIntoView(true)")
    splash:select(".load_more_btn").click()
    splash:wait(1)
    -- 判断load_more_btn是否是none.
    display = get_btn_display()
    if(display == 'none')
      then
        break
      end
  end

  return splash:html()  -- 直接返回页面源代码
end
"""

resp = requests.get(
    url='http://192.168.63.128:8050/execute',
    params={
        "lua_source": lua_source
    }
)
with open("log2.html", mode="w", encoding="utf-8") as f:
    f.write(resp.text)

tree = etree.HTML(resp.text)
divs = tree.xpath('/html/body/div[1]/div[3]/div[2]/div[3]/div[2]/div[5]/div/ul/li[1]/div[2]/div')
for div in divs:
    a = div.xpath('./div/div/h3/a')
    if not a:  # 过滤掉广告
        continue
    a = a[0]
    print(a.xpath("./@href")[0])
    print(a.xpath("./text()")[0])
三. Scrapy_splash模块
实现和2.2一样的功能
开始动手
scrapy startproject news
cd news
scrapy genspider wangyi 163.com
wangyi.py文件

settings.py文件

wangyi.py源码
import scrapy
from scrapy_splash.request import SplashRequest

lua_source = """
function main(splash, args)
  assert(splash:go(args.url))
  assert(splash:wait(2))
  -- 准备一个js函数. 预加载
  -- jsfunc是splash预留的专门为了js代码和lua代码结合准备的
  get_btn_display = splash:jsfunc([[
    	function(){
    		return document.getElementsByClassName('load_more_btn')[0].style.display;
  		}
    ]])

  while(true)
  do
    splash:runjs("document.getElementsByClassName('load_more_btn')[0].scrollIntoView(true)")
    splash:select(".load_more_btn").click()
    splash:wait(1)
    -- 判断load_more_btn是否是none.
    display = get_btn_display()
    if(display == 'none')
      then
        break
      end
  end

  return splash:html()  -- 直接返回页面源代码
end
"""

class WangyiSpider(scrapy.Spider):
    name = 'wangyi'
    allowed_domains = ['163.com']
    start_urls = ['http://news.163.com/']
    # 重写start_requests
    def start_requests(self):
        yield SplashRequest(
            url=self.start_urls[0],
            callback=self.parse,
            endpoint='execute',     # 终端表示你要执行哪一个splash的服务
            args={
                "lua_source": lua_source
            }
        )

    def parse(self, resp):
        divs = resp.xpath('/html/body/div[1]/div[3]/div[2]/div[3]/div[2]/div[5]/div/ul/li[1]/div[2]/div')
        for div in divs:
            a = div.xpath('./div/div/h3/a')
            if not a:  # 过滤掉广告
                continue
            a = a[0]
            print(a.xpath("./@href").extract_first())
            print(a.xpath("./text()").extract_first())
settings.py源码
BOT_NAME = 'news'

SPIDER_MODULES = ['news.spiders']
NEWSPIDER_MODULE = 'news.spiders'

# Obey robots.txt rules
ROBOTSTXT_OBEY = False
LOG_LEVEL = "WARNING"

# Crawl responsibly by identifying yourself (and your website) on the user-agent
USER_AGENT = 'Mozilla/5.0 (Macintosh; Intel Mac OS X 10_15_4) AppleWebKit/537.36 (KHTML, like Gecko) Chrome/92.0.4515.131 Safari/537.36'

# scrapy_splash
# 渲染服务的url, 这里换成你自己的
SPLASH_URL = 'http://192.168.63.128:8050'
# 下载器中间件, 这个必须要配置
DOWNLOADER_MIDDLEWARES = {
    'scrapy_splash.SplashCookiesMiddleware': 723,
    'scrapy_splash.SplashMiddleware': 725,
    'scrapy.downloadermiddlewares.httpcompression.HttpCompressionMiddleware': 810,
}

# 这个可由可无
# SPIDER_MIDDLEWARES = {
#     'scrapy_splash.SplashDeduplicateArgsMiddleware': 100,
# }
# 去重过滤器, 这个必须要配置
DUPEFILTER_CLASS = 'scrapy_splash.SplashAwareDupeFilter'
# 使用Splash的Http缓存, 这个必须要配置
HTTPCACHE_STORAGE = 'scrapy_splash.SplashAwareFSCacheStorage'