本文参考链接:https://blog.csdn.net/u011424614/article/details/113420000

前情提示:本文使用的是windows10系统
主要流程讲解
1.本文选择的路线是 视频文件–>FFmpeg–>nginx–>web播放
2.FFmpeg是一个强大的视频编辑软件,基本干视频,音频的多多少少都会用到这个软件。本文中FFmpeg的作用是将视频整成视频流的形式。
3.nginx的作用主要是将FFmpeg的视频流进行发布,供web进行访问。
4.web访问我选择了video标签,参考文章中还出现了一种div形式的,也是很好的。
第一步:下载FFmpeg
百度链接:https://pan.baidu.com/s/1isTdobOaDEcQXcNAs_f9fw 提取码:0ohe
官网:https://ffmpeg.org/download.html
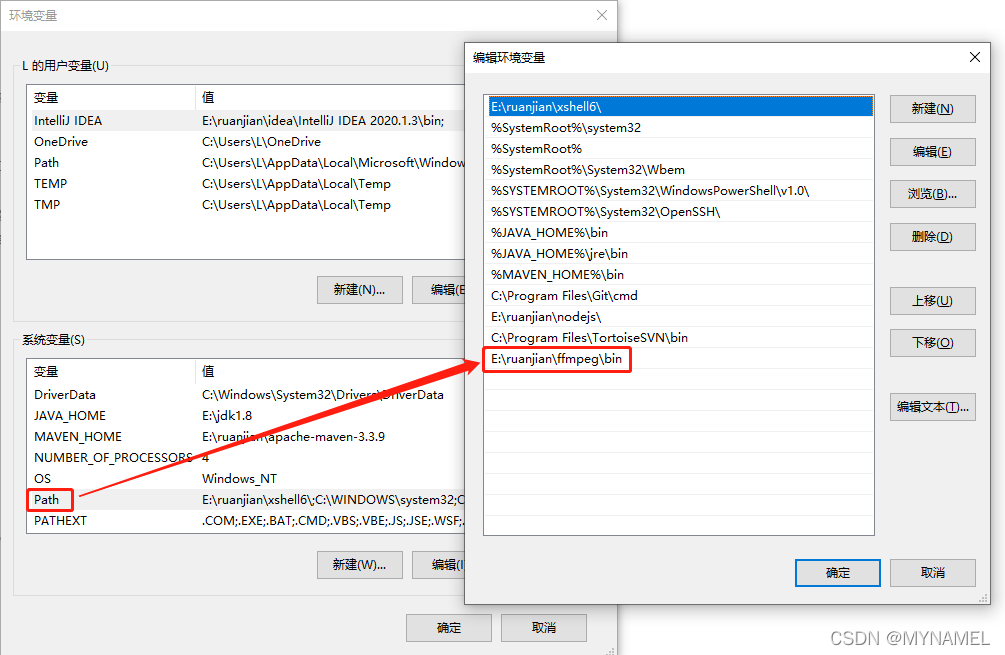
安装教程就是解压完了然后配置一下环境变量就行了。path里面配到bin目录

第二步:安装nginx
这个更简单,下载完了解压一下,然后把rtmp的放在nginx的总目录下就行了,主要是配置文件的书写。
nginx百度链接:https://pan.baidu.com/s/1V9kcE8KmD8JdlI-fvXe0bQ 提取码:z70m
nginx官网下载:https://nginx.org/en/download.html
rtmp模块github下载:https://github.com/illuspas/nginx-rtmp-win32/tree/master
rtmp模块百度下载:https://pan.baidu.com/s/1gP165PFQOm4POgJFeT8jBw 提取码:4psx
nginx解压,把rtmp模块放在他的总目录下,下面是截图

在conf目录下新建一个nginx-rtmp.conf文件,把下面这段代码复制进去
下文中的注意事项,要建好 C://m3u8//live 和 C://m3u8//show 这两个文件夹,视频被直播时是会被处理的,这两个就是处理时需要用来存储处理材料的文件夹。当然,名字和位置你可以自己定义。
worker_processes  1;
events {
    worker_connections  1024;
}
# # RTMP configuration
rtmp {
    server {
        listen 1935; # Listen on standard RTMP port
        chunk_size 4000;

        application livetv {
            live on;
            # Turn on HLS
            hls on;
            hls_path C://m3u8//live;
            hls_fragment 3;
            hls_playlist_length 60;
            # disable consuming the stream from nginx as rtmp
            deny play all;
        }

		application file {
            live on;
            # Turn on HLS
            hls on;
            hls_path C://m3u8//show;
            hls_fragment 3;
            hls_playlist_length 60;
            # disable consuming the stream from nginx as rtmp
            deny play all;
        }
    }
}

http {
    sendfile off;
    tcp_nopush on;
    # aio on;
    directio 512;
    default_type application/octet-stream;

	server {
		listen 8080;
		location /live {
			# Disable cache
			add_header Cache-Control no-cache;

			# CORS setup
			add_header 'Access-Control-Allow-Origin' '*' always;
			add_header 'Access-Control-Expose-Headers' 'Content-Length';

			# allow CORS preflight requests
			if ($request_method = 'OPTIONS') {
				add_header 'Access-Control-Allow-Origin' '*';
				add_header 'Access-Control-Max-Age' 1728000;
				add_header 'Content-Type' 'text/plain charset=UTF-8';
				add_header 'Content-Length' 0;
				return 204;
			}

			types {
				application/vnd.apple.mpegurl m3u8;
				video/mp2t ts;
			}
            alias C://m3u8//live;
			# root E://m3u8;
		}

		location /show {
			# Disable cache
			add_header Cache-Control no-cache;

			# CORS setup
			add_header 'Access-Control-Allow-Origin' '*' always;
			add_header 'Access-Control-Expose-Headers' 'Content-Length';

			# allow CORS preflight requests
			if ($request_method = 'OPTIONS') {
				add_header 'Access-Control-Allow-Origin' '*';
				add_header 'Access-Control-Max-Age' 1728000;
				add_header 'Content-Type' 'text/plain charset=UTF-8';
				add_header 'Content-Length' 0;
				return 204;
			}

			types {
				application/vnd.apple.mpegurl m3u8;
				video/mp2t ts;
			}
            alias C://m3u8//show;
			# root E://m3u8;
		}
	}
}
第三步:写好代码
此处我只写出我用的video那段,另外一种div的请到页首的参考链接里面学习
<!DOCTYPE html>
<html lang="zh-CN">
<head>
    <meta charset="UTF-8">
    <title>直播</title>
    <link href="https://cdn.bootcss.com/video.js/7.6.5/alt/video-js-cdn.min.css" rel="stylesheet">
    <script src="https://cdn.bootcss.com/video.js/6.6.2/video.js"></script>
    <script src="https://cdn.bootcss.com/videojs-contrib-hls/5.15.0/videojs-contrib-hls.min.js"></script>
</head>
<body>
    <video id="liveVideo" class="video-js vjs-default-skin vjs-big-play-centered" autoplay muted>
        <source id="source" src="http://127.0.0.1:8080/show/stream.m3u8"  type="application/x-mpegURL">
    </video>
</body>
<script>
    var liveVideo = videojs('liveVideo',{
        bigPlayButton : true,
        textTrackDisplay : false,
        posterImage: false,
        errorDisplay : false,
    })
    // let li = document.getElementById("liveVideo");
    // li.style.display = 'none';
</script>
</html>
第四步:启动
个人建议启动顺序:nginx,web页面,ffmpeg
启动nginx:先到nginx文件夹中,打开cmd,使用下面命令
该命令是让nginx按照指定配置文件进行启动
nginx -c conf/nginx-rtmp.conf
启动web页面:双击
启动ffmpeg:先到你要发布的视频文件夹中,打开cmd,使用下面命令
0169.flv替换成你的视频,其他的我建议你不要乱动,如果你是新手的话
ffmpeg -re -i 0169.flv -vcodec libx264 -vprofile baseline -g 30 -acodec aac -strict -2 -f flv rtmp://127.0.0.1:1935/file/stream
第五步:看页面啊,还看我的博客干啥。
成功的请三连谢谢,没成功的出门左转,再见。