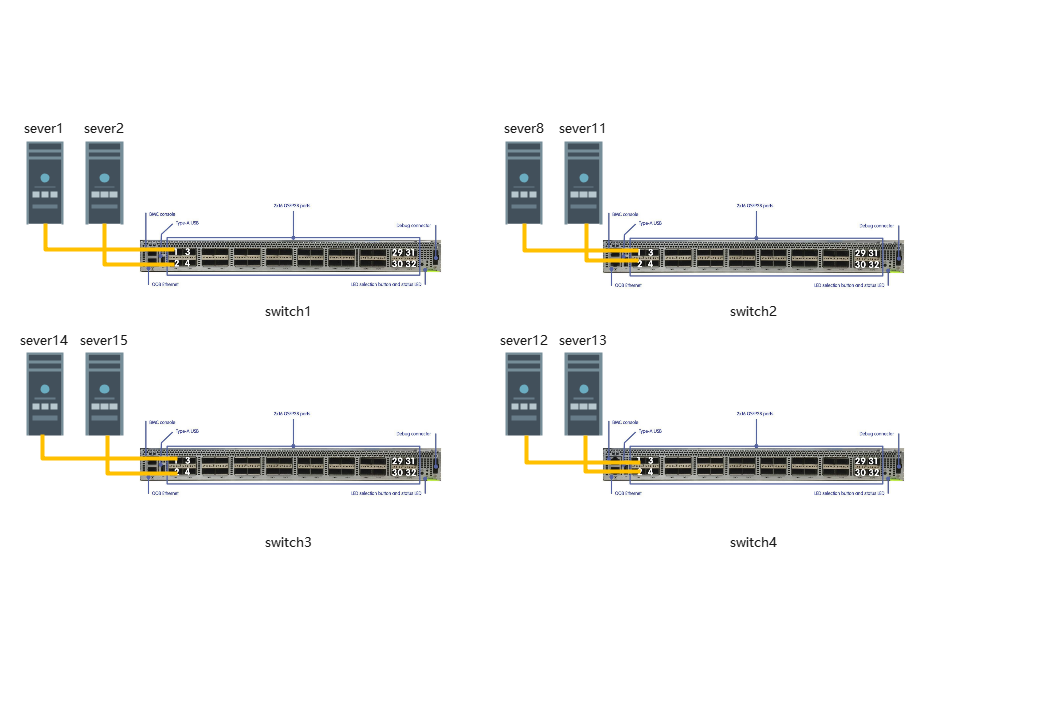
一、网络拓扑

| Tofino交换机 | IP | 用户名 | 密码 |
|---|---|---|---|
| switch00 | 172.16.50.241 | root | |
| switch01 | 172.16.50.242 | root | |
| switch02 | 172.16.50.243 | root | |
| switch03 | 172.16.50.244 | root |
注:需通过外网访问computer26,然后访问交换机。
# Access the switch00 through external internet.
# ssh to computer26
ssh sdn@39.98.115.249 -p 8226
sdn@39.98.115.249''s password:
# ssh to switch00
sdn@computer26:~$ ssh root@172.16.50.241 # 241~244
root@172.16.150.252's password:
root@localhost:~
| 服务器 | 内网IP及ssh port | 实验用IP | 用户名 | 密码 | 备注 |
|---|---|---|---|---|---|
| sever01 | 172.16.50.1:6001 | 192.16.200.1 | sdn | 可以ping通交换机 | |
| sever02 | 172.16.50.2:6002 | 192.16.200.2 | sdn | 正在安装实验环境 | |
| sever08 | 172.16.50.8:6008 | 192.16.200.8 | sdn | ||
| sever11 | … | sdn | |||
| sever12 | … | sdn | |||
| sever13 | … | sdn | |||
| sever14 | … | sdn | |||
| sever15 | … | sdn |
注:部分交换机重启后没有设置反代理,需通过外网访问computer26,然后访问。
二、可编程交换机
1、进入$sde目录
root@localhost:~$ cd bf-sde-9.3.1/
root@localhost:~/bf-sde-9.3.1#. ./set_sde.bash # 不要忘记前?的点,这是设置当
前?录为sde
Using bf-sde-9.3.1 in /root/bf-sde-9.3.1
2、P4程序编写
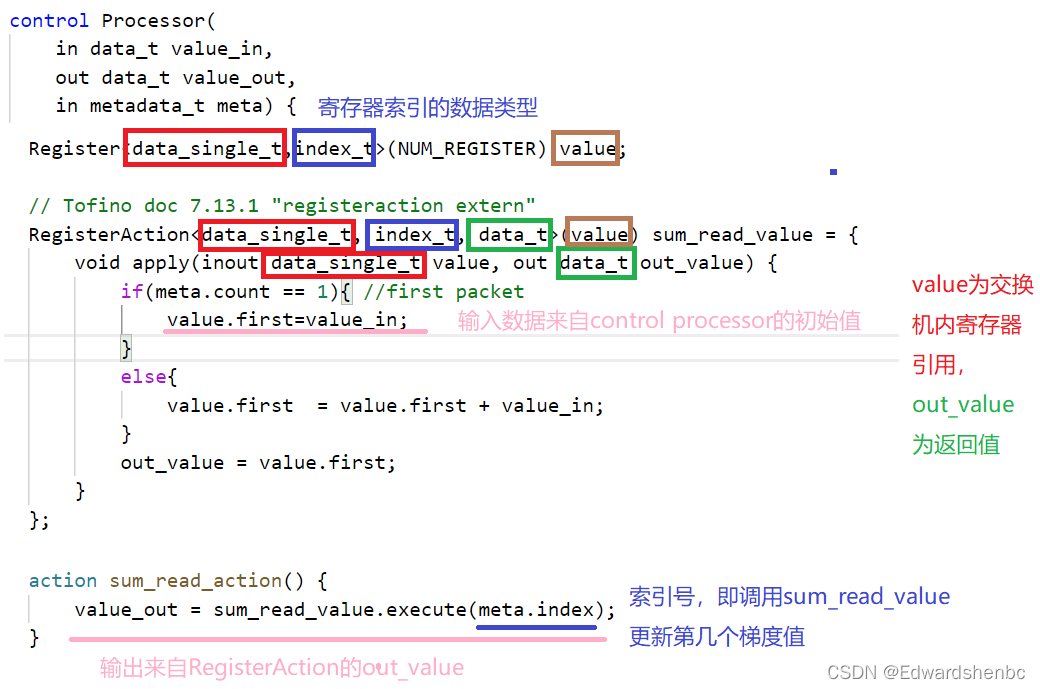
参考PUBLIC_Tofino-Native-Arch-Document.pdf文档
1)对寄存器的操作

3、P4程序编译
以对$sde/bc/ngaa文件夹内跑文件编译为例,在$sde目录下:
root@localhost:~/bf-sde-9.3.1# ./p4_build-9.0.0.sh -p bc/ngaa/ngaa.p4
Using SDE          /root/bf-sde-9.3.1
Using SDE_INSTALL /root/bf-sde-9.3.1/install
Using SDE version bf-sde-9.3.1

OS Name:  "Open Network Linux OS ONL-bf-9.1.0, 2020-02-11.16
This system has 8GB of RAM and 8 CPU(s)
Parallelization:  Recommended: -j4   Actual: -j4

Compiling for p4_16/tna
P4 compiler path:    /root/bf-sde-9.3.1/install/bin/bf-p4c
P4 compiler version: 9.3.1 (SHA: 18fd024) (p4c-based)
Build Dir: /root/bf-sde-9.3.1/build/p4-build/ngaa
 Logs Dir: /root/bf-sde-9.3.1/logs/p4-build/ngaa

  Building ngaa        CLEAR CONFIGURE MAKE INSTALL ... DONE
编译生成的二进制文件存储在$sde/build/p4-build/目录下
4、交换机的运行
需要在三个shell里的$sde目录下分别依次执行下列“1)、2)、3)”三步
1)运行P4程序
注意运行run_switchd.sh时直接用p4文件名即可(无需路径),会自动定位$sde/build/p4-build/目录下的ngaa文件
root@localhost:~/bf-sde-9.3.1# ./run_switchd.sh -p ngaa
Using SDE /root/bf-sde-9.3.1
Using SDE_INSTALL /root/bf-sde-9.3.1/install
Setting up DMA Memory Pool
Using TARGET_CONFIG_FILE /root/bf-sde-9.3.1/install/share/p4/targets/tofino/ngaa.conf
Using PATH /root/bf-sde-9.3.1/install/bin:/root/bf-sde-9.3.1/install/bin:/usr/local/sbin:/usr/local/bin:/usr/sbin:/usr/bin:/sbin:/bin:/lib/platform-config/current/onl/bin:/lib/platform-config/current/onl/sbin:/lib/platform-config/current/onl/lib/bin:/lib/platform-config/current/onl/lib/sbin
Using LD_LIBRARY_PATH /usr/local/lib:/root/bf-sde-9.3.1/install/lib:
bf_sysfs_fname /sys/class/bf/bf0/device/dev_add
Install dir: /root/bf-sde-9.3.1/install (0x5619cbf96980)
bf_switchd: system services initialized
bf_switchd: loading conf_file /root/bf-sde-9.3.1/install/share/p4/targets/tofino/ngaa.conf...
bf_switchd: processing device configuration...
Configuration for dev_id 0
  Family        : tofino
  pci_sysfs_str : /sys/devices/pci0000:00/0000:00:03.0/0000:05:00.0
  pci_domain    : 0
  pci_bus       : 5
  pci_fn        : 0
  pci_dev       : 0
  pci_int_mode  : 1
  sbus_master_fw: /root/bf-sde-9.3.1/install/
  pcie_fw       : /root/bf-sde-9.3.1/install/
  serdes_fw     : /root/bf-sde-9.3.1/install/
  sds_fw_path   : /root/bf-sde-9.3.1/install/
  microp_fw_path:
bf_switchd: processing P4 configuration...
P4 profile for dev_id 0
num P4 programs 1
  p4_name: ngaa
  p4_pipeline_name: pipe
    libpd:
    libpdthrift:
    context: /root/bf-sde-9.3.1/install/share/tofinopd/ngaa/pipe/context.json
    config: /root/bf-sde-9.3.1/install/share/tofinopd/ngaa/pipe/tofino.bin
  Pipes in scope [0 1 2 3 ]
  diag:
  accton diag:
  Agent[0]: /root/bf-sde-9.3.1/install/lib/libpltfm_mgr.so
  non_default_port_ppgs: 0
  SAI default initialize: 1
bf_switchd: library /root/bf-sde-9.3.1/install/lib/libpltfm_mgr.so loaded
bf_switchd: agent[0] initialized
Tcl server started..
Tcl server: listen socket created
Tcl server: bind done on port 8008, listening...
Tcl server: waiting for incoming connections...
Health monitor started
Operational mode set to ASIC
Initialized the device types using platforms infra API
ASIC detected at PCI /sys/class/bf/bf0/device
ASIC pci device id is 16
Starting PD-API RPC server on port 9090
bf_switchd: drivers initialized
detecting.. IOMMU not enabled on the platform
Setting core_pll_ctrl0=cd44cbfe
-
bf_switchd: dev_id 0 initialized

bf_switchd: initialized 1 devices
Adding Thrift service for bf-platforms to server
bf_switchd: thrift initialized for agent : 0
bf_switchd: spawning cli server thread
bf_switchd: spawning driver shell
bf_switchd: server started - listening on port 9999
bfruntime gRPC server started on 0.0.0.0:50052

        ********************************************
        *      WARNING: Authorised Access Only     *
        ********************************************

bfshell>
2)设置可编程交换机端口

可编程交换机共有32个端口,每个端口可以以10Gbps/25Gbps/40Gbps/100Gbps的速率运行,我们需要以特定速率启用特定端口,才能使交换机接收到来自主机的包。
可以在bfshell下进入ucli再进入port manager来逐步设置端口
bfshell> ucli
Starting UCLI from bf-shell
Cannot read termcap database;
using dumb terminal settings.
bf-sde> pm
bf-sde.pm>
也可以使用port.bfsh文件批量设置端口
root@localhost:~/bf-sde-9.3.1# ./run_bfshell.sh -f bc/ngaa/port.bfsh
Using SDE /root/bf-sde-9.3.1
Using SDE_INSTALL /root/bf-sde-9.3.1/install
Connecting to localhost port 7777 to check status on these devices: [0]
Waiting for device 0 to be ready
/root/bf-sde-9.3.1/install/bin/bfshell bc/ngaa/port.bfsh
ucli
pm
port-add 1/- 10G NONE
an-set 1/- 2
port-enb 1/-
port-add 32/0 100G NONE
port-enb 32/0
show


        ********************************************
        *      WARNING: Authorised Access Only     *
        ********************************************

bfshell> ucli
Cannot read termcap database;
using dumb terminal settings.
bf-sde.pm> pm
error: unknown command 'pm'
bf-sde.pm> port-add 1/- 10G NONE
bf-sde.pm> an-set 1/- 2
bf-sde.pm> port-enb 1/-
bf-sde.pm> port-add 32/0 100G NONE
bf-sde.pm> port-enb 32/0
bf-sde.pm> show
-----+----+---+----+-------+----+--+--+---+---+---+--------+----------------+----------------+-
PORT |MAC |D_P|P/PT|SPEED  |FEC |AN|KR|RDY|ADM|OPR|LPBK    |FRAMES RX       |FRAMES TX       |E
-----+----+---+----+-------+----+--+--+---+---+---+--------+----------------+----------------+-
1/0  |23/0|132|3/ 4|100G   |NONE|Ds|Au|YES|ENB|DWN|  NONE  |               0|               0|
2/0  |22/0|140|3/12|100G   |NONE|En|Au|YES|ENB|DWN|  NONE  |               0|               0|
32/0 |25/0|136|3/ 8|100G   |NONE|Au|Au|YES|ENB|DWN|  NONE  |               0|               0|
bf-sde.pm>
其中port.bfsh文件内容及说明如下
ucli
pm
port-add 1/- 10G NONE
an-set 1/- 2
port-enb 1/-
port-add 32/0 100G NONE
port-enb 32/0
show
添加端口:port-add <conn_id/chnl> <speed (1G, 10G, 25G, 40G, 40G_NB, 50G, 100G, 40G_NON_BREAKABLE)> <fec (NONE, FC, RS)>
删除端口:port-del <conn_id/chnl>
启用端口:port-enb <conn_id/chnl>
禁用端口:port-dis <conn_id/chnl>
显示端口信息:show -a -p <conn_id/chnl> [-d]
端口自动协商:an-set <conn_id/chnl_id> <AN_setting>
-
AN_setting 是以下之一:
- 0 接受SDE 确定的默认值;
- 1 强制启用 AN;
- 2 强制禁用 AN。
** 通配符“-”**代表全部端口或通道,例如bf-sde.bf_pltfm.pm> port-enb 1/- 表示启动端口1的全部通道
3)写入P4程序表项
在P4程序中我们定义了一些table,这些table需要接收key来执行对应的action。我们需要对照自己的P4程序编写相应的setup.py文件并在新的终端运行。

其中setup.py代码与p4文件的table相对应,具体如下:

至此P4程序就算成功运行了,接下来的任务就是主机端向对应的网口发定义好的包,然后交换机会根据P4程序对包进?解析处理转发等?作。
5、故障排除
1)提示IP冲突
由于已经运行一个p4进程导致的冲突,kill进程重启bf_switchd即可
ps -ax | grep switch #查找到正在运行p4进程的pid
sudo kill xxx # xxx为进程号
2)提示“Device mmap failed for dev_id 0”
root@Switch:~$ cd /root/bf-sde-*
root@Switch:~$ . ./set_sde.bash
root@Switch:~$ ./install/bin/bf_kdrv_mod_load $SDE_INSTALL
6、其他
1)scp传输
在跳板机computer26,将当前目录下的ngaa文件夹复制到172.16.50.241交换机的bc
scp -r ./ngaa root@172.16.50.241:/root/bf-sde-9.3.1/bc
三、主机端
1、环境配置
四、参考资料
1、https://github.com/Fangjin98/distributed_PS_ML
2、https://gitlab.tongyuejun.cn/zhangjx/p4_doc/-/blob/main/Wedge100BF_User_Manual.org