文章目录
- Red Hat OpenShift 4.8 环境集群搭建
- openshift 如何输出json日志
- openshfit Vertical Pod Autoscaler 实践
- openshift Certified Helm Charts 实践
- openshift 创建一个Serverless应用程序
Red Hat OpenShift 4.8 环境集群搭建
1. helm介绍
Helm是Kubernetes最初的软件包经理之一。Red Hat?现在正在认证Helm Charts,与Red Hat认证操作员的方式非常相似。为了了解合作伙伴的舵手图或操作员如何被红帽公司认证,红帽公司发布了OpenShift和容器认证的合作伙伴指南。
在这个实验室里,你可以学习到认证舵机图。首先,您试图部署未经认证的Helm图表,导致安装失败。然后检查安装失败的原因。接下来,您部署一张经过认证的舵轮图,并观察它成功的条件。
目标:
- 验证the Red Hat Certified Helm Chart repository
- 添加第三方Helm存储库
- Install a non-certified Helm Chart (fails on purpose)
- 安装Red Hat Community Helm Chart存储库
2. 验证红帽认证的 Helm Chart Repository
Red Hat已经创建了一个舵机海图存储库来提供Red Hat to provide Certified Helm Charts。在本练习中,您将验证存储库是否存在于您的集群中。charts.openshift.io是官方认证Helm Charts repository。
- 浏览到您的Red Hat OpenShift?容器平台web控制台,并以
admin身份登录
有关此操作的说明和凭证在您收到的配置电子邮件中 - 使用透视图切换器切换到Administrator透视图
- 在导航菜单中,单击“
Home”。 - .在“首页导航”区域单击“
Search”。 - Click the
Resourcesdrop-down list and selectHelmChartRepository. - Click
HCR openshift-helm-charts. - Click the
YAMLtab. - Scroll to line 36 to see the URL of the OpenShift Certified Charts Repository:
url:https://charts.openshift.io
3. 添加 Helm Repository
在本例中,您将安装一个特定的新Helm Repository。它不会起作用,因为你的集群是在AWS上,而这个例子是针对Azure的。但是这一课很重要,所以一定要完成练习。
3.1 View Quick Start
1.Use the perspective switcher to switch to the Developer perspective
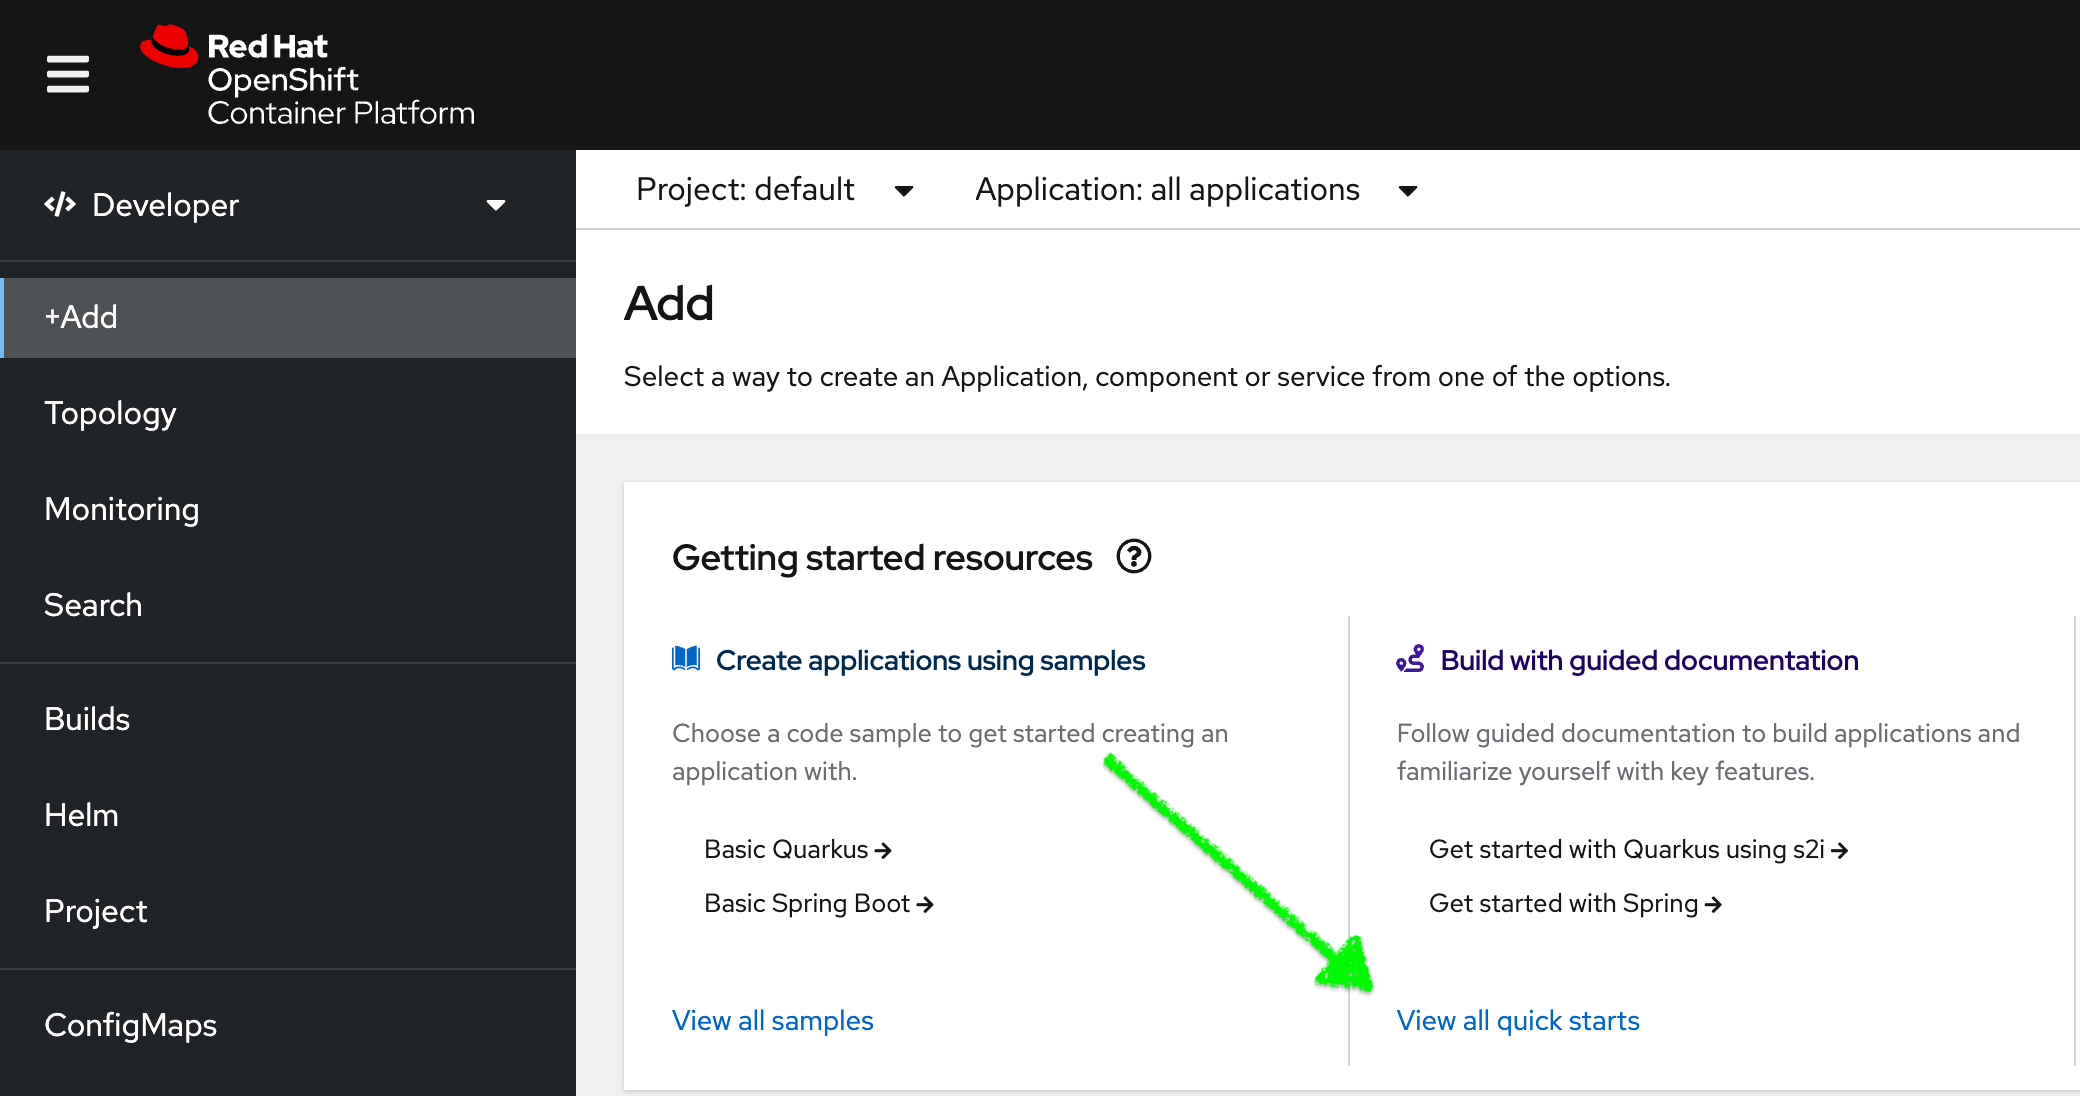
2.Click Add and click View all quick starts:

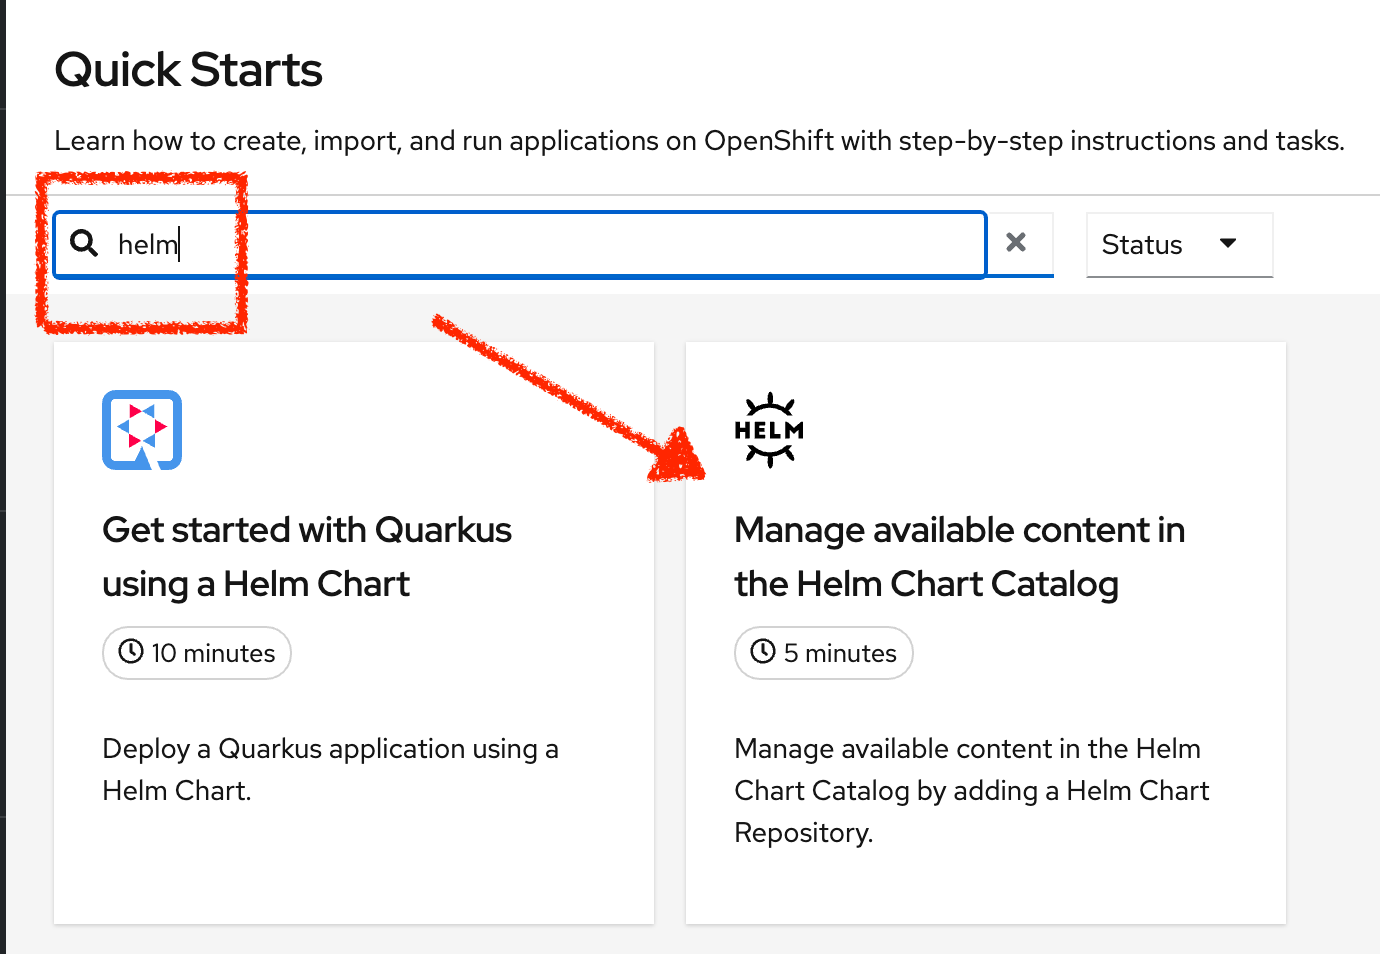
3.在搜索框中,键入helm,然后在helm Chart Catalog卡中选择“Manage available content in the Helm Chart Catalog”。

4.遵循右边打开的五分钟介绍帮助中的步骤。
3.2 Install Helm Client
1.登录您的bastion主机
2.在你的堡垒主机上安装头盔客户端下载它从Red Hat镜像:
sudo wget https://mirror.openshift.com/pub/openshift-v4/clients/helm/latest/helm-linux-amd64 -O /usr/local/bin/helm
sudo chmod +x /usr/local/bin/helm
3.3 Install Non-Certified Helm Chart
在本节中,您将使用Helm命令行应用程序从命令行安装未经认证的Helm Chart。
1.Log in to your bastion host using SSH.实验1有相关说明
2.检查helm是否工作正常:
$ helm version
version.BuildInfo{Version:"v3.5.0+6.el8", GitCommit:"77fb4bd2415712e8bfebe943389c404893ad53ce", GitTreeState:"clean", GoVersion:"go1.14.12"}
3,执行以下命令将Bitnami Helm存储库添加到您的堡垒
$ helm repo add bitnami https://charts.bitnami.com/bitnami
"bitnami" has been added to your repositories
4.为了确保Bitnami存储库工作正常,列出所有的Helm Charts:
$ helm search repo bitnami | grep mariadb
bitnami/mariadb                                 9.3.16          10.5.11         Fast, reliable, scalable, and easy to use open-...
bitnami/mariadb-cluster                         1.0.2           10.2.14         DEPRECATED Chart to create a Highly available M...
bitnami/mariadb-galera                          5.10.3          10.5.11         MariaDB Galera is a multi-master database clust...
5.接下来,尝试从Bitnami库中安装一个图表:
首先,创建一个项目来部署图表到:
$ oc new-project my-helm-test

Now using project "my-helm-test" on server "https://api.cluster-41ff.41ff.sandbox842.opentlc.com:6443".

You can add applications to this project with the 'new-app' command. For example, try:

    oc new-app rails-postgresql-example

to build a new example application in Ruby. Or use kubectl to deploy a simple Kubernetes application:

    kubectl create deployment hello-node --image=k8s.gcr.io/serve_hostname
Install a chart using a <release_name>, which is a unique identifier you make up, and a <chart> name, which is the actual chart name from the repository:
# helm install <release_name> <chart> <parameters>
$ helm install my-mariadb bitnami/mariadb
[omitted]
6.检查Pod是否启动:
$ oc get pods
No resources found in helm-test namespace.
如果你确实看到了mariadb荚果,等几分钟,然后尝试再次oc get pods。估计吊舱已经开走了。
错误是什么?这是一个权限问题。MariaDB Helm Chart试图部署Pods的StatefulSet,但是失败了,因为运行pod请求的userId对于OpenShift的强默认权限设置来说太低了。
7.:具体错误见:
$ oc describe statefulset my-mariadb
[ ... omitted for brevity ... ]
Events:
  Type     Reason            Age                   From                    Message
  ----     ------            ----                  ----                    -------
  Normal   SuccessfulCreate  5m12s                 statefulset-controller  create Claim data-my-mariadb-0 Pod my-mariadb-0 in StatefulSet my-mariadb success
  Warning  FailedCreate      90s (x17 over 5m12s)  statefulset-controller  create Pod my-mariadb-0 in StatefulSet my-mariadb failed error: pods "my-mariadb-0" is forbidden: unable to validate against any security context constraint: [provider "anyuid": Forbidden: not usable by user or serviceaccount, provider restricted: .spec.securityContext.fsGroup: Invalid value: []int64{1001}: 1001 is not an allowed group, spec.containers[0].securityContext.runAsUser: *Invalid value: 1001: must be in the ranges: [1000650000, 1000659999],* provider "nonroot": Forbidden: not usable by user or serviceaccount, provider "hostmount-anyuid": Forbidden: not usable by user or serviceaccount, provider "machine-api-termination-handler": Forbidden: not usable by user or serviceaccount, provider "hostnetwork": Forbidden: not usable by user or serviceaccount, provider "hostaccess": Forbidden: not usable by user or serviceaccount, provider "node-exporter": Forbidden: not usable by user or serviceaccount, provider "privileged": Forbidden: not usable by user or serviceaccount]
4. 安装Red Hat社区Helm Repository
除了Red Hat Certified Helm Charts之外,Red Hat还有一个开发人员存储库。到目前为止,在认证库中没有多少有趣的舵轮图。在本节中,您将添加开发人员的存储库,并查看是否可以部署一些有用的应用程序。
1.从web控制台顶部的工具栏中,单击ocp_web_console_add_icon (Add),将以下YAML内容添加到集群中。
2.复制并粘贴以下YAML内容到打开的文本区域:
apiVersion: helm.openshift.io/v1beta1
kind: HelmChartRepository
metadata:
  name: redhat-developer-charts
spec:
  name: redhat-developer-charts
  connectionConfig:
    url: https://redhat-developer.github.io/redhat-helm-charts
3.Click Create.
4.Use the perspective switcher to switch to the Developer perspective.
5.Select the my-helm-test project if it is not already selected.
6.In the navigation menu, click Add.
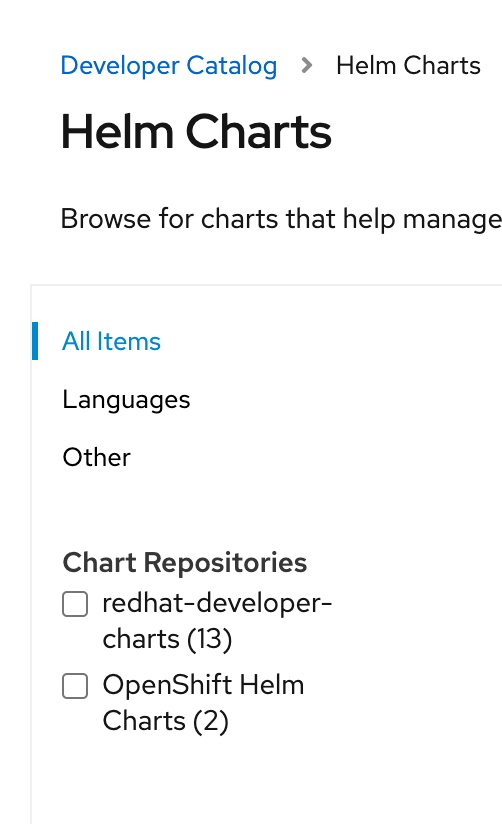
7.Scroll down to the Developer Catalog card and click Helm Chart.
注意,你的集群现在有社区贡献的专门为OpenShift制作的Helm Charts:

8.Install the Helm Charts if you like.
Red Hat community charts are likely to work on your cluster.
9.Clean up the the environment:
oc delete project my-helm-test
In this lab you experienced the various ways that Helm Charts are made available through Helm Repositories.
- You validated the Red Hat Certified Helm Repository
- You added a third party Helm Repository
- You installed a non-certified Helm Chart to experience a failure
- You installed the Red Hat Community Helm Repository
In the next lab you try out the Vertical Pod Autoscaler with your Coffee Shop application.