flannel-github下载链接
CNI网络插件的主要功能就是为了实现pod资源能够跨宿主机进行通信
要在每个pod节点上安装
壹,在243上
壹-壹:上传、解压、拉取证书
cd /opt/src/
上传软件
mkdir /opt/flannel-v0.11.1
tar -zxvf flannel-v0.11.0-linux-amd64.tar.gz -C /opt/flannel-v0.11.0/
ln -s /opt/flannel-v0.11.0/ /opt/flannel
mkdir /opt/flannel/cert/
cd /opt/flannel/cert/
scp 192.168.6.245:/opt/certs/ca.pem /opt/flannel/cert/
scp 192.168.6.245:/opt/certs/client.pem /opt/flannel/cert/
scp 192.168.6.245:/opt/certs/client-key.pem /opt/flannel/cert/
壹-贰 编辑flannel配置文件
cd /opt/flannel/
vi subnet.env
FLANNEL_NETWORK=172.6.0.0/16
FLANNEL_SUBNET=172.6.243.1/24
FLANNEL_MTU=1500
FLANNEL_IPMASQ=false
壹-叁 创建启动脚本
1-1,vi flanneld.sh
#!/bin/sh
./flanneld \
  --public-ip=192.168.6.243 \
  --etcd-endpoints=https://192.168.6.242:2379,https://192.168.6.243:2379,https://192.168.6.244:2379 \
  --etcd-keyfile=./cert/client-key.pem \
  --etcd-certfile=./cert/client.pem \
  --etcd-cafile=./cert/ca.pem \
  --iface=ens33 \
  --subnet-file=./subnet.env \
  --healthz-port=2401
1-2 , 检查配置,权限,创建日志目录
chmod +x /opt/flannel/flanneld.sh
mkdir -p /data/logs/flanneld
1-3, 创建supervisor配置文件
vim /etc/supervisord.d/flannel.ini
[program:flanneld-6-243]
command=/opt/flannel/flanneld.sh                             ; the program (relative uses PATH, can take args)
numprocs=1                                                   ; number of processes copies to start (def 1)
directory=/opt/flannel                                       ; directory to cwd to before exec (def no cwd)
autostart=true                                               ; start at supervisord start (default: true)
autorestart=true                                             ; retstart at unexpected quit (default: true)
startsecs=30                                                 ; number of secs prog must stay running (def. 1)
startretries=3                                               ; max # of serial start failures (default 3)
exitcodes=0,2                                                ; 'expected' exit codes for process (default 0,2)
stopsignal=QUIT                                              ; signal used to kill process (default TERM)
stopwaitsecs=10                                              ; max num secs to wait b4 SIGKILL (default 10)
user=root                                                    ; setuid to this UNIX account to run the program
redirect_stderr=true                                         ; redirect proc stderr to stdout (default false)
killasgroup=true                                             ; kill all process in a group
stopasgroup=true                                             ; stop all process in a group
stdout_logfile=/data/logs/flanneld/flanneld.stdout.log       ; stderr log path, NONE for none; default AUTO
stdout_logfile_maxbytes=64MB                                 ; max # logfile bytes b4 rotation (default 50MB)
stdout_logfile_backups=4                                     ; # of stdout logfile backups (default 10)
stdout_capture_maxbytes=1MB                                  ; number of bytes in 'capturemode' (default 0)
stdout_events_enabled=false                                  ; emit events on stdout writes (default false)
killasgroup=true
stopasgroup=true
壹-肆 ,操作etcd,增加host-gw # 只需执行一次即可
cd /opt/etcd
./etcdctl set /coreos.com/network/config ‘{“Network”: “172.6.0.0/16”, “Backend”: {“Type”: “host-gw”}}’ #在etcd中设置 host-gw模式
./etcdctl get /coreos.com/network/config #检查是否配置成功
./etcdctl rm /coreos.com/network/config ‘{“Network”: “172.6.0.0/16”, “Backend”: {“Type”: “host-gw”}}’ ####### 删除设置
启动flannel
supervisorctl update
supervisorctl status
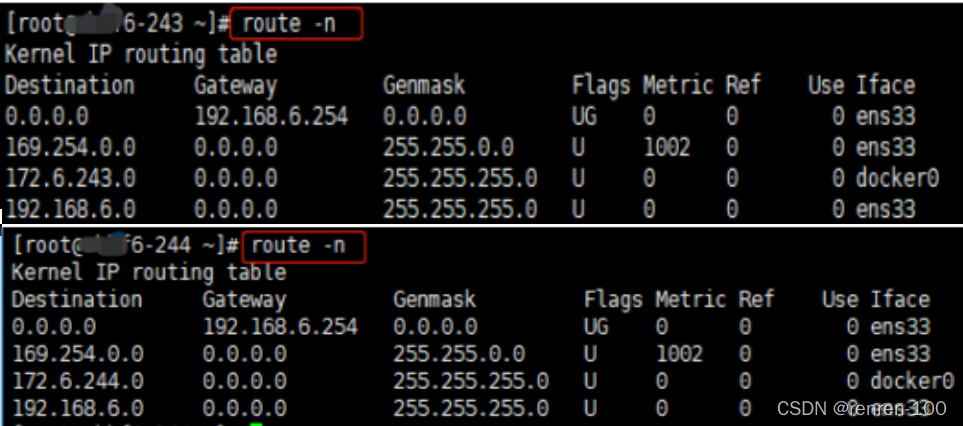
检查route -n 网关设置

贰,在244上
贰-壹 ,上传软件、解压、拉取证书
上传软件到/opt/src
mkdir /opt/flannel-v0.11.1
tar -zxvf flannel-v0.11.0-linux-amd64.tar.gz -C /opt/flannel-v0.11.1/
ln -s /opt/flannel-v0.11.1/ /opt/flannel
cd /opt/flannel
mkdir cert
scp 192.168.6.245:/opt/certs/ca.pem /opt/flannel/cert/
scp 192.168.6.245:/opt/certs/client.pem /opt/flannel/cert/
scp 192.168.6.245:/opt/certs/client-key.pem /opt/flannel/cert/
贰 -贰 ,编辑flannel配置文件
vi subnet.env
FLANNEL_NETWORK=172.6.0.0/16
FLANNEL_SUBNET=172.6.244.1/24
FLANNEL_MTU=1500
FLANNEL_IPMASQ=false
贰-叁 ,创建启动脚本:
vi flanneld.sh
#!/bin/sh
./flanneld \
  --public-ip=192.168.6.244 \
  --etcd-endpoints=https://192.168.6.242:2379,https://192.168.6.243:2379,https://192.168.6.244:2379 \
  --etcd-keyfile=./cert/client-key.pem \
  --etcd-certfile=./cert/client.pem \
  --etcd-cafile=./cert/ca.pem \
  --iface=ens33 \
  --subnet-file=./subnet.env \
  --healthz-port=2401
启动文件
vi /etc/supervisord.d/flannel.ini
[program:flanneld-6-244]
command=/opt/flannel/flanneld.sh                             ; the program (relative uses PATH, can take args)
numprocs=1                                                   ; number of processes copies to start (def 1)
directory=/opt/flannel                                       ; directory to cwd to before exec (def no cwd)
autostart=true                                               ; start at supervisord start (default: true)
autorestart=true                                             ; retstart at unexpected quit (default: true)
startsecs=30                                                 ; number of secs prog must stay running (def. 1)
startretries=3                                               ; max # of serial start failures (default 3)
exitcodes=0,2                                                ; 'expected' exit codes for process (default 0,2)
stopsignal=QUIT                                              ; signal used to kill process (default TERM)
stopwaitsecs=10                                              ; max num secs to wait b4 SIGKILL (default 10)
user=root                                                    ; setuid to this UNIX account to run the program
redirect_stderr=true                                         ; redirect proc stderr to stdout (default false)
killasgroup=true                                             ; kill all process in a group
stopasgroup=true                                             ; stop all process in a group
stdout_logfile=/data/logs/flanneld/flanneld.stdout.log       ; stderr log path, NONE for none; default AUTO
stdout_logfile_maxbytes=64MB                                 ; max # logfile bytes b4 rotation (default 50MB)
stdout_logfile_backups=4                                     ; # of stdout logfile backups (default 10)
stdout_capture_maxbytes=1MB                                  ; number of bytes in 'capturemode' (default 0)
stdout_events_enabled=false                                  ; emit events on stdout writes (default false)
killasgroup=true
stopasgroup=true
mkdir /data/logs/flanneld
chmod +x /opt/flannel/flanneld.sh
supervisorctl update
supervisorctl status
在没有加flannel前,宿主机只能ping的通本机上运行的pod,无法访问其他宿主机上运行的pods


在添加了flannel之后,可以实现宿主机跨node节点与pod互通

还可实现同一个资源控制下的pods互通

叁:关于flannel 典型的网络模型待续
叁-壹,flannel的host-gw网络模型
这种模型相当于在各运行的node节点上添加了一条路由

flannel的作用相当于:添加路由
添加路由
route add -net 172.6.243.0/24 gw 192.168.6.243
route add -net 172.6.244.0/24 gw 192.168.6.244
删除路由
route del -net 172.6.243.0/24 gw 192.168.6.243
route del -net 172.6.244.0/24 gw 192.168.6.244
叁-贰:Vxlan 模型
肆:各个节点上优化iptables规则
1,优化pod之间互访不用原地址
- 在没有优化之前通过运行在244上的pods去curl
运行在243上的pod时,243上运行的pods的日志显示,访问地址是自己宿主机(243)的ip地址,显然不行,应该是谁访问的留下谁的地址(pod访问的应该留下pod的地址)。故而才会优化各节点,实现pod访问的应该显示pod的地址

2,涉及到的验证测试命令:
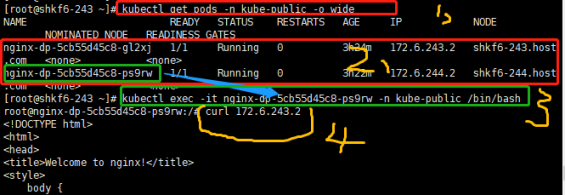
登录进一个运行中的pod
kubectl exec -it nginx-dp-5cb55d45c8-ps9rw -n kube-public /bin/sh #进入一个pod中
然后在pod中去curl另一个pod, 于此同时去监听被curl pod的实时日志
kubectl logs -f nginx-dp-5cb55d45c8-gl2xj -n kube-public
以nginx为例
3,在所有需要优化的机器上安装iptables
yum -y install iptables-services
systemctl start iptables
systemcl enable iptables
systemctl status iptables
4,查看k8s预设的iptables 规则
iptables-save|grep -i postrouting

5,删除预设置的iptables规则
iptables -t nat -D POSTROUTING -s 172.6.243.0/24 ! -o docker0 -j MASQUERADE
6,然后添加一条经过修改过的规则
iptables -t nat -I POSTROUTING -s 172.6.243.0/24 ! -d 172.6.0.0/16 ! -o docker0 -j MASQUERADE

192.168.6.243主机上的,来源是172.6.243.0/24段的docker的ip,目标ip不是172.6.0.0/16段,网络发包不从docker0桥设备出站的,才进行转换
yum install iptables-services -y
systemctl start iptables.service
systemctl start iptables.service
7,把默认禁止的规则删除掉
1,查找默认规则
iptables-save | grep -i reject
2,删除默认的规则
iptables -t filter -D INPUT -j REJECT --reject-with icmp-host-prohibited
iptables -t filter -D FORWARD -j REJECT --reject-with icmp-host-prohibited
3,保存修改的配置
iptables-save > /etc/sysconfig/iptables
service iptables save

每个节点上都需要执行
最终的结果如下:
