1 Pod介绍
Pod在整个生命周期中被系统定义为各种状态,熟悉Pod的各种状态对于理解如何设置Pod的调度策略、重启策略是很有必要的。

?Pod的重启策略(RestartPolicy)应用于Pod内的所有容器,并且仅在Pod所处的Node上由kubelet进行判断和重启操作。
当某个容器异常退出或者健康检查失败时,kubelet将根据RestartPolicy的设置来进行相应的操作。
◎ Always:当容器失效时,由kubelet自动重启该容器。
◎ OnFailure:当容器终止运行且退出码不为0时,由kubelet自动重启该容器。
◎ Never:不论容器运行状态如何,kubelet都不会重启该容器。
Kubernetes对Pod的健康状态可以通过两类探针来检查: LivenessProbe和ReadinessProbe,kubelet定期执行这两类探针来诊断容器的健康状况。
- LivenessProbe探针:用于判断容器是否存活(Running状态),如果LivenessProbe探针探测到容器不健康,则kubelet将杀掉该容器,并根据容器的重启策略做相应的处理。
- ReadinessProbe探针:用于判断容器服务是否可用(Ready状态),达到Ready状态的Pod才可以接收请求。
在Kubernetes平台上,我们很少会直接创建一个Pod,在大多数情况下会通过RC、Deployment、DaemonSet、Job等控制器完成对一组Pod副本的创建、调度及全生命周期的自动控制任务
2 Pod基本使用
2.1 创建容器
在使用Docker时,可以使用docker run命令创建并启动一个容器。而在Kubernetes系统中对长时间运行容器的要求是:其主程序需要一直在前台执行。对于无法改造为前台执行的应用,可以使用开源工具Supervisor辅助进行前台运行的功能。
Pod可以由1个或多个容器组合而成,如下案例Pod只由一个容器组成,配置文件frontend-localredis-pod.yaml的内容如下:
        apiVersion: v1
        kind: Pod
        metadata:
          name: frontend
          labels:
            name: frontend
        spec:
          containers:
          - name: frontend
            image: kubeguide/guestbook-php-frontend
            env:
            - name: GET_HOSTS_FROM
              value: env
            ports:
            - containerPort: 80
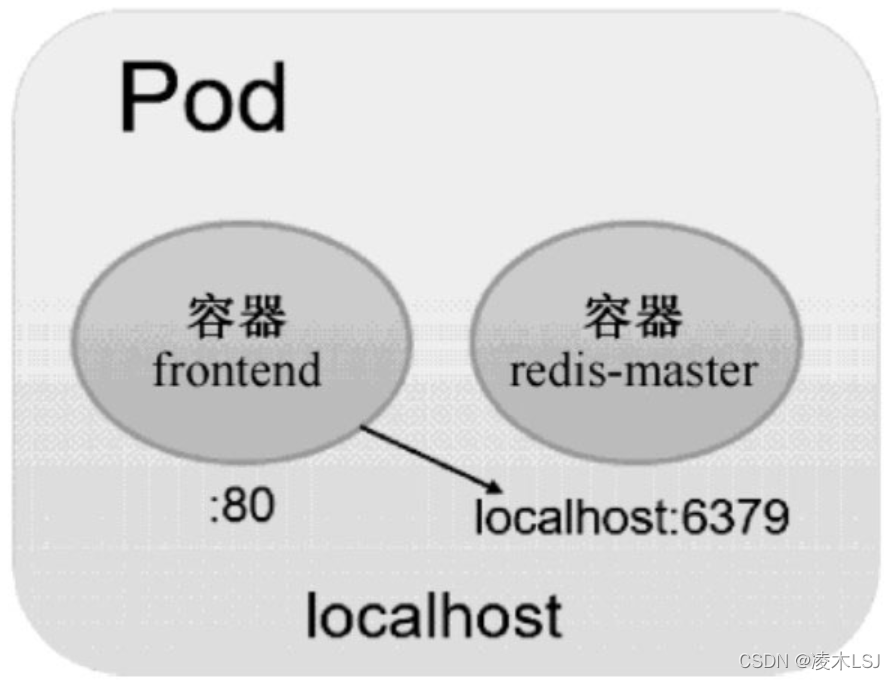
另一种场景是,当frontend和redis两个容器应用为紧耦合的关系,并组合成一个整体对外提供服务时,应将这两个容器打包为一个Pod:

        apiVersion: v1
        kind: Pod
        metadata:
          name: redis-php
          labels:
            name: redis-php
        spec:
          containers:
          - name: frontend
            image: kubeguide/guestbook-php-frontend:localredis
            ports:
            - containerPort: 80
          - name: redis
            image: kubeguide/redis-master
            ports:
            - containerPort: 6379
kubectl create -f frontend-localredis-pod.yam? ? ? ? ? ? ? ? ? ? ? ? ?//创建pod
kubectl get pods? ? ? ? ? ? ? ? ? ? ? ? ? ? ? ? ? ? ? ? ? ? ? ? // 查看已创建的pod
kubectl describe pod <pod名>? ? ? ? ? ? ? ? ? ? ? ? ? //查看具体pod的信息
2.2 静态Pod
静态Pod是由kubelet进行管理的仅存在于特定Node上的Pod。它们不能通过API Server进行管理,无法与ReplicationController、Deployment或者DaemonSet进行关联,并且kubelet无法对它们进行健康检查。
最常见的 Static Pod:
- etcd
- kube-apiserver
- kube-controller-manager
- kube-scheduler
在配置文件/var/lib/kubelet/config.yaml 里找到staticPodPath


?在目录 staticPodPath 中放入一个static-web.yaml文件
apiVersion: v1
kind: Pod
metadata:
  name: static-web
  labels:
    name: static-web
spec:
  containers:
    - name: static-web
      image: nginx
      ports:
        - name: web
          containerPort: 80
重启 kubelet
systemctl stop kubelet
systemctl daemon-reload
systemctl start kubelet
等待一会儿,查看本机中已经启动的容器,可以看到一个Nginx容器已经被kubelet成功创建了出来。
删除该Pod的操作只能将static-web.yaml文件删除。
2.3 Pod配置管理
应用部署的一个最佳实践是将应用所需的配置信息与程序进行分离,这样可以使应用程序被更好地复用。
ConfigMap将应用打包为容器镜像后,可以通过环境变量或者外挂文件的方式在创建容器时进行配置注入。
ConfigMap供容器使用的典型用法如下:
- 生成为容器内的环境变量。
- 设置容器启动命令的启动参数(需设置为环境变量)。
- 以Volume的形式挂载为容器内部的文件或目录。
使用yaml文件创建
   cm-appconfigfile.yaml
   apiVersion: v1
   kind: ConfigMap
   metadata:
      name: cm-appconfigfile
   data:
      key-serverxml: |
        <...>
      key-logproperity: "..."
kubectl create -f cm-appconfigfile.yaml
kubectl get?ConfigMap
kubectl get?ConfigMap?cm-appconfigfile -o yaml
kubectl describe configmap?cm-appconfigfile??
通过kubectl命令行方式创建,使用参数--from-file或--from-literal指定内容通过kubectl create configmap创建ConfigMap。
kubectl create configmap -h
kubectl create configmap config-name --from-file=[key-name]=directory或者file
kubectl create configmap config-name --from-literal=key-name=value
kubectl create configmap config-name --from-env-file=envfile
????????--from-env-file只能跟文件,不能是目录,并且文件里key/value有格式的要求,会做参数的校验。
在Pod“cm-test-pod”的定义中,将ConfigMap“cm-appconfigfile”中的内容以环境变量(APPLOGLEVEL和APPDATADIR)方式设置为容器内部的环境变量,容器的启动命令将显示这两个环境变量的值("env | grep APP"):
          apiVersion: v1
          kind: Pod
          metadata:
            name: cm-test-pod
          spec:
            containers:
            - name: cm-test
              image: busybox
              command: [ "/bin/sh", "-c", "env | grep APP" ]
              env:
              - name: APPLOGLEVEL             # 定义环境变量的名称
                valueFrom:                     # key“apploglevel”对应的值
                configMapKeyRef:
                  name: cm-appconfigfile?          # 环境变量的值取自cm-appconfigfile
                  key: apploglevel          # key为apploglevel
              - name: APPDATADIR              # 定义环境变量的名称
                valueFrom:                     # key“appdatadir”对应的值
                configMapKeyRef:
                  name: cm-appconfigfile?          # 环境变量的值取自cm-appconfigfile
                  key: appdatadir           # key为appdatadir
            restartPolicy: Never
kubectl create -f?cm-test-pod.yaml
kubectl get pods ---show-all
Kubernetes从1.6版本开始,引入了一个新的字段envFrom,实现了在Pod环境中将ConfigMap(也可用于Secret资源对象)中所有定义的key=value自动生成为环境变量:
        apiVersion: v1
        kind: Pod
        metadata:
          name: cm-test-pod
        spec:
          containers:
          - name: cm-test
            image: busybox
            command: [ "/bin/sh", "-c", "env" ]
            envFrom:
            - configMapRef
              name: cm-appconfigfile?      # 根据cm-appvars中的key=value自动生成环境变量
         restartPolicy: Never
2.4?共享Volume
          apiVersion: v1
          kind: Pod
          metadata:
            name: volume-pod
          spec:
            containers:
            - name: tomcat
              image: tomcat
              ports:
              - containerPort: 8080
              volumeMounts:
              - name: app-logs
                mountPath: /usr/local/tomcat/logs
            - name: logreader
              image: logreader
              command: ["sh", "-c", "tail -f /logs/catalina*.log"]
              volumeMounts:
              - name: app-logs
                mountPath: /logs
            volumes:
            - name: app-logs
              emptyDir: {}
这里设置的Volume名为app-logs,类型为emptyDir。挂载到tomcat容器内的/usr/local/tomcat/logs目录,同时挂载到logreader容器内的/logs目录。tomcat容器在启动后会向/usr/local/tomcat/logs目录写文件,logreader容器就可以读取其中的文件了。
附录:Pod定义文件?
apiVersion: v1
        kind: Pod
        metadata:
          name: string
          namespace: string
          labels:
            - name: string
          annotations:
            - name: string
        spec:
          containers:
          - name: string
            image: string
            imagePullPolicy: [Always | Never | IfNotPresent]
            command: [string]
            args: [string]
            workingDir: string
            volumeMounts:
            - name: string
              mountPath: string
              readOnly: boolean
            ports:
            - name: string
              containerPort: int
              hostPort: int
              protocol: string
            env:
            - name: string
          value: string
        resources:
          limits:
            cpu: string
            memory: string
          requests:
            cpu: string
            memory: string
        livenessProbe:
          exec:
            command: [string]
          httpGet:
            path: string
            port: number
            host: string
            scheme: string
            httpHeaders:
            - name: string
              value: string
          tcpSocket:
            port: number
          initialDelaySeconds: 0
          timeoutSeconds: 0
          periodSeconds: 0
          successThreshold: 0
          failureThreshold: 0
        securityContext:
          privileged: false
      restartPolicy: [Always | Never | OnFailure]
      nodeSelector: object
      imagePullSecrets:
    -    name: string
      hostNetwork: false
      volumes:
      - name: string
         emptyDir: {}
         hostPath:
           path: string
         secret:
           secretName: string
           items:
              - key: string
                path: string
            configMap:
              name: string
              items:
              - key: string
                path: string


?
