目录
一、git工具使用
1、版本控制系统结构
?本地版本控制系统(较传统)
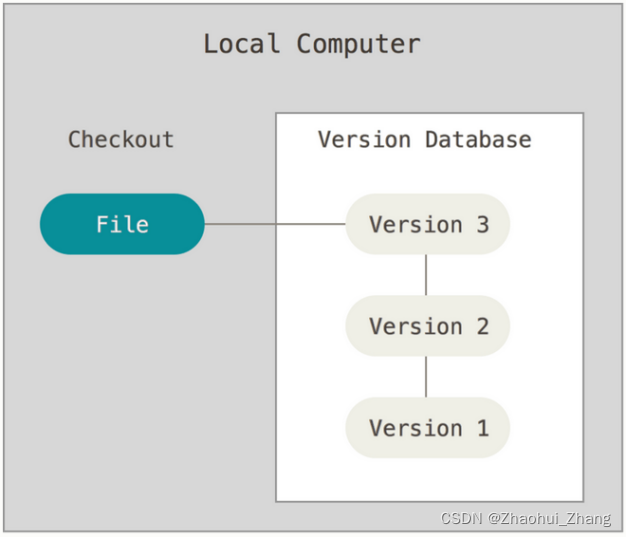
集中化的版本控制系统(较传统)

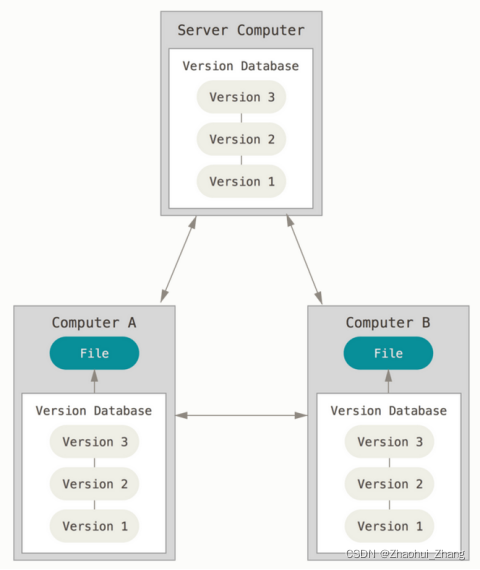
分布式版本控制系统(主流系统)
2、git简介
Git特点:
????????速度
????????简单的设计
????????对非线性开发模式的强力支持(允许成千上万个并行开发的分支)
????????完全分布式
????????有能力高效管理类似 Linux 内核一样的超大规模项目(速度和数据量)
自诞生于 2005 年以来,Git 日臻成熟完善,在高度易用的同时,仍然保留着初期设定的目标。 它的速度飞快,极其适合管理大项目,有着令人难以置信的非线性分支管理系统。
Git必看秘籍:
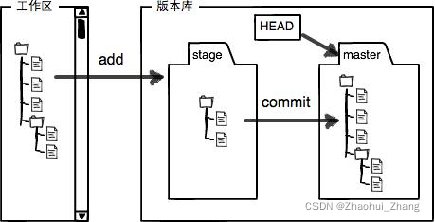
Git 有三种状态:已提交(committed)、已修改(modified) 和 已暂存(staged)。
???????? 已修改表示修改了文件,但还没保存到数据库中。
???????? 已暂存表示对一个已修改文件的当前版本做了标记,
? ? ? ? ?使之包含在下次提交的快照中。 已提交表示数据已经安全地保存在本地数据库中。
这会让我们的 Git 项目拥有三个阶段:工作区、暂存区以及 Git 目录。
3、git安装

?4、git使用
| 用户信息 | $ git config --global user.name "zzh" $ git config --global user.email “290637510@qq.com” |
| 检查当前文件状态 | $ git status $ git status -s?? ??? ?//简化输出 |
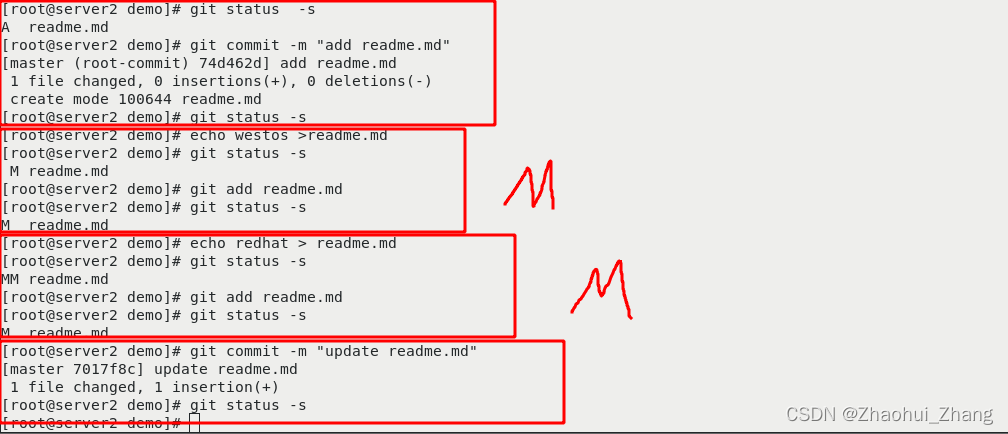
| 状态简览 | $ git status -s ? ????????A ?lib/git.rb? ? ? ? ? ? ? ? ?//暂存状态,待提交状态 ? ? ? ? ? ?M README? ? ? ? ? ?//已提交文件发生改动后未重新提交(M在右边) ????????M? ? README? ? ? ? ? ?//已提交文件发生改动后重新提交(M在左边) ????????MM? Rakefile ?????????? LICENSE.txt? ? ? ? //新建的文件未槽作过的状态 M在右边表示在工作区,M在左边表示在暂存区 |
| 跟踪新文件 | ?git add README |
| 忽略文件 | $ cat .gitignore ????????.*?? ??? ?//忽略所有隐藏文件 ????????/test?? ??? ?//只忽略当前目录下的test文件 ????????build/?? ??? ?//忽略任何目录下名为 build 的文件夹 |
| 查看已暂存和未暂存的修改 | git diff |
| 提交更新 | git commit |
| 跳过使用暂存区域 | git commit -a -m 'added new benchmarks' |
| 移除文件 | $ git rm PROJECTS.md $ git rm --cached README |
| 重命名文件 | $ git mv README.md README 其实,运行 git mv 就相当于运行了下面三条命令: ???????? $ mv README.md README ???????? $ git rm README.md ? ? ? ? ?$ git add README |
| 查看提交历史 | $ git log $ git log -p -2 $ git log --stat $ git log --pretty=oneline |
| 取消暂存的文件 | $ git reset HEAD README.md |
| 撤消对文件的修改 | $ git checkout -- README.md |
| 版本回退: | $ git reflog $ git reset --hard efa267a |
示例:
?
远程仓库:注册github/gitee帐号,并新建一个仓库:?
张朝辉/demohttps://gitee.com/zhaohui_zhang/demo

?
向gitee中提交本机的ssh公钥,以便上传文件。
 ?向gitee上推送本机项目

上传项目到gitee:
添加——>提交——>上传?

下载项目到本机:
ssh密钥——>克隆到本地?

二、gitlab代码仓库
对于一些开源项目,可以托管在github或者gitee上。但是对于企业内部的代码,具有很高的隐私性,就需要托管在私人仓库上。用到的私人仓库为Gitlab
Gitlab的安装
官方网站:
清华源网站:
安装软件:
#安装依赖
yum install -y curl policycoreutils-python openssh-server perl

#下载并安装软件
wget https://omnibus.gitlab.cn/el/7/gitlab-jh-14.8.2-jh.0.el7.x86_64.rpm
rpm -ivh gitlab-jh-14.8.2-jh.0.el7.x86_64.rpm

vim /etc/gitlab/gitlab.rb
    external_url 'http://172.25.254.2'		//访问gitlab的地址

gitlab-ctl  reconfigure			//重载服务

登录gitlab:
http://172.25.254.2  		//用户:root 第一次登录需要强制修改密码

安装完成后,查看状态,可以看到已经安装的组件。

在浏览器访问<172.25.254.2>,首次登录,用户名和密码如下:
 ?
?
?修改语言:

?修改密码(密码最少8位,设置的是“Westos007”):

添加客户端SSH密钥(公钥):


?创建项目:

?克隆项目到本地:

上传文件到gitlab
添加——>提交——>上传?
# echo www.westos.org > index.html
# git add index.html                            //添加
# git commit -m "add index.html"                //提交
# git push -uf origin main                      //上传

三、jenkins持续集成
和gitlb实现整合
1、jenkins简介
Jenkins是开源CI&CD软件领导者, 提供超过1000个插件来支持构建、部署、自动化, 满足任何项目的需要。
Jenkins用Java语言编写,可在Tomcat等流行的servlet容器中运行,也可独立运行。
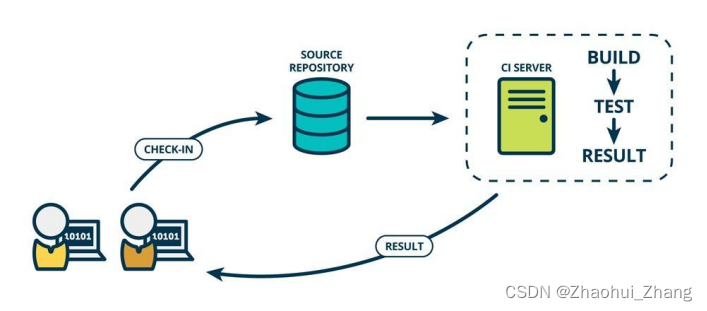
CI(Continuous integration持续集成)持续集成强调开发人员提交了新代码之后,立刻进行构建、(单元)测试。
?CD(Continuous Delivery持续交付) 是在持续集成的基础上,将集成后的代码部署到更贴近真实运行环境(类生产环境)中。
2、jenkins安装
官方网站:
https://jenkins.io/zh/download/![]() https://jenkins.io/zh/download/国内镜像站:
https://jenkins.io/zh/download/国内镜像站:
Index of /jenkins/redhat/ | 清华大学开源软件镜像站 | Tsinghua Open Source MirrorIndex of /jenkins/redhat/ | 清华大学开源软件镜像站,致力于为国内和校内用户提供高质量的开源软件镜像、Linux 镜像源服务,帮助用户更方便地获取开源软件。本镜像站由清华大学 TUNA 协会负责运行维护。![]() https://mirrors.tuna.tsinghua.edu.cn/jenkins/redhat/
https://mirrors.tuna.tsinghua.edu.cn/jenkins/redhat/
安装jenkins:
#下载jenkins软件包
wget https://mirrors.tuna.tsinghua.edu.cn/jenkins/redhat/jenkins-2.338-1.1.noarch.rpm

yum install -y java-1.8.0-openjdk.x86_64        //安装jdk依赖
yum install -y jenkins-2.338-1.1.noarch.rpm        //安装jenkins软件包
systemctl start jenkins.service                    //启动jenkins服务
访问jenkins:
第一次启动时会从外网下载组件,会比较慢。

更改jenkins镜像源:
注意:默认jenkins升级的网站访问速度较慢,因此需要测试后寻找速度较快的镜像源
#测试jenkins的镜像源网速
curl -sSL https://cdn.jsdelivr.net/gh/lework/jenkins-update-center/speed-test.sh | bash

更新插件源:
vim  /var/lib/jenkins/hudson.model.UpdateCenter.xml
  1 <?xml version='1.1' encoding='UTF-8'?>
  2 <sites>
  3   <site>
  4     <id>default</id>
  5     <url>https://cdn.jsdelivr.net/gh/lework/jenkins-update-center/updates/ustc/update-center.json</url>
  6   </site>
  7 </sites>
先测试镜像源网速:
 ?
? ?替换为自己选的网站地址 <vim /var/lib/jenkins/hudson.model.UpdateCenter.xml >

?默认走手动设置的镜像源时需要一个证书,安装证书过程如下:
#创建证书目录
mkdir /var/lib/jenkins/update-center-rootCAs
#下载证书
wget https://cdn.jsdelivr.net/gh/lework/jenkins-update-center/rootCA/update-center.crt -O /var/lib/jenkins/update-center-rootCAs/update-center.crt
#更改证书权限
chown jenkins.jenkins -R /var/lib/jenkins/update-center-rootCAs ?镜像源更改完成后重启jenkins服务即可生效
?第一次访问过程如下:
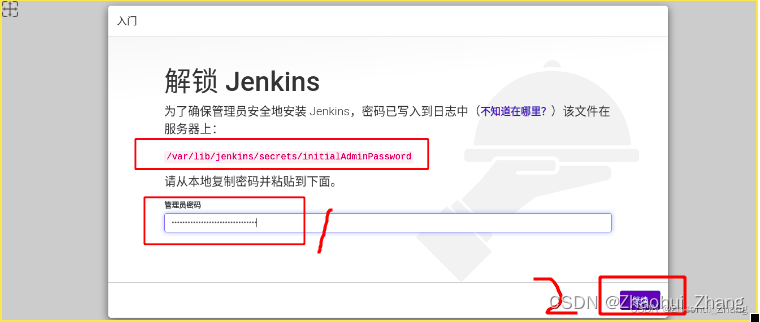
访问: http://172.25.254.3:8080
使用初始密码登录:cat /var/lib/jenkins/secrets/initialAdminPassword
安装默认插件即可,使用admin用户,登录后修改密码。


?
?

修改密码:
修改密码后得重新登录,登录用户名是admin,密码为新改的密码。

?新建项目:


jenkins和gitlab的整合:
导入gitlab地址实现和gitlab的整合
注意:jenkins是以git的方式访问gitlab,因此jenkins的客户端必须先安装<yum install -y git>

?在gitlab上添加jenkins客户端的公钥:


?在jenkins上添加客户端的私钥:
 ?
?
??选择分支名称(必须和gitlab上统一)?

随意执行一个shell脚本看看效果

轮询< * * * * * >表示每分钟从gitlab上刷新一下

查看构建历史:
?


当gitlab发生更改时jenkins也会同步更新:
这就需要一个触发器,当gitlab发生改动时,将会主动通知jenkins的触发器,进而触发jenkins的同步机制。

?
 ?
?
?
?

在gitlab上添加要通知的地址及token?

 ??
??
在jenkins界面保存后生效
?
在浏览器测试:在gitlab上发送一个通知,在jenkins界面上会自动更新项目

?在终端测试:
在gitlab客户端的项目下,新建一个文件并推送到gitlab中,检查jenkins自动同步。

3、jenkins的构建:


在jenkins主机上安装docker:
启动之前安装的harbor服务器<server1>
安装docker用到的镜像源已在<docker-ce.repo>和<Centos7.repo>中写好(参考之前的内容),可以直接安装,然后修改网桥策略,生效后启动docker。
设置解析。
复制证书。复制阿里云的加速器。
最后重启docker
   57  vim docker-ce.repo
   59  vim Centos7.repo
   60  yum install -y docker-ce-20.10.12-3.el7.x86_64
   61  vim /etc/sysctl.d/docker.conf
            net.bridge.bridge-nf-call-iptables = 1
            net.bridge.bridge-nf-call-ip6tables = 1
   62  sysctl --system
   63  systemctl start docker
接着在jenkins网页中构建docker
分别表示:6——在harbor仓库中的项目名称;7——版本号升序(由第2步那个插件生成);8——本机下的docker套接字文件(unix://表示本机);9——harbor仓库地址(注意设置好解析)


?
这里的用户名和密码就是登录harbor仓库的用户名和密码。
 ?
?

更改gitlab的Dockerfile文件,令其自动触发给jenkins,查看构建过程如下:

?构建完成后,在jenkins的本地docker镜像中可以查看到镜像

在harbor仓库中也可以看到构建成功的镜像

目前未之,在终端中编辑完以后,可以通过gitlab联合jenkins将Dockerfile自动构建并上传镜像到harbor仓库中,这就是“集成”;下一步需要自动化部署镜像,也就是“交付”。
开发者上传代码——>jenkins自动构建——>在harbor中创建镜像——>部署到k8s集群
4、项目自动集成与交付:
在jenkins中新建项目:

?为项目docker_project_test添加一个触发器:当test项目完成后触发本项目运行
 ?
?
 ?
?
?
注意:必须给</var/run/docker.sock>满权限,否则构建时会因为无法访问而构建失败


?测试:在jenkins的客户端查看docker进程,已经部署成功??

截至当前,整套流程已经完毕,接下来测试让整套步骤自动运行
第一步:在gitlab客户端更改i项目文件并推送到gitlab中
git commit -a -m "update v1"            //提交并添加更改(-a是add的意思)
git push -uf origin main                //推送

查看gitlab上,更改完成

第二步:查看jenkins中test项目的构建历史,显示在gitlab发生更改时已经触发构建?
 ?
?
第三步:查看harbor中的镜像列表,jenkins最新的一次构建已经完成

?注意:
需要删除上一步实验中正在运行的容器,否则会因为名称冲突而无法运行新容器;还需要删除上一版本的镜像,否则镜像存在时,jenkins不会拉取新的镜像。
docker ps -a | grep webserver && docker rm -f webserver            //删除正在运行的容器
docker rmi reg.westos.org/library/webserver:latest                //删除上一版本的镜像
sleep 1                                                        //休眠1秒
docker run -d --name webserver -p 80:80 reg.westos.org/library/webserver:latest
?
第四步:查看jenkins的项目构建成功

?第五步:在本地测试

5、 分布式结构实现项目自动集成与交付:
实验需要四台虚拟机,分别为server1/2/3/4,server1为harbor仓库,server2为git客户端,server3为jenkins客户端,server4为待部署(交付)的远程主机
#在server3上
scp Centos7.repo docker-ce.repo root@172.25.254.4:/etc/yum.repos.d/        //复制docker源

scp /etc/sysctl.d/docker.conf root@172.25.254.4:/etc/sysctl.d/        //复制网桥配置

cp -r /etc/docker/certs.d/ /etc/docker/daemon.json root@172.25.254.4:/etc/docker/        //复制加速器及证书

#在server4上
yum install -y docker-ce-20.10.12-3.el7.x86_64        //安装docker
sysctl --system                            //载入网桥配置
vim /etc/hosts                                //设置harbor仓库解析
vim /etc/docker/daemon.json                 //更改仓库为本地仓库
systemctl start docker                        //启动docker
docker info
在远端主机中部署就需要ssh,所以在jenkins中安装ssh插件,并添加ssh验证信息

?
?
?

?
?
?添加ssh认证:

?
?更改docker_project_test项目的构建命令:

?

结果测试:
在server2中重新更改文件,并再次推送到gitlab,查看远端主机的运行结果。

?
在浏览器访问server4的IP,在server终端查看docker运行情况。都自动构建好了。

?
四、本章总结
?梳理流程如下:
user --->? git push --->? gitlab ---> trigger ---> jenkins(test)?---> build and push image ---> harbor ---> trigger ---> jenkins(docker_project) ---> pull harbor image && docker run container
?

