Xilinx ZCU102板卡系统构建移植记录
README
1. 本文档为记录 Xilinx ZCU102 开发板 使用petalinux工具链编译移植linux系统的过程,在编译过程中,均使用本地的源码编译,以保证编译出来的系统稳定和版本稳定,以便后续的产品输出。
一.文件说明
1. ubuntu-20.04.3-desktop-amd64.iso          ubuntu镜像文件
2. petalinux-v2021.2-final-installer.run     petalinux开发环境搭建安装文件
3. sstate_aarch64_2021.2.tar.gz              petalinux开发依赖文件
4. downloads_2021.2.tar.gz                   petalinux开发依赖文件
依赖文件链接:
petalinux-v2021.2-final-installer.run
sstate_aarch64_2021.2.tar.gz
downloads_2021.2.tar.gz
二.开发环境搭建
1. 虚拟机安装ubuntu20.04系统
1.1 安装过程请自行查找网络教程
2. ubuntu20.04系统安装后预先做的事情
2.1 更换国内更新源
ubuntu@ubuntu:~$ sudo mv /etc/apt/sources.list /etc/apt/sources.list_back      更新源文件备份
ubuntu@ubuntu:~$ sudo vi /etc/apt/sources.list      打开更新源文件并写入
# 中科大源
deb https://mirrors.ustc.edu.cn/ubuntu/ focal main restricted universe multiverse
deb-src https://mirrors.ustc.edu.cn/ubuntu/ focal main restricted universe multiverse
deb https://mirrors.ustc.edu.cn/ubuntu/ focal-updates main restricted universe multiverse
deb-src https://mirrors.ustc.edu.cn/ubuntu/ focal-updates main restricted universe multiverse
deb https://mirrors.ustc.edu.cn/ubuntu/ focal-backports main restricted universe multiverse
deb-src https://mirrors.ustc.edu.cn/ubuntu/ focal-backports main restricted universe multiverse
deb https://mirrors.ustc.edu.cn/ubuntu/ focal-security main restricted universe multiverse
deb-src https://mirrors.ustc.edu.cn/ubuntu/ focal-security main restricted universe multiverse
deb https://mirrors.ustc.edu.cn/ubuntu/ focal-proposed main restricted universe multiverse
deb-src https://mirrors.ustc.edu.cn/ubuntu/ focal-proposed main restricted universe multiverse
保存退出
ubuntu@ubuntu:~$ sudo apt-get update
2.2 安装软件和依赖库等
ubuntu@ubuntu:~$ sudo apt-get install vim
ubuntu@ubuntu:~$ sudo apt-get install build-essential  tofrodos iproute2 gawk xvfb gcc git make net-tools libncurses5-dev tftpd zlib1g-dev libssl-dev flex bison libselinux1 gnupg wget diffstat chrpath socat xterm autoconf libtool tar unzip texinfo gcc-multilib build-essential libsdl1.2-dev libglib2.0-dev libssl-dev screen pax gzip sudo apt-get install tofrodos iproute2 gawk xvfb gcc git make net-tools libncurses5-dev tftpd zlib1g-dev libssl-dev flex bison libselinux1 gnupg wget diffstat chrpath socat xterm autoconf libtool tar unzip texinfo gcc-multilib build-essential libsdl1.2-dev libglib2.0-dev libssl-dev screen pax gzip  zlib1g:i386
ubuntu@ubuntu:~$ sudo apt-get install python2
ubuntu@ubuntu:~$ sudo apt-get install libtinfo5
2.3 修改系统使用bash
ubuntu@ubuntu:~$ sudo dpkg-reconfigure dash
进入界面选择 n, 保存退出, 系统切换使用bash
3. 搭建petallinux开发环境
3.1 创建工具链安装路径
ubuntu@ubuntu:~$ sudo mkdir -p /tools/Xilinx/petalinux/2021.2
3.2 修改工具链目录的权限
ubuntu@ubuntu:~$ sudo chown ubuntu:ubuntu /tools/Xilinx/petalinux/2021.2
3.3 安装工具链
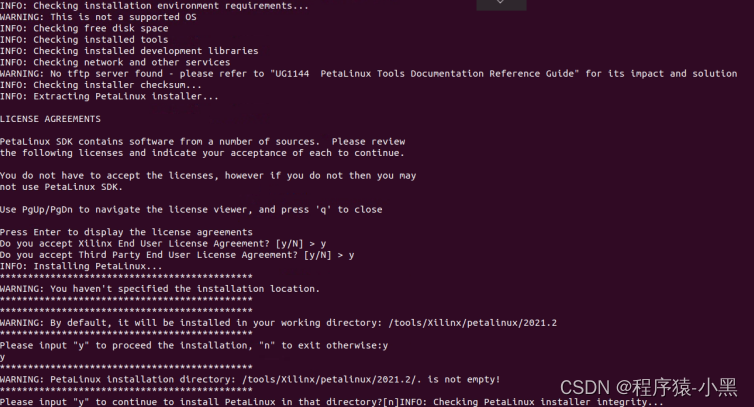
ubuntu@ubuntu:/tools/Xilinx/petalinux/2021.2$  /mnt/shared/petalinux-v2021.2-final-installer.run
注意: 这里的安装包是放在win下的共享目录中的,所以执行的时候加了/mnt/shared目录
  petalinux在运行安装时,默认的安装是所在的目录,也就是要先 cd 到 /tools/Xilinx/petalinux/2021.2 目录下
执行过程如下图片:

查看安装目录如下:

3.4 安装工具链所依赖的官方文件
ubuntu@ubuntu:~$ sudo mkdir -p /tools/Xilinx/petalinux_lib/2021.2
ubuntu@ubuntu:~$ sudo chown ubuntu:ubuntu /tools/Xilinx/petalinux_lib/2021.2
ubuntu@ubuntu:/tools/Xilinx/petalinux_lib/2021.2$ tar -zxvf /mnt/shared/sstate_aarch64_2021.2.tar.gz
ubuntu@ubuntu:/tools/Xilinx/petalinux_lib/2021.2$ tar -zxvf /mnt/shared/downloads_2021.2.tar.gz
注意: 由于压缩包太大,直接使用共享文件夹,直接从win目录解压到ubuntu系统中
3.5 下载官方程序源码 (包括官方的 u-boot,kernel 等)
ubuntu@ubuntu:~/workspace$ mkdir source_code
ubuntu@ubuntu:~/workspace$ cd source_code
ubuntu@ubuntu:~/workspace/source_code$ touch get_code.sh
ubuntu@ubuntu:~/workspace/source_code$ chmod 777 get_code.sh
执行 get_code.sh 脚本获取源码文件
get_code.sh 文件内容如下:
#!/bin/bash
if [ ! -d "./linux-xlnx" ]; then
	git clone https://github.com/Xilinx/linux-xlnx.git
fi
if [ ! -d "./u-boot-xlnx" ]; then
	git clone https://github.com/Xilinx/u-boot-xlnx.git
fi
if [ ! -d "./device-tree-xlnx" ]; then
	git clone https://github.com/Xilinx/device-tree-xlnx.git
fi
if [ ! -d "./dtc" ]; then
	git clone https://git.kernel.org/pub/scm/utils/dtc/dtc.git
fi
if [ ! -d "./arm-trusted-firmware" ]; then
	git clone https://github.com/Xilinx/arm-trusted-firmware.git
fi
if [ ! -d "./xen" ]; then
	git clone https://github.com/Xilinx/xen.git
fi
if [ ! -d "./embeddedsw" ]; then
	git clone https://github.com/Xilinx/embeddedsw.git
fi
三.SD卡启动模式系统编译搭建
1. 创建工程目录
ubuntu@ubuntu:~$ mkdir -p /home/ubuntu/workspace/petalinux_sd
2. 编写编译流程脚本(本人为了编译过程方便,自行创建工程脚本)
2.1 创建脚本 build.sh
ubuntu@ubuntu:~/workspace/petalinux_sd$ touch build.sh
ubuntu@ubuntu:~/workspace/petalinux_sd$ chomd 777 build.sh
build.sh 文件添加如下内容:
#!/bin/bash
workspace="`pwd`"
project_name="ZCU102"
hw_bsp="xsa"

echo "workspace:${workspace}"
echo "project_name:${project_name}, hw_bsp:${hw_bsp}"

function tools_env(){
    echo "##### set tools env #####"
    local tools_path=/tools/Xilinx/petalinux/2021.2
    source ${tools_path}/settings.sh
    echo $PETALINUX
    echo "#########################"
}

function project_create(){
    echo "#### project create ####"
    cd ${workspace}
    if [ -d ${project_name} ]; then
        rm ${project_name} -rf
    fi
    petalinux-create --type project --template zynqMP --name ${project_name}
    cd -
    echo "########################"
}

function project_configure_hw(){
    if [ ! -d  ${workspace}/${project_name} ]; then
        exit 0
    fi
    echo "#### project configure ####"
    cd ${workspace}/${project_name}
    #### set kernel version ####
    ## 忽略编译工具对内核的版本校验
    echo "KERNEL_VERSION_SANITY_SKIP=\"1\"" >> ${workspace}/${project_name}/project-spec/meta-user/recipes-kernel/linux/linux-xlnx_%.bbappend
    #### config hw ####
    cp ${workspace}/${hw_bsp}/*.xsa  ./
    petalinux-config --get-hw-description=./
    #### cp config file ####
    cp ${workspace}/petalinuxbsp.conf  ${workspace}/${project_name}/project-spec/meta-user/conf/petalinuxbsp.conf
    cd -
    echo "###########################"
}

function project_build(){
    echo "#### project build ####"
    if [ ! -d  ${workspace}/${project_name} ]; then
        exit 0
    fi
    cd ${workspace}/${project_name}
    petalinux-build
    cd -
    echo "#######################"
}

function project_image_out(){
    echo "#### project image out ####"
    if [ ! -d  ${workspace}/${project_name} ]; then
        exit 0
    fi
    local image_file_path=${workspace}/${project_name}/images/linux
    echo "${image_file_path}"
    cd ${image_file_path}
    petalinux-package --boot --fsbl --fpga --u-boot --force --kernel
    cd -
    echo "###########################"
}

function project_image_cp(){
    echo "#### project image cp ####"
    if [ ! -d  ${workspace}/${project_name} ]; then
        exit 0
    fi
    local out_path=/mnt/shared
    if [ -d ${out_path}/images ]; then
        rm ${out_path}/images -rf
    fi
    cp ${workspace}/${project_name}/images ${out_path} -rf
    echo "###########################"
}

tools_env
project_create
project_configure_hw
project_build
project_image_out
project_image_cp
2.2 创建配置文件 petalinuxbsp.conf
ubuntu@ubuntu:~/workspace/petalinux_sd$ touch petalinuxbsp.conf
ubuntu@ubuntu:~/workspace/petalinux_sd$ chomd 664 petalinuxbsp.conf
petalinuxbsp.conf 文件内容添加如下:
#User Configuration

#OE_TERMINAL = "tmux"

PREMIRRORS_prepend = " \
    git://.*/.*  file:///tools/Xilinx/petalinux_lib/2021.2/downloads/  \n \
    ftp://.*/.*  file:///tools/Xilinx/petalinux_lib/2021.2/downloads/  \n \
    http://.*/.*  file:///tools/Xilinx/petalinux_lib/2021.2/downloads/  \n \
    https://.*/.*  file:///tools/Xilinx/petalinux_lib/2021.2/downloads/  \n \
"
DL_DIR="/tools/Xilinx/petalinux_lib/2021.2/downloads"
SSTATE_DIR="/tools/Xilinx/petalinux_lib/2021.2/sstate_aarch64_2021.2/aarch64"
2.3 创建存放vivado构建出的硬件配置文件 *.xsa
ubuntu@ubuntu:~/workspace/petalinux_sd$ mkdir xsa
xsa 文件存放硬件配置文件,文件夹内只能存放一个文件
3. 构建系统过程
ubuntu@ubuntu:~/workspace/petalinux_sd$ ./build.sh
脚本会自动创建petalinux工程,并通过xsa文件进行petalinux配置
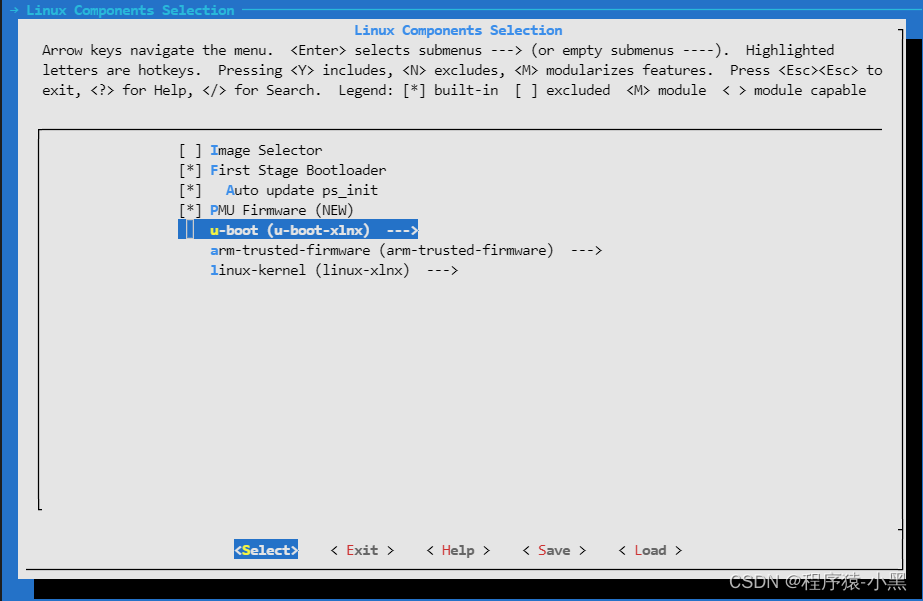
petalinux-config 命令执行如下
3.1 添加本地需要编译的源码路径


以上添加了 u-boot 的源码路径:
/home/ubuntu/workspace/source_code/u-boot-xlnx
逐步返回后,其他两项也同样的步骤进行配置源码目录:
/home/ubuntu/workspace/source_code/arm-trusted-firmware
/home/ubuntu/workspace/source_code/linux-xlnx

3.2 配置完源码目录后开始配置其他的选项

关掉 BB 网络

添加petalinux编译过程中,获取文件的路径,默认的是官网的,由于网速慢,这里从本地获取


最后保存退出

脚本会自动的编译源码,等待结束
编译完成后烧写SD卡

将 BOOT.BIN , boot.scr , image.ub 三个文件拷贝到SD卡上
四.QSPI启动模式系统编译搭建
待续