|
Linux驱动开发
c代码——>目标文件————>最终目标文件
驱动 ,ko文件 uimage:内核二进制文件
成为内核不可分割的部分
ko:kernel object:模块(独 立),分离,灵活度高,模块化,易于管理,减小内核体积)
编写代码----编译ko(前提,内核先编译)------装载模块insmod(系统先要运行,ko是运行在内核态,装载的时候是在用户态)
*1. 编译驱动的准备工作:
-
内核:管理工作(设备,文件,网络,内存,进程)
www.kernel.org (linux-3.14.tar.xz) 放到ubuntu下 加压Linux内核
a,编译内核
tar -zxvf linux-3.14.tar.xz
步骤:
1,设置交叉工具链-----uimage也云心arm开发板
vim Makefile
ARCH=arm
CROSS_COMPLE=arm-none-linux-gnueabi-
2,选择一个soc ,可以支持很多平台,所以要挑出对我们平台的代码
make exynos_defconfig
//cp -raf arch/arm/configs/exynos_defconfgi .config
3,make menuconfig 内核裁剪,产生一个图形界面
system typ------>s3c uart to use for low-level messages将数值改为2 *标识编译到内核中
4,make uimage -j2(双线程编译),编译内核
//如果编译报错:缺少mkimage
sudo cp -raf mkimage /usr/bin/
sudo chmod 777 /usr/bin/
重新在make uimage
5,编译设备树文件----描述设备信息--最终编译成dtb
以一个默认的设备树文件为参考,变成我们自己想要的dts文件
arch/arm/boot/dts$ cp exynos4412-origen.dts exynos4412-fs4412.dts
arch/arm/boot/dts$ vim Makefile
70行 添加 exynos4412-fs4412.dtb \
回到内核源码顶层目录:
Linux-3.14$ make dtbs
使用uimage和dtb文件
cp -raf arch/arm/boot/uimage /tftpboot
cp -raf arch/arm/boot/dts/exynos4412-fs4412.dtb /tftpboot
内核崩掉了,需要网卡的移植
移植dm9000
实际上是设备树文件的修改:
vim arch/arm/boot/dts/exynos4412-fs4412.dts
添加如下内容:
srom-cs1@50000000{
compatible="simple="simple-bus";
#address-cells=<1>;
#size-cells=《1?
reg=<0x5000000 0x10000000>
ranges;
ethrenet@5000000{
compatible="davocom ,dm9000";
reg=<0x5000000 0x2 0x5000004 0x2>
inrerrupts=<6 4>
davicom,no-eeprom;
mac-address-[00 0a 2d a6 55 a2];
};
};
保存退出后,需要再次编译dts文件
make dtbs
然后cp -raf arch/arm/boot/dts/exynos4412-fs4412.dtb /tftpboot/
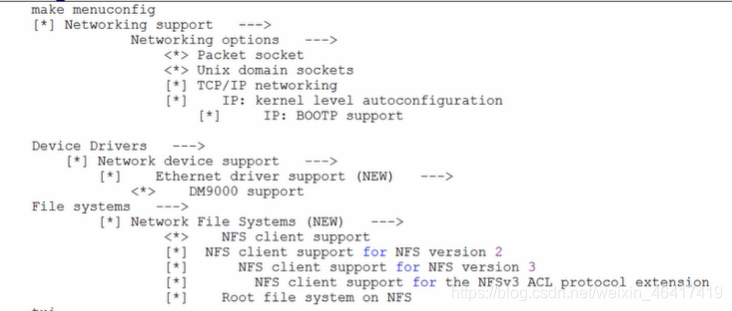
配置内核:make menuconfig 进入图形配置界面

退出时要保存
再次编译内核:make uimage -j2
cp -raf arch/arm/boot/uimage /tftpboot
cp -raf arch/arm/boot/dts/exynos4412-fs4412.dtb /tftpboot
开发板中的在uboot设置中,添加一个参数clk_ignore_unused
set bootargs console=ttySAC,115200 int=/linuxrc root=/dev/nfs rw nfsroot rw nfsroot=192.168.7.21:/opt/4412/rootfs ip=192.168.7.22 clk_ignore_unused
重新启动开发板
			b,编写驱动代码
			source  sight(看代码的工具)
			环境搭建/烧录镜像和工具/si_linux3.14-ori.tgz
			解压到内核源码的顶层目录:
			tar -xvf  si_linux3.14-ori.tag

	在source insght里去写
	驱动代码需要有四个部分:头文件,驱动模块装载和卸载函数入口到声明,事项模块装载和卸载入口,GPL的声明
#include <linux/init.h>
#include<linux/module.h>
static int __init hell0_drv_init(void)
{
//一般做系统申请资源
printk(“---------------%s----------------\n”,FUNCTION);;
return 0;
}
static void _exit hello_drv_exit(void)
{
一般做系统释放资源
prink(“-------------------%s-----------------------\n”,FUNCTION);
}
module_init(hello_drv_init);
module_exit(hello_drv_exit);
MODULE_LICENSE(“GPL”);
~
~
~
			c,编译驱动代码---Makefile((被读取两次:make 2,内核源码中Makefile)
			ROOTFS_DIR=/opt/4412/rootfs
ifeq ($(KERNELRELEASE),)
#内核源码的路径,不通环境会不样,内核源码一定要先编译
KERNEL DIR=/home/george/linux_4412/kernel/linux-3.14
CUR_DIR=$(shell pwd)
all:
make -C $(KERNEL_DIR) M=$(CUR_DIR) modules
clean:
make -C
(
K
E
R
N
E
L
D
I
R
)
M
=
(KERNEL_DIR) M=
(KERNELD?IR)M=(CUR_DIR) clean
install:
cp -raf *.ko $(ROOTFS_DIR)/drv_module
else
#用于指定到底编译的是哪个代码----hello.c
obj-m+=hello.o
endif
~
~
~
insmod hello.ko 加载模块
lsmod
rmmod hello 卸载模块
驱动模块的开发:
1,参数传递
加载ko: insmod hello.ko myname="geroge " myvalue=77
用途:WiFi驱动,WiFi硬件中内部也运行内部的代码,原厂开发,这些代码叫做固件—fireware.bin
装载WiFi驱动,必须告诉固件的头文件在哪里
insmod rtxxx.ko path=/lib/modules/firware/xxx.bin
在代码如何处理参数:
module_param(name,type,perm)
参数1:表示参数的名字,比如myname,myvalue
参数2:参数类型,char ,int
参数3:/sys
#include <linux/init.h>
#include<linux/module.h>
#include<linux/stat.h>
#inlcude"math.h"

static int myvalue=56;
static  char  myname="peter";

static int __init hell0_drv_init(void)
{
        printk("--------------%s-----------------\n",__FUNCTION__);
        printk("name=%s,value=%d\n",myname,myvalue);
        prink("a+b=%d,a-b=%d\n",my_add(33,22),my_sub(44,22));


        return 0;
}

static void _exit hello_drv_exit(void)
{


}

module_init(hello_drv_init);
module_exit(hello_drv_exit);


MODULE_LICENSE("GPL");
module_param(myvalue,int,0666);
module_param(myname,charp,S_IRUGO|S_IWUGO);
~
~
~
~
两个ko文件,一个去调用另一个里面的函数
#include<linux/module.h>
#inlcude<linux/init.h>

//不需要模块加载和卸载到入口声明,直接定义好一些封装好的函数
int my_add(int a,int b)
{
return  a+b;
}

EXPORT_SYMBOL(my_sub);
int my_sub(int a,int b)
{
   	return a-b;
   	}
EXPORT_SYMBOL(my_sub);
MODULE_LICENSE("GPL");
#ifndef __MATH__H__
#define __MATH__H__

int my_add(int a,int b);
int my_sub(int a,int b);

#endif
ifeq ($(KERNELRELEASE),)
#内核源码的路径,不通环境会不样,内核源码一定要先编译

KERNEL DIR=/home/george/linux_4412/kernel/linux-3.14
CUR_DIR=$(shell pwd)

all:

        make -C $(KERNEL_DIR) M=$(CUR_DIR)  modules
clean:
        make -C $(KERNEL_DIR) M=$(CUR_DIR)  clean

install:
        cp -raf  *.ko  $(ROOTFS_DIR)/drv_module

else
#用于指定到底编译的是哪个代码----hello.c
obj-m+=hello.o
obj-m+=math.o

endif
先导进去:insmod math.ko
然后:ls /sys/module/math
insmod hello.ko 出现结果
注意:一个驱动调用另一个驱动,必须先将被调用的驱动进行装载
|