1.先安装fastdfs-nginx-module-maste
cd /optunzip -o fastdfs-nginx-module-master.zip -d /usr/localcd /usr/local/fastdfs-nginx-module-master/srccp mod_fastdfs.conf /etc/fdfs/cd /etc/fdfs/2.编辑mod_fastdfs.conf
base_path=/tmp改成:base_path=/data/fastdfs
base_path=/data/fastdfstracker_server=tracker:22122改成:tracker_server=192.168.42.200:22122,这个ip改成自己的
tracker_server=192.168.42.200:22122url_have_group_name = false改成:url_have_group_name = true;(url中包含group名称)
url_have_group_name = truestore_path0=/home/yuqing/fastdfs改成:store_path0=/data/fastdfs/storage
store_path0=/data/fastdfs/storage3.安装nginx服务器
cd /opttar -zxf nginx-1.14.2.tar.gzcd nginx-1.14.2./configure --prefix=/usr/local/nginx --add-module=/usr/local/fastdfs-nginx-module-master/srcmakemake installcd /usr/local/nginx/sbin/4.编辑nginx.conf
cd /usr/local/nginx/confvim nginx.confevents {
?? ?use epoll;
?? ?worker_connections 1024;
}
http {
?? ?server {
?? ??? ?listen 80;
?? ??? ?server_name 主机地址;
?? ??? ?location /group1/M00/{
?? ??? ??? ?ngx_fastdfs_module;
?? ??? ?}
?? ?}
?? ?server {
?? ??? ?listen 8888;
?? ??? ?server_name 192.168.42.200;
?? ??? ?location / {
?? ??? ??? ?root html;
?? ??? ??? ?index index.html index.htm;
?? ??? ?}
?? ?}
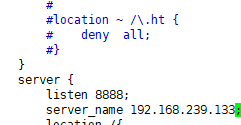
}注意:http中的第二个server在nginx.conf没有需要自己添加,添加位置如下:

5.启动nginx
cd /usr/local/nginx/sbin/./nginx -c /usr/local/nginx/conf/nginx.conf